
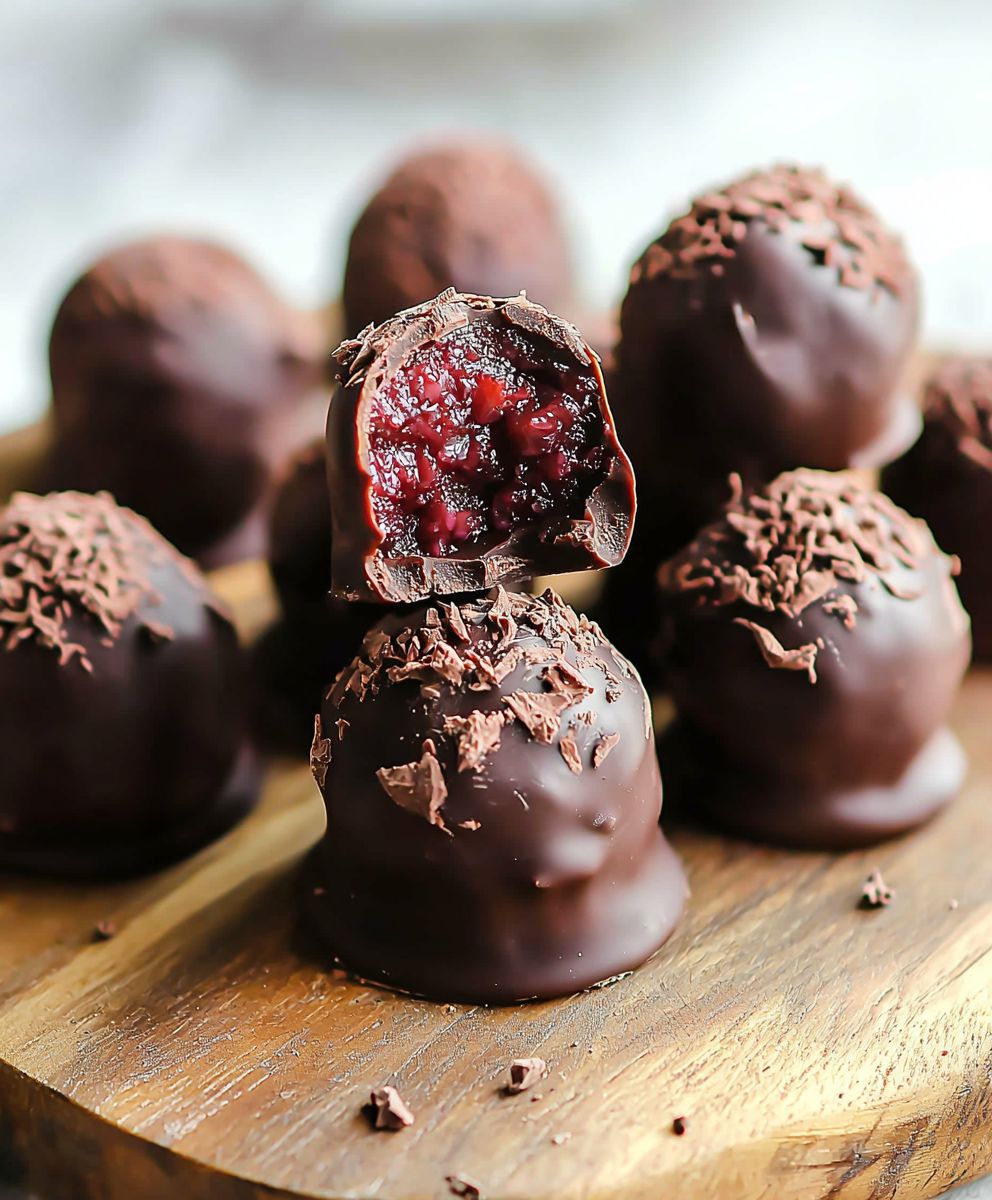
Vegan chocolate cherry truffles: Prepare to indulge in a decadent treat that’s surprisingly simple to make! Imagine biting into a rich, dark chocolate sphere, bursting with the sweet and tart flavor of cherries. These aren’t your average truffles; they’re a plant-based delight that will impress even the most discerning chocolate connoisseur.
While the exact origins of the truffle are debated, these luxurious confections have been enjoyed for centuries, often associated with celebrations and special occasions. Our vegan chocolate cherry truffles offer a modern, compassionate twist on this classic dessert. We’ve replaced traditional dairy with plant-based alternatives, without sacrificing any of the creamy, melt-in-your-mouth texture you crave.
What makes these truffles so irresistible? It’s the perfect balance of flavors and textures. The intense dark chocolate provides a bittersweet base, while the cherries add a delightful fruity tang. The smooth, velvety texture is simply divine, making each bite a truly unforgettable experience. Plus, they’re incredibly convenient to make! With just a few simple ingredients and minimal effort, you can whip up a batch of these delightful treats for yourself, your family, or your next gathering. Get ready to experience chocolate bliss, the vegan way!

Ingredients:
- 1 (13.5 ounce) can full-fat coconut milk, refrigerated overnight
- 1/4 cup unsweetened cocoa powder, plus more for dusting
- 1/4 cup maple syrup
- 1 teaspoon vanilla extract
- 1/4 teaspoon sea salt
- 1 cup vegan dark chocolate chips (at least 70% cacao)
- 1/2 cup dried cherries, finely chopped
- Optional toppings: chopped nuts, shredded coconut, cacao nibs
Preparing the Chocolate Cherry Truffle Base
Okay, let’s get started! The key to amazing vegan truffles is using high-quality ingredients. The coconut milk needs to be nice and cold so we can easily separate the cream from the watery liquid. Don’t skip the overnight refrigeration step!
- Scoop out the coconut cream: Carefully open the refrigerated can of coconut milk. You’ll notice that the thick, solid coconut cream has separated from the watery liquid. Using a spoon, scoop out only the thick coconut cream into a medium-sized saucepan. Try to leave as much of the watery liquid behind as possible. We only want the creamy part for the richest truffle texture.
- Combine ingredients in the saucepan: Add the cocoa powder, maple syrup, vanilla extract, and sea salt to the saucepan with the coconut cream.
- Whisk until smooth: Place the saucepan over medium heat. Whisk the mixture constantly until everything is well combined and smooth. This usually takes about 3-5 minutes. Make sure there are no lumps of cocoa powder remaining.
- Melt the chocolate: Add the vegan dark chocolate chips to the saucepan. Continue whisking until the chocolate is completely melted and the mixture is glossy and smooth. Be careful not to overheat the chocolate, as it can seize up. If needed, reduce the heat to low or remove the saucepan from the heat briefly to prevent burning.
- Stir in the cherries: Remove the saucepan from the heat and stir in the finely chopped dried cherries. Make sure the cherries are evenly distributed throughout the chocolate mixture.
- Transfer to a bowl: Pour the chocolate cherry mixture into a bowl. This will help it cool more evenly.
- Chill in the refrigerator: Cover the bowl tightly with plastic wrap, pressing the plastic wrap directly onto the surface of the chocolate mixture. This will prevent a skin from forming. Refrigerate for at least 4 hours, or preferably overnight, until the mixture is firm enough to scoop. The longer it chills, the easier it will be to form the truffles.
Forming the Truffles
Now comes the fun part shaping our little chocolate gems! This can get a little messy, but that’s part of the charm. Have your cocoa powder ready for dusting, and don’t be afraid to get your hands dirty!
- Prepare your workspace: Line a baking sheet with parchment paper or a silicone baking mat. This will prevent the truffles from sticking.
- Scoop the truffle mixture: Remove the chilled chocolate cherry mixture from the refrigerator. Using a small cookie scoop or a spoon, scoop out portions of the mixture. Aim for about 1 tablespoon per truffle.
- Roll into balls: Gently roll each portion of the mixture between your palms to form a smooth ball. Don’t worry if they’re not perfectly round rustic truffles are just as delicious! If the mixture is too soft to roll easily, return it to the refrigerator for another 30 minutes to firm up further.
- Place on the baking sheet: Place each rolled truffle onto the prepared baking sheet.
- Chill again (optional): For firmer truffles, you can chill the formed truffles in the refrigerator for another 30 minutes before coating them. This will make them easier to handle.
Coating the Truffles
Time to add the finishing touch! You can use cocoa powder, chopped nuts, shredded coconut, or cacao nibs to coat your truffles. Get creative and have fun with it!
- Prepare your coating station: Place the cocoa powder (or your chosen coating) in a shallow bowl or plate.
- Roll in the coating: One at a time, gently roll each truffle in the cocoa powder (or your chosen coating) until it is completely covered.
- Remove excess coating: Gently tap off any excess coating.
- Place back on the baking sheet: Place the coated truffles back onto the prepared baking sheet.
- Repeat: Repeat steps 2-4 until all the truffles are coated.
Final Chill and Storage
Almost there! A final chill will help the truffles set and develop their flavor. Proper storage is also important to keep them fresh and delicious.
- Chill the coated truffles: Refrigerate the coated truffles for at least 30 minutes to allow the coating to set and the truffles to firm up.
- Serve and enjoy: Once chilled, the truffles are ready to serve!
- Store properly: Store the truffles in an airtight container in the refrigerator for up to 1 week. You can also freeze them for up to 2 months. If freezing, thaw them in the refrigerator before serving.
Tips and Variations
Want to customize your truffles? Here are a few ideas:
- Add a liqueur: Stir in a tablespoon or two of your favorite liqueur (such as rum, brandy, or coffee liqueur) to the chocolate mixture for an extra kick.
- Use different extracts: Experiment with different extracts, such as almond extract, peppermint extract, or orange extract.
- Add spices: A pinch of cinnamon, nutmeg, or cayenne pepper can add warmth and complexity to the truffles.
- Use different dried fruits: Substitute the dried cherries with other dried fruits, such as cranberries, apricots, or figs.
- Add nuts: Stir in chopped nuts, such as walnuts, pecans, or almonds, to the chocolate mixture for added texture and flavor.
- Make them spicy: Add a pinch of cayenne pepper to the chocolate mixture for a subtle kick.
- Double dip: For an extra decadent treat, dip the truffles in melted vegan chocolate after they have been chilled and coated.
Troubleshooting
Sometimes things don’t go exactly as planned. Here are a few common issues and how to fix them:
- Truffle mixture is too soft: If the truffle mixture is too soft to roll, return it to the refrigerator for a longer period of time. You can also add a tablespoon of cocoa powder to help thicken it up.
- Truffles are too sticky: If the truffles are too sticky to handle, lightly dust your hands with cocoa powder before rolling them.
- Coating is not sticking: If the coating is not sticking to the truffles, make sure the truffles are cold enough. You can also lightly dampen the truffles with a little water or plant-based milk before rolling them in the coating.
- Chocolate seizes up: If the chocolate seizes up while melting, try adding a teaspoon of coconut oil or plant-based milk to help smooth it out. Be careful not to overheat the chocolate.
Enjoy!
These vegan chocolate cherry truffles are a delicious and decadent treat that everyone will love. They’re perfect for parties, holidays, or any time you’re craving something sweet. Enjoy!
Conclusion:
And there you have it! These vegan chocolate cherry truffles are more than just a dessert; they’re an experience. From the rich, decadent chocolate to the burst of sweet and tart cherry, every bite is a little piece of heaven. I truly believe this is a recipe you absolutely must try. It’s surprisingly simple to make, requires minimal ingredients, and the results are simply stunning. Forget store-bought truffles loaded with artificial flavors and preservatives; these homemade delights are in a league of their own. But why are these truffles a must-try, you ask? Well, beyond the incredible flavor profile, they’re also incredibly versatile. Need a show-stopping dessert for a dinner party? These truffles are your answer. Looking for a thoughtful homemade gift? Package these beauties in a pretty box and watch the recipient’s face light up. Craving a little something sweet after dinner? One or two of these truffles will perfectly satisfy your sweet tooth without being overly heavy. Plus, they’re vegan! So, you can indulge guilt-free, knowing you’re enjoying a plant-based treat. Now, let’s talk about serving suggestions and variations. While these truffles are divine on their own, you can certainly elevate them even further. Try serving them with a dollop of coconut whipped cream and a sprinkle of shaved dark chocolate. Or, pair them with a glass of your favorite dessert wine or a steaming cup of coffee. For a truly decadent experience, melt a few truffles into a mug of warm almond milk for the ultimate vegan hot chocolate. Feeling adventurous? There are endless variations you can explore! For a hint of warmth, add a pinch of cinnamon or cayenne pepper to the chocolate mixture. If you’re a fan of nuts, roll the truffles in chopped almonds, pecans, or pistachios. You could even experiment with different types of dried fruit, such as cranberries or apricots, instead of cherries. And for an extra touch of elegance, drizzle the finished truffles with melted white chocolate or a contrasting dark chocolate. I’m so excited for you to try this recipe and discover the magic of these vegan chocolate cherry truffles for yourself. I poured my heart into creating this recipe, and I truly believe it’s a winner. The combination of the intense chocolate flavor, the juicy cherries, and the smooth, creamy texture is simply irresistible. So, what are you waiting for? Gather your ingredients, put on some music, and get ready to create some truffle magic! I promise you won’t be disappointed. And once you’ve made them, I’d absolutely love to hear about your experience. Did you try any variations? What did you think of the flavor? Did you share them with friends and family? Please, don’t hesitate to leave a comment below and share your thoughts and photos. Your feedback is invaluable, and it helps me continue to create recipes that you’ll love. I can’t wait to see your truffle creations! Happy baking (or rather, truffle-making)! I hope you enjoy these vegan chocolate cherry truffles as much as I do. They are a perfect treat for any occasion, or just because! Print
Vegan Chocolate Cherry Truffles: A Decadent & Easy Recipe
- Total Time: 265 minutes
- Yield: 24 truffles 1x
Description
Rich, decadent vegan chocolate truffles with sweet dried cherries, coated in cocoa powder. A perfect treat!
Ingredients
- 1 (13.5 ounce) can full-fat coconut milk, refrigerated overnight
- 1/4 cup unsweetened cocoa powder, plus more for dusting
- 1/4 cup maple syrup
- 1 teaspoon vanilla extract
- 1/4 teaspoon sea salt
- 1 cup vegan dark chocolate chips (at least 70% cacao)
- 1/2 cup dried cherries, finely chopped
- Optional toppings: chopped nuts, shredded coconut, cacao nibs
Instructions
- Carefully open the refrigerated can of coconut milk. Scoop out only the thick coconut cream into a medium-sized saucepan, leaving the watery liquid behind.
- Add the cocoa powder, maple syrup, vanilla extract, and sea salt to the saucepan with the coconut cream.
- Place the saucepan over medium heat. Whisk the mixture constantly until everything is well combined and smooth (3-5 minutes).
- Add the vegan dark chocolate chips to the saucepan. Continue whisking until the chocolate is completely melted and the mixture is glossy and smooth. Be careful not to overheat the chocolate.
- Remove the saucepan from the heat and stir in the finely chopped dried cherries.
- Pour the chocolate cherry mixture into a bowl.
- Cover the bowl tightly with plastic wrap, pressing the plastic wrap directly onto the surface of the chocolate mixture. Refrigerate for at least 4 hours, or preferably overnight, until firm enough to scoop.
- Line a baking sheet with parchment paper or a silicone baking mat.
- Remove the chilled chocolate cherry mixture from the refrigerator. Using a small cookie scoop or a spoon, scoop out portions of the mixture (about 1 tablespoon per truffle).
- Gently roll each portion of the mixture between your palms to form a smooth ball. If the mixture is too soft to roll easily, return it to the refrigerator for another 30 minutes to firm up further.
- Place each rolled truffle onto the prepared baking sheet.
- For firmer truffles, you can chill the formed truffles in the refrigerator for another 30 minutes before coating them.
- Place the cocoa powder (or your chosen coating) in a shallow bowl or plate.
- One at a time, gently roll each truffle in the cocoa powder (or your chosen coating) until it is completely covered.
- Gently tap off any excess coating.
- Place the coated truffles back onto the prepared baking sheet.
- Repeat steps 2-4 until all the truffles are coated.
- Refrigerate the coated truffles for at least 30 minutes to allow the coating to set and the truffles to firm up.
- Once chilled, the truffles are ready to serve!
- Store the truffles in an airtight container in the refrigerator for up to 1 week. You can also freeze them for up to 2 months. If freezing, thaw them in the refrigerator before serving.
Notes
- The key to amazing vegan truffles is using high-quality ingredients.
- The coconut milk needs to be nice and cold so we can easily separate the cream from the watery liquid. Don’t skip the overnight refrigeration step!
- Be careful not to overheat the chocolate, as it can seize up.
- If the mixture is too soft to roll easily, return it to the refrigerator for another 30 minutes to firm up further.
- For firmer truffles, you can chill the formed truffles in the refrigerator for another 30 minutes before coating them.
- Store the truffles in an airtight container in the refrigerator for up to 1 week. You can also freeze them for up to 2 months. If freezing, thaw them in the refrigerator before serving.
- Customize your truffles by adding a liqueur, different extracts, spices, dried fruits, or nuts.
- If the truffle mixture is too soft, return it to the refrigerator for a longer period of time. You can also add a tablespoon of cocoa powder to help thicken it up.
- If the truffles are too sticky, lightly dust your hands with cocoa powder before rolling them.
- If the coating is not sticking to the truffles, make sure the truffles are cold enough. You can also lightly dampen the truffles with a little water or plant-based milk before rolling them in the coating.
- If the chocolate seizes up while melting, try adding a teaspoon of coconut oil or plant-based milk to help smooth it out. Be careful not to overheat the chocolate.
- Prep Time: 20 minutes
- Cook Time: 5 minutes


Leave a Comment