
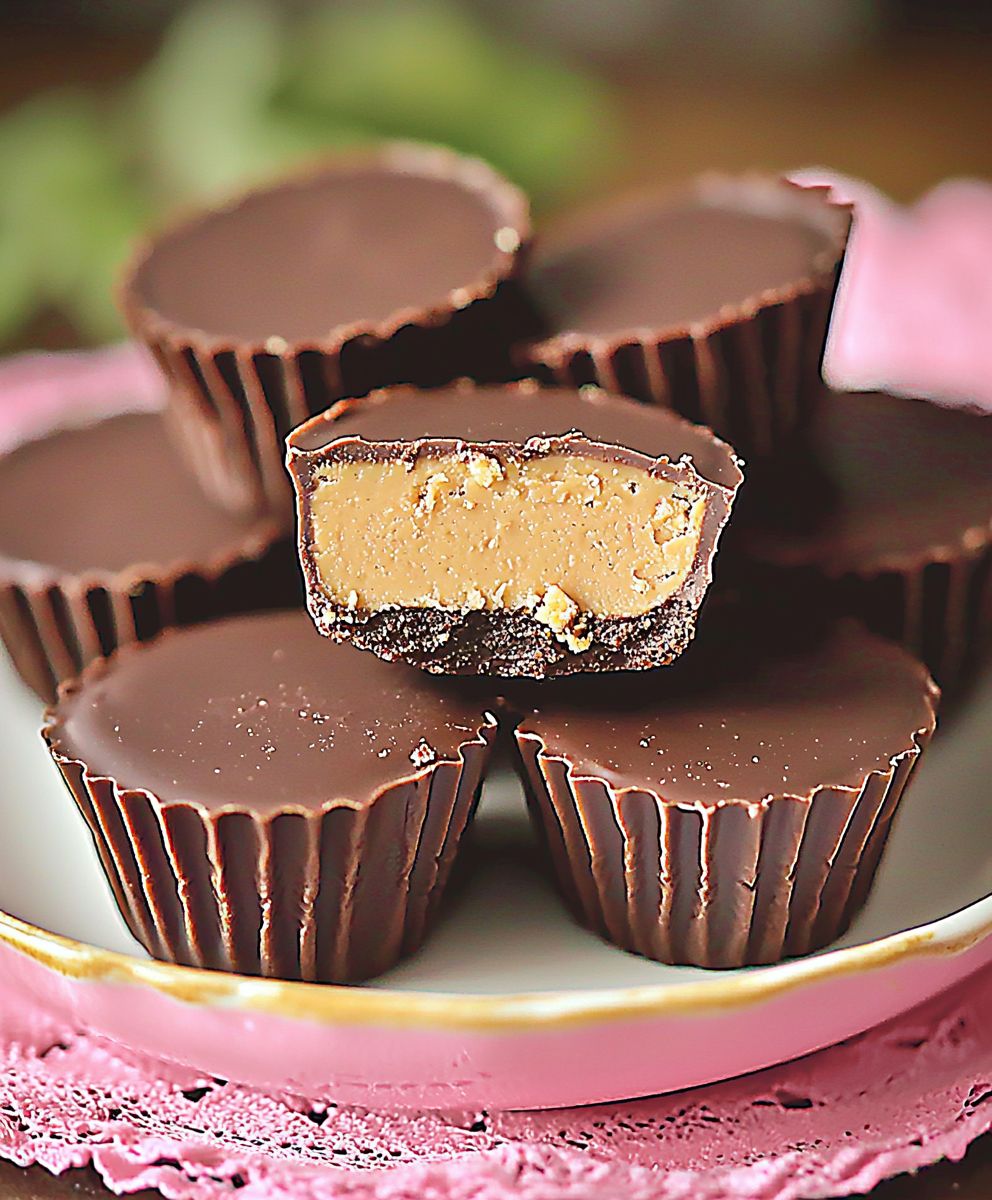
Valentine Peanut Butter Cups: the perfect homemade treat to show your love! Forget store-bought candies this year and dive into a delightful, easy-to-make dessert that’s guaranteed to impress your sweetheart (or yourself self-love is important too!). Imagine biting into a rich, dark chocolate shell that gives way to a creamy, melt-in-your-mouth peanut butter center. Sounds divine, right?
Peanut butter cups have a surprisingly interesting history, dating back to the early 20th century. H.B. Reese, a former Hershey employee, created the iconic Reese’s Peanut Butter Cups, and they quickly became a beloved American classic. The combination of chocolate and peanut butter is a flavor match made in heaven, a testament to the perfect balance of sweet and salty.
What makes these Valentine Peanut Butter Cups so irresistible? It’s the symphony of textures and flavors! The smooth, velvety chocolate complements the nutty, slightly salty peanut butter filling. Plus, they’re incredibly convenient to make at home. You can customize them with different types of chocolate, add a sprinkle of sea salt, or even swirl in some raspberry jam for an extra touch of romance. Whether you’re a seasoned baker or a kitchen novice, these homemade peanut butter cups are a fun and rewarding project. Get ready to spread the love, one delicious bite at a time!

Ingredients:
- 1 cup (2 sticks) unsalted butter, softened
- 1 cup granulated sugar
- 1 cup packed light brown sugar
- 2 large eggs
- 1 teaspoon vanilla extract
- 2 1/2 cups all-purpose flour
- 1 teaspoon baking soda
- 1/2 teaspoon salt
- 1 1/2 cups creamy peanut butter
- 1 cup powdered sugar
- 12 ounces semi-sweet chocolate chips
- 1 tablespoon shortening (vegetable or coconut oil)
- Valentine’s Day themed sprinkles (optional)
- Mini cupcake liners
Preparing the Peanut Butter Filling:
Okay, let’s get started with the heart of our Valentine’s Peanut Butter Cups the creamy, dreamy peanut butter filling! This is where the magic truly begins, and trust me, you’ll want to sneak a spoonful (or two!) before it even makes it into the cups.
- Cream the Peanut Butter and Powdered Sugar: In a large bowl, combine the 1 1/2 cups of creamy peanut butter and 1 cup of powdered sugar. I like to use a stand mixer with the paddle attachment for this, but a hand mixer works just as well. If you’re going the manual route, just be prepared for a little arm workout! Mix on medium speed until the peanut butter and powdered sugar are fully incorporated and the mixture is smooth and creamy. Don’t overmix, though, or it might become too oily. We’re aiming for a consistency that’s firm enough to hold its shape but still melts in your mouth.
- Check the Consistency: The peanut butter filling should be firm enough to roll into small balls. If it seems too soft, add a little more powdered sugar, a tablespoon at a time, until you reach the desired consistency. If it’s too dry, add a tiny bit of melted butter or a teaspoon of milk. Remember, we want it to be perfect!
- Chill the Filling (Optional but Recommended): This step is optional, but I highly recommend chilling the peanut butter filling for about 30 minutes in the refrigerator. This will make it easier to handle when we assemble the cups later. It helps the filling firm up and prevents it from melting too quickly when it comes into contact with the warm chocolate.
Making the Cookie Dough Base:
Now, let’s move on to the cookie dough base. This is what gives our peanut butter cups that delightful, slightly chewy texture that complements the creamy filling perfectly. We’re going for a soft, slightly underbaked cookie that will melt in your mouth along with the peanut butter and chocolate.
- Cream the Butter and Sugars: In a large bowl (or the bowl of your stand mixer), cream together the 1 cup (2 sticks) of softened unsalted butter, 1 cup of granulated sugar, and 1 cup of packed light brown sugar. Beat on medium speed until the mixture is light and fluffy. This usually takes about 3-5 minutes. The key here is to really incorporate air into the butter and sugar, which will result in a tender cookie.
- Add the Eggs and Vanilla: Beat in the 2 large eggs one at a time, mixing well after each addition. Then, stir in the 1 teaspoon of vanilla extract. The vanilla enhances the flavors of both the cookie and the peanut butter, so don’t skip it!
- Combine the Dry Ingredients: In a separate bowl, whisk together the 2 1/2 cups of all-purpose flour, 1 teaspoon of baking soda, and 1/2 teaspoon of salt. Whisking ensures that the baking soda and salt are evenly distributed throughout the flour, which is crucial for proper rising and flavor.
- Gradually Add the Dry Ingredients to the Wet Ingredients: Gradually add the dry ingredients to the wet ingredients, mixing on low speed until just combined. Be careful not to overmix! Overmixing can develop the gluten in the flour, resulting in a tough cookie. We want a tender cookie, so mix until the flour is just incorporated.
Assembling and Baking the Peanut Butter Cups:
Alright, the moment we’ve been waiting for! It’s time to assemble our Valentine’s Peanut Butter Cups and get them into the oven. This is where the magic really happens, and you’ll start to see your creations come to life.
- Prepare the Muffin Tin: Line a mini muffin tin with mini cupcake liners. This will make it easy to remove the peanut butter cups once they’re baked and cooled.
- Fill the Liners with Cookie Dough: Drop a small spoonful of cookie dough (about 1 tablespoon) into each mini cupcake liner. Gently press the dough down to create a small well in the center. You can use your fingers or the back of a spoon to do this.
- Add the Peanut Butter Filling: Take a small amount of the peanut butter filling (about 1 teaspoon) and roll it into a small ball. Place the peanut butter ball into the well of each cookie dough-filled liner.
- Top with More Cookie Dough: Top each peanut butter ball with another small spoonful of cookie dough (about 1 teaspoon). Gently press the dough down to seal the peanut butter filling inside.
- Bake the Peanut Butter Cups: Bake in a preheated oven at 350°F (175°C) for 8-10 minutes, or until the edges of the cookies are lightly golden brown. Be careful not to overbake them, as they will continue to cook slightly as they cool.
- Cool Completely: Remove the muffin tin from the oven and let the peanut butter cups cool completely in the tin before removing them. This will allow them to firm up and prevent them from falling apart.
Melting the Chocolate and Dipping (or Drizzling):
Now for the final touch the chocolate! This is what transforms our peanut butter cups from delicious cookies into irresistible treats. You can either dip the entire peanut butter cup in chocolate or drizzle it over the top, depending on your preference. I personally love the look of a drizzle, but dipping gives you that satisfying chocolate shell.
- Melt the Chocolate: In a heat-safe bowl, combine the 12 ounces of semi-sweet chocolate chips and 1 tablespoon of shortening. You can melt the chocolate in the microwave or over a double boiler.
- Microwave Method: Microwave in 30-second intervals, stirring well after each interval, until the chocolate is completely melted and smooth. Be careful not to overheat the chocolate, as it can burn.
- Double Boiler Method: Fill a saucepan with about an inch of water and bring it to a simmer. Place the heat-safe bowl on top of the saucepan, making sure the bottom of the bowl doesn’t touch the water. Stir the chocolate constantly until it’s completely melted and smooth.
- Dipping (Optional): If you’re dipping the peanut butter cups, carefully dip each one into the melted chocolate, making sure to coat it completely. Place the dipped peanut butter cups on a parchment-lined baking sheet.
- Drizzling (Optional): If you’re drizzling the chocolate, use a spoon or a piping bag to drizzle the melted chocolate over the top of each peanut butter cup. Get creative with your drizzle!
- Add Sprinkles (Optional): While the chocolate is still wet, sprinkle the peanut butter cups with Valentine’s Day themed sprinkles. This adds a festive touch and makes them even more appealing.
- Let the Chocolate Set: Place the baking sheet in the refrigerator for about 15-20 minutes, or until the chocolate is completely set.
Serving and Storing:
Congratulations! You’ve successfully created your own batch of delicious Valentine’s Peanut Butter Cups. Now it’s time to enjoy them or share them with your loved ones.
- Serving: Serve the peanut butter cups chilled or at room temperature. They’re perfect for Valentine’s Day parties, gifts, or just a sweet treat for yourself.
- Storing: Store the peanut butter cups in an airtight container in the refrigerator for up to a week. They can also be frozen for longer storage. Just make sure to thaw them completely before serving.
Tips and Variations:
Peanut Butter Variations:
Feel free to experiment with different types of peanut butter. Crunchy peanut butter will add a nice texture, while dark roast peanut butter will give a deeper flavor.
Chocolate Variations:
You can use milk chocolate, dark chocolate, or even white chocolate instead of semi-sweet chocolate. You can also add a pinch of sea salt to the melted chocolate to enhance the flavor.
Add-Ins:
Get creative with your add-ins! You can add chopped nuts, pretzels, or
Conclusion:
So, there you have it! These Valentine Peanut Butter Cups are truly a must-try, and I’m not just saying that because I created the recipe. The combination of rich, dark chocolate and creamy, homemade peanut butter filling is simply irresistible. They’re the perfect homemade treat to show your love this Valentine’s Day, or honestly, any day you’re craving a little something special. Forget the store-bought versions loaded with preservatives and questionable ingredients; these are made with love and real food, and you can taste the difference!
But why are these *really* a must-try? Because they’re incredibly easy to make! Seriously, even if you’re a beginner in the kitchen, you can absolutely nail this recipe. The steps are straightforward, the ingredients are readily available, and the satisfaction of creating something so delicious from scratch is unparalleled. Plus, they’re customizable!
Serving Suggestions and Variations:
Think beyond just gifting them as is. Imagine presenting these beauties nestled in a heart-shaped box, tied with a pretty ribbon. Or, how about incorporating them into a dessert platter alongside other Valentine’s Day treats? They’d be a stunning addition to any romantic spread.
And speaking of customization, the possibilities are endless!
* Add a sprinkle of sea salt: A touch of flaky sea salt on top of the chocolate adds a delightful contrast to the sweetness.
* Mix in some chopped nuts: For extra crunch, stir some chopped peanuts, almonds, or pecans into the peanut butter filling.
* Use different chocolate: While I love the richness of dark chocolate, feel free to use milk chocolate or even white chocolate for a sweeter treat.
* Add a layer of jam: A thin layer of raspberry or strawberry jam between the chocolate and peanut butter filling adds a fruity twist.
* Make them vegan: Use vegan chocolate and a plant-based butter alternative in the peanut butter filling to create a delicious vegan version.
* Get creative with toppings: Sprinkles, edible glitter, crushed freeze-dried berries let your imagination run wild!
These Valentine Peanut Butter Cups are also fantastic as a simple dessert after a romantic dinner. Serve them with a scoop of vanilla ice cream or a dollop of whipped cream for an extra indulgent treat. You could even crumble them over a chocolate milkshake for a decadent twist.
I truly believe that these homemade peanut butter cups will become a new Valentine’s Day tradition in your household. They’re a fun and easy way to show your loved ones how much you care, and they’re guaranteed to put a smile on everyone’s face.
So, what are you waiting for? Gather your ingredients, preheat your oven (or don’t, since this recipe doesn’t require baking!), and get ready to create some magic in the kitchen. I’m confident that you’ll love these Valentine Peanut Butter Cups as much as I do.
And most importantly, I want to hear about your experience! Did you try the recipe? Did you make any variations? What did your loved ones think? Share your photos and stories in the comments below. I can’t wait to see your creations and hear all about your Valentine’s Day adventures! Happy baking (or rather, chocolate-making)!
Valentine Peanut Butter Cups: A Sweet Treat for Your Valentine
Homemade Valentine's Day Peanut Butter Cups with a soft cookie base, creamy peanut butter filling, and chocolate coating. Perfect for gifting or a sweet treat!
Ingredients
- 1 cup (2 sticks) unsalted butter, softened
- 1 cup granulated sugar
- 1 cup packed light brown sugar
- 2 large eggs
- 1 teaspoon vanilla extract
- 2 1/2 cups all-purpose flour
- 1 teaspoon baking soda
- 1/2 teaspoon salt
- 1 1/2 cups creamy peanut butter
- 1 cup powdered sugar
- 12 ounces semi-sweet chocolate chips
- 1 tablespoon shortening (vegetable or coconut oil)
- Valentine’s Day themed sprinkles (optional)
- Mini cupcake liners
Instructions
- In a large bowl, combine the peanut butter and powdered sugar. Mix until smooth and creamy.
- Check the consistency. It should be firm enough to roll into small balls. Add more powdered sugar if too soft, or a tiny bit of melted butter or milk if too dry.
- Chill the filling for 30 minutes (optional).
- Cream together the softened butter, granulated sugar, and brown sugar until light and fluffy.
- Beat in the eggs one at a time, then stir in the vanilla extract.
- In a separate bowl, whisk together the flour, baking soda, and salt.
- Gradually add the dry ingredients to the wet ingredients, mixing on low speed until just combined. Do not overmix.
- Line a mini muffin tin with mini cupcake liners.
- Drop a small spoonful of cookie dough (about 1 tablespoon) into each liner and press down to create a well.
- Roll a small amount of peanut butter filling (about 1 teaspoon) into a ball and place it in the well of each cookie dough-filled liner.
- Top each peanut butter ball with another small spoonful of cookie dough (about 1 teaspoon). Gently press the dough down to seal the peanut butter filling inside.
- Bake in a preheated oven at 350°F (175°C) for 8-10 minutes, or until the edges of the cookies are lightly golden brown.
- Cool completely in the tin before removing.
- Melt the chocolate chips and shortening in a heat-safe bowl in the microwave (30-second intervals, stirring in between) or over a double boiler until smooth.
- Dip each peanut butter cup into the melted chocolate or drizzle it over the top.
- Add sprinkles while the chocolate is still wet (optional).
- Let the chocolate set in the refrigerator for 15-20 minutes.
Notes
- Peanut Butter Variations: Experiment with crunchy or dark roast peanut butter.
- Chocolate Variations: Use milk chocolate, dark chocolate, or white chocolate. Add a pinch of sea salt to the melted chocolate.
- Add-Ins: Add chopped nuts or pretzels.
Leave a Comment