
Salted Caramel Apple Pie Cheesecake Recipe – just hearing those words together conjures images of pure dessert bliss, doesn’t it? I’ve always believed that the best creations come from combining beloved classics, and this particular dessert is a testament to that philosophy. Imagine, for a moment, the comforting, spiced warmth of a homemade apple pie, perfectly paired with the luxurious, velvety tang of a classic cheesecake. Now, elevate that experience even further with the irresistible, complex sweetness and hint of salt from a rich caramel drizzle. It’s an invitation to an unparalleled culinary journey.
While apple pie and cheesecake each boast centuries of history as cherished comfort foods across various cultures, their brilliant fusion into one harmonious dessert is a more modern culinary marvel. This dish isn’t just about combining two favorites; it’s about crafting an entirely new experience that captures the essence of both, then adding that golden touch of salted caramel that simply makes everything better. People absolutely adore this creation because it delivers on every single craving. You’ll discover the delightful contrast of tender, spiced apples nestled in a buttery, crisp crust, topped with a smooth, rich cream cheese filling, all crowned with that glistening, salty-sweet caramel. It’s a symphony of textures and tastes – the tartness of the apples, the sweetness of the caramel, the creamy tang of the cheesecake, and the satisfying crunch of the crust, making every forkful an exploration.
Why this Salted Caramel Apple Pie Cheesecake Recipe is a true showstopper:
It’s the ultimate convergence of cozy nostalgia and decadent indulgence, promising an unforgettable experience with every single forkful. Get ready to bake a masterpiece that will undoubtedly become a new family favorite!

Ingredients:
-
For the Graham Cracker Crust:
- 1 ½ cups (about 180g) Graham Cracker Crumbs: Roughly 10-12 full graham cracker sheets, finely crushed. You can achieve this using a food processor or by placing them in a Ziploc bag and crushing them with a rolling pin until no large pieces remain.
- ¼ cup (50g) Granulated Sugar: To add a touch of sweetness to our buttery base and help with caramelization during baking.
- ½ teaspoon Ground Cinnamon: A warm and inviting spice that perfectly complements the apple and caramel flavors we’ll be introducing later.
- 6 tablespoons (85g) Unsalted Butter: Melted. This acts as the essential binder for our delicious crust, ensuring it holds its shape beautifully.
- ¼ teaspoon Fine Sea Salt: A little secret ingredient that really enhances the flavors, balancing the sweetness and adding depth to the crust.
-
For the Cheesecake Filling:
- 3 (8-ounce / 226g each) blocks Full-Fat Cream Cheese: Softened to room temperature. This is absolutely crucial for achieving a smooth, lump-free filling that bakes evenly.
- 1 cup (200g) Granulated Sugar: For the classic, comforting sweetness that defines a perfect cheesecake.
- 2 large Eggs: Room temperature. Incorporating eggs at room temperature helps them emulsify better with the cream cheese, leading to a creamier texture.
- 1 large Egg Yolk: Room temperature. This addition provides extra richness and contributes significantly to the velvety smooth consistency we’re after.
- 1 teaspoon Pure Vanilla Extract: For that essential aromatic vanilla flavor that rounds out the entire cheesecake experience.
- ¼ cup (60g) Sour Cream: Full-fat, room temperature. This ingredient adds a delightful tangy note and further contributes to that luxurious, velvety smooth texture.
- 1 tablespoon All-Purpose Flour: A small amount of flour helps to stabilize the filling and significantly reduces the chances of those dreaded cracks forming during baking.
- Pinch of Fine Sea Salt: Just a tiny pinch, it truly balances the sweetness and enhances the overall flavor profile of the cheesecake.
-
For the Apple Pie Topping:
- 4 medium-sized Apples: About 4-5 cups peeled, cored, and diced into ½-inch pieces. I love using a mix of Granny Smith (for a lovely tartness that cuts through the richness) and Honeycrisp or Fuji (for sweetness and a great texture that holds up well).
- 3 tablespoons Unsalted Butter: For sautéing the apples and creating a rich, flavorful base for our topping.
- ¼ cup (50g) Granulated Sugar: Adjust this amount based on the natural sweetness of your chosen apples and your personal preference.
- 2 tablespoons Brown Sugar: Lightly packed. This adds a deeper, more molasses-like flavor and a lovely caramel note to the apples.
- 1 teaspoon Ground Cinnamon: The quintessential apple pie spice, providing that warm, comforting aroma and flavor.
- ¼ teaspoon Ground Nutmeg: A hint of this warm spice elevates the aroma and adds another layer of complexity.
- ⅛ teaspoon Ground Cloves (optional): For those who love an extra layer of warmth and a slightly spicier apple flavor.
- 1 tablespoon Lemon Juice: Freshly squeezed. This is important for preventing the apples from browning and brightening all the apple flavors.
- 2 tablespoons Water: Or apple cider, to help the apples soften gently and create a little sauciness.
- 1 tablespoon Cornstarch: Mixed with 1 tablespoon cold water to create a smooth slurry, which will be used for thickening our apple topping to the perfect consistency.
-
For the Salted Caramel Sauce:
- 1 cup (200g) Granulated Sugar: The pure, sweet foundation of our homemade caramel.
- ¼ cup (60ml) Water: Helps dissolve the sugar evenly at the start, which is key to preventing dreaded sugar crystallization.
- ½ cup (120ml) Heavy Cream: Warmed slightly (you can microwave it for about 30 seconds). This is absolutely crucial for preventing the hot caramel from seizing up when added.
- 4 tablespoons (57g) Unsalted Butter: Cubed, and at room temperature. Adds incredible richness and helps achieve that wonderfully smooth finish.
- 1 teaspoon Pure Vanilla Extract: Enhances the flavor of the caramel, adding a beautiful aromatic note.
- ¾ – 1 teaspoon Fine Sea Salt: Or flaky sea salt for sprinkling. You’ll want to adjust this amount to your personal preference for saltiness. This is what makes our “Salted Caramel Apple Pie Cheesecake Recipe” truly sing!
-
For Garnish (Optional):
- Extra Graham Cracker Crumbs for texture
- A few thinly sliced fresh apple pieces for visual appeal
- A light dusting of cinnamon for an extra aromatic touch
Getting Started: Prepping Your Kitchen for the Ultimate Salted Caramel Apple Pie Cheesecake
Before we dive into the fun stuff, let’s get our kitchen organized and ready. Baking, especially a multi-component masterpiece like this Salted Caramel Apple Pie Cheesecake Recipe, is much more enjoyable and significantly more successful when you have everything in its proper place and prepared beforehand. First things first, ensure all your cold ingredients, particularly the cream cheese, eggs, and sour cream for the cheesecake filling, are at room temperature. This is not just a suggestion; it is a vital step for achieving that perfectly smooth, lump-free cheesecake texture we are truly aiming for. Cold ingredients simply don’t emulsify properly with each other, which can lead to a lumpy batter and a less desirable, inconsistent final product. So, make sure to take them out of the fridge at least 1-2 hours before you plan to start mixing.
Next, let’s get our oven ready. Preheat your oven to a steady 325°F (160°C). Grab your trusty 9-inch springform pan. I always, always recommend lining the bottom of the springform pan with a circle of parchment paper and then lightly greasing the sides. This thoughtful preparation makes for much easier removal of your beautiful cheesecake and ensures a cleaner, more professional-looking result. For a truly perfect, crack-free bake, we’ll also be preparing a water bath. This helps to create a moist baking environment within the oven, which is essential for preventing cracks in your delicate cheesecake. To do this, wrap the outside of your springform pan tightly with several layers of heavy-duty aluminum foil. Make sure the foil extends all the way up the sides, creating a secure barrier to prevent any water from seeping into the pan. Trust me, a soggy crust is absolutely not what we want after all the effort we’re putting into this incredible dessert!
Phase 1: Crafting the Perfect Graham Cracker Crust
- Prepare your Graham Cracker Crumbs: If you’re starting with whole graham crackers, place them in a food processor and pulse until very fine crumbs form. Alternatively, if you don’t have a food processor, you can place them in a sturdy plastic bag (like a Ziploc) and crush them thoroughly with a rolling pin until no large pieces remain. We’re looking for a consistent, fine crumb texture here, almost like sand. This ensures an even and well-packed crust.
- Combine Dry Ingredients: In a medium bowl, combine your finely crushed graham cracker crumbs, granulated sugar, ground cinnamon, and fine sea salt. Take a whisk or a fork and mix these dry ingredients together thoroughly until they are evenly distributed. This step is important because it ensures every single bite of our crust has that lovely, balanced flavor profile we’re aiming for.
- Add Melted Butter: Now, pour the melted unsalted butter into the dry crumb mixture. Using a fork, or even better, your clean hands, mix everything together until the crumbs are uniformly moistened. The mixture should resemble wet sand and, crucially, it should hold together when you press it between your fingers. If, for some reason, it seems a little too dry, you can add another half tablespoon of melted butter, but be careful not to make it greasy, which can lead to a less crisp crust.
- Press into the Pan: Transfer the moistened graham cracker mixture into your previously prepared 9-inch springform pan. Using the bottom of a flat glass or a measuring cup, firmly and evenly press the mixture over the bottom of the pan. Make sure it’s packed down tightly to form a solid, even crust. This compactness is absolutely key for a sturdy, reliable base that won’t crumble apart when you go to slice your beautiful cheesecake.
- Pre-bake the Crust: Place the springform pan into your preheated oven (still at 325°F / 160°C) and bake for 8-10 minutes. This pre-baking step serves a couple of important purposes: it helps to set the crust, making it delightfully crispier, and it also prevents it from becoming soggy once the wet cheesecake filling is added on top.
- Cool the Crust: Once baked, carefully remove the crust from the oven and set it aside to cool completely on a wire rack while you move on to preparing the decadent cheesecake filling. It’s really important that the crust is cool so it doesn’t warm up the cheesecake batter, which could affect its texture.
Phase 2: Whipping Up the Silky Smooth Cheesecake Filling
- Beat Cream Cheese: In a large mixing bowl (or the bowl of a stand mixer fitted with the paddle attachment), beat the softened cream cheese on medium speed for about 2-3 minutes. You are aiming for it to be incredibly smooth, light, and fluffy, with absolutely no lumps whatsoever. Do not rush this step; it is utterly essential for achieving that perfectly smooth, lump-free cheesecake texture. Make sure to scrape down the sides and bottom of the bowl frequently with a spatula to ensure everything gets thoroughly incorporated.
- Add Sugar and Flour: Gradually add the granulated sugar to the cream cheese, beating on low-medium speed until just combined. Then, add the all-purpose flour and the pinch of sea salt, mixing until barely incorporated. The flour really helps to prevent those unfortunate cracks that can sometimes appear during baking, which is always a bonus for presentation!
- Incorporate Eggs and Yolk: Add the eggs one at a time, mixing on low speed after each addition just until the yolk disappears and is fully incorporated. Then, add the extra egg yolk and mix until just combined. It is crucial not to overmix at this stage! Overmixing incorporates too much air into the batter, which can lead to an expansion in the oven and then subsequent cracking during cooling, as well as a less dense, almost spongy texture. We want just enough mixing to combine the ingredients smoothly.
- Stir in Sour Cream and Vanilla: Gently fold in the room temperature sour cream and the pure vanilla extract until they are just incorporated. A flexible rubber spatula is perfect for this final step, ensuring you don’t overmix the delicate batter. The batter should now be wonderfully smooth, creamy, and uniform in consistency.
- Prepare for Water Bath: Take your cooled graham cracker crust in the foil-wrapped springform pan. Carefully pour the silky smooth cheesecake filling over the cooled crust. Gently tap the pan on the counter a few times to release any large air bubbles that might be trapped within the batter. These bubbles can sometimes lead to imperfections on the surface.
- Bake in a Water Bath: Place the foil-wrapped springform pan inside a larger roasting pan. Very carefully pour hot (not boiling) water into the roasting pan until it comes about halfway up the sides of the springform pan. This water bath creates a steamy, humid environment in the oven, which promotes incredibly even baking, a slow rise, and significantly helps prevent those pesky cracks from forming on the surface of your cheesecake.
- Bake the Cheesecake: Transfer the roasting pan, with the cheesecake nestled inside, to your preheated oven (still at 325°F / 160°C). Bake for approximately 60-75 minutes. The cheesecake is ready when the edges appear set and slightly puffed, but the very center still has a slight, jiggle-like wobble when you gently shake the pan. Don’t worry, that slight wobble is perfectly normal; it will firm up beautifully as it cools.
- Cool Slowly: Once baked, turn off the oven but leave the cheesecake inside with the oven door ajar for a full hour. This slow cooling process prevents any sudden temperature changes that can shock the cheesecake and cause cracking. Patience here is key!
- Chill Thoroughly: After the hour in the oven, carefully remove the springform pan from the water bath and the roasting pan. Gently remove the aluminum foil. Let the cheesecake cool completely on a wire rack at room temperature for another 1-2 hours. Once it’s at room temperature, cover it loosely with plastic wrap and refrigerate for at least 6-8 hours, or preferably overnight. This chilling step is absolutely non-negotiable for a perfectly set cheesecake! It allows the flavors to meld beautifully and the texture to firm up to that classic, dense, and creamy consistency.
Phase 3: Simmering the Irresistible Apple Pie Topping
- Prepare Apples: Peel, core, and dice your chosen apples into consistent ½-inch pieces. I find this size to be absolutely perfect as it cooks down nicely but still offers some delightful textural integrity in the finished topping. Having them uniformly sized helps them cook evenly and prevents some pieces from becoming mushy while others are still hard.
- Sauté Apples: In a large skillet or saucepan, melt the unsalted butter over medium heat. Add the diced apples and cook for 5-7 minutes, stirring occasionally, until they start to soften slightly around the edges. We’re not trying to fully cook them yet, just get them started.
- Add Sugars and Spices: Stir in the granulated sugar, brown sugar, ground cinnamon, ground nutmeg, and the optional ground cloves. Continue to cook for another 3-5 minutes, allowing the sugars to fully dissolve and the spices to become wonderfully fragrant. Your kitchen will start smelling absolutely divine at this point – a true preview of the deliciousness to come!
- Deglaze and Simmer: Pour in the fresh lemon juice and water (or apple cider, if you prefer). Bring the mixture to a gentle simmer. Once simmering, reduce the heat to low, cover the skillet, and continue to cook for 10-15 minutes, or until the apples are tender but still retain some of their shape and bite. The exact cooking time will vary depending on your apple variety and your desired level of tenderness.
- Thicken the Topping: In a small separate bowl, whisk together the cornstarch and 1 tablespoon of cold water to create a smooth slurry. Pour this cornstarch slurry into the simmering apples, stirring constantly to prevent lumps. Continue to cook for 1-2 minutes, stirring all the while, until the mixture has thickened to a lovely, glossy consistency that beautifully coats the back of your spoon.
- Cool Completely: Remove the apple topping from the heat and immediately transfer it to a separate bowl. Let it cool completely to room temperature before assembling your cheesecake. This step is critical: warm apple topping will melt the chilled cheesecake and ruin its beautiful, firm texture, so patience is key!
Phase 4: Creating the Luxurious Salted Caramel Sauce from Scratch
- Prepare Cream and Butter: Before you even think about putting sugar on the stove, ensure your heavy cream is slightly warmed (you can microwave it for 30 seconds to a minute) and your butter is cubed and at room temperature. Having these two ingredients ready and at the correct temperature is absolutely crucial, as the caramel-making process moves very quickly and doesn’t allow for fumbling around.
- Caramelize Sugar and Water: In a heavy-bottomed saucepan (a light-colored pan is best here, as it allows you to easily monitor the color changes of the caramel), combine the granulated sugar and water. Stir gently with a heatproof spatula or wooden spoon just until the sugar is dissolved. Once it begins to boil, it’s very important to avoid stirring to prevent unwanted sugar crystallization on the sides of the pan.
- Cook to Amber: Cook the sugar syrup over medium-high heat. The mixture will first boil vigorously, then turn clear, and eventually start to color around the edges of the pan. Watch it very, very carefully at this point! Once it starts to turn a light amber color, swirl the pan occasionally to ensure the cooking is even. Continue cooking until it reaches a rich, deep amber color, similar to an old penny. This usually takes about 8-12 minutes from the start, but please be aware that it can go from perfect to burnt in mere seconds, so stay focused and don’t walk away!
- Add Warm Cream (Carefully!): As soon as the caramel reaches your desired deep amber color, immediately and very carefully pour in the warm heavy cream. Be extremely cautious, as the mixture will bubble up violently and release a lot of steam! Stir constantly with your heatproof spatula until smooth. If, by chance, it seizes up and forms a hard lump, do not panic. Simply reduce the heat to low and keep stirring; it will eventually melt back into a smooth sauce.
- Stir in Butter, Vanilla, and Salt: Remove the saucepan from the heat. Add the cubed room temperature butter, the pure vanilla extract, and ¾ teaspoon of fine sea salt. Stir constantly until the butter is fully melted and completely incorporated, and the sauce is perfectly smooth and glossy. At this point, taste the caramel and adjust the salt if desired; some people prefer a bolder, more pronounced salted caramel flavor!
- Cool the Caramel: Transfer the luxurious salted caramel sauce to a heatproof jar or bowl. Let it cool completely to room temperature. As it cools, it will thicken significantly, achieving that perfect drizzle-able consistency. If, later on, it becomes too thick to drizzle, you can gently warm it in the microwave for a few seconds or in a small saucepan over very low heat until it loosens up.
Phase 5: Assembling Your Masterpiece: The Salted Caramel Apple Pie Cheesecake
Now comes the truly satisfying part – bringing all these incredible components together to form our show-stopping Salted Caramel Apple Pie Cheesecake Recipe! Make absolutely sure that both your cheesecake and your apple topping are thoroughly chilled before you even begin this step. Precision and care here will lead to a visually stunning and, of course, a ridiculously delicious result that will impress everyone.
- Release the Cheesecake: Once your cheesecake has thoroughly chilled (and for best results, overnight is truly ideal), run a thin, sharp knife or an offset spatula very carefully around the inner edge of the springform pan. This helps to gently loosen the cheesecake from the sides. Then, gently release and remove the springform ring. This is always a triumphant moment that reveals your beautifully baked cheesecake! You can carefully transfer the cheesecake to a serving plate or simply leave it on the base of the springform pan for now.
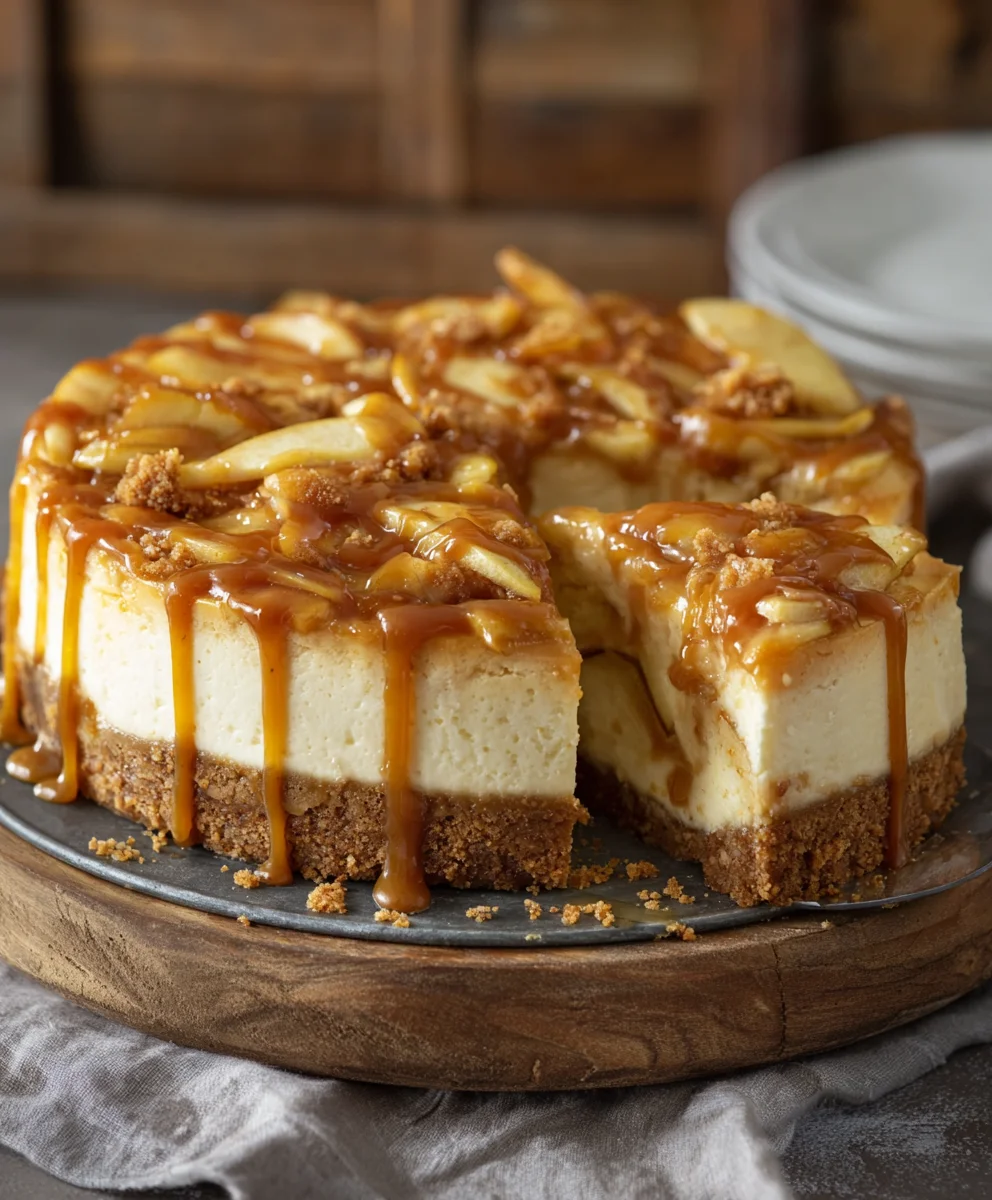
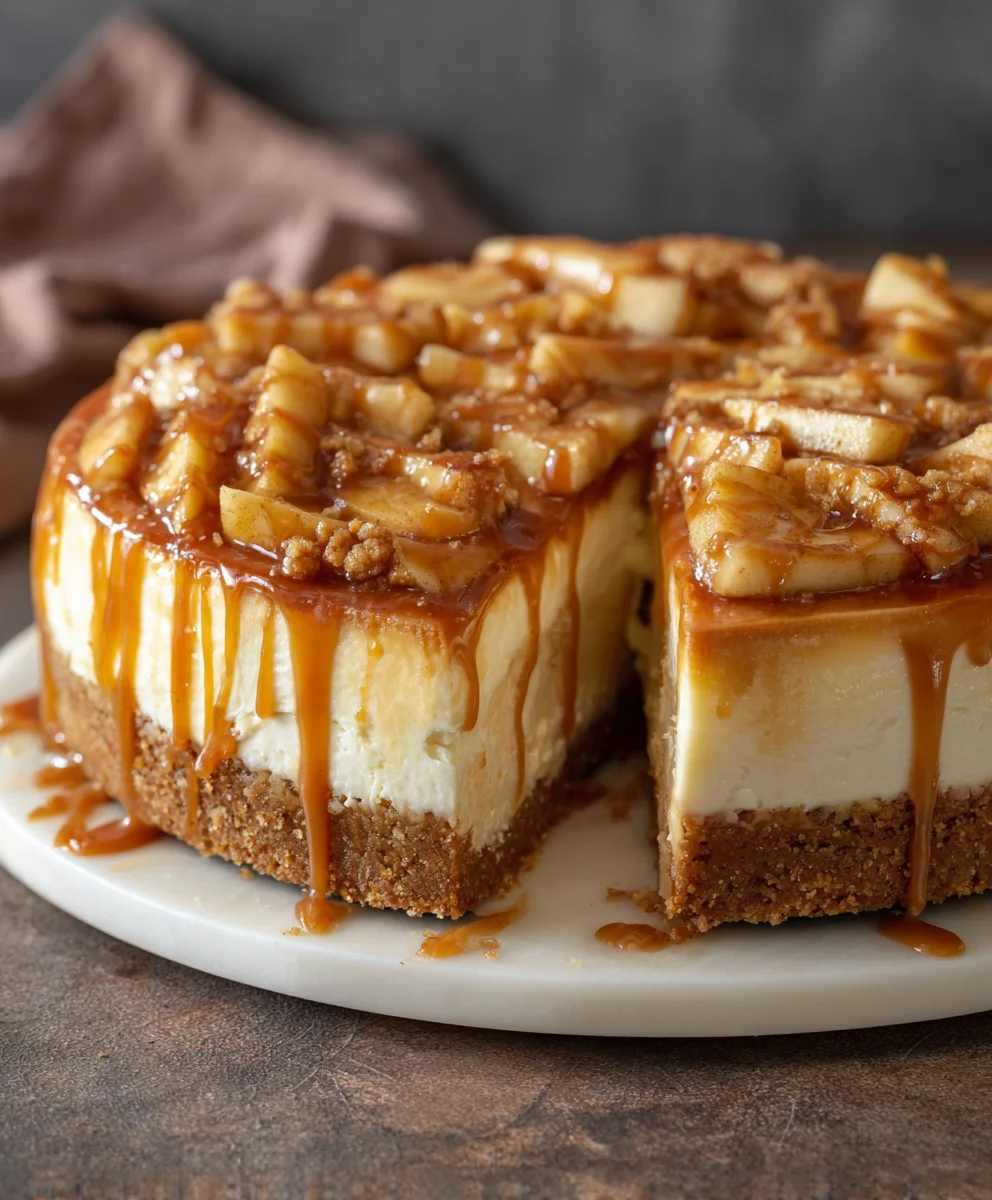
- Apply Apple Pie Topping: Evenly spread the completely cooled apple pie topping over the top of the chilled cheesecake. Take your time to create a beautiful, even layer that extends gracefully to the very edges of the cheesecake. The vibrant color and appealing texture of the apples will look absolutely fantastic against the creamy white cheesecake base.
- Drizzle Salted Caramel: Generously drizzle the cooled (but still perfectly pourable) salted caramel sauce over the apple topping. You can create an elegant swirling pattern, or just let it cascade organically down the sides of the cheesecake – either way, it will look and taste amazing. Don’t be shy with the caramel; it’s a key player in this dessert and contributes so much to the overall flavor profile!
- Garnish (Optional): If you like, you can sprinkle a few extra graham cracker crumbs artistically around the edges of the cheesecake for added texture and a visual cue to the crust below. You could also arrange some thinly sliced fresh apple pieces on top for a fresh touch, or add a light dusting of cinnamon for an extra aromatic flourish.
- Chill Again (Briefly): For the absolute best serving experience, return the assembled cheesecake to the refrigerator for at least another 30 minutes. This allows the caramel to set slightly on top and, crucially, gives all the magnificent flavors a chance to fully meld and harmonize. This extra chilling step ensures clean, beautiful slices and maximum enjoyment of every single bite.
Phase 6: The Grand Finale: Chilling and Serving Your Divine Creation
You’ve done it! You’ve meticulously followed every step of the Salted Caramel Apple Pie Cheesecake Recipe, and now your magnificent dessert is truly ready for its grand debut. The final chilling period is just as important as the precise baking itself, as it allows all the rich, complex flavors to fully develop and integrate, and the textures to become perfectly unified and firm. A well-chilled cheesecake is not only infinitely easier to slice into clean, elegant portions, but it also tastes exponentially better, with each distinct layer shining through with its individual charm and contributing to the overall deliciousness.
When you’re finally ready to serve your masterpiece, use a very sharp knife that has been run under hot water and then wiped completely clean between each and every slice. This simple trick creates those perfect, clean, professional-looking cuts that every baker dreams of achieving. Each carefully extracted slice will beautifully reveal the stunning layers: the crunchy, buttery graham cracker crust, the smooth, creamy, and subtly tangy cheesecake filling, the warmly spiced, tender apple pie topping, and finally, the luxurious, salty-sweet homemade caramel sauce. It truly is a symphony of textures and an explosion of harmonious flavors in every single, delightful bite!
This cheesecake is undeniably decadent and utterly satisfying on its own, but if you want to elevate the experience even further, consider serving it alongside a generous dollop of freshly whipped cream, a scoop of premium vanilla bean ice cream (to introduce a temperature contrast), or, for the ultimate caramel lover, an extra drizzle of that luscious homemade salted caramel sauce. It’s also an absolutely stunning and impressive centerpiece for any holiday gathering, a special occasion, or simply as a well-deserved treat for yourself and loved ones. Prepare for an abundance of rave reviews and insistent requests for the recipe – you’ve earned them!
Storing your masterpiece is thankfully simple: cover any leftover cheesecake tightly with plastic wrap to prevent it from absorbing any refrigerator odors and store it in the refrigerator for up to 4-5 days. While it’s highly unlikely to last that long given its deliciousness, it’s good to know it holds up well, continuing to deliver joy with every decadent bite. Enjoy the incredible fruits of your labor – this is truly a dessert to be immensely proud of, showcasing your skill and patience in the kitchen!
Conclusion:
This Salted Caramel Apple Pie Cheesecake Recipe is truly a showstopper. It’s not just a dessert; it’s an experience, a symphony of flavors and textures that will undoubtedly impress anyone who tries it. Believe me when I say, this is one recipe you’ll want to keep in your permanent collection.
Why This Recipe Is a Must-Try: An Unforgettable Dessert Experience
What makes this particular cheesecake so utterly irresistible, you ask? It’s the ingenious marriage of comforting classics with a gourmet twist. We’ve taken the quintessential coziness of apple pie and elevated it with the sophisticated creaminess of a perfectly baked cheesecake. Then, to push it into truly unforgettable territory, we’ve infused it with that utterly addictive salty-sweet kick of caramel. The harmonious blend of spiced, tender apple chunks, nestled within a smooth, tangy cream cheese filling, all resting on a buttery, crisp crust and generously topped with a rich, velvety salted caramel sauce is simply divine. Every single bite is a revelation, offering a perfect balance – the comforting warmth of autumn spices, the bright, fruity tartness of fresh apples, the decadent richness of the cheesecake, and that surprising pop of sea salt that brilliantly cuts through the sweetness. It’s a dessert that speaks to both cherished nostalgia and modern, sophisticated palates, making it the ideal centerpiece for any gathering, from a casual family dinner to the most festive holiday celebration. I promise, you’ll witness pure delight on the faces of everyone who tastes it. This is more than just a dessert; it’s a moment of pure culinary magic, a true testament to how extraordinary classic flavors can become when combined with a touch of creative flair.
Elevate Your Indulgence: Serving Suggestions & Creative Variations
While this cheesecake is absolutely stellar enjoyed on its own, I love offering a few ideas to personalize and enhance your dessert experience. For an extra touch of warmth and gooey decadence, try serving a slice ever-so-slightly warmed – just enough to make the caramel ooze deliciously and the apple filling become even more tender, without compromising the perfect texture of the cheesecake. A generous dollop of freshly whipped cream, perhaps lightly sweetened and infused with a hint of vanilla bean or a whisper of cinnamon, creates a cloud-like, ethereal complement. Or, for the ultimate indulgent treat, imagine a scoop of premium vanilla bean ice cream slowly melting alongside a warm slice – pure bliss! Don’t hesitate to drizzle a little extra Salted Caramel Apple Pie Cheesecake Recipe sauce over the top just before serving, or even sprinkle some toasted pecans, walnuts, or candied ginger for an added textural crunch and flavor dimension.
Feeling adventurous? The beauty of this recipe lies in its versatility. Experiment with different apple varieties; perhaps a mix of tart Granny Smiths and sweet Honeycrisps for a more complex apple flavor. You could also play with the spices, introducing a pinch of cardamom, a touch of ground ginger, or even a hint of star anise to your apple filling for an exotic twist. For the crust, while our classic graham cracker base is wonderful, a gingersnap crust would introduce a delightful spicy kick, or even a shortbread crust for a more buttery foundation. And if you’re hosting a larger gathering or prefer individual portions, consider making mini cheesecakes in ramekins or muffin tins – they’re adorable, elegant, and perfectly portable, delivering all the incredible layers of flavor in a personal package. These variations allow you to truly make this recipe your own, reflecting your unique taste.
Your Turn to Shine: Bake, Share, and Inspire!
I’ve poured my heart into perfecting this Salted Caramel Apple Pie Cheesecake Recipe, and now I truly can’t wait for you to experience the sheer joy of creating and savoring it in your own kitchen. There’s something incredibly satisfying about bringing a dessert of this caliber to life, knowing the profound delight and genuine compliments it will bring to your friends, family, and loved ones. So, gather your ingredients, set aside some dedicated time, and prepare to create something truly spectacular. Please don’t be intimidated by the layers; each step is designed to be straightforward, enjoyable, and incredibly rewarding. Once you’ve baked this magnificent masterpiece, please, please, please come back and share your experience with me and our wonderful community! Did you put your own unique spin on it? What were the reactions of your taste testers? Snap a gorgeous photo, leave a comment detailing your adventure below, or tag us on social media. Your stories, tips, and delicious creations are what inspire us all to keep baking and exploring! I’m genuinely excited to see your delicious results and hear all about your journey with this incredible dessert. Happy baking, my friends, and get ready for an avalanche of well-deserved compliments!
Ultimate Salted Caramel Apple Pie Cheesecake
Experience pure dessert bliss with this Salted Caramel Apple Pie Cheesecake. A luxurious fusion of warm spiced apple pie, velvety cheesecake, and rich salted caramel, promising an unforgettable symphony of textures and tastes.
Ingredients
-
1 ½ cups graham cracker crumbs
-
¼ cup granulated sugar (for crust)
-
½ teaspoon ground cinnamon (for crust)
-
¼ teaspoon fine sea salt (for crust)
-
½ cup unsalted butter, melted (for crust)
-
24 oz full-fat cream cheese, softened
-
1 cup granulated sugar (for cheesecake)
-
3 large eggs, room temperature
-
1 teaspoon pure vanilla extract (for cheesecake)
-
½ cup full-fat sour cream, room temperature
-
1 tablespoon all-purpose flour
-
Pinch of fine sea salt (for cheesecake)
-
3 medium apples, peeled, cored, diced
-
2 tablespoons unsalted butter (for apples)
-
2 tablespoons brown sugar, packed
-
1 teaspoon ground cinnamon (for apples)
-
¼ teaspoon ground nutmeg
-
⅛ teaspoon ground cloves (optional)
-
1 tablespoon lemon juice
-
2 tablespoons water or apple cider
-
1 tablespoon cornstarch, mixed with 1 tbsp cold water
-
1 cup granulated sugar (for caramel)
-
¼ cup water (for caramel)
-
½ cup heavy cream, warmed
-
6 tablespoons unsalted butter, cubed
-
1 teaspoon pure vanilla extract (for caramel)
-
¾ – 1 teaspoon fine sea salt (for caramel), or flaky sea salt
Instructions
-
Step 1
Preheat oven to 325°F (160°C). Prepare a 9-inch springform pan by lining the bottom with parchment paper, greasing the sides, and wrapping the outside tightly with heavy-duty aluminum foil for a water bath. Ensure cream cheese, eggs, and sour cream are at room temperature. -
Step 2
Crush 1 ½ cups graham crackers finely. In a bowl, combine crumbs, ¼ cup granulated sugar, ½ teaspoon ground cinnamon, and ¼ teaspoon fine sea salt. Stir in ½ cup melted unsalted butter until moistened. Firmly press the mixture into the bottom of the prepared springform pan. Bake for 8-10 minutes, then cool completely on a wire rack. -
Step 3
In a large bowl, beat 24 oz softened cream cheese until smooth (2-3 mins). Gradually add 1 cup granulated sugar, 1 tablespoon all-purpose flour, and a pinch of fine sea salt; mix until just combined. Add 3 large eggs one at a time, mixing on low speed until just incorporated. Gently fold in 1 teaspoon pure vanilla extract and ½ cup sour cream until blended. Do not overmix. -
Step 4
Pour the cheesecake filling over the cooled crust and gently tap the pan to release air bubbles. Place the foil-wrapped springform pan into a larger roasting pan. Carefully pour hot water into the roasting pan until it reaches halfway up the sides of the springform pan. Bake at 325°F (160°C) for 60-75 minutes, until edges are set and the center slightly jiggles. Turn off the oven, leave the door ajar, and let the cheesecake cool inside for 1 hour. Remove from water bath, cool on a wire rack for 1-2 hours, then refrigerate, covered, for at least 6-8 hours or preferably overnight. -
Step 5
In a large skillet, melt 2 tablespoons unsalted butter over medium heat. Add 3 diced apples and cook for 5-7 minutes until slightly soft. Stir in 2 tablespoons brown sugar, 1 teaspoon ground cinnamon, ¼ teaspoon ground nutmeg, and optional ⅛ teaspoon ground cloves. Cook 3-5 minutes until fragrant. Pour in 1 tablespoon lemon juice and 2 tablespoons water (or apple cider). Simmer, covered, for 10-15 minutes until apples are tender. Whisk 1 tablespoon cornstarch with 1 tablespoon cold water to make a slurry; stir into apples and cook 1-2 minutes until thickened. Transfer to a bowl and cool completely to room temperature. -
Step 6
Have ½ cup warmed heavy cream and 6 tablespoons cubed, room temperature unsalted butter ready. In a heavy-bottomed saucepan, combine 1 cup granulated sugar and ¼ cup water. Stir gently until sugar dissolves, then cook over medium-high heat without stirring until the syrup turns a rich, deep amber color (8-12 minutes). Carefully pour in the warm heavy cream, stirring constantly until smooth. Remove from heat, stir in 1 teaspoon pure vanilla extract and ¾-1 teaspoon fine sea salt until butter is melted and sauce is glossy. Adjust salt to taste. Transfer to a heatproof jar and cool completely; it will thicken as it cools. -
Step 7
Run a thin knife around the edge of the chilled cheesecake and release the springform ring. Evenly spread the completely cooled apple pie topping over the cheesecake. Generously drizzle the cooled salted caramel sauce over the apple topping. Optionally, garnish with extra graham cracker crumbs, fresh apple slices, or a dusting of cinnamon. Refrigerate for at least 30 minutes before serving. For clean slices, use a sharp knife dipped in hot water and wiped clean between cuts. Store leftover cheesecake tightly covered in the refrigerator for up to 4-5 days.
Important Information
Nutrition Facts (Per Serving)
It is important to consider this information as approximate and not to use it as definitive health advice.
Allergy Information
Please check ingredients for potential allergens and consult a health professional if in doubt.

Leave a Comment