
Sweet Chili Chicken Recipe – are you ready to transform your weeknight dinner into an extraordinary culinary experience? Imagine succulent pieces of chicken, perfectly coated in a vibrant, glossy sauce that offers an irresistible dance between a gentle sweetness and a delightful, subtle kick of heat. This isn’t just another chicken dish; it’s a journey for your taste buds, promising to become a cherished favorite in your kitchen repertoire. I am so excited for you to try it!
Originating from the rich culinary traditions of Southeast Asia, sweet chili sauce has captivated palates worldwide, and when paired with tender chicken, it creates a dish that is both comforting and exciting. It’s the perfect harmony of flavors – the savory chicken acting as a canvas for the complex, yet approachable, sweet chili glaze. People adore this dish not only for its incredible flavor profile – that perfect blend of tangy, sweet, and spicy – but also for its remarkable versatility and surprising ease of preparation. Whether you’re feeding a family or simply treating yourself, this Sweet Chili Chicken Recipe delivers restaurant-quality taste with minimal fuss, making it ideal for busy evenings or a relaxed weekend meal.

Ingredients:
-
For the Crispy Chicken:
- 2 lbs boneless, skinless chicken thighs or breasts, cut into uniform 1-inch pieces
- 1/2 cup all-purpose flour
- 1/4 cup cornstarch
- 1 teaspoon salt
- 1/2 teaspoon black pepper
- 1/4 teaspoon garlic powder
- 1/4 teaspoon onion powder
- 2 large eggs, lightly beaten
- 2-3 cups vegetable oil, for frying (or enough to fill your pan about 1 inch deep)
-
For the Homemade Sweet Chili Sauce:
- 1/2 cup sweet chili sauce (store-bought, or for a more nuanced flavor, you can make your own by combining 1/4 cup sugar, 1/4 cup water, 2 tbsp rice vinegar, 1 tbsp fish sauce, 1 minced garlic clove, 1 tsp grated ginger, and 1/2 tsp red pepper flakes, simmering until syrupy, then adding a cornstarch slurry to thicken)
- 1/4 cup rice vinegar (unseasoned is preferred to control sweetness)
- 1/4 cup low-sodium soy sauce
- 2 tablespoons light brown sugar, packed
- 1 tablespoon honey (local honey adds a nice touch!)
- 1 tablespoon fresh ginger, grated or very finely minced
- 2-3 cloves garlic, minced (about 1 tablespoon)
- 1-2 fresh red chilies (such as Thai bird’s eye or serrano), thinly sliced or minced (adjust to your preferred spice level; remove seeds for less heat)
- 1 tablespoon cornstarch
- 2 tablespoons cold water (for the cornstarch slurry)
- 1/4 cup water (additional, for thinning the sauce if needed)
-
For Serving and Garnish:
- Cooked white rice or brown rice
- Steamed broccoli florets, snap peas, or other desired vegetables
- Toasted sesame seeds, for garnish
- Fresh green onions, thinly sliced, for garnish
Preparing the Crispy Chicken
- Prepare the Chicken Pieces: Let’s start by getting our chicken ready for its crispy adventure. Take your boneless, skinless chicken thighs or breasts and carefully cut them into uniform 1-inch bite-sized pieces. I often find that chicken thighs contribute more moisture and flavor, staying tender even after frying, but chicken breasts will work beautifully if you prefer leaner meat. The key here is uniformity; aim for pieces that are roughly the same size so they cook evenly. Once cut, the most important step for ultimate crispiness is to gently but thoroughly pat the chicken pieces very dry with paper towels. Any residual moisture will create steam during frying, which prevents the coating from adhering properly and results in a less crispy texture. So, take your time with this!
- Set Up the Dredging Station: Now, we’ll set up a classic three-part dredging station to create that perfect crust. You’ll need two shallow bowls. In the first shallow bowl, whisk together the all-purpose flour, cornstarch, salt, black pepper, garlic powder, and onion powder. The cornstarch is our secret weapon for an extra-crispy exterior, so don’t skip it! Make sure all the dry ingredients are thoroughly combined to ensure an even distribution of flavor and seasoning. In the second shallow bowl, lightly beat the two large eggs until the yolks and whites are fully incorporated into a smooth egg wash.
- Coat the Chicken Thoroughly: Working in small batches, take a handful of chicken pieces and first dredge them in the seasoned flour mixture. Ensure each piece is fully coated, then gently shake off any excess flour. Next, dip the flour-coated chicken into the beaten egg, allowing any extra egg to drip back into the bowl. Finally, return the chicken to the dry flour mixture for a second coating. This double-dredging technique is crucial for building a robust, thick crust that will become incredibly crispy and delicious when fried. As you coat each piece, place them on a clean plate or, even better, a wire rack to prevent them from sticking together. Repeat this process until all your chicken pieces are beautifully coated. For an even better adhesion and to prevent the coating from flaking off during frying, allow the coated chicken to rest at room temperature for about 10-15 minutes before proceeding. This resting period allows the flour mixture to absorb some moisture and create a stronger bond with the chicken.
Crafting the Irresistible Sweet Chili Sauce
- Combine Sauce Base Ingredients: While your perfectly coated chicken is resting, let’s get started on the star of our Sweet Chili Chicken Recipe – the incredibly flavorful sauce! In a medium saucepan or a deep skillet, combine the sweet chili sauce (whether store-bought or your quick homemade version), unseasoned rice vinegar, low-sodium soy sauce, packed light brown sugar, and honey. Give these ingredients a good stir to begin dissolving the sugars and melding the initial flavors.
- Infuse with Aromatics and Spice: Now it’s time to introduce our aromatic heavy-hitters that provide depth and warmth to the sauce. Add the freshly grated or finely minced ginger, the minced garlic, and for that essential sweet and spicy kick, the thinly sliced or minced fresh red chilies. Remember, you are the master of your kitchen, so feel free to adjust the amount of chilies to perfectly match your desired level of heat. For a milder Sweet Chili Chicken experience, you might remove the seeds from the chilies, or use fewer peppers altogether. If you’re a fan of a fiery dish, keep those seeds in and perhaps add an extra chili! Stir everything together thoroughly to ensure the aromatics are well distributed.
- Prepare the Cornstarch Slurry: To achieve that signature glossy, thick consistency for our sauce, we’ll use a cornstarch slurry. In a small separate bowl, whisk together the tablespoon of cornstarch with two tablespoons of cold water until you have a smooth, lump-free mixture. It’s important to use cold water here to prevent the cornstarch from clumping. Set this thickening agent aside for a moment.
- Simmer and Thicken the Sauce: Place the saucepan containing your sauce ingredients over medium heat. Bring the mixture to a gentle simmer, stirring occasionally, until the brown sugar is completely dissolved and the sauce starts to bubble lightly around the edges. This gentle heat allows all the flavors to meld beautifully. Once simmering, slowly pour the prepared cornstarch slurry into the sauce while continuously whisking. This constant whisking is vital to prevent any lumps from forming and to ensure the sauce thickens evenly. Continue to whisk and cook for another 1-2 minutes, or until the sauce thickens to a consistency that lightly coats the back of a spoon. If you find the sauce becomes too thick, don’t worry! You can easily thin it out by adding the additional 1/4 cup of water, a tablespoon at a time, until you achieve your desired consistency. Take a moment to taste the sauce at this stage and adjust seasonings if necessary – perhaps a pinch more salt to enhance the savory notes, a dash more vinegar for brightness, or another hint of honey to perfect the sweet and sour balance. Remove the sauce from the heat and set it aside; it will continue to thicken slightly as it cools. This beautifully crafted sauce is now ready to coat our crispy chicken.
Cooking the Crispy Chicken Perfection
- Heat the Frying Oil: In a large, heavy-bottomed skillet, a Dutch oven, or even a deep cast-iron pot, pour in enough vegetable oil (or another neutral oil like canola or peanut oil) to reach about 1 inch deep. Place the skillet over medium-high heat. For optimal crispiness and even cooking, the ideal temperature for frying is usually between 350°F and 375°F (175°C to 190°C). If you have a kitchen thermometer, it’s an invaluable tool here to ensure consistent results. If you don’t have one, you can test the oil by dropping a tiny pinch of flour or a small piece of coated chicken into it; if it sizzles vigorously and immediately, the oil is ready. Be patient and allow the oil to come to temperature gradually; rushing this step can lead to chicken that’s either undercooked or overly browned on the outside.
- Fry the Chicken in Batches: Once your oil is at the correct temperature, carefully add the coated chicken pieces to the hot oil. It is absolutely crucial not to overcrowd the pan. Frying in small batches is essential to maintain the oil temperature and ensure the chicken cooks evenly, developing that beautiful golden-brown and wonderfully crispy crust. Overcrowding will drastically lower the oil temperature, which will result in greasy, soggy chicken rather than the crisp texture we’re aiming for. Cook the chicken for about 4-6 minutes per batch, turning occasionally with tongs to ensure all sides are evenly browned and cooked. The internal temperature of the chicken should reach a safe 165°F (74°C). You’ll notice the chicken turn a gorgeous golden hue as it cooks.
- Drain the Fried Chicken: As each batch of chicken reaches that perfect golden-brown crispiness and is cooked through, carefully remove it from the hot oil using a slotted spoon or a spider strainer. Immediately transfer the fried chicken to a wire rack that’s set over a baking sheet lined with paper towels. This setup allows any excess oil to drain away efficiently, which is key to keeping the chicken as crispy as possible. For an extra boost of flavor, sprinkle a tiny pinch of salt over the hot chicken immediately after removing it from the oil – this simple step truly enhances the overall taste and makes the crust even more delightful. Repeat the frying process with the remaining chicken, always ensuring the oil returns to the proper temperature between batches before adding more chicken. Consistency is key for uniform results in your Sweet Chili Chicken Recipe.
Combining and Serving Your Sweet Chili Chicken
-
Combine Chicken and Sauce: Once all the chicken is beautifully fried, golden, and resting, it’s time for the moment of truth – bringing it all together with our incredible sweet chili sauce! You have two excellent options here, depending on your personal preference for the texture of your Sweet Chili Chicken:
- Option A (For Maximum Crispiness): If your top priority is to maintain the absolute maximum crispiness of the chicken, transfer all the freshly fried chicken to a large mixing bowl. Pour about two-thirds of the prepared sweet chili sauce over the chicken. Using a sturdy spatula or tongs, gently but quickly toss the chicken until each piece is lightly and evenly coated with the luscious sauce. This method ensures that the chicken retains its wonderful crunch right up until the moment it hits your plate, with just a delicious, glossy glaze of sauce.
- Option B (For a Fully Coated and Glazed Experience): For a more fully coated, saucier, and deeply integrated flavor experience, you can return your skillet (the one you used for frying, or a clean large wok) to a medium-low heat. Add all the fried chicken back into the pan, then pour the entire batch of sweet chili sauce over it. Toss gently but thoroughly for about 1-2 minutes, just long enough for the sauce to warm through and cling beautifully to every single piece of chicken. Be careful not to cook for too long at this stage, or the chicken will start to lose its desirable crisp texture and become softer. This option creates a more cohesive dish where the sauce truly envelops and infuses the chicken.
Personally, I often lean towards Option B for most of my Sweet Chili Chicken Recipe servings, as I absolutely adore how the sauce truly melds with the chicken. However, if I’m serving this for a party and want to ensure the chicken stays crispy for a longer duration, Option A is my definite go-to! Choose the method that best suits your craving.
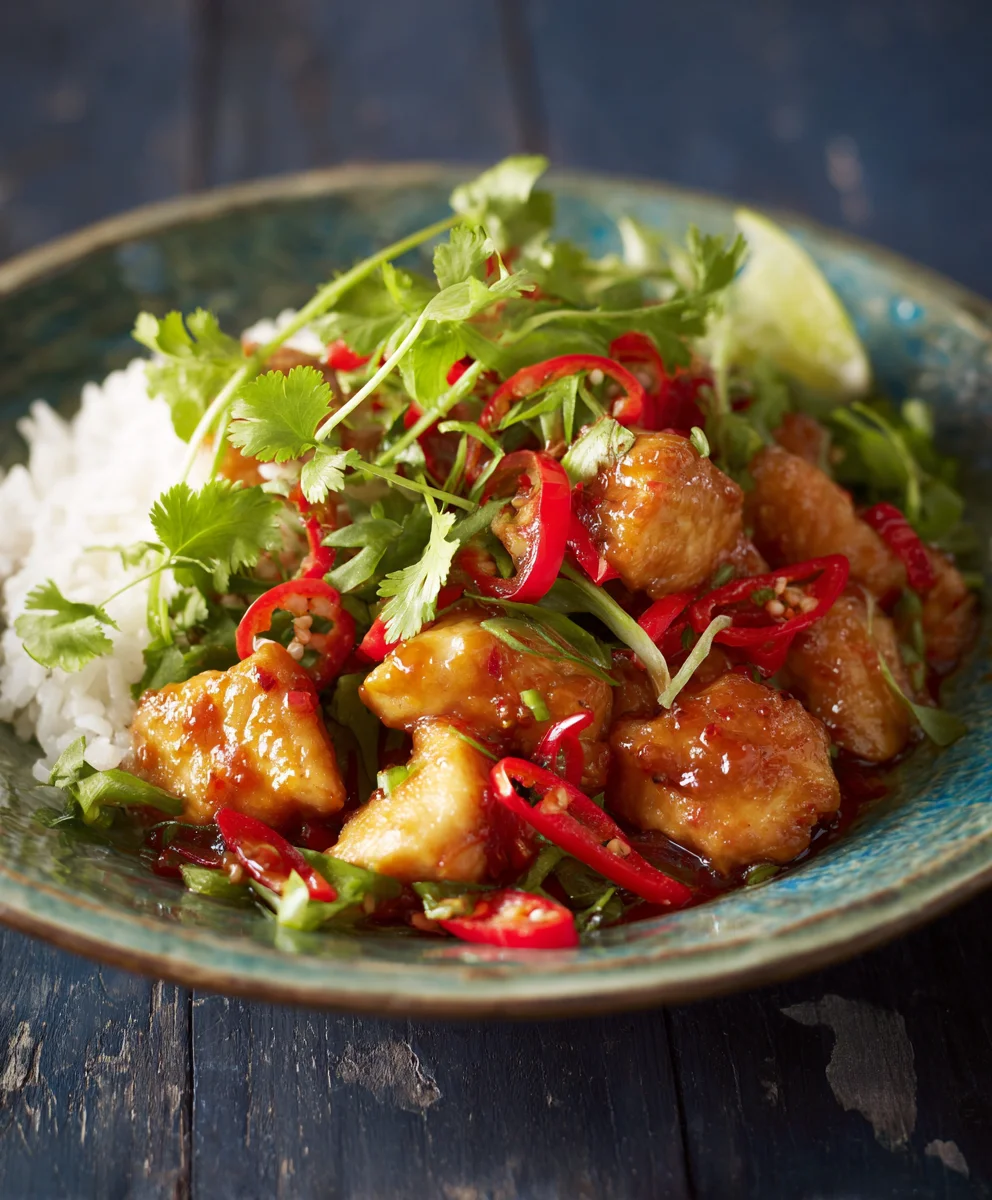
- Plate and Garnish: Now for the moment you’ve been waiting for – serving up your incredibly delicious Sweet Chili Chicken! Spoon generous portions of the sauced chicken over a fluffy bed of freshly cooked white rice, or for a heartier meal, brown rice. Alongside, serve some perfectly steamed broccoli florets or your favorite complementary vegetables, like vibrant snap peas or tender asparagus. The bright green of the vegetables provides a lovely visual contrast to the golden chicken and rich, glistening sauce, and it’s a fantastic way to add freshness and balance to your meal.
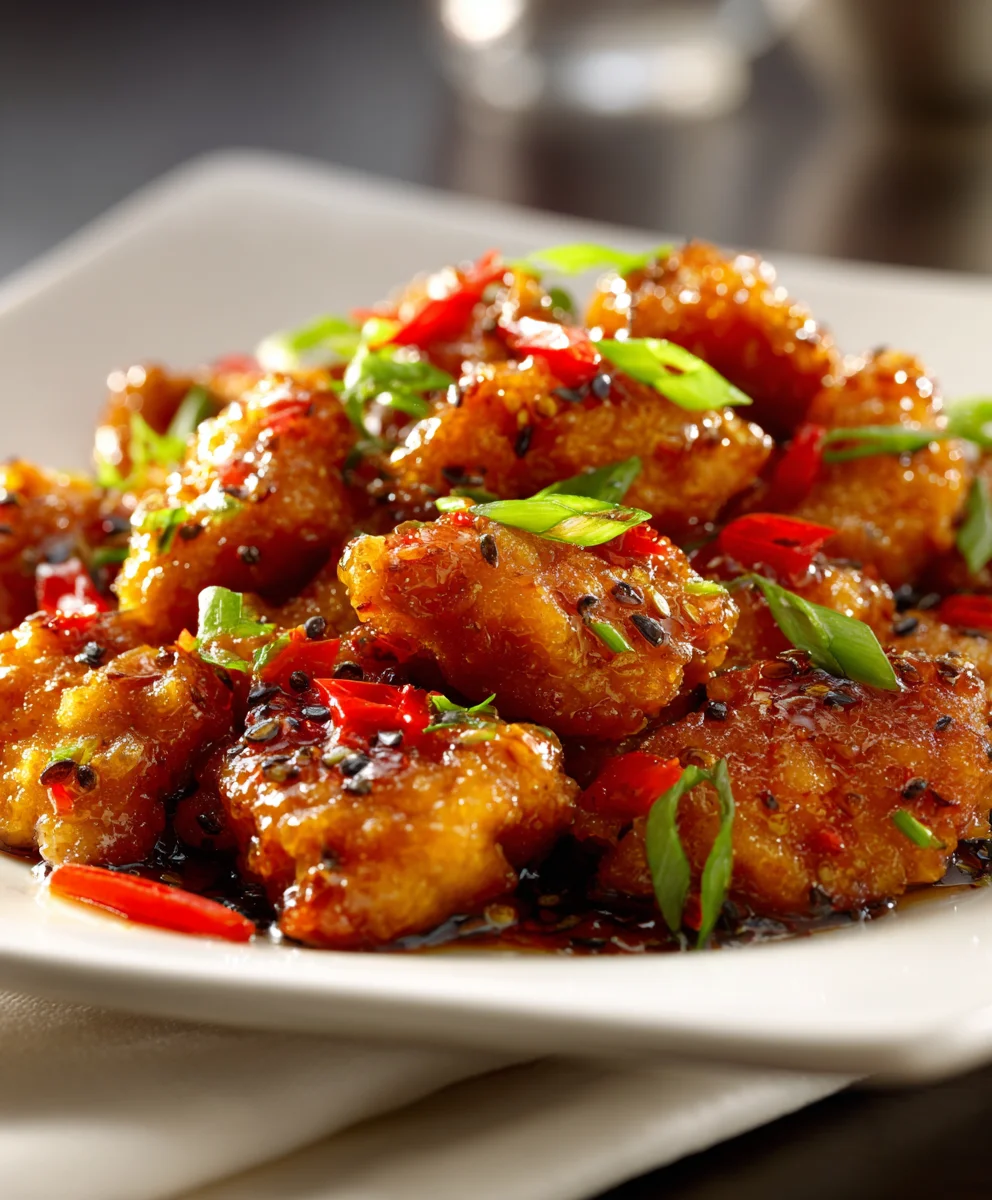
- Add the Final Touches: To achieve that desirable restaurant-quality finish and add another layer of texture, generously sprinkle your Sweet Chili Chicken with toasted sesame seeds. The sesame seeds contribute a delightful nutty crunch and an appealing visual element that makes the dish even more inviting. Finally, scatter a good amount of freshly thinly sliced green onions over the top. The bright, slightly pungent flavor of the green onions provides a fantastic, fresh counterpoint to the sweetness and spice of the dish, elevating every bite.
- Serve Immediately for Best Enjoyment: This amazing dish is truly best enjoyed fresh, when the chicken is still warm, the sauce is glistening, and the garnishes are vibrant. Take a moment to appreciate the beautiful colors, the incredible aromas, and the effort you put into creating this fantastic meal before diving into your homemade Sweet Chili Chicken. It’s a truly satisfying dish that masterfully brings together sweet, savory, and spicy notes in every glorious bite, making it a perfect weeknight dinner or a special treat!
- Storage (If by Some Miracle You Have Leftovers): Should you, by some incredible feat, have any leftovers of this delectable Sweet Chili Chicken, store them promptly in an airtight container in the refrigerator for up to 2-3 days. When reheating, it’s best done gently in a microwave or a skillet over low heat, though do keep in mind that the chicken may lose some of its original crispness. But let’s be honest, with a Sweet Chili Chicken Recipe this good, I highly doubt you’ll be faced with the challenge of storing many leftovers!
Conclusion:
And so, we arrive at the culmination of our culinary journey – the moment of truth for this truly exceptional dish. I genuinely believe that if there’s one recipe you absolutely must add to your repertoire this year, it’s this one. It transcends the realm of a simple weeknight meal, elevating the humble chicken into an extraordinary experience that delights every single one of your senses. This isn’t just about preparing food; it’s about crafting memories, about bringing vibrant flavors to your table that spark conversations and satisfied sighs. The magic of this dish lies in its exquisite balance: the initial kiss of sweetness that brightens your palate, swiftly followed by a gentle, invigorating warmth from the chili that awakens your taste buds without ever overwhelming them. Then comes the savory depth, the umami richness that ties everything together, creating a symphony of flavors that is both complex and incredibly comforting. The chicken, always tender and succulent, acts as the perfect canvas, absorbing every nuance of that glorious, glossy sauce. It’s a testament to how simple ingredients, combined with a little love and the right technique, can yield such profoundly delicious results.
Why This Sweet Chili Chicken Recipe is an Absolute Game-Changer
From the moment you take your first bite, you’ll understand why this Sweet Chili Chicken Recipe has become a staple in my kitchen and why I’m so eager for it to become one in yours. It’s the kind of dish that garners immediate compliments, making you feel like a gourmet chef without having spent hours slaving over a hot stove. It’s deceptively easy to prepare, relying on accessible ingredients that you likely already have on hand or can easily find at any grocery store. The process itself is straightforward, making it perfect for both seasoned cooks looking for a quick yet impressive meal and beginners eager to explore exciting new flavors without intimidation. Think about those busy weeknights when you crave something special but lack the time; this recipe is your savior. Or perhaps you’re hosting friends and want to serve something that looks sophisticated but comes together effortlessly – again, this is your answer. The visual appeal alone, with its glistening, amber-hued sauce and vibrant garnishes, is enough to make mouths water before anyone has even picked up a fork.
Transforming Your Meal: Serving Suggestions and Delicious Variations
One of the many beauties of this Sweet Chili Chicken is its incredible versatility. While it’s absolutely perfect as is, there are so many ways to customize it and make it your own. For a classic and incredibly satisfying meal, I highly recommend serving it alongside a generous helping of fluffy, steamed jasmine rice. The rice acts as the perfect absorbent companion, soaking up every drop of that irresistible sweet chili sauce, ensuring no flavor is left behind. If you’re a noodle lover, consider tossing the chicken and sauce with some freshly cooked egg noodles or delicate rice vermicelli for a complete and utterly delightful noodle bowl. Don’t forget the greens! A simple side of stir-fried broccoli, blanched asparagus, or a vibrant medley of bell peppers and snow peas will add a wonderful freshness and crunch, complementing the rich chicken beautifully. And for that extra flourish, a sprinkle of toasted sesame seeds, a handful of chopped fresh cilantro, and a scattering of thinly sliced spring onions not only add visual appeal but also layers of aromatic flavor and texture that truly elevate the dish.
Feeling adventurous? Let’s talk about variations. While chicken thighs are my personal favorite for their succulence, you could easily substitute with boneless, skinless chicken breasts for a leaner option, just be mindful not to overcook them. For those who prefer a different protein, this sauce works wonderfully with firm tofu (pressed and pan-fried until crispy), succulent shrimp, or even thinly sliced pork loin. Want to dial up the heat? Feel free to add an extra pinch or two of red pepper flakes, or for a fresher kick, finely mince a fresh red chili and stir it into the sauce. On the other hand, if you’re cooking for someone sensitive to spice, simply reduce the amount of chili flakes or omit them entirely. You can also play with the vegetables; sliced carrots, mushrooms, or bamboo shoots can be incorporated into the stir-fry alongside the chicken, adding more body and nutrition to your meal. A final squeeze of fresh lime juice just before serving can also introduce a bright, zesty note that cuts through the richness and adds another layer of complexity. Really, the possibilities are endless once you’ve mastered the core Sweet Chili Chicken Recipe.
Your Turn: Cook, Savor, and Share Your Culinary Triumphs!
Now that I’ve shared all my secrets and enthusiasm for this incredible dish, it’s truly your turn. I wholeheartedly encourage you to roll up your sleeves, gather your ingredients, and dive into making this Sweet Chili Chicken. Don’t hesitate; the joy of cooking this recipe is almost as satisfying as eating it. Experience for yourself the magic of transforming simple ingredients into something truly spectacular. I promise you, the aroma alone that will fill your kitchen as this dish cooks will be enough to get everyone excited for dinner. And once you’ve created your masterpiece, please don’t keep it to yourself! I would absolutely love to hear about your experience. Did you make any exciting variations? What did you serve it with? Share your culinary triumphs with me and other home cooks. Take a photo, write a comment, or simply tell a friend about how delicious your meal was. Your feedback and personal twists inspire us all and keep the culinary conversation vibrant and exciting. Happy cooking, my friends, and prepare to fall in love with your new favorite Sweet Chili Chicken!
Sweet Chili Chicken Recipe
Transform your weeknight dinner into an extraordinary culinary experience with this Sweet Chili Chicken Recipe. Succulent pieces of crispy chicken are coated in a vibrant, glossy sauce, offering an irresistible dance between gentle sweetness and a delightful, subtle kick of heat. Quick, easy, and restaurant-quality flavor for any occasion.
Ingredients
-
2 lbs chicken thighs or breasts, cut into 1-inch pieces
-
1/2 cup all-purpose flour
-
1/4 cup cornstarch
-
1 tsp salt
-
1/2 tsp black pepper
-
1/4 tsp garlic powder
-
1/4 tsp onion powder
-
2 large eggs
-
2-3 cups vegetable oil, for frying
-
1/2 cup sweet chili sauce (store-bought or homemade)
-
1/4 cup rice vinegar (unseasoned)
-
1/4 cup low-sodium soy sauce
-
2 tbsp light brown sugar
-
1 tbsp honey
-
1 tbsp fresh ginger, grated
-
2-3 cloves garlic, minced
-
1-2 fresh red chilies, sliced/minced (adjust heat)
-
1 tbsp cornstarch (for slurry)
-
2 tbsp cold water (for slurry)
-
1/4 cup water (additional, for thinning)
-
Cooked white or brown rice, for serving
-
Steamed broccoli florets or desired vegetables, for serving
-
Toasted sesame seeds, for garnish
-
Green onions, sliced, for garnish
Instructions
-
Step 1
Cut 2 lbs chicken into 1-inch pieces and pat very dry with paper towels. -
Step 2
In a shallow bowl, whisk 1/2 cup flour, 1/4 cup cornstarch, 1 tsp salt, 1/2 tsp black pepper, 1/4 tsp garlic powder, and 1/4 tsp onion powder. In a second shallow bowl, beat 2 large eggs. -
Step 3
Double-dredge chicken pieces: first in flour mix, then egg, then flour mix again. Place on a clean wire rack and let rest at room temperature for 10-15 minutes. -
Step 4
In a medium saucepan, combine 1/2 cup sweet chili sauce, 1/4 cup rice vinegar, 1/4 cup low-sodium soy sauce, 2 tbsp brown sugar, and 1 tbsp honey. Stir to dissolve the sugars. -
Step 5
Stir in 1 tbsp grated ginger, 2-3 cloves minced garlic, and 1-2 sliced/minced red chilies (adjust to preferred spice level). -
Step 6
In a small separate bowl, whisk 1 tbsp cornstarch with 2 tbsp cold water until smooth and lump-free. Set aside. -
Step 7
Place saucepan over medium heat; bring to a gentle simmer, stirring occasionally. Slowly whisk in the prepared cornstarch slurry. Continue to whisk and cook for 1-2 minutes until the sauce thickens and coats the back of a spoon. If too thick, thin with additional 1/4 cup water, one tablespoon at a time. Taste and adjust seasonings. Remove from heat. -
Step 8
In a large, heavy-bottomed skillet, pour enough vegetable oil to reach about 1 inch deep. Heat over medium-high heat to 350-375°F (175-190°C). -
Step 9
Carefully add coated chicken pieces to the hot oil in small batches. Fry for about 4-6 minutes per batch, turning occasionally, until golden-brown and cooked through (internal temperature 165°F/74°C). -
Step 10
As each batch finishes, remove chicken with a slotted spoon to a wire rack set over a paper towel-lined baking sheet. Lightly sprinkle with salt. Repeat frying for remaining chicken, ensuring oil returns to temperature between batches. -
Step 11
Choose your preferred method: (A) For maximum crispiness: Toss all fried chicken in a large mixing bowl with about two-thirds of the prepared sweet chili sauce until lightly coated. (B) For a fully glazed experience: Return skillet to medium-low heat, add all fried chicken and the entire batch of sweet chili sauce. Toss gently for 1-2 minutes until warmed and fully coated. -
Step 12
Spoon generous portions of the sauced chicken over cooked white or brown rice. Serve alongside steamed broccoli florets or your favorite complementary vegetables. -
Step 13
Generously sprinkle your Sweet Chili Chicken with toasted sesame seeds and thinly sliced green onions for garnish. -
Step 14
This dish is best enjoyed fresh when the chicken is warm and crispy. It offers a perfect balance of sweet, savory, and spicy notes. -
Step 15
Store any leftovers in an airtight container in the refrigerator for up to 2-3 days. Reheat gently in a microwave or skillet, noting chicken may lose some crispness.
Important Information
Nutrition Facts (Per Serving)
It is important to consider this information as approximate and not to use it as definitive health advice.
Allergy Information
Please check ingredients for potential allergens and consult a health professional if in doubt.


Leave a Comment