
Strawberry Lemonade Layer Cake is not just a dessert; it’s a vibrant celebration of summer, sunshine, and delightful flavors. I am absolutely thrilled to share with you a recipe that promises to be the star of any gathering, marrying the zesty tang of lemonade with the sweet, succulent burst of fresh strawberries in every glorious bite. Imagine a confection that perfectly encapsulates the quintessential tastes of warmer days, a dessert reminiscent of leisurely afternoons and joyful celebrations.
While the precise origins of combining these specific flavors into a multi-layered masterpiece might be relatively modern, both strawberry and lemonade have long held revered places in our culinary hearts, symbolizing refreshment and simple pleasures. This cake takes those beloved individual elements and elevates them into something truly extraordinary.
Why This Cake Is Unforgettable
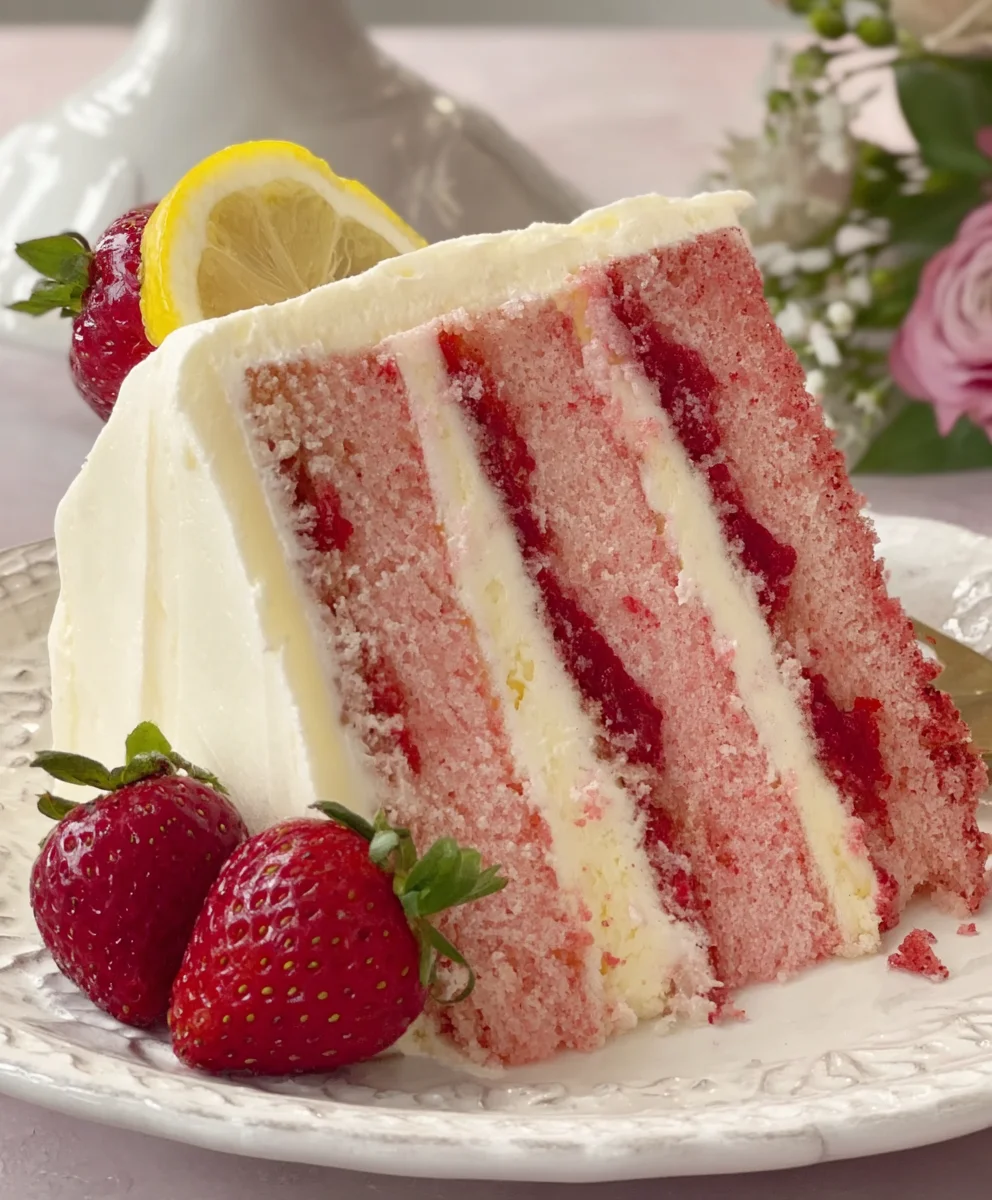
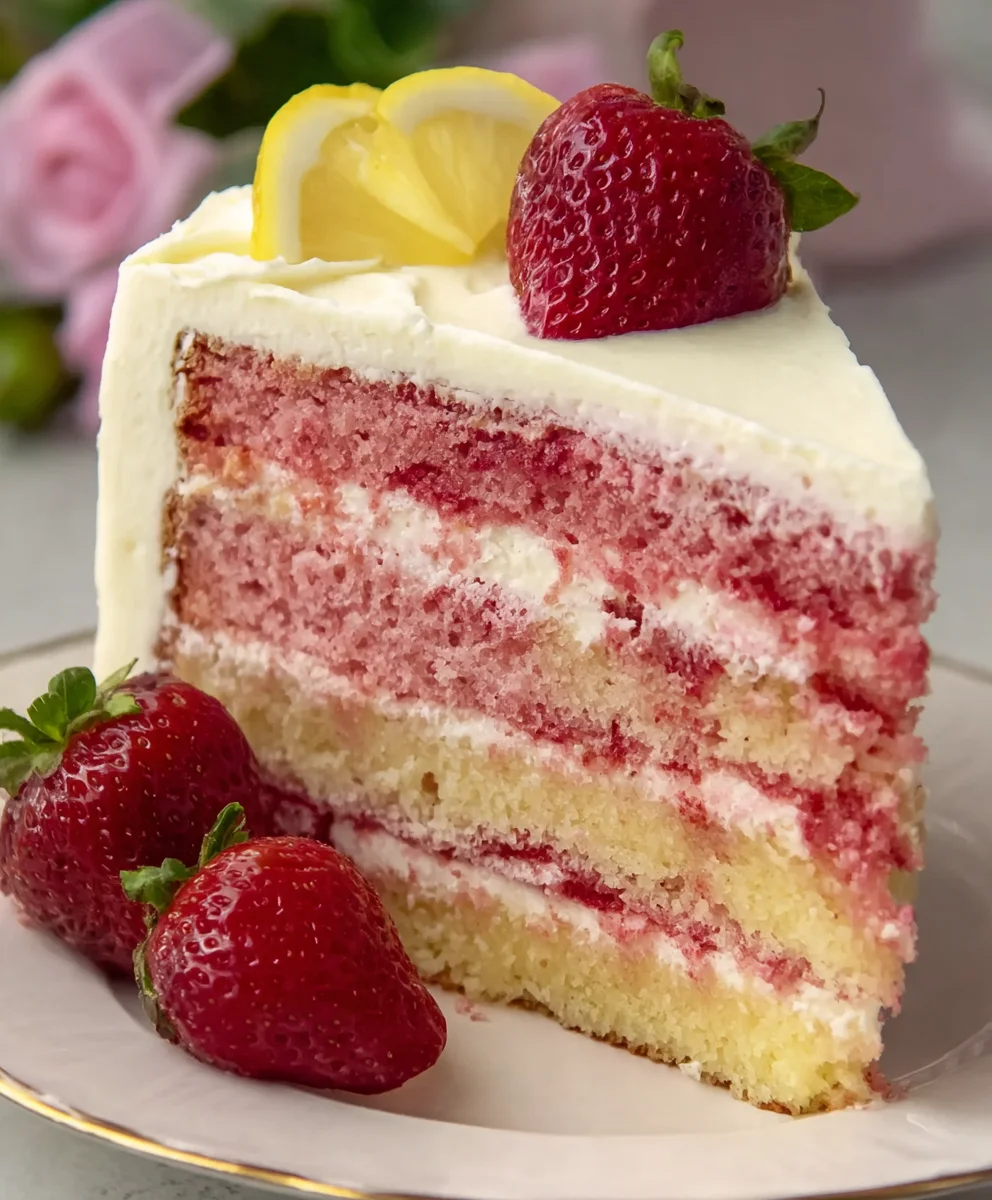
People adore the Strawberry Lemonade Layer Cake not only for its stunning presentation—a visual feast of pinks and yellows—but also for its exquisite balance of sweet and tart, its incredibly moist crumb, and the luscious, creamy frosting that ties it all together. It’s an experience, a delightful journey for your palate that brings a smile with every forkful, making every occasion feel a little more special. I truly believe you’ll find this recipe to be a refreshing escape and a new favorite.

Ingredients:
- For the Strawberry Lemonade Cake Layers:
- 3 cups (360g) all-purpose flour, sifted
- 2 teaspoons baking powder
- 1 teaspoon baking soda
- ½ teaspoon salt
- 1 ½ cups (340g) unsalted butter, softened to room temperature
- 2 ½ cups (500g) granulated sugar
- 4 large eggs, at room temperature
- 1 teaspoon pure vanilla extract
- 1 cup (240ml) buttermilk, at room temperature
- ¼ cup (60ml) fresh lemon juice
- 2 tablespoons lemon zest (from about 2 large lemons)
- Red or pink gel food coloring (optional, for a subtle pink hue)
- For the Sweet Strawberry Filling:
- 4 cups (about 1.5 lbs) fresh strawberries, hulled and diced
- ½ cup (100g) granulated sugar (adjust to taste, depending on strawberry sweetness)
- 2 tablespoons fresh lemon juice
- 2 tablespoons cornstarch
- ¼ cup (60ml) cold water
- For the Zesty Lemon Buttercream Frosting:
- 2 cups (450g) unsalted butter, softened to room temperature
- 8 cups (960g) powdered sugar (confectioners’ sugar), sifted
- ½ cup (120ml) heavy cream or whole milk, at room temperature
- ¼ cup (60ml) fresh lemon juice
- 1 tablespoon lemon zest
- 1 teaspoon pure vanilla extract
- ¼ teaspoon salt
- For Garnish (Optional):
- Fresh strawberries, halved or sliced
- Thin lemon slices or twists
- Fresh mint leaves
For the Strawberry Lemonade Layer Cake: Cake Layers
- Prepare Your Pans and Oven: First things first, let’s get organized! Preheat your oven to 350°F (175°C). Grease and flour three 8-inch round cake pans. For an extra measure of non-stick perfection, I always recommend lining the bottoms of the pans with parchment paper circles. This ensures your beautiful cake layers release without a hitch, a crucial step for achieving that pristine presentation for our delightful “Strawberry Lemonade Layer Cake”.
- Combine Dry Ingredients: In a medium bowl, whisk together the 3 cups of sifted all-purpose flour, 2 teaspoons of baking powder, 1 teaspoon of baking soda, and ½ teaspoon of salt. Sifting the flour is a little extra step that makes a big difference, ensuring your cake is light and airy. Set this dry mixture aside for now.
- Cream Butter and Sugar: In the bowl of a stand mixer fitted with the paddle attachment (or using a large bowl with an electric hand mixer), cream together the 1 ½ cups of softened unsalted butter and 2 ½ cups of granulated sugar on medium-high speed for about 3-5 minutes. You’re looking for a light, fluffy, and pale mixture. This creaming process incorporates air into the butter, which is absolutely essential for a tender cake crumb. Don’t rush this step; it’s the foundation of a fantastic cake!
- Add Eggs Gradually: Reduce the mixer speed to medium-low and add the 4 large eggs, one at a time, mixing well after each addition. Be sure to scrape down the sides of the bowl after each egg to ensure everything is fully incorporated. After the eggs, stir in the 1 teaspoon of pure vanilla extract. At this point, I sometimes add a tiny drop or two of red or pink gel food coloring if I want the cake layers to have a very subtle pink hue, which hints at the delicious strawberry lemonade flavor profile. It’s totally optional but adds a lovely visual touch.
- Alternate Wet and Dry Ingredients: In a separate small bowl or liquid measuring cup, combine the 1 cup of buttermilk and ¼ cup of fresh lemon juice. With the mixer on low speed, begin adding the dry ingredient mixture to the wet ingredients in three alternating additions with the buttermilk-lemon mixture in two additions, beginning and ending with the dry ingredients. For example, add about one-third of the dry ingredients, mix until just combined, then add half of the buttermilk-lemon mixture, mix until just combined, and so on. It is crucial not to overmix the batter once the flour is added, as this can lead to a tough cake. Mix only until just combined, with a few streaks of flour remaining.
- Fold in Lemon Zest: Gently fold in the 2 tablespoons of fresh lemon zest using a spatula. This brings a vibrant, fragrant burst of lemon right into the cake layers, complementing our “Strawberry Lemonade Layer Cake” beautifully.
- Divide and Bake: Divide the batter evenly among your three prepared 8-inch cake pans. I often use a kitchen scale to ensure precise, even layers, which makes stacking much easier later on. Smooth the tops with an offset spatula. Bake for 25-30 minutes, or until a wooden skewer or toothpick inserted into the center of a cake comes out clean.
- Cooling the Cake Layers: Once baked, remove the cakes from the oven and let them cool in their pans on a wire rack for about 10-15 minutes. This allows the cakes to set up properly before being handled. After this initial cooling, carefully invert the cakes onto the wire rack, remove the parchment paper, and let them cool completely. Allowing the cakes to cool fully is incredibly important before frosting; otherwise, your frosting will melt, and your beautiful “Strawberry Lemonade Layer Cake” will turn into a messy disaster!
For the Strawberry Lemonade Layer Cake: Sweet Strawberry Filling
- Prepare Strawberries: Hull and dice 4 cups of fresh strawberries. Try to make the pieces relatively uniform in size for even cooking. Place the diced strawberries in a medium saucepan.
- Combine with Sugar and Lemon: Add ½ cup of granulated sugar and 2 tablespoons of fresh lemon juice to the saucepan with the strawberries. Give it a good stir. The amount of sugar can be adjusted based on the sweetness of your strawberries. If your strawberries are super ripe and sweet, you might use a little less; if they’re a bit tart, you might want to add a touch more.
- Thicken the Filling: In a small separate bowl, whisk together 2 tablespoons of cornstarch and ¼ cup of cold water until smooth. This is your cornstarch slurry, which will thicken our delicious filling.
- Cook the Strawberries: Place the saucepan over medium heat. Bring the strawberry mixture to a gentle simmer, stirring occasionally. Once simmering, cook for about 5-7 minutes, or until the strawberries have softened slightly and released their juices.
- Add Slurry: Pour the cornstarch slurry into the simmering strawberry mixture, stirring constantly. Continue to cook, stirring, for another 1-2 minutes, until the mixture thickens to a consistency similar to a thick jam or pie filling. It should coat the back of a spoon.
- Cool the Filling: Remove the saucepan from the heat. Transfer the strawberry filling to a clean bowl and press a piece of plastic wrap directly onto the surface of the filling to prevent a skin from forming. Let it cool completely to room temperature, then transfer it to the refrigerator to chill for at least 1-2 hours, or until firm. A well-chilled filling is essential for easy layering and to prevent it from oozing out of your cake! This filling will be a star in our “Strawberry Lemonade Layer Cake”.
For the Strawberry Lemonade Layer Cake: Zesty Lemon Buttercream Frosting
- Cream the Butter: In the bowl of a stand mixer fitted with the paddle attachment, or with a large bowl and an electric hand mixer, beat 2 cups of softened unsalted butter on medium-high speed for 5-7 minutes until it becomes very pale and fluffy. This step is critical for a light, airy buttercream. Don’t skimp on the creaming time here; it truly makes a difference in the texture of your frosting.
- Add Powdered Sugar Gradually: Reduce the mixer speed to low. Gradually add the 8 cups of sifted powdered sugar, one cup at a time, mixing well after each addition until fully incorporated. The powdered sugar should be sifted to prevent lumps, which can make your frosting grainy. Start slowly to avoid a sugar cloud! Once all the sugar is added, increase the speed to medium and beat for another 2-3 minutes.
- Incorporate Liquids and Flavorings: With the mixer still on low speed, slowly pour in ½ cup of heavy cream (or whole milk), ¼ cup of fresh lemon juice, and 1 teaspoon of pure vanilla extract. Add ¼ teaspoon of salt to balance the sweetness. Once these liquids are incorporated, add 1 tablespoon of fresh lemon zest.
- Whip Until Fluffy: Increase the mixer speed to medium-high and beat for another 3-5 minutes, scraping down the sides of the bowl frequently. You want the frosting to be incredibly light, fluffy, and spreadable. The lemon zest will infuse the buttercream with a bright, zesty aroma and flavor, making this the perfect complement to our “Strawberry Lemonade Layer Cake”. If the frosting is too thick, add a tiny bit more cream, 1 teaspoon at a time. If it’s too thin, add a little more sifted powdered sugar.
- Set Aside: Once your frosting has reached that perfect consistency, cover the bowl with plastic wrap until you are ready to assemble the cake.
Assembling Your Strawberry Lemonade Layer Cake
- Level the Cake Layers: Ensure your cake layers are completely cool. Using a serrated knife or a cake leveler, gently level the tops of each cake layer so they are perfectly flat. This will make stacking much easier and result in a more professional-looking cake.
- First Layer of Frosting: Place one leveled cake layer on your serving plate or cake stand. If you want to secure it, add a small dollop of frosting to the center of the plate before placing the first layer down. Spread about 1 cup of the lemon buttercream frosting evenly over the top of this layer, leaving a small border around the edge.
- Create a Frosting Dam: Using a piping bag fitted with a round tip (or a Ziploc bag with the corner snipped off), pipe a thick “dam” or border of lemon buttercream around the outer edge of the frosted cake layer. This dam will hold our glorious strawberry filling in place and prevent it from oozing out. This step is vital for a clean and sturdy “Strawberry Lemonade Layer Cake”.
- Add Strawberry Filling: Carefully spoon about half of your chilled strawberry filling into the center of the frosting dam, spreading it evenly within the border. Be gentle not to push it over the dam.
- Second Cake Layer: Carefully place the second cake layer on top, pressing down gently to ensure it’s level. Repeat the process: spread another cup of lemon buttercream, pipe a frosting dam, and fill with the remaining strawberry filling.
- Top with Final Layer: Place the third and final cake layer on top. Press down very gently.
- Crumb Coat: Now for the crumb coat! Apply a very thin layer of lemon buttercream all over the top and sides of the entire cake. This traps any loose crumbs, creating a smooth canvas for your final frosting layer. Don’t worry about perfection here; this layer is just for sealing. This crumb coat is a secret weapon for a truly polished “Strawberry Lemonade Layer Cake.”
- Chill the Cake: Once the crumb coat is applied, place the cake in the refrigerator for at least 20-30 minutes, or until the frosting is firm to the touch. This chilling time sets the crumb coat and makes the final frosting much easier.
- Final Frosting Layer: Remove the chilled cake from the refrigerator. Apply the remaining lemon buttercream frosting to the top and sides of the cake. Use an offset spatula or a bench scraper to smooth out the frosting for a beautiful finish. Take your time, adding more frosting as needed to achieve your desired look. I love a rustic swirl, but a super smooth finish is also gorgeous!
- Decorate Your Masterpiece: This is where your “Strawberry Lemonade Layer Cake” truly comes to life! Arrange fresh strawberry halves or slices around the top edge or in the center. Add thin lemon slices or elegant lemon twists for that vibrant citrus pop. A few fresh mint leaves can also add a beautiful touch of color and freshness.
- Serve and Enjoy: Once decorated, your magnificent Strawberry Lemonade Layer Cake is ready to be admired and, most importantly, devoured! Slice with a sharp, warm knife (wipe the knife clean between slices for neat cuts) and serve. This cake is best served at room temperature or slightly chilled. If you have any leftovers (which is unlikely, trust me!), store them in an airtight container in the refrigerator for up to 3-4 days. Allow it to come to room temperature for about 30 minutes before serving again for the best texture and flavor.
Conclusion:
My culinary journey with this particular dessert has been nothing short of delightful, and I genuinely believe that once you experience it, you’ll feel the same profound satisfaction. This isn’t just another cake; it’s a vibrant symphony of flavors, a true showstopper that captivates both the eyes and the palate. The combination of sweet, juicy strawberries and the bright, zesty tang of lemon creates an unforgettable harmony, making every single bite a pure moment of bliss. It’s an unparalleled indulgence that transcends the ordinary, offering a fresh perspective on what a dessert can truly be. The layers are incredibly moist, the crumb tender, and the frosting, oh, the frosting! It’s light, creamy, and perfectly balances the intensity of the fruit. This truly is a recipe that lives up to its promise of being utterly spectacular, designed to impress yet surprisingly accessible for the home baker.
It’s the kind of dessert that elicits gasps of admiration when presented, and then blissful sighs of contentment when tasted. I’ve personally witnessed the sheer joy it brings to gatherings, transforming a simple meal into a memorable occasion. The effort, which I promise is more enjoyable than daunting, is repaid tenfold by the incredible reward of a homemade masterpiece. It strikes that perfect balance: elegant enough for the most sophisticated dinner party, yet comforting and familiar enough for a casual family brunch. If you’ve been searching for that one special dessert that truly stands out from the crowd, something that feels both celebratory and deeply satisfying, your search ends here. It’s a testament to the fact that classic flavors, when brought together with a touch of thoughtfulness, can create something truly extraordinary. This Strawberry Lemonade Layer Cake isn’t just a recipe; it’s an experience waiting to unfold in your kitchen.
When it comes to serving, this magnificent cake is incredibly versatile. For a sophisticated dessert, a thin slice served alongside a scoop of vanilla bean ice cream or a dollop of freshly whipped cream can elevate it further, though it shines brightly all on its own. Imagine it as the centerpiece for a summer garden party, its cheerful colors reflecting the sunshine, or bringing a burst of freshness to a winter celebration, reminding everyone of warmer days. It pairs beautifully with a delicate cup of Earl Grey tea, a glass of chilled Prosecco, or even a simple iced coffee for an afternoon treat. Don’t be afraid to experiment with your presentation – a sprinkle of edible glitter, a few whole fresh strawberries, or a twist of lemon zest can add that final, personal touch. For a more casual setting, a generous slice makes an ideal accompaniment to a celebratory brunch, offering a sweet and tangy counterpoint to savory dishes.
And let’s talk about variations – this is where you can truly make the recipe your own! If strawberries aren’t in season, or if you simply prefer a different berry, try substituting them with raspberries or even a mix of berries; the vibrant tartness will still work wonderfully with the lemon. For an extra touch of decadence, consider adding a thin layer of lemon curd between the cake layers before frosting, intensifying that citrus punch. If you’re not a fan of buttercream, a light cream cheese frosting infused with lemon zest would be an exquisite alternative, adding a slightly different texture and tang. For those who prefer smaller, individual portions, this recipe adapts beautifully to cupcakes; simply adjust the baking time and frosting method. You could even bake it in a sheet pan for an easier-to-serve dessert at larger gatherings. The possibilities are truly endless, allowing you to tailor this sensational dessert to your specific tastes and needs, making it a staple in your baking repertoire for years to come. It’s a canvas for your creativity, inviting you to personalize every delicious detail.
So, what are you waiting for? I wholeheartedly encourage you to carve out some time this week, gather your ingredients, and embark on the joyous journey of creating this incredible dessert. Don’t be intimidated by the layers; I’ve designed the recipe to be as straightforward and rewarding as possible. There’s an unparalleled sense of accomplishment that comes from presenting a homemade cake of this caliber, especially one that tastes as amazing as it looks. The smiles, the compliments, and the pure enjoyment of those you share it with will be all the reward you need. And please, when you do bake it, I would absolutely love to hear about your experience! Share your photos, your triumphs, and any clever variations you come up with. Tag me if you post about it online, or simply drop a comment below. Your stories and feedback truly inspire me, and I’m always thrilled to see how these recipes come to life in your kitchens. Go forth and bake this glorious Strawberry Lemonade Layer Cake! You won’t regret a single moment of it.
Strawberry Lemonade Layer Cake
Strawberry Lemonade Layer Cake is a vibrant celebration of summer, sunshine, and delightful flavors, marrying the zesty tang of lemonade with the sweet, succulent burst of fresh strawberries in every glorious bite. This recipe promises to be the star of any gathering, offering a perfect balance of sweet and tart with an incredibly moist crumb and luscious, creamy frosting.
Ingredients
-
3 cups all-purpose flour, sifted
-
2 teaspoons baking powder
-
1 teaspoon baking soda
-
½ teaspoon salt
-
1 ½ cups unsalted butter, softened
-
2 ½ cups granulated sugar
-
4 large eggs, room temperature
-
1 teaspoon pure vanilla extract
-
1 cup buttermilk, room temperature
-
¼ cup fresh lemon juice
-
2 tablespoons lemon zest
-
Red or pink gel food coloring (optional)
-
4 cups fresh strawberries, hulled and diced
-
½ cup granulated sugar (for filling, adjust to taste)
-
2 tablespoons fresh lemon juice (for filling)
-
2 tablespoons cornstarch
-
¼ cup cold water
-
2 cups unsalted butter, softened (for frosting)
-
8 cups powdered sugar, sifted
-
½ cup heavy cream or whole milk
-
¼ cup fresh lemon juice (for frosting)
-
1 tablespoon lemon zest (for frosting)
-
1 teaspoon pure vanilla extract (for frosting)
-
¼ teaspoon salt (for frosting)
-
Fresh strawberries (for garnish, optional)
-
Thin lemon slices or twists (for garnish, optional)
-
Fresh mint leaves (for garnish, optional)
Instructions
-
Step 1
Preheat oven to 350°F (175°C). Grease, flour, and line three 8-inch round cake pans with parchment paper. -
Step 2
Whisk together flour, baking powder, baking soda, and salt. Set aside. -
Step 3
In a stand mixer, cream softened butter and granulated sugar for 3-5 minutes until light and fluffy. -
Step 4
Add eggs one at a time, then stir in vanilla extract. Optional: add a drop of pink gel food coloring. -
Step 5
Combine buttermilk and lemon juice. Alternately add dry mixture (in 3 parts) and buttermilk-lemon mixture (in 2 parts) to wet ingredients. Mix until just combined. -
Step 6
Gently fold in lemon zest. -
Step 7
Divide batter evenly among pans. Bake for 25-30 minutes, or until a wooden skewer comes out clean. -
Step 8
Cool cakes in pans for 10-15 minutes, then invert onto a wire rack to cool completely. -
Step 9
Place diced strawberries in a saucepan with sugar (adjust to taste) and lemon juice. Bring to a gentle simmer; cook 5-7 minutes until softened. -
Step 10
Whisk cornstarch with cold water to form a slurry. Stir slurry into simmering strawberries; cook 1-2 minutes until thickened. -
Step 11
Transfer filling to a bowl, cover surface with plastic wrap, and chill 1-2 hours until firm. -
Step 12
In a stand mixer, beat softened butter for 5-7 minutes until very pale and fluffy. -
Step 13
Gradually add sifted powdered sugar on low speed, then beat on medium for 2-3 minutes. -
Step 14
Slowly add heavy cream (or whole milk), lemon juice, vanilla extract, and salt. Add lemon zest. -
Step 15
Increase mixer speed to medium-high; beat for 3-5 minutes until incredibly light and fluffy. Cover until ready to assemble. -
Step 16
Level cooled cake layers with a serrated knife. -
Step 17
Place first cake layer on serving plate. Spread ~1 cup buttercream, leaving a border. Pipe a thick buttercream dam around the edge. -
Step 18
Spoon half of chilled strawberry filling into the center of the dam. -
Step 19
Place second cake layer. Repeat frosting, dam, and remaining filling steps. -
Step 20
Place the third and final cake layer on top. -
Step 21
Apply a thin crumb coat of buttercream to the cake. Chill cake for 20-30 minutes until firm. -
Step 22
Apply remaining buttercream to the cake, smoothing as desired. Garnish with fresh strawberries, lemon slices/twists, and mint leaves (optional). -
Step 23
Slice with a sharp, warm knife and serve at room temperature or slightly chilled. Store leftovers in an airtight container in the refrigerator for up to 3-4 days; allow to come to room temperature before serving for best flavor.
Important Information
Nutrition Facts (Per Serving)
It is important to consider this information as approximate and not to use it as definitive health advice.
Allergy Information
Please check ingredients for potential allergens and consult a health professional if in doubt.


Leave a Comment