
Shamrock Pancakes: Imagine starting your St. Patrick’s Day with a stack of fluffy, vibrant green pancakes! These aren’t just any breakfast treat; they’re a festive way to celebrate Irish heritage and bring a touch of magic to your morning. Forget the same old routine this year, let’s make breakfast an event!
Pancakes, in their simplest form, have been around for centuries, gracing tables in various cultures. But the addition of green coloring, transforming them into Shamrock Pancakes, is a relatively modern, playful twist, perfectly aligned with the jovial spirit of St. Patrick’s Day. It’s a fun way to involve kids in the holiday celebrations and create lasting memories.
What’s not to love? These pancakes are incredibly easy to make, requiring minimal ingredients and effort. The vibrant green color is visually appealing, and the fluffy texture combined with the sweet, comforting taste of pancakes is a guaranteed crowd-pleaser. Whether you top them with whipped cream, syrup, or a sprinkle of green sprinkles, Shamrock Pancakes are sure to bring a smile to everyone’s face. Plus, they’re a fantastic way to sneak in a little extra green food coloring a St. Patrick’s Day must!

Ingredients:
- 1 1/2 cups all-purpose flour
- 3 1/2 teaspoons baking powder
- 1/4 teaspoon baking soda
- 1 tablespoon granulated sugar
- 1/4 teaspoon salt
- 1 1/4 cups buttermilk
- 1 large egg, lightly beaten
- 2 tablespoons unsalted butter, melted, plus more for greasing
- 1 teaspoon vanilla extract
- Green food coloring (gel food coloring recommended)
- Chocolate chips (optional)
- Whipped cream (optional, for serving)
- Sprinkles (optional, for serving)
- Maple syrup (for serving)
Preparing the Green Pancake Batter
Alright, let’s get started! First things first, we need to get our dry ingredients all mixed up. This ensures that the baking powder and baking soda are evenly distributed, which is key for fluffy pancakes.
- In a large bowl, whisk together the flour, baking powder, baking soda, sugar, and salt. Make sure you really whisk it well no one wants a clump of baking powder in their pancake!
- In a separate bowl, whisk together the buttermilk, egg, melted butter, and vanilla extract. The buttermilk adds a lovely tang and helps to create a tender pancake.
- Now, pour the wet ingredients into the dry ingredients. Gently fold them together until just combined. Do not overmix! A few lumps are perfectly fine. Overmixing will develop the gluten in the flour, resulting in tough pancakes.
- This is where the magic happens! Add green food coloring, a few drops at a time, until you reach your desired shade of green. I recommend using gel food coloring because it’s more concentrated and won’t thin out the batter as much as liquid food coloring. Start with a few drops and mix well, then add more until you get that perfect Shamrock green.
- If you’re feeling extra festive, you can gently fold in some chocolate chips at this point. I love the combination of green pancakes and chocolate chips, but it’s totally optional!
Cooking the Shamrock Pancakes
Now for the fun part cooking the pancakes! The key here is to use a lightly greased griddle or frying pan over medium heat. You want the pan hot enough to cook the pancakes through, but not so hot that they burn on the outside before the inside is cooked.
- Heat a lightly greased griddle or large frying pan over medium heat. You can use butter, oil, or cooking spray to grease the pan. I prefer butter for the flavor, but be careful not to let it burn.
- To test if the griddle is hot enough, sprinkle a few drops of water onto the surface. If the water sizzles and evaporates quickly, the griddle is ready.
- Pour 1/4 cup of batter onto the hot griddle for each pancake. You can use a measuring cup or a ladle to ensure even-sized pancakes.
- Cook for 2-3 minutes per side, or until golden brown and cooked through. You’ll know it’s time to flip the pancakes when bubbles start to form on the surface and the edges look set.
- Gently flip the pancakes with a spatula and cook for another 2-3 minutes, or until golden brown on the other side.
- Repeat with the remaining batter, greasing the griddle as needed.
Creating the Shamrock Shape (Optional)
If you want to take your Shamrock pancakes to the next level, you can create a Shamrock shape! There are a few ways to do this:
Using a Cookie Cutter:
- Cook the pancakes as directed above.
- Once the pancakes are cooked, use a Shamrock-shaped cookie cutter to cut out the shapes.
- You can then arrange the Shamrock pancakes on a plate and decorate them with whipped cream and sprinkles.
Piping the Shape:
- Transfer some of the green batter to a piping bag or a zip-top bag with a corner snipped off.
- On the hot griddle, pipe the outline of a Shamrock shape.
- Fill in the outline with more batter.
- Cook as directed above. This method requires a bit more practice, but it’s a fun way to create custom Shamrock pancakes.
Freehanding It:
- Pour the batter onto the griddle in three separate circles that slightly overlap to form the three leaves of the shamrock.
- Use the spatula to gently shape the batter into a more defined shamrock shape as it cooks.
- Add a small strip of batter for the stem.
- Cook as directed above. This method requires a steady hand and a bit of artistic flair!
Serving Your Shamrock Pancakes
Now for the best part serving and enjoying your delicious Shamrock pancakes! There are so many ways to dress them up and make them extra special.
- Stack the pancakes on a plate and top with whipped cream, sprinkles, and a drizzle of maple syrup.
- You can also add fresh fruit, such as berries or bananas, for a healthy and colorful touch.
- For a more decadent treat, try adding chocolate sauce or a scoop of ice cream.
- Don’t forget the maple syrup! Warm maple syrup is the perfect complement to these fluffy green pancakes.
- Serve immediately and enjoy! These pancakes are best enjoyed fresh off the griddle.
Tips and Tricks for Perfect Pancakes
Here are a few extra tips and tricks to help you make the best Shamrock pancakes ever:
- Don’t overmix the batter: As I mentioned earlier, overmixing will result in tough pancakes. Mix the wet and dry ingredients until just combined, leaving a few lumps.
- Use a hot griddle: A hot griddle is essential for evenly cooked pancakes. Test the griddle by sprinkling a few drops of water onto the surface. If the water sizzles and evaporates quickly, the griddle is ready.
- Grease the griddle lightly: Use butter, oil, or cooking spray to grease the griddle. Be careful not to use too much grease, as this can make the pancakes greasy.
- Don’t flip the pancakes too early: Wait until bubbles start to form on the surface and the edges look set before flipping the pancakes. Flipping them too early can cause them to stick to the griddle.
- Keep the pancakes warm: If you’re making a large batch of pancakes, you can keep them warm in a preheated oven (200°F) until ready to serve. Place the cooked pancakes on a baking sheet in a single layer.
- Get creative with toppings: Don’t be afraid to experiment with different toppings! Whipped cream, sprinkles, fresh fruit, chocolate sauce, and ice cream are all great options.
- Make them ahead of time: You can make the pancake batter ahead of time and store it in the refrigerator for up to 24 hours. Just be sure to give it a good stir before cooking.
- Freeze the pancakes: Cooked pancakes can be frozen for up to 2 months. Let them cool completely, then wrap them individually in plastic wrap and place them in a freezer bag. To reheat, simply microwave them for a few seconds or toast them in a toaster.
Variations and Add-Ins
Want to switch things up a bit? Here are some fun variations and add-ins to try:
- Chocolate Chip Shamrock Pancakes: Fold chocolate chips into the batter before cooking.
- Blueberry Shamrock Pancakes: Fold fresh or frozen blueberries into the batter before cooking.
- Rainbow Sprinkles Shamrock Pancakes: Fold rainbow sprinkles into the batter before cooking.
- Oatmeal Shamrock Pancakes: Add 1/2 cup of rolled oats to the batter for a heartier pancake.
- Whole Wheat Shamrock Pancakes: Substitute half of the all-purpose flour with whole wheat flour for a healthier pancake.
- Vegan Shamrock Pancakes: Use plant-based milk and a flax egg (1 tablespoon ground flaxseed mixed with 3 tablespoons water) in place of the buttermilk and egg.
Troubleshooting Common Pancake Problems
Sometimes, even with the best intentions, things can go wrong. Here’s how to troubleshoot some common pancake problems:
- Pancakes are flat: This is usually caused by using old baking powder or overmixing the batter. Make sure your baking powder is fresh and don’t overmix the batter.
- Pancakes are tough

Conclusion:
So, there you have it! These Shamrock Pancakes are more than just a breakfast; they’re a celebration on a plate, a burst of fun, and a guaranteed way to start your day (or someone else’s!) with a smile. I truly believe this recipe is a must-try, and here’s why: it’s incredibly easy to follow, even for novice cooks. The vibrant green color is naturally derived, so you can feel good about what you’re feeding yourself and your loved ones. And most importantly, they taste absolutely delicious! The subtle vanilla and almond extracts elevate the flavor profile beyond your average pancake, creating a truly memorable breakfast experience. But the fun doesn’t stop there! Feel free to get creative with your serving suggestions and variations. For a truly decadent treat, top your stack of Shamrock Pancakes with a dollop of whipped cream and a sprinkle of green sprinkles. A drizzle of maple syrup is, of course, a classic choice, but why not try something a little different? A homemade berry compote would add a touch of sweetness and tartness, perfectly complementing the pancakes’ subtle flavors. Or, for a more savory option, consider serving them with a side of crispy bacon or sausage. If you’re feeling adventurous, you can even experiment with different flavor combinations. Add a handful of chocolate chips to the batter for a chocolatey twist. Or, incorporate some chopped nuts for added texture and flavor. For a healthier option, substitute some of the all-purpose flour with whole wheat flour and add a tablespoon of flaxseed meal. You could even add a swirl of cream cheese filling to the center of each pancake while they’re cooking for an extra layer of richness. The possibilities are endless!Serving Suggestions and Variations:
* Classic: Maple syrup and butter. * Decadent: Whipped cream and green sprinkles. * Fruity: Berry compote or fresh berries. * Savory: Bacon or sausage. * Chocolatey: Chocolate chips in the batter. * Nutty: Chopped nuts in the batter. * Healthy: Whole wheat flour and flaxseed meal. * Rich: Cream cheese filling swirl. I’ve poured my heart into perfecting this recipe, and I’m confident that you’ll love it as much as I do. The key to truly great Shamrock Pancakes lies in not overmixing the batter. A few lumps are perfectly fine; in fact, they’ll help ensure that your pancakes are light and fluffy. And don’t be afraid to experiment with the amount of food coloring to achieve your desired shade of green. Remember, the goal is to have fun and create something delicious! So, what are you waiting for? Gather your ingredients, put on your favorite music, and get ready to whip up a batch of these magical Shamrock Pancakes. I promise you won’t be disappointed. And most importantly, I’d love to hear about your experience! Did you try any of the variations I suggested? Did you come up with your own creative twist? Share your photos and stories in the comments below. I can’t wait to see what you create! Happy cooking, and may the luck of the Irish be with you! Let me know if you have any questions, and I’ll do my best to help. Enjoy! Print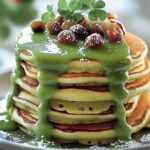
Shamrock Pancakes: A Delicious and Festive Recipe
- Total Time: 25 minutes
- Yield: 8–10 pancakes 1x
Description
Fluffy and festive green Shamrock Pancakes, perfect for St. Patrick’s Day! Easy to make and customizable with chocolate chips, whipped cream, sprinkles, and maple syrup.
Ingredients
- 1 1/2 cups all-purpose flour
- 3 1/2 teaspoons baking powder
- 1/4 teaspoon baking soda
- 1 tablespoon granulated sugar
- 1/4 teaspoon salt
- 1 1/4 cups buttermilk
- 1 large egg, lightly beaten
- 2 tablespoons unsalted butter, melted, plus more for greasing
- 1 teaspoon vanilla extract
- Green food coloring (gel food coloring recommended)
- Chocolate chips (optional)
- Whipped cream (optional, for serving)
- Sprinkles (optional, for serving)
- Maple syrup (for serving)
Instructions
- Prepare Dry Ingredients: In a large bowl, whisk together the flour, baking powder, baking soda, sugar, and salt.
- Prepare Wet Ingredients: In a separate bowl, whisk together the buttermilk, egg, melted butter, and vanilla extract.
- Combine Wet and Dry: Pour the wet ingredients into the dry ingredients. Gently fold until just combined. Do not overmix; a few lumps are fine.
- Add Green Food Coloring: Add green food coloring, a few drops at a time, until you reach your desired shade of green. Gel food coloring is recommended.
- (Optional) Add Chocolate Chips: Gently fold in chocolate chips, if desired.
- Heat Griddle: Heat a lightly greased griddle or large frying pan over medium heat.
- Cook Pancakes: Pour 1/4 cup of batter onto the hot griddle for each pancake.
- Flip and Cook: Cook for 2-3 minutes per side, or until golden brown and cooked through. Flip when bubbles start to form on the surface.
- Repeat: Repeat with the remaining batter, greasing the griddle as needed.
- Serve: Stack the pancakes and top with whipped cream, sprinkles, and maple syrup. Add fresh fruit or chocolate sauce if desired. Serve immediately.
Notes
- Don’t Overmix: Overmixing the batter will result in tough pancakes.
- Hot Griddle: A hot griddle is essential for evenly cooked pancakes. Test by sprinkling a few drops of water onto the surface.
- Grease Lightly: Use butter, oil, or cooking spray to grease the griddle.
- Don’t Flip Too Early: Wait until bubbles form on the surface before flipping.
- Keep Warm: Keep cooked pancakes warm in a preheated oven (200°F) until ready to serve.
- Get Creative: Experiment with different toppings!
- Make Ahead: Pancake batter can be made ahead of time and stored in the refrigerator for up to 24 hours.
- Freeze: Cooked pancakes can be frozen for up to 2 months.
- Prep Time: 10 minutes
- Cook Time: 15 minutes


Leave a Comment