
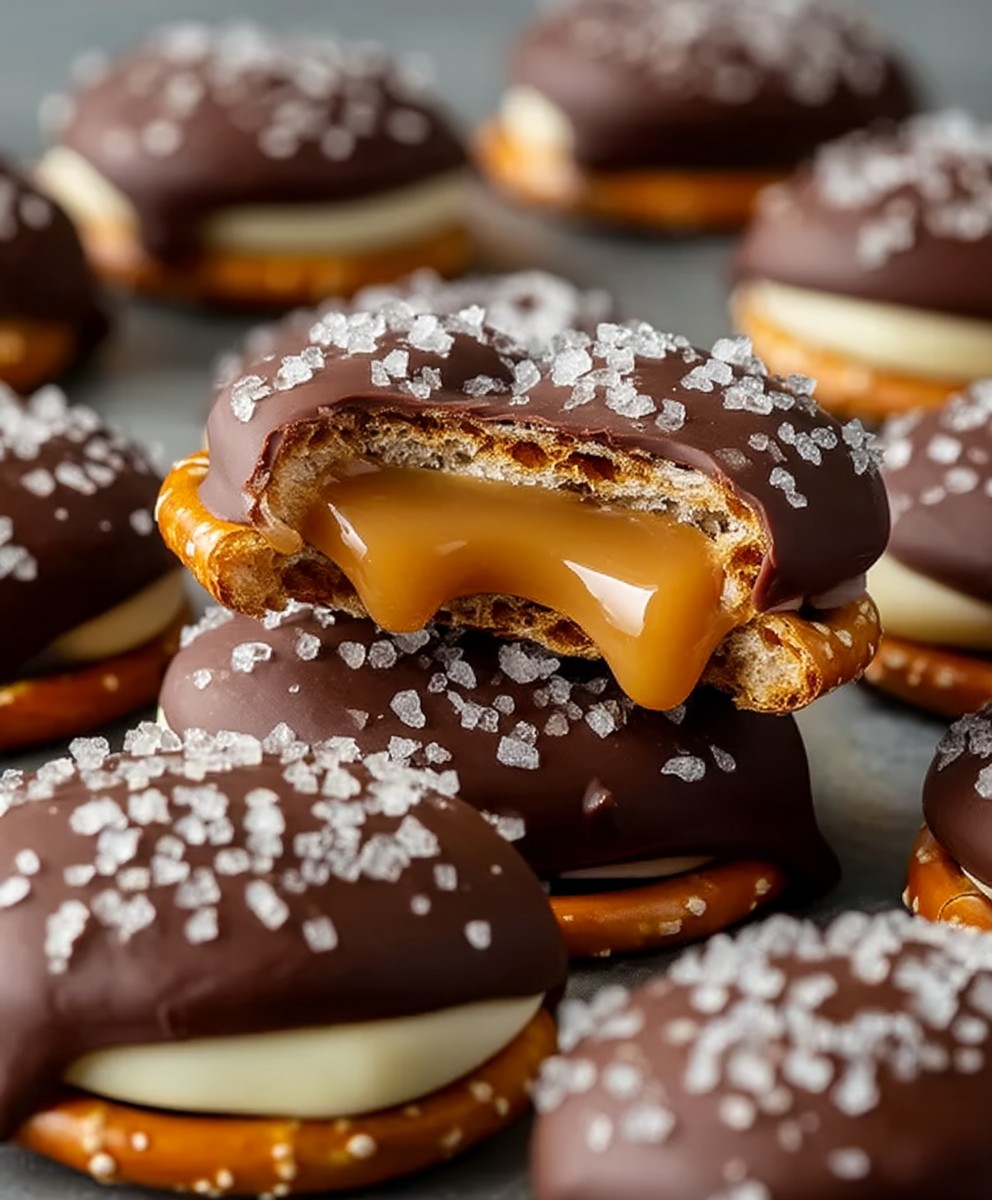
Salted Caramel Chocolate Pretzels: Prepare to enter a realm of irresistible indulgence! Imagine the satisfying crunch of a salty pretzel, enveloped in smooth, rich chocolate, and then drizzled with luscious, homemade salted caramel. It’s a symphony of flavors and textures that will have your taste buds singing. This isn’t just a snack; it’s an experience.
While the exact origins of combining pretzels, chocolate, and caramel are somewhat shrouded in delicious mystery, the concept of balancing sweet and salty flavors has been a culinary pursuit for centuries. The pretzel itself boasts a history stretching back to medieval Europe, while chocolate’s journey from bitter Aztec beverage to beloved confection is equally fascinating. The addition of salted caramel, a more modern innovation, elevates this treat to a whole new level of sophistication.
What makes these Salted Caramel Chocolate Pretzels so universally adored? It’s the perfect marriage of contrasting elements. The saltiness of the pretzel cuts through the sweetness of the chocolate and caramel, creating a balanced and addictive flavor profile. The crunchy pretzel provides a delightful textural contrast to the smooth chocolate and gooey caramel. Plus, they’re incredibly easy to make, requiring minimal effort for maximum reward. Whether you’re looking for a quick and easy dessert, a crowd-pleasing party snack, or a thoughtful homemade gift, these pretzels are guaranteed to be a hit. Get ready to experience the magic!

Ingredients:
- 1 bag (10-12 ounces) pretzel twists
- 1 cup (2 sticks) unsalted butter, softened
- 1 cup granulated sugar
- 1/4 cup light corn syrup
- 1/4 cup water
- 1 teaspoon vanilla extract
- 1/2 teaspoon sea salt, plus more for sprinkling
- 12 ounces semi-sweet chocolate chips
- 2 tablespoons vegetable shortening
- Optional: Sprinkles, chopped nuts, or other toppings
Making the Salted Caramel:
- First, let’s get started on the caramel. This is the heart of our salted caramel chocolate pretzels, and it’s important to get it right. In a medium saucepan, combine the butter, granulated sugar, corn syrup, and water.
- Place the saucepan over medium heat. Stir constantly with a wooden spoon until the butter is melted and the sugar is dissolved. This usually takes a few minutes. Don’t stop stirring! We want to prevent the sugar from burning.
- Once the mixture is smooth and the sugar is dissolved, stop stirring. Insert a candy thermometer into the saucepan, making sure it doesn’t touch the bottom.
- Now, we’re going to cook the caramel until it reaches the hard-crack stage, which is 300-310°F (149-154°C). This will take about 10-15 minutes, but keep a close eye on it. The color will gradually change from a light amber to a deeper golden brown.
- Important: Do not stir the caramel while it’s cooking at this stage. Stirring can cause sugar crystals to form, resulting in a grainy caramel.
- Once the caramel reaches the desired temperature, immediately remove the saucepan from the heat. Be careful, as the caramel will be extremely hot!
- Stir in the vanilla extract and sea salt. The mixture will bubble up a bit, so be prepared. Stir until everything is well combined.
- Let the caramel cool slightly for a minute or two before moving on to the next step. This will help it thicken up a bit and make it easier to spread.
Coating the Pretzels:
- Preheat your oven to 350°F (175°C). Line a large baking sheet with parchment paper or a silicone baking mat. This will prevent the pretzels from sticking and make cleanup a breeze.
- Arrange the pretzel twists in a single layer on the prepared baking sheet. Make sure they’re not overlapping, so the caramel can coat them evenly.
- Carefully pour the warm caramel over the pretzels, making sure to coat each one as evenly as possible. You can use a spoon or spatula to help spread the caramel.
- Don’t worry if the caramel drips down to the baking sheet. We’ll deal with that later. The important thing is to get a good coating on the pretzels.
- Place the baking sheet in the preheated oven and bake for 5-7 minutes. The caramel will bubble and spread out a bit. Keep a close eye on them to prevent burning.
- Remove the baking sheet from the oven and let the pretzels cool completely on the baking sheet. This will take about 30-45 minutes. The caramel will harden as it cools.
- Once the pretzels are cool and the caramel is set, you can gently break them apart if they’re stuck together.
Melting the Chocolate:
- While the pretzels are cooling, let’s melt the chocolate. In a heat-safe bowl, combine the semi-sweet chocolate chips and vegetable shortening.
- You can melt the chocolate in the microwave or over a double boiler. If using the microwave, heat in 30-second intervals, stirring after each interval, until the chocolate is melted and smooth.
- If using a double boiler, fill a saucepan with about an inch of water and bring it to a simmer. Place the bowl with the chocolate and shortening over the simmering water, making sure the bottom of the bowl doesn’t touch the water.
- Stir the chocolate constantly until it’s melted and smooth. Be careful not to overheat the chocolate, as it can seize up and become grainy.
- Once the chocolate is melted, remove it from the heat.
Dipping and Decorating:
- Now comes the fun part: dipping the caramel-coated pretzels in chocolate! Dip each pretzel into the melted chocolate, making sure to coat it completely.
- Lift the pretzel out of the chocolate and let the excess chocolate drip off. You can gently tap the pretzel against the side of the bowl to help remove the excess.
- Place the chocolate-covered pretzel on a clean sheet of parchment paper or a silicone baking mat.
- While the chocolate is still wet, sprinkle with sea salt, sprinkles, chopped nuts, or any other toppings you like. Get creative!
- Repeat the dipping and decorating process with the remaining pretzels.
- Once all the pretzels are dipped and decorated, place them in the refrigerator for about 15-20 minutes to allow the chocolate to set.
Storing Your Salted Caramel Chocolate Pretzels:
- Once the chocolate is set, your salted caramel chocolate pretzels are ready to enjoy!
- Store the pretzels in an airtight container at room temperature. They will stay fresh for up to a week.
- If you live in a warm climate, you may want to store them in the refrigerator to prevent the chocolate from melting.
Tips and Variations:
- Use different types of chocolate: Try using milk chocolate, dark chocolate, or white chocolate for a different flavor.
- Add a drizzle: Drizzle the pretzels with melted white chocolate or peanut butter for an extra touch of sweetness.
- Use different toppings: Experiment with different toppings, such as crushed Oreos, mini chocolate chips, or shredded coconut.
- Make them festive: Use holiday-themed sprinkles or candies to make these pretzels perfect for any occasion.
- Adjust the salt: If you prefer a less salty treat, reduce the amount of sea salt in the caramel and on top of the pretzels.
- Make a caramel sauce instead: If you don’t want to bake the pretzels, you can make a caramel sauce and drizzle it over them after they’ve been dipped in chocolate.
- Use different pretzels: While pretzel twists are classic, you can also use pretzel rods or squares. Adjust the baking time accordingly.
Troubleshooting:
- Caramel is too hard: If your caramel is too hard, it may have been cooked at too high of a temperature. Next time, make sure to use a candy thermometer and cook the caramel to the correct temperature.
- Caramel is too soft: If your caramel is too soft, it may not have been cooked long enough. Next time, cook the caramel for a longer period of time, until it reaches the hard-crack stage.
- Chocolate is seizing: If your chocolate is seizing, it means it’s overheated or has come into contact with water. To prevent this, melt the chocolate slowly and carefully, and make sure your bowl and utensils are completely dry.
- Pretzels are sticking to the baking sheet: To prevent the pretzels from sticking to the baking sheet, make sure to line it with parchment paper or a silicone baking mat.
Conclusion:
And there you have it! These Salted Caramel Chocolate Pretzels are truly irresistible, and I genuinely believe they’ll become a new favorite in your household. The combination of salty, sweet, and crunchy is simply divine, creating a symphony of flavors and textures that will leave you wanting more. This isn’t just another dessert; it’s an experience. The ease of preparation makes it a perfect choice for a quick treat, a fun activity with kids, or even a last-minute addition to a party spread.
Why is this recipe a must-try? Because it’s ridiculously easy, incredibly satisfying, and endlessly adaptable. You don’t need to be a master baker to whip up a batch of these beauties. The simple steps ensure success every time, and the minimal ingredients mean you probably have most of what you need already in your pantry. But beyond the convenience, it’s the taste that truly sets these pretzels apart. The rich, decadent chocolate perfectly complements the salty crunch of the pretzel, while the homemade salted caramel adds a layer of luxurious sweetness that elevates the entire treat. It’s a flavor explosion in every bite!
Now, let’s talk about serving suggestions and variations. While these Salted Caramel Chocolate Pretzels are amazing on their own, you can easily customize them to suit your preferences. For a more intense chocolate experience, use dark chocolate instead of milk chocolate. If you’re a fan of nuts, sprinkle some chopped pecans, walnuts, or almonds over the melted chocolate before it sets. For a festive touch, add some colorful sprinkles or edible glitter. You could even drizzle a contrasting color of chocolate on top for a visually stunning presentation.
Thinking about serving them? These pretzels are fantastic as a standalone dessert, but they also pair beautifully with a scoop of vanilla ice cream or a cup of hot coffee. They make a wonderful addition to a dessert platter, and they’re always a hit at parties and gatherings. Consider packaging them in small cellophane bags and tying them with a ribbon for a thoughtful and delicious homemade gift. They are also great for movie nights!
But don’t just take my word for it. I wholeheartedly encourage you to give this recipe a try. I’m confident that you’ll be amazed by how easy it is to create such a delicious and impressive treat. And more importantly, I’d love to hear about your experience! Did you make any variations? Did you serve them at a special occasion? What did your family and friends think?
Please, come back and leave a comment below to share your thoughts and photos. Your feedback is invaluable, and it helps other readers discover the joy of making these Salted Caramel Chocolate Pretzels. I truly believe that cooking and baking are meant to be shared, and I can’t wait to see what you create! So, grab your ingredients, preheat your oven (or don’t, since this is mostly no-bake!), and get ready to indulge in a truly unforgettable treat. Happy baking (or pretzel-making)! I hope you enjoy them as much as I do.
Salted Caramel Chocolate Pretzels: The Ultimate Sweet & Salty Treat
Sweet and salty treat! Crunchy pretzels coated in homemade caramel, baked, dipped in chocolate, and sprinkled with sea salt.
Ingredients
- 1 bag (10-12 ounces) pretzel twists
- 1 cup (2 sticks) unsalted butter, softened
- 1 cup granulated sugar
- 1/4 cup light corn syrup
- 1/4 cup water
- 1 teaspoon vanilla extract
- 1/2 teaspoon sea salt, plus more for sprinkling
- 12 ounces semi-sweet chocolate chips
- 2 tablespoons vegetable shortening
- Optional: Sprinkles, chopped nuts, or other toppings
Instructions
- In a medium saucepan, combine the butter, granulated sugar, corn syrup, and water.
- Place the saucepan over medium heat. Stir constantly with a wooden spoon until the butter is melted and the sugar is dissolved.
- Insert a candy thermometer into the saucepan, making sure it doesn’t touch the bottom.
- Cook the caramel until it reaches the hard-crack stage, which is 300-310°F (149-154°C). Do not stir during this stage.
- Once the caramel reaches the desired temperature, immediately remove the saucepan from the heat.
- Stir in the vanilla extract and sea salt. Stir until everything is well combined.
- Let the caramel cool slightly for a minute or two.
- Preheat your oven to 350°F (175°C). Line a large baking sheet with parchment paper or a silicone baking mat.
- Arrange the pretzel twists in a single layer on the prepared baking sheet.
- Carefully pour the warm caramel over the pretzels, making sure to coat each one as evenly as possible.
- Place the baking sheet in the preheated oven and bake for 5-7 minutes.
- Remove the baking sheet from the oven and let the pretzels cool completely on the baking sheet (about 30-45 minutes).
- Once the pretzels are cool and the caramel is set, you can gently break them apart if they’re stuck together.
- In a heat-safe bowl, combine the semi-sweet chocolate chips and vegetable shortening.
- Melt the chocolate in the microwave (30-second intervals, stirring after each) or over a double boiler until smooth.
- Once the chocolate is melted, remove it from the heat.
- Dip each caramel-coated pretzel into the melted chocolate, making sure to coat it completely.
- Lift the pretzel out of the chocolate and let the excess chocolate drip off.
- Place the chocolate-covered pretzel on a clean sheet of parchment paper or a silicone baking mat.
- While the chocolate is still wet, sprinkle with sea salt, sprinkles, chopped nuts, or any other toppings you like.
- Repeat the dipping and decorating process with the remaining pretzels.
- Place them in the refrigerator for about 15-20 minutes to allow the chocolate to set.
- Store the pretzels in an airtight container at room temperature for up to a week.
- If you live in a warm climate, you may want to store them in the refrigerator to prevent the chocolate from melting.
Notes
- Use a candy thermometer for accurate caramel temperature.
- Do not stir the caramel while it’s cooking at the hard-crack stage.
- Line the baking sheet with parchment paper or a silicone baking mat to prevent sticking.
- Melt the chocolate slowly and carefully to prevent seizing.
- Get creative with your toppings!

Leave a Comment