
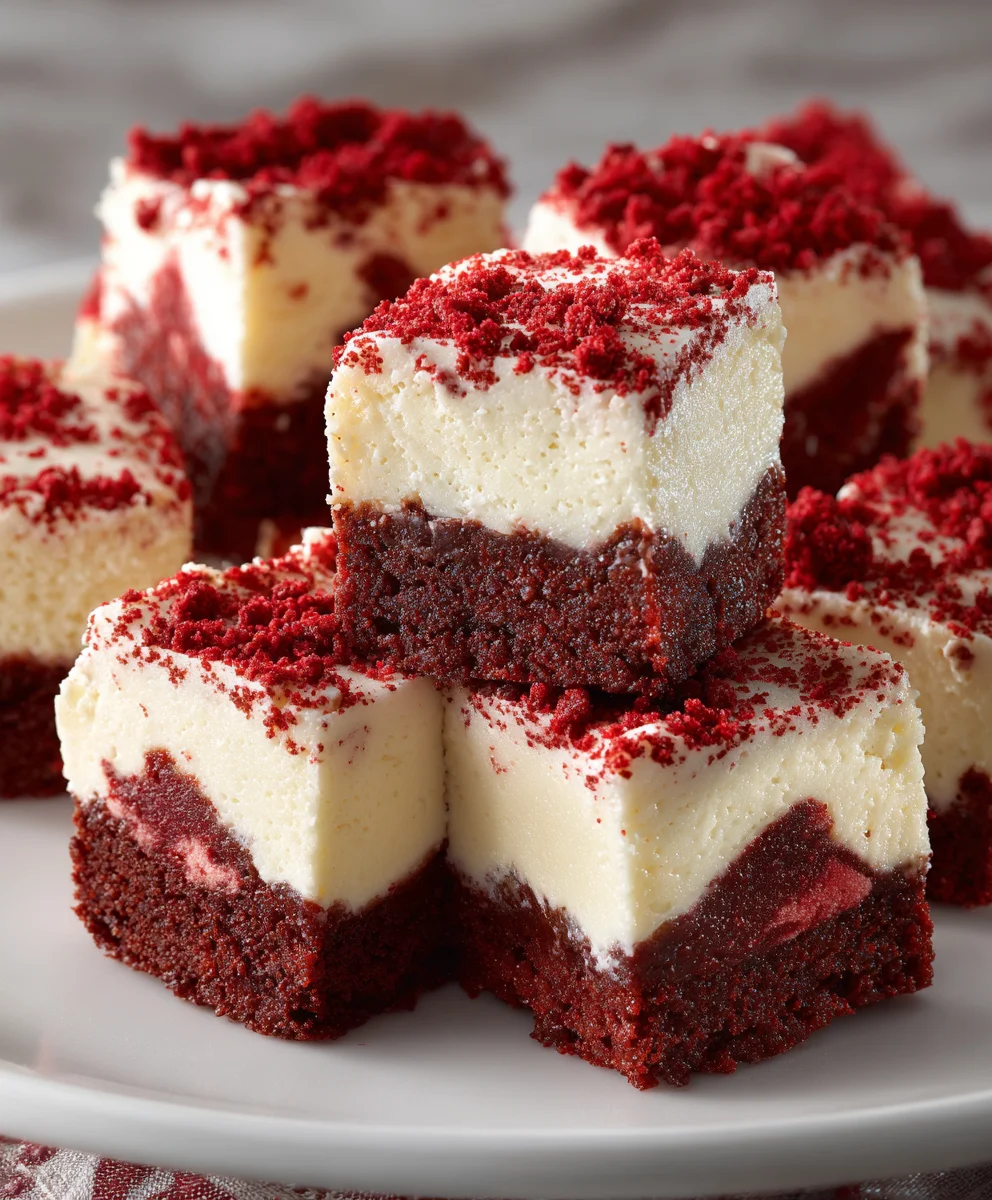
Red Velvet Cheesecake Bites – just the name itself conjures images of luxurious indulgence, doesn’t it? I am absolutely thrilled to guide you through the creation of these utterly irresistible treats. Imagine combining the deep, cocoa-kissed richness and iconic crimson hue of classic red velvet cake with the smooth, tangy, and utterly creamy decadence of a perfect cheesecake, all miniaturized into a delightful, portion-controlled bite. It’s a match made in dessert heaven!
The history of red velvet cake is often debated, with origins possibly tracing back to Victorian “velvet” cakes and gaining widespread popularity in the American South. Cheesecake, on the other hand, boasts an ancient lineage, enjoyed even by the ancient Greeks. These Red Velvet Cheesecake Bites represent a modern culinary evolution, bringing together two beloved traditions into one spectacular confection. People adore this dish not just for its stunning visual appeal – that vibrant red contrasting with the creamy white swirl is truly captivating – but for the harmonious symphony of flavors and textures. Each bite delivers a tender, slightly crumbly crust, followed by the velvety smooth cheesecake layer, infused with that unmistakable red velvet essence. They are convenient for entertaining, perfect for gifting, or simply as a luxurious personal treat. Get ready to impress and delight with these miniature marvels!

Ingredients:
-
For the Red Velvet Cake Base:
- 1 ½ cups (180g) all-purpose flour, sifted
- 1 cup (200g) granulated sugar
- 1 tablespoon unsweetened cocoa powder (natural, not Dutch-processed, for that authentic red velvet tang)
- ½ teaspoon baking soda
- ¼ teaspoon salt
- ½ cup (120ml) buttermilk, at room temperature
- ½ cup (120ml) vegetable oil (or another neutral-flavored oil like canola)
- 1 large egg, at room temperature
- 1 teaspoon pure vanilla extract
- 1 tablespoon red food coloring (liquid or gel paste, I usually opt for gel for a more vibrant hue)
- 1 teaspoon white vinegar
-
For the Cheesecake Filling:
- 2 (8-ounce) blocks (450g) full-fat cream cheese, softened to room temperature
- ½ cup (100g) granulated sugar
- 1 large egg, at room temperature
- 1 teaspoon pure vanilla extract
- ¼ cup (60g) sour cream, at room temperature (full-fat is best for richness)
-
For the Cream Cheese Frosting:
- 8 ounces (225g) full-fat cream cheese, softened to room temperature
- ½ cup (113g) unsalted butter, softened to room temperature
- 2 ½ cups (300g) powdered sugar, sifted
- 1 teaspoon pure vanilla extract
- 1-2 tablespoons milk or heavy cream (as needed for desired consistency)
-
Optional Garnish:
- White chocolate shavings
- Red velvet cake crumbs (from trimming edges, if any)
- Holiday sprinkles or edible glitter
Preparing the Red Velvet Cake Base
- Preheat your oven and prepare your pan: First things first, I like to get the oven ready. Preheat your oven to a cozy 350°F (175°C). For these delightful Red Velvet Cheesecake Bites, you’ll want to line a 9×13-inch baking pan with parchment paper, making sure the paper hangs over the sides. This creates little “handles” that will make it incredibly easy to lift your baked cake out later. A little spray of non-stick cooking spray before the parchment can help it adhere better, ensuring a smooth, even surface. I often gently crinkle the parchment paper first, then smooth it out into the pan; this helps it fit into the corners without too much fuss.
- Whisk together the dry ingredients: In a large mixing bowl, combine your sifted all-purpose flour, granulated sugar, unsweetened cocoa powder, baking soda, and salt. Give them a good whisk for about 30 seconds to a minute. It’s important to make sure everything is really well combined here, as this ensures your leavening agents and flavorings are evenly distributed throughout the batter. Sifting the flour is key for a tender cake and helps prevent lumps, which is especially important for the delicate texture we’re aiming for with these Red Velvet Cheesecake Bites.
- Combine the wet ingredients: In a separate, medium-sized bowl, whisk together your buttermilk, vegetable oil, large egg, pure vanilla extract, and red food coloring. I find that using gel food coloring provides a much more vibrant and consistent red color without adding too much extra liquid to the batter, which can sometimes thin it out. You’ll want a really deep, rich red color here; don’t be shy with the food coloring, as the cocoa powder will mute it slightly. Whisk until all these wet ingredients are fully integrated and that gorgeous red hue is uniform.
- Gently combine wet and dry ingredients: Now, pour your wet ingredients into your dry ingredients. Using a whisk or a rubber spatula, mix until just combined. The key word here is “just.” You don’t want to overmix your batter, as this can develop the gluten in the flour too much, leading to a tough, dense cake base. We’re aiming for light and fluffy for our Red Velvet Cheesecake Bites! A few small lumps are perfectly fine and will usually disappear during baking.
- Add the vinegar: This is the secret ingredient for classic red velvet! Stir in the white vinegar. You might notice a slight fizzing or bubbling; this is the vinegar reacting with the baking soda, which helps to activate the leavening and create that characteristic subtle tang and tender crumb of traditional red velvet cake. Mix it in quickly and gently.
- Bake the red velvet cake base: Pour the beautifully red batter into your prepared 9×13-inch pan and spread it evenly with an offset spatula or the back of a spoon. Pop it into your preheated oven and bake for 15-20 minutes, or until a wooden skewer or toothpick inserted into the center comes out with only moist crumbs attached, or clean. Be careful not to overbake, as this cake is quite thin and can dry out quickly. Once baked, remove the cake from the oven and let it cool completely in the pan on a wire rack. This cooling process is crucial for the stability of your Red Velvet Cheesecake Bites. I often let it cool for at least an hour, or even longer if my kitchen is warm.
Crafting the Velvety Cheesecake Filling
- Prepare your cheesecake ingredients: While your red velvet cake base is cooling, you can start on the luscious cheesecake filling. Ensure your full-fat cream cheese, large egg, and sour cream are all at room temperature. This is incredibly important for a smooth, lump-free cheesecake batter. If your cream cheese is cold, it won’t incorporate properly, leaving you with little unmixed cream cheese chunks, which is definitely not what we want in our Red Velvet Cheesecake Bites.
- Beat the cream cheese: In a large mixing bowl, using an electric mixer (either a stand mixer with the paddle attachment or a hand mixer), beat the softened cream cheese on medium speed for about 2-3 minutes until it’s super smooth and creamy, with no lumps whatsoever. Scrape down the sides of the bowl frequently to ensure everything gets evenly incorporated. This step really sets the foundation for a silky-smooth cheesecake.
- Incorporate the sugar: Add the granulated sugar to the cream cheese and continue beating on medium speed for another 1-2 minutes. The mixture should become light and fluffy. The sugar not only adds sweetness but also helps to aerate the cream cheese further.
- Add the egg and vanilla: Now, add the large egg and pure vanilla extract. Beat on low speed just until combined. Be very careful not to overmix once the egg is added. Overmixing introduces too much air into the batter, which can cause the cheesecake to puff up too much during baking and then crack as it cools. We want a perfectly smooth, uncracked top for our Red Velvet Cheesecake Bites.
- Gently fold in the sour cream: Finally, fold in the sour cream using a rubber spatula. Sour cream adds a lovely tang and extra creaminess to the cheesecake, complementing the sweetness beautifully. Fold it in just until it’s fully incorporated. Again, avoid overmixing. The consistency should be wonderfully smooth and pourable, but still thick.
Baking Your Red Velvet Cheesecake Bites
- Reduce oven temperature and prepare for baking: Once your red velvet cake base is completely cooled, reduce your oven temperature to 300°F (150°C). This lower temperature is ideal for baking cheesecakes, as it prevents cracking and promotes a slow, even set.
- Pour cheesecake filling over cake base: Gently pour the prepared cheesecake filling evenly over the cooled red velvet cake base in the pan. Use an offset spatula or the back of a spoon to spread it out to the edges, creating a uniform layer. Take your time with this to ensure a consistent thickness across your Red Velvet Cheesecake Bites.
- Create a water bath (optional but recommended): For the ultimate creamy texture and to prevent cracking, I highly recommend baking the cheesecake in a water bath. To do this, place your 9×13-inch baking pan (with the cake and filling) inside a larger roasting pan. Carefully pour hot water into the larger roasting pan until it comes about halfway up the sides of your 9×13-inch pan. This gentle, steamy environment helps the cheesecake bake slowly and evenly, resulting in an incredibly smooth and luscious texture, which is paramount for perfect Red Velvet Cheesecake Bites.
- Bake the Red Velvet Cheesecake Bites: Carefully transfer the roasting pan with the water bath and your cheesecake pan into the preheated 300°F (150°C) oven. Bake for 45-60 minutes. The cheesecake is done when the edges are set, but the center still has a slight wobble when you gently shake the pan. It will continue to set as it cools.
- Cooling is key: Once baked, turn off the oven, crack the oven door slightly, and let the cheesecake cool in the oven for about 1 hour. This slow cooling process helps prevent drastic temperature changes that can lead to cracks. After an hour, carefully remove the pan from the water bath (if using) and from the oven. Let it cool completely on a wire rack at room temperature.
- Chill thoroughly: Once cooled to room temperature, cover the pan loosely with plastic wrap and refrigerate for at least 4 hours, but ideally overnight. This chilling time is absolutely essential! It allows the cheesecake to firm up properly, making it much easier to cut into neat Red Velvet Cheesecake Bites and enhancing its rich flavor and texture. Don’t skip this step!
Whipping Up the Dreamy Cream Cheese Frosting
- Soften your ingredients: Just like with the cheesecake, ensure your full-fat cream cheese and unsalted butter are softened to room temperature. This is crucial for a smooth, lump-free frosting that’s easy to spread and pipe.
- Beat cream cheese and butter: In a large mixing bowl, using an electric mixer with the paddle attachment (or a hand mixer), beat the softened cream cheese and butter together on medium speed for about 3-4 minutes. You’re aiming for a super light, airy, and fluffy mixture. Scrape down the sides of the bowl multiple times to ensure everything is evenly combined. This creates the foundational texture for our frosting, ensuring it’s not too dense for our delicate Red Velvet Cheesecake Bites.
- Gradually add powdered sugar: With the mixer on low speed, gradually add the sifted powdered sugar, one cup at a time. Once all the sugar is added, increase the speed to medium-high and beat for another 2-3 minutes until the frosting is incredibly light, fluffy, and smooth. Sifting the powdered sugar beforehand is a non-negotiable step for me; it prevents lumps and ensures a silky-smooth frosting.
- Stir in vanilla and adjust consistency: Beat in the pure vanilla extract. If your frosting seems too thick, add milk or heavy cream, one tablespoon at a time, beating after each addition, until you reach your desired consistency. I prefer a slightly stiffer frosting for piping, but if you’re just spreading it, a slightly softer consistency might be easier. Taste and adjust for sweetness if desired. This frosting is the crowning glory for your Red Velvet Cheesecake Bites, so make it perfect!
Assembling and Decorating Your Red Velvet Cheesecake Bites
- Lift and prepare for cutting: Once the cheesecake is thoroughly chilled, use the parchment paper overhangs to carefully lift the entire cheesecake out of the pan and transfer it to a large cutting board. Gently peel back the parchment paper from the sides.
- Trim and cut the cheesecake: Using a large, sharp knife, trim a thin strip off each edge of the cheesecake. This creates perfectly neat, straight edges for your Red Velvet Cheesecake Bites, giving them a professional look. You can save these trimmings for garnishing later! Now, carefully cut the large cheesecake into uniform squares or rectangles. I usually aim for 24-36 bites, depending on how small I want them. For clean cuts, wipe your knife with a hot, damp cloth and dry it between each cut. This prevents the cheesecake from sticking and dragging, ensuring each bite is beautifully presented.
-
Frosting the bites: You have a couple of options for frosting your Red Velvet Cheesecake Bites:
- Piping: For an elegant touch, transfer your cream cheese frosting to a piping bag fitted with your favorite decorative tip (a star tip works wonderfully!). Pipe a beautiful swirl or rosette onto the top of each individual Red Velvet Cheesecake Bite. This method is visually stunning and allows for precise frosting.
- Spreading: If you prefer a simpler approach, you can just spoon a dollop of frosting onto each bite and gently spread it with a small offset spatula or the back of a spoon. This gives a more rustic, homey feel but is equally delicious.
- Garnish (optional): This is where you can let your creativity shine! Sprinkle some white chocolate shavings, a few reserved red velvet cake crumbs, or some festive sprinkles on top of each frosted bite. A tiny dusting of cocoa powder can also look sophisticated. The garnishes add not only visual appeal but also an extra layer of texture and flavor, truly elevating your Red Velvet Cheesecake Bites.
Chilling and Serving
- Final chill: Once your Red Velvet Cheesecake Bites are frosted and garnished, I like to give them one final chill in the refrigerator for at least 30 minutes. This helps the frosting set nicely and ensures the bites are firm and refreshing when served.
- Serving your Red Velvet Cheesecake Bites: Arrange your beautiful bites on a serving platter. These are absolutely perfect for parties, holiday gatherings, or as a decadent individual treat. They are best served chilled, straight from the refrigerator. The combination of the moist, tangy red velvet cake, the creamy, rich cheesecake, and the sweet, velvety cream cheese frosting is truly irresistible. Each bite is a symphony of textures and flavors.
- Storage: Any leftover Red Velvet Cheesecake Bites should be stored in an airtight container in the refrigerator for up to 3-4 days. While they rarely last that long in my house, it’s good to know they keep well! Enjoy every single magnificent bite! These little beauties are a labor of love, but oh so worth it!

Conclusion:
Well, my fellow dessert enthusiasts, we’ve reached the sweet finale of our journey, and I genuinely hope you’re feeling as inspired as I am to get into the kitchen. After walking through the steps, you can see that creating something truly extraordinary doesn’t have to be overly complicated, and the payoff is absolutely immense. What we’ve explored together isn’t just another recipe; it’s an invitation to craft a dessert that’s as delightful to behold as it is to taste, a treat that effortlessly marries elegance with undeniable deliciousness. I’m talking about those irresistible Red Velvet Cheesecake Bites, tiny marvels that pack a huge punch of flavor and charm. These aren’t just any ordinary dessert; they are a celebration in miniature, a perfect harmony of textures and tastes that will leave an indelible impression on anyone lucky enough to try them. They offer a sophisticated yet approachable way to indulge, proving that sometimes, the best things really do come in small, perfectly formed packages, designed to brighten any moment or occasion with their vibrant appeal and unforgettable taste.
Why These Are Your Next Go-To Dessert:
There are countless reasons why I firmly believe these should be your next baking project. First, let’s talk about the visual appeal. The striking contrast of the vibrant red base, kissed with a hint of cocoa, against the pristine, creamy white cheesecake topping is simply mesmerizing. It’s a feast for the eyes before it even touches the palate, making them an instant showstopper at any gathering, whether it’s a casual get-together or a formal holiday dinner. Then there’s the flavor profile – that quintessential red velvet tang, subtle and sophisticated, perfectly complemented by the rich, smooth, and slightly tart cream cheese filling. This intricate balance of sweet and tangy creates a depth of flavor that is truly satisfying without being overly heavy. And let’s not forget the delightful crunch of the cookie crust providing the perfect textural counterpoint to the silky smooth cheesecake. Each bite is a perfectly balanced symphony of sweet, tangy, and rich, a truly decadent experience that manages to be both comforting and luxurious. They capture the essence of two beloved desserts – the classic red velvet cake and the universally adored cheesecake – and combine them into one bite-sized, utterly perfect creation. The sheer delight of holding one of these miniature masterpieces in your hand, knowing the joy it’s about to bring, is truly unparalleled. These Red Velvet Cheesecake Bites are proof that impressive desserts don’t have to be daunting to make, offering maximum impact with manageable effort.
Serving Them Up or Making Them Your Own:
One of the many beauties of these cheesecake bites is their incredible versatility. They are spectacular served chilled, straight from the refrigerator, allowing their creamy texture to truly shine and their flavors to meld beautifully. Imagine them as the star attraction on a dessert platter at your next dinner party, drawing oohs and aahs from your guests, or as a sophisticated finale to a holiday feast. They make an excellent alternative to a traditional, full-sized cake, offering individual portions that are both elegant and practical, cutting down on serving fuss and ensuring everyone gets a perfect slice. For an extra touch of indulgence, consider a light dusting of cocoa powder or a delicate drizzle of melted white chocolate over the top just before serving – the visual appeal is astounding, and the flavor layers deepen beautifully. You could also pair them with a fresh berry coulis, perhaps a vibrant raspberry or a sweet strawberry sauce, to introduce a fruity brightness that cuts through the richness, elevating the experience even further. For a fun, seasonal twist, try garnishing with a tiny sprig of fresh mint or a few festive sprinkles appropriate to the occasion. And why stop there? Get creative! You could experiment with different cookie crusts – perhaps an Oreo crust for a double chocolate punch, or even a classic graham cracker crust if you prefer a more traditional cheesecake base. While the red velvet essence is key, you could subtly infuse the cheesecake layer with a hint of orange zest or a touch of almond extract for a truly unique twist that speaks to your personal palate. The possibilities for customization are as endless as your imagination, allowing you to truly make this recipe your own signature treat, adapting it for any season or celebration.
Your Turn! Let’s Get Baking & Sharing:
Now that you have all the tools, tips, and inspiration, it’s truly your moment to shine. Don’t just read about these delectable treats; take the plunge and make them! I promise you, the process is rewarding, and the results are absolutely worth every moment you spend in the kitchen. There’s a unique satisfaction that comes from creating something so visually stunning and incredibly delicious from scratch, and I truly believe you’ll feel that joy. Once you’ve whipped up your own batch of these delightful Red Velvet Cheesecake Bites, I would absolutely love to hear all about your experience. Did you add a special twist? Were they a hit at your gathering? What was your favorite part of the process, or perhaps a challenge you overcame? Please don’t hesitate to share your thoughts, your successes, and even any clever modifications you came up with. Your feedback and creative ideas are what make our baking community so vibrant and inspiring, and I genuinely look forward to learning from your culinary adventures. Head into your kitchen, preheat that oven, and prepare to create some magic. I’m eagerly anticipating hearing about your delightful creations. Happy baking, everyone!
Red Velvet Cheesecake Bites
These delightful Red Velvet Cheesecake Bites combine the deep, cocoa-kissed richness of classic red velvet cake with the smooth, tangy decadence of a perfect cheesecake, topped with a dreamy cream cheese frosting. All miniaturized into a delightful, portion-controlled bite, they are perfect for entertaining or a luxurious personal treat.
Ingredients
-
1 ½ cups (180g) all-purpose flour, sifted
-
1 cup (200g) granulated sugar
-
1 tablespoon unsweetened cocoa powder (natural)
-
½ teaspoon baking soda
-
¼ teaspoon salt
-
½ cup (120ml) buttermilk, at room temperature
-
½ cup (120ml) vegetable oil
-
1 large egg, at room temperature
-
1 teaspoon pure vanilla extract
-
1 tablespoon red food coloring (gel paste)
-
1 teaspoon white vinegar
-
2 (8-ounce) blocks (450g) full-fat cream cheese, softened
-
½ cup (100g) granulated sugar
-
1 large egg, at room temperature
-
1 teaspoon pure vanilla extract
-
¼ cup (60g) sour cream, at room temperature
-
8 ounces (225g) full-fat cream cheese, softened
-
½ cup (113g) unsalted butter, softened
-
2 ½ cups (300g) powdered sugar, sifted
-
1 teaspoon pure vanilla extract
-
1-2 tablespoons milk or heavy cream (as needed)
-
White chocolate shavings (optional)
-
Red velvet cake crumbs (optional)
-
Holiday sprinkles or edible glitter (optional)
Instructions
-
Step 1
Preheat oven to 350°F (175°C). Line a 9×13-inch pan with parchment paper, leaving overhangs. In a large bowl, whisk together flour, granulated sugar, cocoa powder, baking soda, and salt. In another bowl, whisk buttermilk, vegetable oil, egg, vanilla, and red food coloring. Combine wet and dry ingredients, mixing until just combined. Stir in vinegar. Pour batter into pan and spread evenly. Bake for 15-20 minutes until a toothpick comes out with moist crumbs. Cool completely in the pan. -
Step 2
Ensure cream cheese, egg, and sour cream are at room temperature. Beat softened cream cheese in a large bowl until smooth. Add granulated sugar; beat until light and fluffy. Add egg and vanilla; beat on low speed until just combined. Fold in sour cream until incorporated. Do not overmix. -
Step 3
Reduce oven to 300°F (150°C). Pour cheesecake filling over the cooled red velvet cake base, spreading evenly. For best results, place the pan in a larger roasting pan with hot water to create a water bath. Bake for 45-60 minutes until edges are set with a slight center wobble. Turn off oven, crack door, and cool in oven for 1 hour. Then remove and cool completely on a wire rack at room temperature. Refrigerate for at least 4 hours, or ideally overnight, until thoroughly chilled and firm. -
Step 4
Ensure cream cheese and unsalted butter are at room temperature. Beat softened cream cheese and butter together until light and fluffy. Gradually add sifted powdered sugar; beat until smooth and fluffy. Beat in vanilla extract and milk/cream until desired consistency. -
Step 5
Lift chilled cheesecake from pan using parchment overhangs. Trim edges and cut into 24-36 uniform squares or rectangles. Clean knife between cuts. Frost each bite: Pipe a swirl or rosette with a decorative tip, or spread a dollop with a small spatula. Garnish as desired with white chocolate shavings, reserved cake crumbs, or sprinkles. -
Step 6
Chill frosted and garnished bites in the refrigerator for at least 30 minutes to set the frosting. Arrange on a platter and serve chilled. Store any leftovers in an airtight container in the refrigerator for up to 3-4 days.
Important Information
Nutrition Facts (Per Serving)
It is important to consider this information as approximate and not to use it as definitive health advice.
Allergy Information
Please check ingredients for potential allergens and consult a health professional if in doubt.
Leave a Comment