
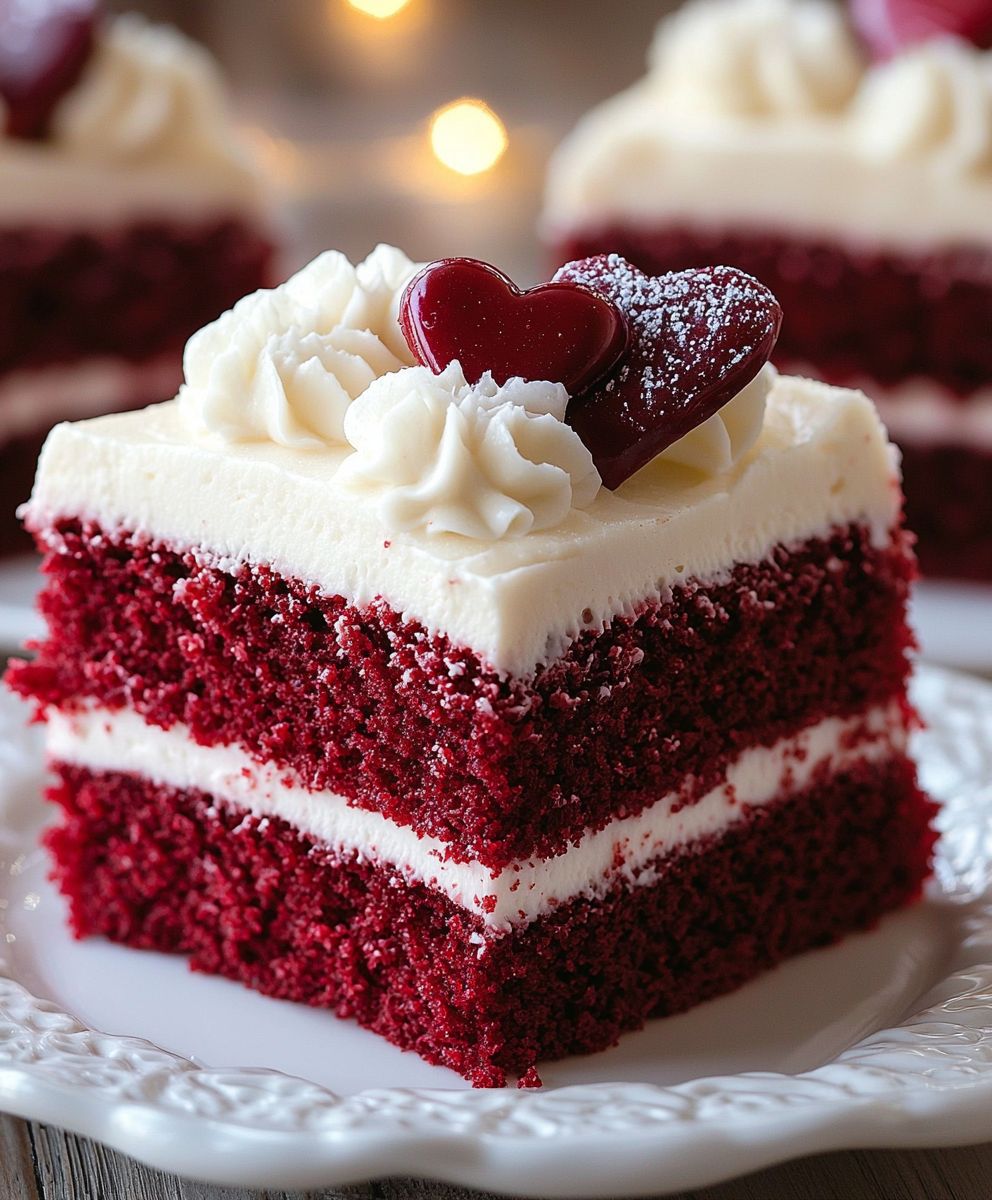
Red Velvet Cake, a dessert shrouded in mystery and dripping with decadence, is more than just a cake it’s an experience. Have you ever wondered about the secret behind its captivating crimson hue and that irresistible tangy-sweet flavor? I certainly have! For years, I’ve been on a quest to perfect this iconic treat, and I’m thrilled to share my ultimate recipe with you.
The history of Red Velvet Cake is as rich and complex as its flavor profile. While its exact origins are debated, many believe it emerged during the Victorian era, where bakers experimented with cocoa powder to create a softer, “velvet” texture in their cakes. The red color, initially derived from the chemical reaction between cocoa and acidic ingredients like buttermilk, has evolved over time, with some recipes incorporating food coloring to enhance its vibrant appeal.
But what is it about this cake that makes it so universally loved? Is it the moist, tender crumb? The subtle cocoa notes dancing with a hint of tang? Or perhaps it’s the creamy, dreamy cream cheese frosting that perfectly complements the cake’s unique flavor? For me, it’s all of the above! Red Velvet Cake offers a delightful balance of flavors and textures that’s both comforting and sophisticated. Whether you’re baking it for a special occasion or simply craving a sweet indulgence, this recipe is guaranteed to impress. So, let’s get baking and create a Red Velvet Cake that will have everyone begging for seconds!

Ingredients:
- 2 ½ cups all-purpose flour
- 2 cups granulated sugar
- 1 teaspoon baking soda
- 1 teaspoon baking powder
- 1 teaspoon salt
- 1 cup vegetable oil
- 1 cup buttermilk
- 2 large eggs
- 2 tablespoons unsweetened cocoa powder
- 1 ounce (2 tablespoons) red food coloring
- 1 teaspoon white vinegar
- 1 teaspoon vanilla extract
Cream Cheese Frosting:
- 8 ounces cream cheese, softened
- ½ cup (1 stick) unsalted butter, softened
- 4 cups powdered sugar
- 1 teaspoon vanilla extract
Instructions:
Preparing the Cake Batter
- Preheat your oven to 350°F (175°C). This is crucial for even baking. Grease and flour two 9-inch round cake pans. You can also use baking spray with flour already included for convenience. Make sure to coat the pans thoroughly to prevent the cake from sticking.
- In a large bowl, whisk together the flour, sugar, baking soda, baking powder, and salt. This ensures that all the dry ingredients are evenly distributed, which is essential for a consistent cake texture. I like to use a whisk for this step because it helps to aerate the flour, resulting in a lighter cake.
- In a separate bowl, combine the vegetable oil, buttermilk, eggs, cocoa powder, red food coloring, vinegar, and vanilla extract. Whisk until well combined. The buttermilk adds a tangy flavor and helps to tenderize the cake, while the vinegar reacts with the baking soda to create a light and fluffy texture. Don’t be alarmed by the amount of red food coloring; it’s what gives red velvet cake its signature color!
- Gradually add the wet ingredients to the dry ingredients, mixing on low speed until just combined. Be careful not to overmix the batter, as this can develop the gluten in the flour and result in a tough cake. Mix until the batter is smooth and there are no lumps.
- Divide the batter evenly between the prepared cake pans. I find it helpful to use a kitchen scale to ensure that each pan has the same amount of batter. This will help the cakes bake evenly and prevent one from being taller than the other.
Baking the Cakes
- Bake for 30-35 minutes, or until a wooden skewer inserted into the center comes out clean. The baking time may vary depending on your oven, so it’s important to check the cakes frequently. Start checking at 30 minutes and add more time as needed. The cakes should be golden brown on top and spring back lightly when touched.
- Let the cakes cool in the pans for 10 minutes before inverting them onto a wire rack to cool completely. This allows the cakes to set slightly and prevents them from breaking when you remove them from the pans. Make sure the wire rack is clean and dry.
Preparing the Cream Cheese Frosting
- In a large bowl, beat the cream cheese and butter together until smooth and creamy. It’s important that the cream cheese and butter are softened to room temperature before you start. This will ensure that the frosting is smooth and lump-free. I like to use an electric mixer for this step, but you can also use a hand mixer or even a whisk.
- Gradually add the powdered sugar, beating on low speed until combined. Be careful not to add the powdered sugar too quickly, as it can create a cloud of dust. Start with a low speed and gradually increase it as the powdered sugar is incorporated.
- Add the vanilla extract and beat until smooth and fluffy. The vanilla extract enhances the flavor of the frosting and adds a touch of sweetness. Beat the frosting for a few minutes until it’s light and airy.
Assembling the Cake
- Once the cakes are completely cool, level them with a serrated knife if necessary. This will ensure that the cake is even and stable. I like to use a long serrated knife to trim the tops of the cakes.
- Place one cake layer on a serving plate or cake stand. Spread a generous layer of cream cheese frosting over the top. Make sure to spread the frosting evenly to the edges of the cake.
- Carefully place the second cake layer on top of the frosting. Gently press down to secure it.
- Frost the entire cake with the remaining cream cheese frosting. You can use a spatula or a piping bag to apply the frosting. I like to start by frosting the top of the cake and then move on to the sides.
- Decorate the cake as desired. You can use sprinkles, chocolate shavings, or fresh berries to decorate the cake. I like to use a piping bag to create decorative swirls and rosettes. You can also crumble some of the cake trimmings and sprinkle them around the base of the cake.
- Refrigerate the cake for at least 30 minutes before serving. This will allow the frosting to set and make the cake easier to slice. The cake can be stored in the refrigerator for up to 3 days.
Tips for Success
- Use high-quality ingredients. The quality of your ingredients will directly impact the taste and texture of your cake. Use fresh eggs, good-quality butter, and pure vanilla extract.
- Measure your ingredients accurately. Baking is a science, so it’s important to measure your ingredients accurately. Use measuring cups and spoons to ensure that you have the correct amounts.
- Don’t overmix the batter. Overmixing the batter can develop the gluten in the flour and result in a tough cake. Mix until the batter is just combined.
- Bake the cakes evenly. Make sure your oven is properly preheated and that the cakes are placed in the center of the oven. Rotate the cakes halfway through baking to ensure even browning.
- Let the cakes cool completely before frosting. Frosting a warm cake will cause the frosting to melt and slide off. Make sure the cakes are completely cool before you start frosting.
- Soften the cream cheese and butter. Softened cream cheese and butter will create a smooth and creamy frosting. Let the cream cheese and butter sit at room temperature for at least 30 minutes before you start making the frosting.
- Don’t overbeat the frosting. Overbeating the frosting can cause it to become too soft and runny. Beat the frosting until it’s smooth and fluffy.
- Refrigerate the cake before serving. Refrigerating the cake will allow the frosting to set and make the cake easier to slice.
Variations
- Chocolate Red Velvet Cake: Add ½ cup of melted chocolate to the batter for a richer, more chocolatey flavor.
- Red Velvet Cupcakes: Pour the batter into cupcake liners and bake for 18-20 minutes.
- Red Velvet Cake Pops: Crumble the baked cake and mix it with cream cheese frosting. Roll the mixture into balls and dip them in melted chocolate.
- Vegan Red Velvet Cake: Substitute the buttermilk with plant-based milk mixed with vinegar, and use vegan butter and cream cheese for the frosting.
Troubleshooting
- Cake is dry: Overbaking is the most common cause of dry cake. Make sure to check the cake frequently while it’s baking and remove it from the oven as soon as a wooden skewer inserted into the center comes out clean. You can also try adding more moisture to the batter by using oil instead of butter or adding a tablespoon of sour cream.
- Cake is dense: Overmixing the batter can result in a dense cake. Be careful not to overmix the batter and mix until it’s just combined. You can also try using cake flour instead of all-purpose flour.
- Frosting is too soft: Overbeating the frosting can cause it to become too soft. Beat the frosting until it’s smooth and fluffy, but don’t overbeat it. You can also try adding more powdered sugar to thicken the frosting.
- Frosting is too stiff: Adding too much powdered sugar can cause the frosting to become too stiff. Add a tablespoon of milk or cream to thin the frosting.
Enjoy your delicious homemade Red Velvet Cake! I hope these detailed instructions and tips help you create a perfect cake every time. Happy baking!
Conclusion:
This isn’t just another cake recipe; it’s an invitation to experience the velvety smooth, subtly tangy, and utterly irresistible magic of Red Velvet Cake. From its vibrant hue to its delicate crumb, every element of this cake is designed to delight. I truly believe that once you’ve tasted this version, you’ll understand why it’s a classic that continues to captivate bakers and dessert lovers alike.
But what makes this particular recipe a must-try? It’s the perfect balance of flavors and textures. The slight tang from the buttermilk and vinegar perfectly complements the rich cocoa notes, creating a depth of flavor that’s simply divine. And the cream cheese frosting? Oh, the cream cheese frosting! It’s the ideal counterpoint to the cake’s sweetness, adding a creamy, tangy finish that will leave you wanting more.
Beyond its inherent deliciousness, this recipe is also surprisingly adaptable. Feel free to experiment with different variations to suit your own preferences.
Serving Suggestions and Variations:
* Classic Presentation: Serve it as is, a towering beauty layered with luscious cream cheese frosting. A dusting of cocoa powder or a scattering of fresh berries adds a touch of elegance.
* Individual Cupcakes: Transform the batter into cupcakes for a portable and perfectly portioned treat. They’re ideal for parties, bake sales, or simply a sweet indulgence on the go.
* Red Velvet Cake Pops: Crumble the baked cake, mix it with frosting, and roll it into cake pops for a fun and festive dessert. Dip them in melted chocolate and decorate with sprinkles for an extra touch of whimsy.
* Chocolate Chips: For an extra layer of decadence, fold in some mini chocolate chips into the batter before baking. The melted chocolate adds a delightful burst of richness.
* Nuts: Add chopped pecans or walnuts to the batter or sprinkle them on top of the frosting for a nutty crunch.
* Coffee Infusion: Enhance the cocoa flavor by adding a tablespoon of instant coffee powder to the batter. It won’t make the cake taste like coffee, but it will deepen the chocolate notes.
* Boozy Twist: A splash of bourbon or rum in the batter or frosting adds a sophisticated touch.
I’ve poured my heart and soul into perfecting this Red Velvet Cake recipe, and I’m confident that it will become a cherished favorite in your own kitchen. It’s more than just a dessert; it’s an experience, a celebration of flavor and texture that’s perfect for any occasion.
So, what are you waiting for? Gather your ingredients, preheat your oven, and get ready to embark on a baking adventure. I promise you, the results will be well worth the effort. And once you’ve created your own masterpiece, I’d absolutely love to hear about it! Share your photos, your variations, and your experiences in the comments below. Let’s create a community of Red Velvet Cake enthusiasts! I can’t wait to see what you bake! Happy baking!
Red Velvet Cake: The Ultimate Guide to Baking Perfection
Classic red velvet cake with tangy buttermilk, vibrant red color, and creamy cream cheese frosting.
Ingredients
- 2 ½ cups all-purpose flour
- 2 cups granulated sugar
- 1 teaspoon baking soda
- 1 teaspoon baking powder
- 1 teaspoon salt
- 1 cup vegetable oil
- 1 cup buttermilk
- 2 large eggs
- 2 tablespoons unsweetened cocoa powder
- 1 ounce (2 tablespoons) red food coloring
- 1 teaspoon white vinegar
- 1 teaspoon vanilla extract
- 8 ounces cream cheese, softened
- ½ cup (1 stick) unsalted butter, softened
- 4 cups powdered sugar
- 1 teaspoon vanilla extract
Instructions
- Preheat oven to 350°F (175°C). Grease and flour two 9-inch round cake pans.
- In a large bowl, whisk together the flour, sugar, baking soda, baking powder, and salt.
- In a separate bowl, combine the vegetable oil, buttermilk, eggs, cocoa powder, red food coloring, vinegar, and vanilla extract. Whisk until well combined.
- Gradually add the wet ingredients to the dry ingredients, mixing on low speed until just combined. Do not overmix.
- Divide the batter evenly between the prepared cake pans.
- Bake for 30-35 minutes, or until a wooden skewer inserted into the center comes out clean.
- Let the cakes cool in the pans for 10 minutes before inverting them onto a wire rack to cool completely.
- In a large bowl, beat the softened cream cheese and butter together until smooth and creamy.
- Gradually add the powdered sugar, beating on low speed until combined.
- Add the vanilla extract and beat until smooth and fluffy.
- Once the cakes are completely cool, level them with a serrated knife if necessary.
- Place one cake layer on a serving plate or cake stand. Spread a generous layer of cream cheese frosting over the top.
- Carefully place the second cake layer on top of the frosting. Gently press down to secure it.
- Frost the entire cake with the remaining cream cheese frosting.
- Decorate the cake as desired.
- Refrigerate the cake for at least 30 minutes before serving.
Notes
- Use high-quality ingredients for the best flavor and texture.
- Measure ingredients accurately.
- Don’t overmix the batter.
- Bake the cakes evenly. Rotate halfway through baking.
- Let the cakes cool completely before frosting.
- Soften the cream cheese and butter before making the frosting.
- Don’t overbeat the frosting.
- Refrigerate the cake before serving.

Leave a Comment