
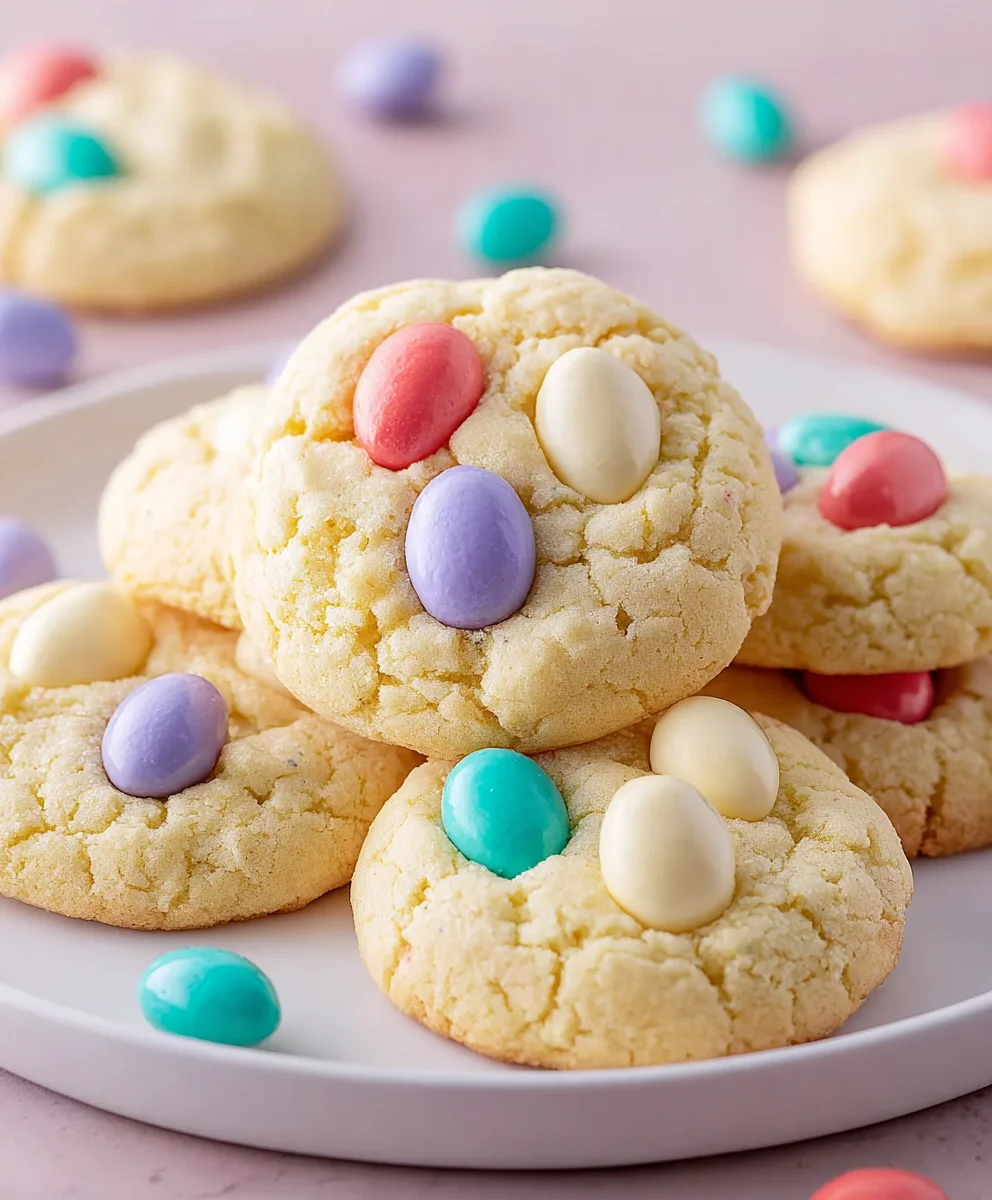
Easter Cake Mix Cookies are a delightful answer to your holiday baking prayers, offering a perfect blend of simplicity and festive charm. As Easter approaches, our kitchens often become hubs of activity, filled with the aroma of spring and the joy of family gatherings. While elaborate desserts certainly have their place, sometimes the most cherished treats are those that are effortlessly delicious and bring a smile to everyone’s face without the stress of complex preparations. This recipe epitomizes that spirit, allowing you to create vibrant, soft, and chewy cookies that are as beautiful to behold as they are delightful to eat.
There’s a wonderful sense of tradition in sharing homemade goodies during the holidays, and these particular cookies offer a modern twist on classic Easter sweets. The concept of using a cake mix for cookies gained popularity for its incredible convenience, transforming a simple box of mix into a versatile base for countless variations. For Easter, this method is particularly brilliant, freeing up valuable time so you can focus on other holiday preparations or, more importantly, enjoy precious moments with loved ones. People adore these Easter Cake Mix Cookies not only for their incredibly moist texture and rich flavor but also for their impressive visual appeal, easily customizable with festive pastel colors and sprinkles. They’re a fantastic activity for baking with children, creating edible memories that last long after the last crumb is gone. Get ready to bake a batch of pure joy!

Ingredients:
- 1 (15.25 ounce) box white or yellow cake mix: I typically reach for a white cake mix for these Easter Cake Mix Cookies because it provides a wonderful blank canvas for vibrant food coloring, really making them pop! However, a yellow cake mix works beautifully too, offering a slightly richer vanilla flavor.
- 2 large eggs: These are crucial for binding our cookie dough together and providing that perfect chewy texture we all love in a good cookie.
- 1/2 cup vegetable oil: Any neutral-flavored oil will do the trick here, like canola or sunflower oil. This is what gives our Easter Cake Mix Cookies their incredibly moist and tender crumb.
- 1 teaspoon pure vanilla extract: While the cake mix already has flavor, a touch of extra vanilla extract just elevates everything, adding depth and warmth to our Easter Cake Mix Cookies. Don’t skip this!
- 1/4 cup all-purpose flour: I find adding a little extra flour helps give the cookies a bit more structure and makes the dough a touch easier to handle, especially after adding liquid food coloring. It also helps prevent them from spreading too much.
- Assorted gel food coloring (pink, blue, yellow, green, purple): This is where the magic happens for our festive Easter Cake Mix Cookies! Gel food coloring provides the most vibrant colors without adding too much liquid to the dough. Think pastel hues for a true Easter vibe.
- 1/2 cup powdered sugar (for rolling): This is essential for achieving that delightful crinkly, slightly crisp exterior on our Easter Cake Mix Cookies. It gives them a lovely finish and a subtle extra sweetness.
- 1/2 cup Easter-themed sprinkles: Think pastel nonpareils, jimmie sprinkles, or even tiny bunny or egg-shaped sprinkles. These are for adding after baking, or you can mix some into the dough for extra fun!
- Optional additions:
- 1/2 cup white chocolate chips: For an extra layer of sweetness and a creamy texture.
- 1/4 cup lemon zest: If you’re using a lemon cake mix or just want a bright, citrusy twist to your Easter Cake Mix Cookies.
- Melted white chocolate: For drizzling over the cooled cookies for an extra decadent touch.
Gathering Your Supplies and Preparing Your Workspace
- First things first, let’s get that oven ready! I always recommend preheating your oven to 350°F (175°C) well in advance. This ensures a consistent temperature throughout the baking process, which is absolutely key for achieving perfectly golden Easter Cake Mix Cookies that are soft and chewy in the center. While it’s heating up, grab a couple of large baking sheets and line them with parchment paper or silicone baking mats. This little trick will save you from sticky situations and make cleanup a breeze – and trust me, you’ll want easy cleanup when those delicious aromas start filling your kitchen!
- Next, let’s gather all our ingredients. It’s so much easier and more enjoyable to bake when everything is measured out and within reach. Get out your large mixing bowl, a whisk, a rubber spatula, and some small bowls for dividing and coloring the dough. Having everything prepped makes the whole process of creating these beautiful Easter Cake Mix Cookies a smooth and joyful experience.
Mixing the Dough for Your Easter Cake Mix Cookies
- In your large mixing bowl, combine the cake mix, two large eggs, 1/2 cup vegetable oil, and 1 teaspoon of vanilla extract. I like to start by gently whisking the wet ingredients together briefly before adding them to the cake mix to ensure an even distribution.
- Now, using a sturdy rubber spatula or a stand mixer with the paddle attachment, mix all the ingredients together on low speed until just combined. Be careful not to overmix! Overmixing can develop the gluten in the flour too much, leading to tougher cookies, and we’re aiming for delightfully soft and chewy Easter Cake Mix Cookies. The dough will be quite thick and sticky, resembling a very soft playdough.
- At this point, I like to stir in the 1/4 cup of all-purpose flour. This extra flour helps to create a slightly firmer dough that’s easier to handle, especially once we add liquid food coloring, which can sometimes thin the dough out a bit. Mix it in until just incorporated. If you’re adding optional white chocolate chips or lemon zest, fold them in now too.
- Once the dough is mixed, it’s a good idea to cover the bowl with plastic wrap and pop it into the refrigerator for about 15-20 minutes. This chilling time helps firm up the dough, making it much less sticky and significantly easier to work with when it comes to dividing and coloring. This step is especially helpful for getting those perfectly shaped Easter Cake Mix Cookies.
Adding That Festive Easter Touch
- This is my favorite part – adding the vibrant colors! Divide the chilled cookie dough into as many portions as you want colors. For example, if you want five different pastel colors, divide the dough into five roughly equal portions. Place each portion into a separate small bowl. I usually aim for about 1 cup of dough per bowl, which makes about 12-15 cookies of each color, giving me a fantastic variety of Easter Cake Mix Cookies.
- Now, it’s time to get colorful! Add a small drop or two of gel food coloring to each bowl. Remember, a little goes a long way with gel colors, so start with just a tiny bit and add more if needed to achieve your desired shade. For Easter, I love soft pastels like baby pink, sky blue, sunny yellow, mint green, and a delicate lavender.
- Using a spoon or your hands (gloves are recommended here if you don’t want stained fingers!), thoroughly mix the color into each portion of dough until the color is evenly distributed. Take your time with this step, ensuring there are no streaks of uncolored dough. You want each cookie to have a consistent, beautiful hue. This step transforms plain cookie dough into truly festive Easter Cake Mix Cookies!
Shaping and Baking Your Beautiful Easter Cake Mix Cookies
- Pour the powdered sugar into a shallow bowl. This is what we’ll be rolling our dough balls in to create that signature crinkle effect.
- Now, scoop out rounded tablespoons of each colored dough. I find a small cookie scoop (about 1.5 inches in diameter) works perfectly for uniform sizing. Roll each scoop of dough between your palms to form a smooth ball. The slight warmth from your hands will help the dough become pliable, but if it gets too sticky, simply wash your hands and start again, or pop the dough back into the fridge for a few minutes.
- Once you have a dough ball, roll it generously in the powdered sugar, ensuring it’s completely coated. You want a thick layer of sugar on the outside; this is what creates those beautiful cracks and a lovely sweetness when baked. Place the sugar-coated dough balls onto your prepared baking sheets, leaving about 2 inches of space between each cookie to allow for spreading. You might be tempted to crowd them, but giving them space is crucial for perfectly round Easter Cake Mix Cookies.
- Place the baking sheets into your preheated 350°F (175°C) oven. Bake for approximately 8-10 minutes. The exact baking time can vary depending on your oven, so keep a close eye on them. You’ll know they’re done when the edges are lightly set and very slightly golden, but the centers still look soft and perhaps just a tiny bit undercooked. They will continue to set as they cool on the baking sheet. Overbaking is the enemy of a soft cookie! You want these Easter Cake Mix Cookies to be wonderfully chewy, not crunchy.
- As soon as you pull the cookies out of the oven, while they’re still warm, you can gently press a few of your Easter sprinkles onto the tops. The warmth of the cookie will help the sprinkles adhere. If you waited until they were completely cool, they might not stick as well. This final touch makes your Easter Cake Mix Cookies even more irresistible and festive.
Cooling and Finishing Touches
- Once baked, let the cookies cool on the baking sheets for about 5 minutes. This brief resting period is important because it allows the cookies to firm up slightly without sticking to the parchment paper or breaking apart when you try to move them. They’re still quite delicate straight out of the oven!
- After 5 minutes, carefully transfer the partially cooled Easter Cake Mix Cookies to a wire cooling rack to cool completely. Allowing them to cool on a rack ensures air circulates all around them, preventing them from becoming soggy on the bottom. Patience is key here, as they firm up beautifully as they reach room temperature, ready for you to enjoy.
- If you wish, once the cookies are completely cool, you can melt some white chocolate (either in the microwave in 30-second intervals or using a double boiler) and drizzle it artfully over the colorful cookies. This adds another layer of visual appeal and a delightful sweetness, truly elevating your homemade Easter Cake Mix Cookies.
Tips for the Perfect Easter Cake Mix Cookies
Achieving Vibrant Colors:
For the most brilliant and true-to-life colors, I always recommend using gel food coloring. Liquid food coloring can sometimes thin out the dough and may not produce as intense a shade. When coloring, start with just a tiny dab of gel and mix thoroughly. You can always add more, but you can’t take it away! Aim for those lovely pastel shades that just scream Easter.
Dough Consistency Matters:
If your dough feels too sticky to roll into balls, don’t fret! This can sometimes happen, especially if your kitchen is warm or if you used a particularly moist cake mix. Simply pop the entire bowl of dough back into the refrigerator for another 20-30 minutes. A firmer, colder dough is always easier to work with, resulting in beautifully shaped Easter Cake Mix Cookies.
Preventing Spreading:
To prevent your cookies from spreading too much and losing their lovely round shape, make sure your oven is accurately preheated. Also, the added 1/4 cup of flour helps significantly. Chilling the dough before coloring and rolling is another crucial step. If you live in a warm climate, you might even consider chilling the formed dough balls for 10 minutes before baking.
Storage Suggestions:
These delightful Easter Cake Mix Cookies stay fresh and soft for up to 3-4 days when stored in an airtight container at room temperature. Layer them between sheets of parchment paper if you stack them to prevent sticking. They also freeze wonderfully! Simply place the cooled cookies in a single layer on a baking sheet to flash freeze for about an hour, then transfer them to a freezer-safe bag or container. They’ll keep for up to 3 months, ready to be thawed for an impromptu treat.
Flavor Variations for Your Easter Cake Mix Cookies:
- Lemon Zest Love: If you’re a fan of citrus, add 1-2 teaspoons of fresh lemon zest to the dough. It brightens the flavor beautifully, especially if you’re using a yellow cake mix.
- Chocolate Chip Surprise: Fold in 1/2 cup of white chocolate chips, milk chocolate chips, or even colorful M&M’s for an extra burst of flavor and texture within your Easter Cake Mix Cookies.
- Extract Experiments: Beyond vanilla, try adding a 1/2 teaspoon of almond extract for a subtle nutty note, or a touch of lemon extract if you want to really amplify that citrus flavor.
- Cake Mix Swap: While white and yellow are perfect for coloring, don’t hesitate to experiment with other cake mix flavors! A strawberry cake mix could make lovely pink cookies, or a funfetti cake mix would add built-in sprinkles.
Perfect for Gifting:
These colorful Easter Cake Mix Cookies make an absolutely charming homemade gift for friends, family, or neighbors. Arrange an assortment of colors in a pretty box or bag, tie it with a festive ribbon, and you have a thoughtful, delicious present that perfectly captures the spirit of Easter. Everyone loves receiving a tray of homemade cookies, especially ones as cheerful and delicious as these!
Don’t Overcrowd the Baking Sheet:
It’s tempting to try and bake as many cookies as possible at once, but giving each cookie enough space (at least 2 inches apart) on the baking sheet is crucial. Overcrowding can lead to uneven baking and cookies that spread into each other, forming one giant, unappealing mass. Patience with multiple batches will ensure each of your Easter Cake Mix Cookies bakes perfectly.
Cooling is Crucial:
While it’s hard to resist a warm cookie straight from the oven, allowing your Easter Cake Mix Cookies to cool completely on a wire rack is essential. This not only allows them to firm up properly but also ensures that any glazes or drizzles you add later will set beautifully without melting or running. A fully cooled cookie also has the best texture.
<h2>Conclusion:</h2>
<p>Well, my friends, we’ve reached the sweet finale of our baking journey, and I genuinely hope you’re feeling as excited as I am about these absolutely delightful treats. What we’ve explored together is more than just a recipe; it’s a gateway to effortless joy in the kitchen, a promise of deliciousness that requires minimal fuss but delivers maximum impact. <strong>These cookies are, without a doubt, a game-changer for anyone who loves homemade goodies but might not always have hours to spend meticulously measuring and mixing.</strong> Imagine, in just a short amount of time, you can whip up a batch of soft, chewy, perfectly textured cookies that taste like they came straight from a gourmet bakery, yet the secret lies in one wonderfully convenient ingredient: a simple cake mix. This recipe empowers you to create something truly special, even on your busiest days, making you feel like a seasoned baker with a secret trick up your sleeve.</p>
<p>The beauty of this recipe truly lies in its simplicity and the spectacular results it yields. It’s perfect for busy weeknights when you crave something sweet, ideal for impromptu gatherings where you need a quick dessert that truly impresses, and absolutely brilliant for involving little helpers in the kitchen without overwhelming them with complex steps. <strong>The tender crumb and the customizable flavors make them incredibly versatile, ensuring there’s a cookie for every preference and every occasion.</strong> You’ll find that the sheer ease of these cookies will make them a regular in your baking rotation, becoming a reliable source of comfort and cheer. There’s a profound satisfaction that comes from watching flour, eggs, and a humble box of cake mix transform into something so utterly delicious, and all with such little effort on your part. It truly feels like magic, allowing you to focus on the joy of sharing and eating rather than the stress of preparation.</p>
<p>Now, let’s talk about enjoying these beauties. While they are undeniably perfect straight from the cooling rack, still slightly warm and gooey, there are so many wonderful ways to elevate your cookie experience. For a classic treat, simply serve them alongside a tall, cold glass of milk, making for an ideal after-school snack or a nostalgic midnight munchie. <strong>For a more sophisticated dessert, consider pairing them with a scoop of premium vanilla bean ice cream, perhaps with a drizzle of warm caramel or chocolate sauce.</strong> The contrast between the chewy cookie and the creamy ice cream is simply divine. They also make an excellent addition to any dessert platter, beautifully complementing other sweets like brownies or fruit tarts, adding a pop of color and a familiar, comforting flavor that everyone loves. Don’t forget how amazing they are crumbled over yogurt or even as a base for a deconstructed trifle! <h5>Think about turning them into impressive cookie sandwiches by slathering a generous dollop of your favorite buttercream or cream cheese frosting between two cookies – that’s a showstopper right there!</h5> A sprinkle of sea salt on top of a chocolate cookie or a dusting of powdered sugar on a lemon cookie can add that extra touch of gourmet appeal.</p>
<p>And speaking of customization, this is where the fun truly begins! While our focus keyword, <strong>Easter Cake Mix Cookies</strong>, highlights their seasonal perfection, don’t let that limit your creativity. This base recipe is a canvas awaiting your personal touch. <strong>Imagine using a lemon cake mix for a zesty spring cookie, or a chocolate fudge mix with white chocolate chips for an intensely rich experience.</strong> A strawberry cake mix with a hint of vanilla extract and colorful sprinkles would be delightful for Valentine’s Day or a birthday celebration. You can experiment with different extracts too – almond, peppermint, or even a touch of orange zest can totally transform the flavor profile. <h4>Consider adding various mix-ins like chopped nuts (pecans, walnuts), dried cranberries, mini marshmallows, or different types of chocolate chips (dark, milk, peanut butter chips) to create endless variations.</h4> For other holidays, simply swap out the sprinkles! Red and green for Christmas, orange and black for Halloween, or patriotic red, white, and blue for the Fourth of July. The possibilities are genuinely boundless, allowing you to tailor these cookies to any theme or taste preference with incredible ease. You can also play with baking times to achieve your preferred texture – a minute or two less for a gooier center, or a minute more for a crispier edge, giving you complete control over your ideal cookie.</p>
<p>So, what are you waiting for? I wholeheartedly encourage you to roll up your sleeves, grab a box of your favorite cake mix, and give this recipe a try. <strong>It’s a fantastic way to bring a little bit of magic and a lot of deliciousness into your home without any stress.</strong> Whether you’re baking for a special occasion like Easter, a casual get-together, or simply because you deserve a treat, these cookies are guaranteed to put a smile on everyone’s face. Once you’ve made them, I would absolutely love to hear about your experience! Did you stick to the original recipe, or did you venture into exciting variations? Did you discover a new favorite flavor combination? Please, share your baking adventures and any brilliant ideas you come up with. <strong>Your feedback and creative adaptations inspire not only me but also our entire community of baking enthusiasts.</strong> Use your imagination, have fun, and enjoy the wonderful aroma that will fill your kitchen. Happy baking, my dear friends, and may your kitchens always be filled with the wonderful aroma of fresh cookies!</p>
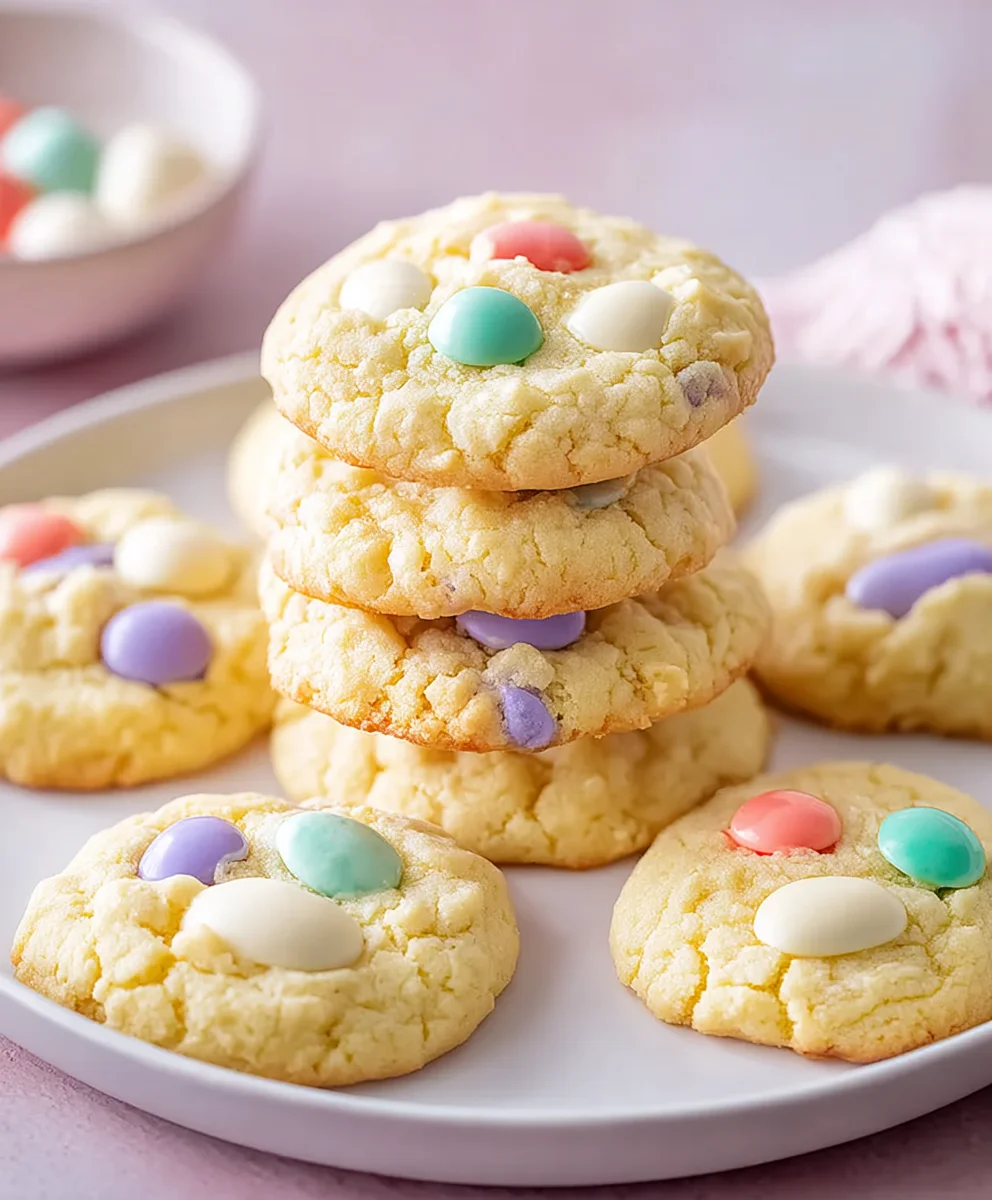
Easter Cake Mix Cookies
Effortlessly delicious and visually vibrant, these Easter Cake Mix Cookies are soft, chewy, and perfect for holiday gatherings. Made from a simple cake mix base and adorned with festive pastel colors and sprinkles, they’re a joyful treat that’s easy to bake and even easier to love.
Ingredients
-
1 (15.25 ounce) box white or yellow cake mix
-
2 large eggs
-
1/2 cup vegetable oil
-
1 teaspoon pure vanilla extract
-
1/4 cup all-purpose flour
-
Assorted gel food coloring (pink, blue, yellow, green, purple)
-
1/2 cup powdered sugar (for rolling)
-
1/2 cup Easter-themed sprinkles
-
Optional: 1/2 cup white chocolate chips
-
Optional: 1/4 cup lemon zest
-
Optional: Melted white chocolate (for drizzling)
Instructions
-
Step 1
Preheat oven to 350°F (175°C). Line baking sheets with parchment paper or silicone mats. -
Step 2
In a large mixing bowl, combine cake mix, eggs, vegetable oil, vanilla extract, and 1/4 cup all-purpose flour. Mix on low speed until just combined. Fold in any optional white chocolate chips or lemon zest if using. Do not overmix. -
Step 3
Cover the bowl with plastic wrap and refrigerate for 15-20 minutes to firm up the dough. -
Step 4
Divide the chilled dough into equal portions, one for each desired color. Add a small drop or two of gel food coloring to each portion and mix thoroughly until the color is evenly distributed. -
Step 5
Pour powdered sugar into a shallow bowl. Scoop rounded tablespoons of each colored dough, roll into smooth balls, and then roll generously in the powdered sugar until fully coated. Place dough balls 2 inches apart on prepared baking sheets. -
Step 6
Bake for 8-10 minutes, or until edges are lightly set and centers still look soft. Do not overbake to ensure a chewy texture. -
Step 7
Immediately after removing from the oven, gently press Easter sprinkles onto the tops of the warm cookies to help them adhere. -
Step 8
Allow cookies to cool on the baking sheets for 5 minutes, then transfer to a wire rack to cool completely. Once fully cooled, optionally drizzle with melted white chocolate.
Important Information
Nutrition Facts (Per Serving)
It is important to consider this information as approximate and not to use it as definitive health advice.
Allergy Information
Please check ingredients for potential allergens and consult a health professional if in doubt.
Leave a Comment