
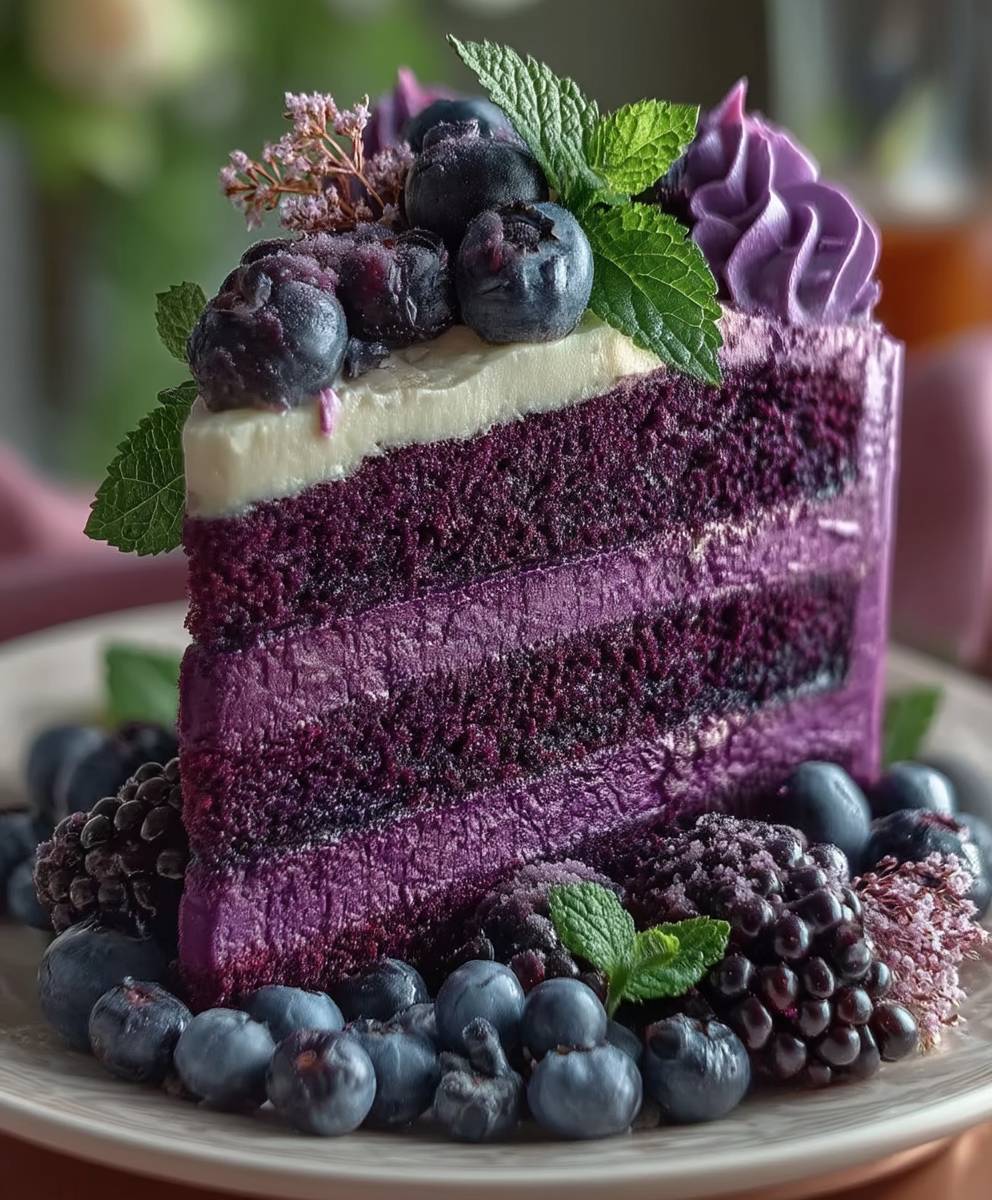
Purple Velvet Cake: Prepare to be captivated by a dessert that’s as visually stunning as it is delicious! Imagine slicing into a cake with a deep, vibrant purple hue, its velvety texture practically melting in your mouth. This isn’t just any cake; it’s a showstopper, perfect for birthdays, holidays, or any occasion that calls for a touch of magic.
While the classic Red Velvet Cake boasts a rich history rooted in the Southern United States, the Purple Velvet Cake is a modern twist, adding a playful and elegant touch to a beloved classic. The vibrant purple color, often achieved with natural ingredients like purple sweet potato or food coloring, makes it an instant conversation starter.
People adore this cake for several reasons. First, the visual appeal is undeniable. The unexpected color makes it a memorable treat. Second, the taste and texture are simply divine. The combination of a moist, tender crumb with a tangy cream cheese frosting creates a symphony of flavors that will leave you wanting more. Finally, while it looks impressive, a Purple Velvet Cake is surprisingly easy to make, especially with our step-by-step recipe. So, get ready to bake a cake that’s both beautiful and utterly irresistible!

Ingredients:
- For the Cake:
- 2 ½ cups all-purpose flour
- 2 cups granulated sugar
- ¾ cup unsweetened cocoa powder (Dutch-processed preferred)
- 1 ½ teaspoons baking powder
- 1 ½ teaspoons baking soda
- 1 teaspoon salt
- 1 cup buttermilk, room temperature
- ½ cup vegetable oil
- 2 large eggs, room temperature
- 2 teaspoons vanilla extract
- 1 teaspoon white vinegar
- 1 cup hot brewed coffee
- 2-3 tablespoons purple gel food coloring (adjust to desired color)
- For the Cream Cheese Frosting:
- 8 ounces cream cheese, softened
- ½ cup (1 stick) unsalted butter, softened
- 4 cups powdered sugar
- 2 teaspoons vanilla extract
- 2-4 tablespoons milk or heavy cream (adjust to desired consistency)
- Optional Garnishes:
- Fresh berries (raspberries, blueberries, blackberries)
- Chocolate shavings
- Edible glitter
Preparing the Cake Batter:
- Preheat and Prepare: First things first, preheat your oven to 350°F (175°C). While the oven is heating up, grease and flour two 9-inch round cake pans. You can also line the bottoms with parchment paper rounds for extra insurance against sticking. This makes removing the cakes a breeze later on!
- Combine Dry Ingredients: In a large mixing bowl, whisk together the flour, sugar, cocoa powder, baking powder, baking soda, and salt. Make sure everything is evenly distributed. This ensures that the leavening agents work properly and the cocoa powder doesn’t clump.
- Combine Wet Ingredients: In a separate bowl, whisk together the buttermilk, oil, eggs, and vanilla extract. Whisk until everything is well combined and the mixture is smooth.
- Combine Wet and Dry: Gradually add the wet ingredients to the dry ingredients, mixing on low speed until just combined. Be careful not to overmix at this stage. Overmixing can lead to a tough cake.
- Add Coffee and Vinegar: In a small bowl, combine the hot brewed coffee and white vinegar. The vinegar helps to activate the cocoa powder and enhance the red color (which will be purple with the food coloring). Add this mixture to the batter and mix until just combined. The batter will be quite thin, but don’t worry, that’s normal!
- Add Food Coloring: Now for the fun part! Add the purple gel food coloring, one tablespoon at a time, until you reach your desired shade of purple. Remember that the color will deepen slightly as the cake bakes. I usually start with two tablespoons and then add more if needed.
- Divide and Bake: Divide the batter evenly between the prepared cake pans. Bake for 30-35 minutes, or until a wooden skewer inserted into the center comes out clean. Keep a close eye on them, as baking times can vary depending on your oven.
- Cool the Cakes: Let the cakes cool in the pans for 10 minutes before inverting them onto a wire rack to cool completely. Make sure the cakes are completely cool before frosting. This is crucial to prevent the frosting from melting.
Preparing the Cream Cheese Frosting:
- Cream Butter and Cream Cheese: In a large mixing bowl, beat the softened cream cheese and butter together until smooth and creamy. This is best done with an electric mixer (stand mixer or hand mixer). Make sure both the butter and cream cheese are at room temperature for the best results.
- Add Powdered Sugar: Gradually add the powdered sugar, one cup at a time, beating on low speed until combined. Be careful not to add the powdered sugar too quickly, or you’ll end up with a cloud of sugar dust!
- Add Vanilla and Milk: Add the vanilla extract and milk (or heavy cream). Beat on medium speed until the frosting is light and fluffy. Add more milk or cream, one tablespoon at a time, until you reach your desired consistency. I prefer a slightly thicker frosting for stability.
Assembling the Cake:
- Level the Cakes (Optional): If your cakes have a slight dome on top, you can use a serrated knife to level them. This will make stacking and frosting the cake much easier. I usually just trim off the very top to create a flat surface.
- Place First Layer: Place one cake layer on a serving plate or cake stand. If you want to protect your serving surface, you can place strips of parchment paper around the edges of the cake before frosting. These can be removed later for a clean presentation.
- Add Frosting: Spread a generous layer of cream cheese frosting evenly over the first cake layer. I like to use an offset spatula for this, but a regular butter knife will work just fine.
- Place Second Layer: Carefully place the second cake layer on top of the frosting.
- Frost the Cake: Frost the entire cake with the remaining cream cheese frosting. You can create a smooth finish or add swirls and texture with your spatula. Get creative!
- Chill the Cake (Optional): For a more stable frosting, chill the cake in the refrigerator for at least 30 minutes before serving. This will help the frosting set up and prevent it from sliding.
- Garnish (Optional): Decorate the cake with fresh berries, chocolate shavings, edible glitter, or any other garnishes you like. I love the contrast of fresh berries against the purple cake and white frosting.
- Serve and Enjoy: Slice and serve your beautiful Purple Velvet Cake! Store any leftovers in the refrigerator.
Tips and Tricks for the Perfect Purple Velvet Cake:
- Room Temperature Ingredients: Using room temperature ingredients, especially the butter, cream cheese, eggs, and buttermilk, is crucial for creating a smooth and well-emulsified batter. This helps the cake bake evenly and have a tender crumb.
- Don’t Overmix: Overmixing the batter can develop the gluten in the flour, resulting in a tough cake. Mix until just combined.
- Dutch-Processed Cocoa Powder: Dutch-processed cocoa powder has a smoother, less acidic flavor than natural cocoa powder. It also tends to produce a darker, richer color. If you can find it, it’s worth using for this recipe.
- Hot Coffee: The hot coffee helps to bloom the cocoa powder and enhance its flavor. It also adds moisture to the cake.
- Gel Food Coloring: Gel food coloring is more concentrated than liquid food coloring, so you’ll need less of it to achieve the desired color. It also won’t thin out the batter as much as liquid food coloring.
- Adjust Sweetness: If you prefer a less sweet frosting, you can reduce the amount of powdered sugar slightly.
- Frosting Consistency: The consistency of the frosting is important for both appearance and stability. If the frosting is too thin, it will slide off the cake. If it’s too thick, it will be difficult to spread. Adjust the amount of milk or cream to achieve your desired consistency.
- Cake Pan Preparation: Properly greasing and flouring the cake pans is essential to prevent the cakes from sticking. You can also use baking spray with flour or line the bottoms of the pans with parchment paper rounds.
- Cooling Time: Make sure the cakes are completely cool before frosting. Warm cakes will melt the frosting and make it difficult to work with.
- Storage: Store leftover cake in an airtight container in the refrigerator for up to 3 days.
Variations and Substitutions:
- Red Velvet Cake: If you prefer a classic Red Velvet Cake, simply substitute red gel food coloring for the purple gel food coloring.
- Chocolate Chips: Add chocolate chips to the batter for an extra chocolatey treat.
- Nuts: Add chopped nuts to the batter or sprinkle them on top of the frosting for added texture and flavor.
- Different Frosting: If you’re not a fan of cream cheese frosting, you can use a different type of frosting, such as buttercream or chocolate ganache.
- Gluten-Free: To make this cake gluten-free, substitute the all-purpose flour with a gluten-free all-purpose flour blend. Be sure to use a blend that contains xanthan gum for best results.
- Vegan: To make this cake vegan, you’ll need to make several substitutions. Use a plant-based milk instead of buttermilk, a flax egg or applesauce instead of eggs
Conclusion:
And there you have it! This Purple Velvet Cake is more than just a dessert; it’s an experience. From the vibrant, eye-catching color to the unbelievably moist and tender crumb, every bite is a celebration. I truly believe this recipe is a must-try for anyone looking to impress, whether it’s for a special occasion or simply to elevate your everyday baking. The subtle tang of the buttermilk combined with the rich cocoa and the hint of vanilla creates a symphony of flavors that will leave you wanting more.
But the best part? It’s surprisingly easy to make! Don’t let the “velvet” in the name intimidate you. With clear instructions and readily available ingredients, even novice bakers can achieve stunning results. I’ve poured my heart into perfecting this recipe, and I’m confident that you’ll be thrilled with the outcome.
Serving Suggestions and Variations:
Now, let’s talk about how to make this cake even more spectacular! While the classic cream cheese frosting is a perfect complement to the Purple Velvet Cake, don’t be afraid to experiment. A white chocolate ganache would add a touch of elegance, or a simple vanilla buttercream would let the cake’s unique flavor shine through.
For serving, a dusting of edible glitter or a scattering of fresh berries can elevate the presentation. Imagine serving slices of this gorgeous cake with a scoop of vanilla bean ice cream and a drizzle of raspberry sauce pure bliss!
If you’re feeling adventurous, consider these variations:
* **Mini Purple Velvet Cupcakes:** Bake the batter in cupcake liners for individual treats. Perfect for parties or lunchbox surprises.
* **Purple Velvet Cake Pops:** Crumble the baked cake, mix it with frosting, and roll it into cake pops. Dip them in melted chocolate and decorate with sprinkles.
* **Purple Velvet Trifle:** Layer cubes of the cake with whipped cream, berries, and chocolate shavings in a trifle bowl for a show-stopping dessert.
* **Add a Citrus Twist:** A little orange or lemon zest in the batter can brighten the flavor and add a refreshing note.
* **Go Nutty:** Fold in chopped pecans or walnuts for added texture and a nutty flavor.The possibilities are endless! Feel free to get creative and adapt the recipe to your own preferences. Baking should be fun, so don’t be afraid to experiment and make it your own.
I’m so excited for you to try this Purple Velvet Cake recipe. I know you’ll love it as much as I do. It’s a guaranteed crowd-pleaser and a surefire way to impress your friends and family.
So, what are you waiting for? Preheat your oven, gather your ingredients, and get ready to bake a cake that’s as beautiful as it is delicious.
Once you’ve made it, I’d absolutely love to hear about your experience! Share your photos and comments on social media using [Your Hashtag] or tag me [Your Social Media Handle]. Let me know what variations you tried and how your cake turned out. Your feedback is invaluable, and I can’t wait to see your creations! Happy baking! I hope you enjoy this Purple Velvet Cake as much as I do.
Purple Velvet Cake: A Decadent Recipe & Baking Guide
A moist and decadent purple-hued twist on classic red velvet cake, topped with creamy cream cheese frosting.
Ingredients
- 2 ½ cups all-purpose flour
- 2 cups granulated sugar
- ¾ cup unsweetened cocoa powder (Dutch-processed preferred)
- 1 ½ teaspoons baking powder
- 1 ½ teaspoons baking soda
- 1 teaspoon salt
- 1 cup buttermilk, room temperature
- ½ cup vegetable oil
- 2 large eggs, room temperature
- 2 teaspoons vanilla extract
- 1 teaspoon white vinegar
- 1 cup hot brewed coffee
- 2-3 tablespoons purple gel food coloring (adjust to desired color)
- 8 ounces cream cheese, softened
- ½ cup (1 stick) unsalted butter, softened
- 4 cups powdered sugar
- 2 teaspoons vanilla extract
- 2-4 tablespoons milk or heavy cream (adjust to desired consistency)
- Fresh berries (raspberries, blueberries, blackberries)
- Chocolate shavings
- Edible glitter
Instructions
- Preheat oven to 350°F (175°C). Grease and flour two 9-inch round cake pans. Line the bottoms with parchment paper rounds.
- In a large mixing bowl, whisk together the flour, sugar, cocoa powder, baking powder, baking soda, and salt.
- In a separate bowl, whisk together the buttermilk, oil, eggs, and vanilla extract until well combined.
- Gradually add the wet ingredients to the dry ingredients, mixing on low speed until just combined. Do not overmix.
- In a small bowl, combine the hot brewed coffee and white vinegar. Add this mixture to the batter and mix until just combined.
- Add the purple gel food coloring, one tablespoon at a time, until you reach your desired shade of purple.
- Divide the batter evenly between the prepared cake pans. Bake for 30-35 minutes, or until a wooden skewer inserted into the center comes out clean.
- Let the cakes cool in the pans for 10 minutes before inverting them onto a wire rack to cool completely.
- In a large mixing bowl, beat the softened cream cheese and butter together until smooth and creamy.
- Gradually add the powdered sugar, one cup at a time, beating on low speed until combined.
- Add the vanilla extract and milk (or heavy cream). Beat on medium speed until the frosting is light and fluffy. Add more milk or cream, one tablespoon at a time, until you reach your desired consistency.
- If your cakes have a slight dome on top, you can use a serrated knife to level them.
- Place one cake layer on a serving plate or cake stand.
- Spread a generous layer of cream cheese frosting evenly over the first cake layer.
- Carefully place the second cake layer on top of the frosting.
- Frost the entire cake with the remaining cream cheese frosting.
- For a more stable frosting, chill the cake in the refrigerator for at least 30 minutes before serving.
- Decorate the cake with fresh berries, chocolate shavings, edible glitter, or any other garnishes you like.
- Slice and serve your beautiful Purple Velvet Cake! Store any leftovers in the refrigerator.
Notes
- Using room temperature ingredients is crucial for a smooth batter.
- Don’t overmix the batter.
- Dutch-processed cocoa powder is preferred for a richer color and flavor.
- Hot coffee helps bloom the cocoa powder.
- Gel food coloring is recommended for vibrant color.
- Adjust sweetness of frosting to your preference.
- Ensure cakes are completely cool before frosting.
- Store leftover cake in an airtight container in the refrigerator for up to 3 days.


Leave a Comment