
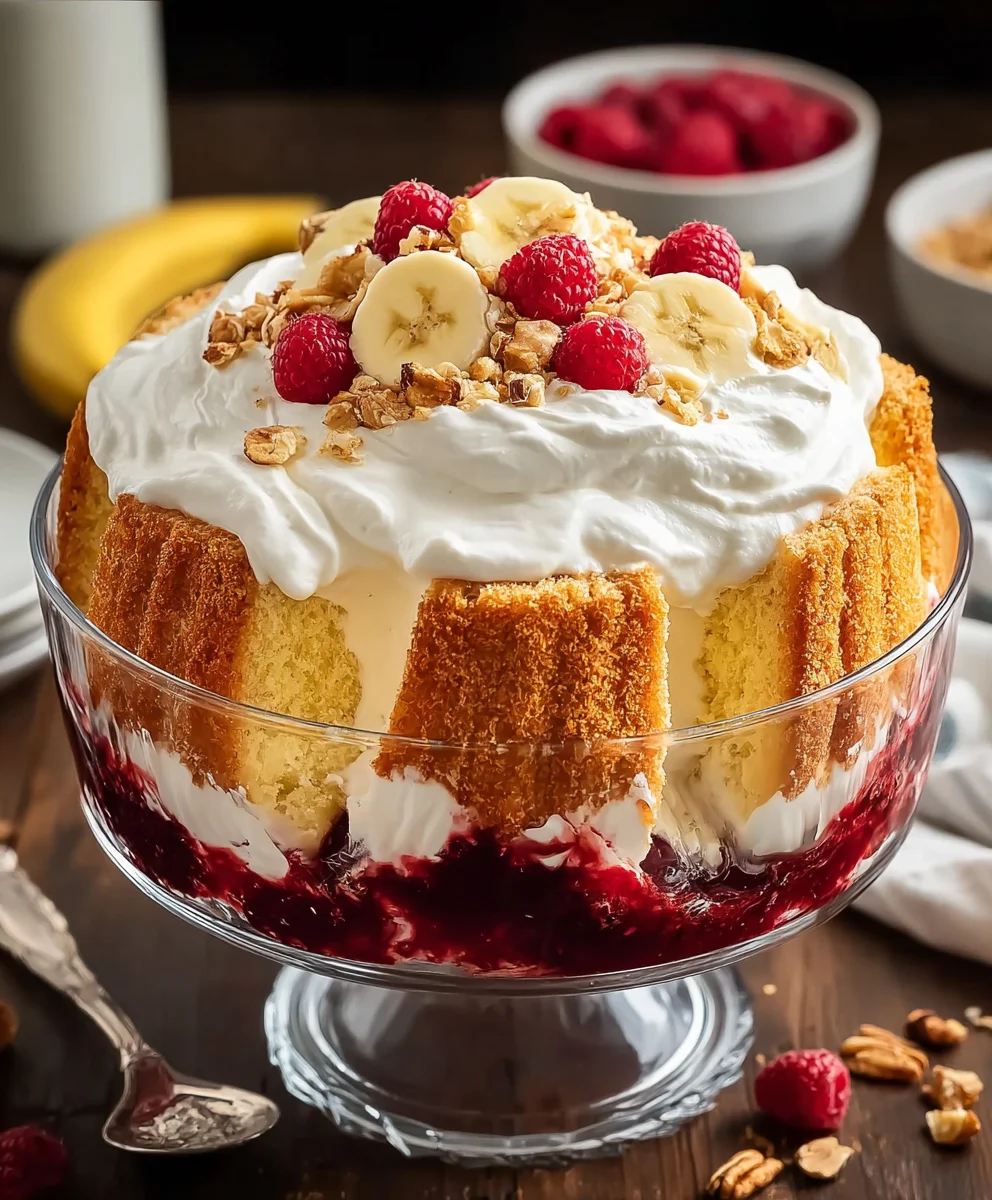
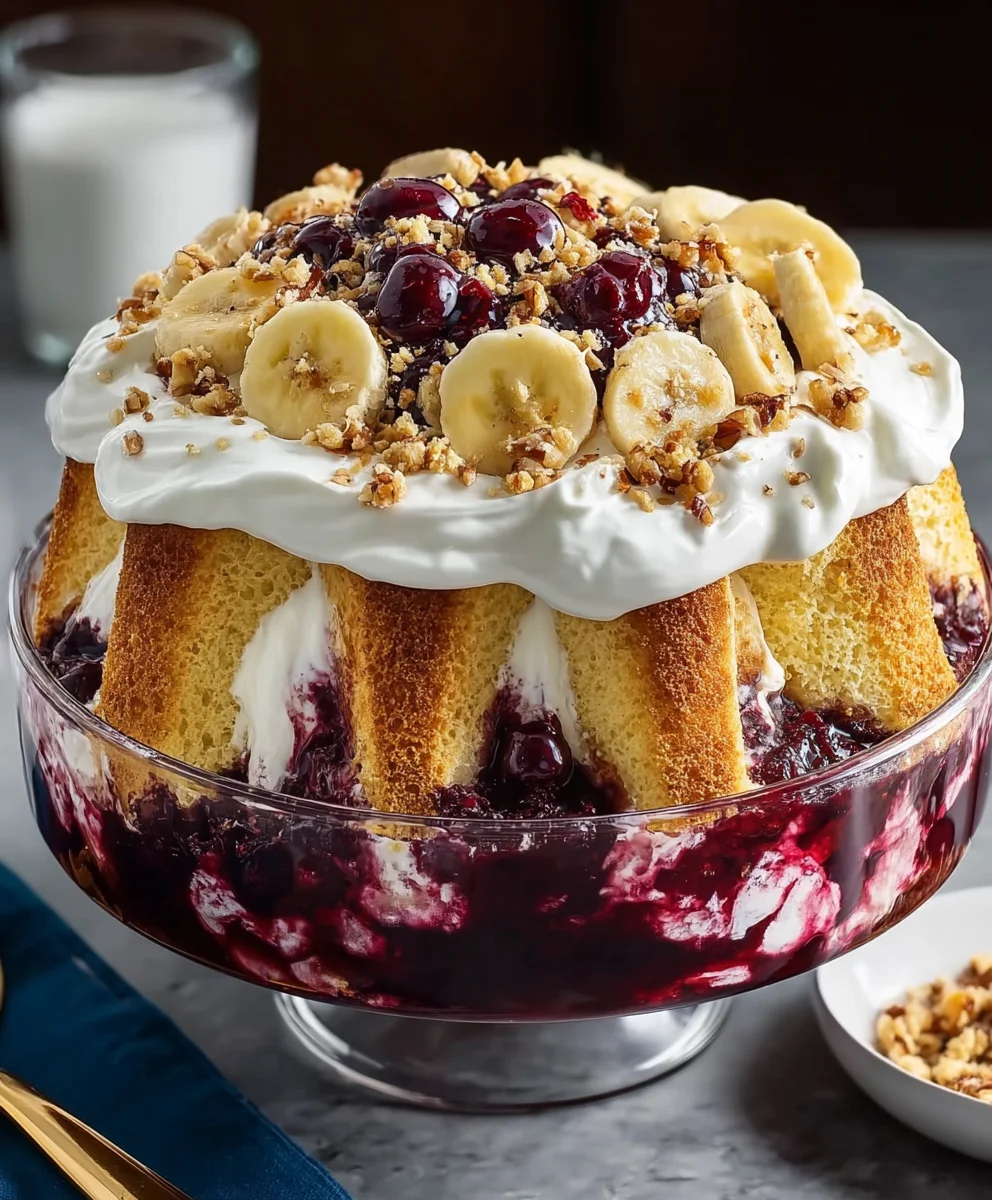
Punch Bowl Cake is more than just a dessert; it’s an edible centerpiece, a beacon of celebration that promises to delight every guest. I’ve always found something truly magical about this layered masterpiece, a dish that effortlessly combines stunning visual appeal with a taste that evokes pure comfort and joy. Imagine sinking your spoon through delicate layers of moist cake, rich, creamy pudding, sweet, vibrant fruit, and a luscious whipped topping – a symphony of textures and flavors in every single bite. It’s a dessert that not only satisfies the sweet tooth but also brightens any table.
This iconic dessert holds a special place in the hearts of many, particularly those familiar with Southern hospitality and generous gatherings. Originating from a tradition of communal feasts and joyous occasions, the Punch Bowl Cake has graced countless family reunions, church potlucks, and holiday celebrations for generations. What truly makes it beloved is its ingenious design: not only is it incredibly easy to assemble, often using readily available ingredients, but it’s also a fantastic make-ahead option, allowing you to spend more time with your loved ones and less time in the kitchen.
Its refreshing taste, beautiful presentation when served in a clear punch bowl, and the sheer convenience of feeding a crowd make it an undisputed champion of potluck tables everywhere. Get ready to create a dessert that will undoubtedly become a cherished tradition in your own home!

Ingredients:
- For the Cake:
- 1 (15.25-ounce) box yellow cake mix (or your preferred flavor, but yellow creates a beautiful contrast!)
- Ingredients called for on the cake mix box (typically eggs, vegetable oil, and water)
- For the Creamy Vanilla Pudding Layer:
- 2 (3.4-ounce) packages instant vanilla pudding mix
- 4 cups cold whole milk (I find whole milk gives the best, richest texture for our Punch Bowl Cake)
- For the Luscious Cream Cheese Layer:
- 1 (8-ounce) package cream cheese, softened to room temperature
- 1/2 cup granulated sugar
- 1 teaspoon pure vanilla extract
- For the Whipped Topping:
- 1 (16-ounce) container frozen whipped topping (like Cool Whip), thawed in the refrigerator overnight or for several hours
- For the Fresh Fruit Layers:
- 2 pounds fresh strawberries, washed, hulled, and sliced
- 4-5 ripe but firm bananas, peeled and sliced
- Optional: 1/4 cup fresh lemon juice (to prevent banana browning, a little trick I always use!)
- For the Cake Soak (optional but highly recommended for moisture and flavor):
- 1/2 cup orange juice, pineapple juice, or a fruit punch that complements your cake and fruit choices
Phase 1: Preparing the Cake Base
- Preheat Your Oven and Prepare Your Pans: First things first, let’s get that oven ready. I always preheat my oven to the temperature specified on your cake mix box, usually around 350°F (175°C). While the oven is heating, prepare your baking pans. For this Punch Bowl Cake, I find it easiest to bake the cake in two 8 or 9-inch round cake pans. Grease and flour them thoroughly, or use a baking spray with flour. This ensures your cake layers release beautifully without any sticking, which is crucial for cutting them up later. There’s nothing more frustrating than a cake stuck to the pan, trust me!
- Mix the Cake Batter: Now, follow the instructions on your yellow cake mix box precisely. Typically, this involves combining the cake mix with eggs, vegetable oil, and water in a large mixing bowl. I like to use an electric mixer on medium speed for about 2 minutes, making sure the batter is completely smooth and free of any lumps. Scrape down the sides of the bowl with a spatula to ensure all ingredients are incorporated. You want a consistent, airy batter that will bake into a tender cake. This foundational step is key to a delightful Punch Bowl Cake.
- Bake the Cake Layers: Divide the prepared cake batter evenly between your two greased and floured cake pans. Place them in the preheated oven and bake according to the time specified on your cake mix box, usually 25-30 minutes. To check for doneness, insert a wooden skewer or toothpick into the center of each cake. If it comes out clean, your cakes are perfectly baked! Don’t overbake, as we want moist cake layers for our Punch Bowl Cake.
- Cool the Cakes: Once baked, remove the cake pans from the oven and let them cool on a wire rack for about 10-15 minutes. This initial cooling in the pan helps the cakes firm up slightly, making them easier to handle. After this period, carefully invert the cakes onto the wire rack to cool completely. It’s absolutely essential that the cakes are fully cooled before you proceed to the next steps. Warm cake will cause your pudding and whipped topping layers to melt, creating a runny mess, and we definitely don’t want that for our gorgeous Punch Bowl Cake! This might take an hour or two, so be patient.
Phase 2: Crafting the Creamy Layers
- Prepare the Vanilla Pudding: In a large mixing bowl, combine the two packages of instant vanilla pudding mix with 4 cups of cold whole milk. Whisk vigorously for about 2 minutes, or until the pudding starts to thicken significantly. You’ll notice it changing from a liquid to a thick, creamy consistency. Once thickened, set the pudding aside to chill in the refrigerator while we work on our other components. This allows it to set up even further, creating that perfect, distinct layer in your Punch Bowl Cake.
- Whip Up the Cream Cheese Layer: Now for one of my favorite parts – the rich cream cheese layer! In a separate medium-sized mixing bowl, combine the softened cream cheese, granulated sugar, and vanilla extract. Using an electric mixer, beat these ingredients together on medium speed until the mixture is light, fluffy, and completely smooth. Make sure there are no lumps of cream cheese remaining. This should take about 2-3 minutes. This layer adds an incredible tangy richness that truly elevates the flavor profile of this Punch Bowl Cake, balancing out the sweetness of the fruit and pudding.
- Fold in Whipped Topping (Part 1 for Cream Cheese Layer): Gently fold about 1 cup of the thawed whipped topping into your cream cheese mixture. Use a rubber spatula for this, incorporating it slowly until just combined. The goal here is to lighten the cream cheese mixture, making it easier to spread and giving it an even more luscious texture. Set this creamy concoction aside.
Phase 3: Fruit Preparation and Soaking
- Prepare the Strawberries: Wash your fresh strawberries thoroughly under cold water. Hull them by removing the green tops and the small core. Then, slice them into uniform pieces, about 1/4-inch thick. You want them substantial enough to provide a good bite but thin enough to layer beautifully in your Punch Bowl Cake. Set these aside in a bowl.
- Prepare the Bananas (with a browning prevention tip!): Peel your ripe but firm bananas. Slice them into similar 1/4-inch thick rounds. Here’s my go-to trick to prevent them from browning: place the sliced bananas in a bowl and gently toss them with 1/4 cup of fresh lemon juice. The acidity of the lemon juice works wonders in keeping them looking fresh and appealing for longer. This is particularly important for a layered dessert like our Punch Bowl Cake, which will sit for a while before serving.
- Prepare the Cake Soak: If you’re using a cake soak (and I really encourage you to, it makes a world of difference in moisture and flavor!), have your 1/2 cup of orange juice, pineapple juice, or fruit punch ready. This will be drizzled over the cake pieces, ensuring every bite of your Punch Bowl Cake is incredibly tender and juicy.
Phase 4: Assembling Your Magnificent Punch Bowl Cake
- Prepare Your Cake for Layering: Take your two completely cooled cake layers. Carefully cut each cake into 1-inch to 1.5-inch cubes or tear them into bite-sized pieces. Don’t worry about perfection here; rustic pieces work perfectly well. We’re going for texture and absorbency. Place these cake pieces in a large bowl.
- The “Punch Bowl” Choice: Now for the star of the show – your punch bowl! Select a large, clear glass punch bowl, trifle dish, or a deep, wide serving bowl. The clear glass is key here, as it allows all the beautiful layers of your Punch Bowl Cake to shine through, making it a stunning centerpiece.
- First Cake Layer: Place about one-third of your cake cubes into the bottom of your chosen punch bowl. Arrange them in a relatively even layer. If you’re using the cake soak, drizzle about one-third of your chosen juice (orange juice, etc.) evenly over these cake pieces. This step is vital for ensuring the cake remains moist and flavorful throughout the Punch Bowl Cake.
- First Fruit Layer (Strawberries): Arrange half of your sliced strawberries over the first layer of cake. Make sure to spread them out evenly so every spoonful of Punch Bowl Cake gets some delicious fruit. You can even press some slices against the sides of the bowl for visual appeal.
- First Cream Cheese Layer: Carefully spoon half of your cream cheese mixture over the strawberries. Gently spread it out using the back of a spoon or a small offset spatula, trying not to disturb the fruit too much. This layer adds a delightful tang and richness that really makes this Punch Bowl Cake special.
- First Pudding Layer: Now, spoon half of your prepared vanilla pudding over the cream cheese layer. Spread it gently and evenly. You’ll notice the distinct layers starting to form, a hallmark of a well-made Punch Bowl Cake.
- Second Cake Layer: Place another one-third of your cake cubes over the pudding. Again, distribute them evenly. Drizzle with another one-third of your cake soak, if using.
- Second Fruit Layer (Bananas): Arrange all of your sliced bananas (remember, the lemon juice kept them fresh!) over this second cake layer. Ensure they are spread out well. This yellow layer will add a beautiful color contrast and creamy texture to your Punch Bowl Cake.
- Second Cream Cheese Layer: Spoon the remaining half of your cream cheese mixture over the bananas and spread it out carefully.
- Second Pudding Layer: Now, add the remaining vanilla pudding over the cream cheese layer and spread it smoothly. Your Punch Bowl Cake is really taking shape now!
- Final Cake Layer: Place the last one-third of your cake cubes over the pudding layer. Drizzle with the remaining cake soak.
- Final Fruit Layer (Strawberries): Arrange the remaining half of your sliced strawberries artfully over the final cake layer. These will be visible from the top and will add a vibrant pop of color.
- The Grand Finale – Whipped Topping: Gently spread the remaining thawed whipped topping evenly over the entire top of your Punch Bowl Cake. You can make it smooth or create decorative swirls with the back of a spoon. This is the beautiful, cloud-like crown of your magnificent dessert.
Phase 5: Chilling and Serving Your Perfect Punch Bowl Cake
- The Essential Chill Time: Once your Punch Bowl Cake is fully assembled, cover the punch bowl loosely with plastic wrap. This is a critical step: refrigerate the cake for at least 4 hours, but ideally overnight. Why so long? This chilling period allows all the flavors to meld together beautifully, the cake layers to fully absorb the moisture from the pudding and fruit juices, and the entire dessert to set firmly. Trust me, the waiting is the hardest part, but it’s what transforms a good layered dessert into an extraordinary Punch Bowl Cake.
- Garnish and Serve: Just before serving, you can add some final touches to your stunning Punch Bowl Cake. I often like to garnish the top with a few whole fresh strawberries or a sprinkle of additional sliced bananas for extra visual appeal. You could also shave some white chocolate or sprinkle a little zest if you’re feeling fancy. To serve, use a large spoon or a serving spatula that can reach all the way to the bottom of the punch bowl, ensuring each serving gets a delightful scoop of every single layer. This ensures everyone experiences the full symphony of flavors and textures that make a Punch Bowl Cake so incredibly special.
- Storage: Any leftover Punch Bowl Cake should be covered tightly with plastic wrap and refrigerated. It will keep well for up to 3-4 days, though the bananas might start to soften a bit over time. The flavors tend to get even better on the second day, making it a fantastic make-ahead dessert for parties or gatherings. Enjoy every glorious spoonful of your homemade Punch Bowl Cake!
Conclusion:
Oh, my dear friends, if there’s one recipe I could implore you to try, it’s this magnificent dessert. I honestly believe this isn’t just another dish; it’s an experience, a memory waiting to be made. After all the details and steps, I hope you’ve gathered just how effortlessly brilliant this creation truly is. It’s the kind of dessert that looks like you spent hours slaving away, when in reality, it’s a wonderfully forgiving and simple assembly job. This is why it’s a must-try for everyone, from novice bakers to seasoned kitchen veterans. It consistently delivers on flavor, presentation, and pure, unadulterated joy. The layers of moist cake, creamy pudding, fresh fruit, and airy whipped topping come together in a symphony of textures and tastes that is nothing short of delightful. It’s light yet satisfying, sweet but not overly so, and utterly refreshing.
What I adore most about this dessert is its incredible versatility and adaptability, making it perfect for virtually any occasion. Think about those big family gatherings – summer barbecues, holiday dinners, graduation parties, or even just a casual Sunday potluck. This is where this recipe truly shines. I always recommend serving it in a clear glass punch bowl, if you have one.
The visual appeal of those vibrant, distinct layers is simply breathtaking and adds an extra touch of elegance to your dessert table.
However, don’t feel limited! For smaller, more intimate gatherings, you can easily scale it down and layer it in a trifle dish or even individual parfait glasses. Imagine charming little single-serving trifles, perfect for a garden party or a bridal shower. You could even use decorative martini glasses for a more sophisticated presentation, perhaps with a sprinkle of chocolate shavings or a fresh mint leaf on top.
Now, let’s talk about making it your own, because that’s where the real fun begins! While the classic combination is always a winner, I wholeheartedly encourage you to experiment with variations to suit your palate and the season. If you’re a fan of tropical flavors, consider using a yellow cake mix, banana pudding, and a medley of pineapple chunks, sliced kiwi, and mango. For berry lovers, a vanilla or lemon cake base with strawberry pudding and an abundance of fresh mixed berries (strawberries, blueberries, raspberries!) creates a vibrant and incredibly fresh dessert. Chocolate enthusiasts can opt for a chocolate cake, chocolate pudding, and perhaps even some mini chocolate chips sprinkled between layers or on top. You could also introduce different extracts to your whipped topping – a hint of almond or coconut extract can really elevate the flavor profile. Don’t be afraid to mix and match; the beauty of this Punch Bowl Cake is its forgiving nature! You can even swap out the cake for brownies or angel food cake for a lighter option. For an adult twist, a drizzle of rum or a complementary liqueur over the cake layers can add a sophisticated depth of flavor, making it an ideal dessert for an evening soirée.
I genuinely can’t wait for you to experience the magic of this recipe for yourself. It’s more than just a dessert; it’s a centerpiece, a conversation starter, and a guaranteed crowd-pleaser. I urge you, don’t hesitate to give it a try. The simplicity will surprise you, and the incredible taste will delight you and everyone you share it with.
Imagine the smiles it will bring to your loved ones’ faces – that’s the true reward of baking.
Once you’ve whipped up your own creation, please, please come back and share your experience with me! I’m so eager to hear about your triumphs, your clever variations, and even any little quirks you encountered along the way. Did you try a unique fruit combination? Did you use a special cake flavor? What kind of bowl did you use? Your insights and photos inspire me and our entire community. So, go forth, bake with joy, and let this wonderful dessert become a new favorite in your culinary repertoire. I’m already looking forward to hearing all about your delicious adventures!
Punch Bowl Cake: Your Go-To Easy Dessert for Any Party!
Punch Bowl Cake is an iconic layered dessert combining moist cake, creamy vanilla pudding, a rich cream cheese layer, fresh fruit, and luscious whipped topping. Easy to assemble and perfect for feeding a crowd, it’s a beautiful, make-ahead centerpiece that delights every guest.
Ingredients
-
1 (15.25-ounce) box yellow cake mix
-
Ingredients per cake mix box (eggs, oil, water)
-
2 (3.4-ounce) instant vanilla pudding mix
-
4 cups cold whole milk
-
1 (8-ounce) cream cheese, softened
-
1/2 cup granulated sugar
-
1 teaspoon pure vanilla extract
-
1 (16-ounce) frozen whipped topping, thawed
-
2 lbs fresh strawberries, sliced
-
4-5 ripe bananas, sliced
-
1/4 cup fresh lemon juice (optional, for bananas)
-
1/2 cup fruit juice (orange, pineapple, or fruit punch)
Instructions
-
Step 1
Preheat oven to 350°F (175°C). Grease and flour two 8 or 9-inch round cake pans. Prepare cake batter according to box instructions; beat until smooth. Divide batter evenly between pans. Bake 25-30 minutes, or until a toothpick comes out clean. Cool in pans for 10-15 minutes, then invert onto a wire rack to cool completely (1-2 hours). Once cooled, cut or tear cake into 1 to 1.5-inch cubes. -
Step 2
In a large bowl, whisk instant vanilla pudding mix with 4 cups cold whole milk for 2 minutes until thickened. Refrigerate to set. In a separate bowl, beat softened cream cheese, granulated sugar, and 1 teaspoon vanilla extract until light and smooth (2-3 minutes). Gently fold 1 cup of thawed whipped topping into the cream cheese mixture until just combined. Set aside remaining whipped topping. -
Step 3
Wash, hull, and slice strawberries. Peel and slice bananas; gently toss with 1/4 cup lemon juice (if using) to prevent browning. Have 1/2 cup fruit juice ready for the cake soak. -
Step 4
Select a large, clear glass punch bowl. Place one-third of the cake cubes at the bottom. Drizzle with one-third of the fruit juice soak. Layer with half of the sliced strawberries. Carefully spoon and spread half of the cream cheese mixture over the strawberries, followed by half of the vanilla pudding. -
Step 5
Add another one-third of the cake cubes over the pudding layer. Drizzle with another one-third of the fruit juice soak. Arrange all of the sliced bananas over this cake layer. Spoon and spread the remaining cream cheese mixture over the bananas, followed by the remaining vanilla pudding. -
Step 6
Place the final one-third of the cake cubes over the pudding layer, drizzling with the remaining fruit juice soak. Artfully arrange the remaining sliced strawberries on top. Gently spread the remaining thawed whipped topping evenly over the entire cake. -
Step 7
Cover the punch bowl loosely with plastic wrap and refrigerate for at least 4 hours, or ideally overnight, to allow flavors to meld and the cake to set. Garnish with whole strawberries or additional banana slices if desired. Serve with a large spoon, ensuring each serving includes all layers. Store leftovers covered in the refrigerator for 3-4 days.
Important Information
Nutrition Facts (Per Serving)
It is important to consider this information as approximate and not to use it as definitive health advice.
Allergy Information
Please check ingredients for potential allergens and consult a health professional if in doubt.
Leave a Comment