
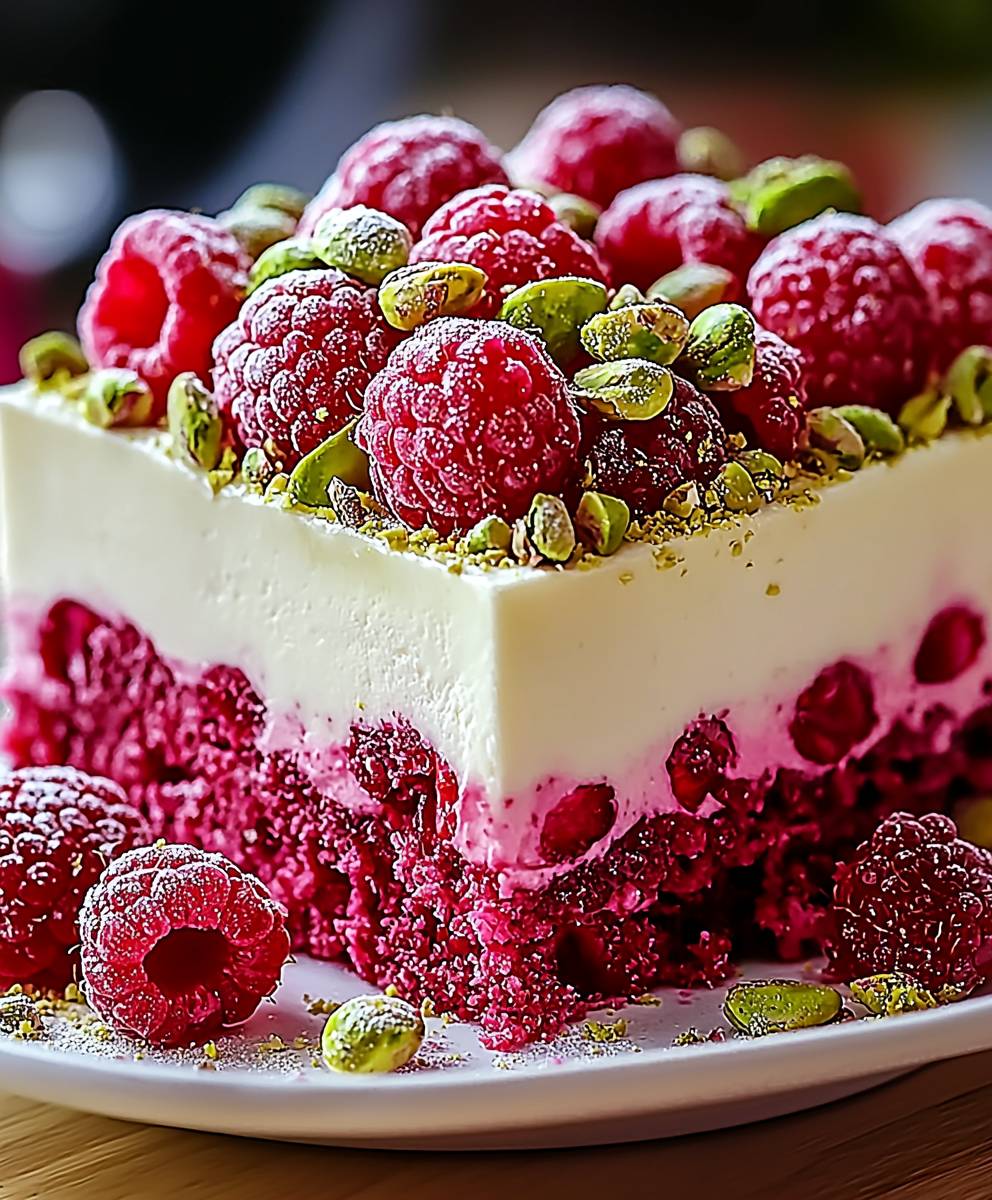
Pistachio Raspberry Dream Cake: Just the name alone conjures images of elegance, flavor, and pure dessert bliss, doesn’t it? I’m thrilled to share this show-stopping recipe with you, a cake that’s as visually stunning as it is delicious. Imagine layers of moist, pistachio-infused sponge, swirled with tangy raspberry jam, and topped with a light-as-air frosting. It’s a symphony of textures and tastes that will leave everyone wanting more.
While the exact origins of this particular combination are somewhat modern, the individual components boast rich histories. Pistachios, with their vibrant green hue, have been enjoyed since ancient times, prized for their unique flavor and nutritional benefits. Raspberries, too, have a long and storied past, cultivated for centuries and associated with romance and indulgence. Combining these elements creates a dessert that feels both familiar and refreshingly new.
So, why is this Pistachio Raspberry Dream Cake destined to become your new favorite? Beyond its undeniable beauty, it’s the perfect balance of sweet and tart. The nutty, earthy notes of the pistachio complement the bright, fruity raspberry beautifully. The cake itself is incredibly moist and tender, and the frosting adds a touch of creamy decadence. Plus, while it looks impressive, it’s surprisingly straightforward to make, making it ideal for both special occasions and everyday celebrations. Get ready to impress your friends and family with this unforgettable treat!

Ingredients:
- For the Pistachio Cake Layers:
- 2 1/2 cups (300g) all-purpose flour
- 1 teaspoon baking powder
- 1/2 teaspoon baking soda
- 1/4 teaspoon salt
- 1 cup (227g) unsalted butter, softened
- 1 3/4 cups (350g) granulated sugar
- 4 large eggs
- 1 teaspoon vanilla extract
- 1 cup (240ml) buttermilk
- 1/2 cup (60g) shelled, unsalted pistachios, finely ground
- 2 tablespoons pistachio paste (optional, for enhanced flavor)
- Green food coloring (optional, for a vibrant green hue)
- For the Raspberry Filling:
- 12 ounces (340g) fresh raspberries
- 1/2 cup (100g) granulated sugar
- 1 tablespoon lemon juice
- 1 tablespoon cornstarch
- For the Pistachio Buttercream Frosting:
- 1 cup (227g) unsalted butter, softened
- 3 cups (360g) powdered sugar
- 1/4 cup (60ml) heavy cream
- 1 teaspoon vanilla extract
- 1/4 cup (30g) shelled, unsalted pistachios, finely ground
- 1-2 tablespoons pistachio paste (optional, for enhanced flavor)
- Pinch of salt
- For Decoration (Optional):
- Fresh raspberries
- Chopped pistachios
- Edible gold leaf
Preparing the Pistachio Cake Layers:
- Preheat and Prep: First things first, preheat your oven to 350°F (175°C). Grease and flour three 8-inch round cake pans. I like to use parchment paper rounds in the bottom of the pans for extra insurance against sticking. This makes removing the cakes a breeze!
- Dry Ingredients: In a medium bowl, whisk together the flour, baking powder, baking soda, and salt. Make sure everything is evenly distributed. This ensures a consistent rise and texture in your cakes.
- Cream Butter and Sugar: In a large bowl (or the bowl of your stand mixer), cream together the softened butter and granulated sugar until light and fluffy. This usually takes about 3-5 minutes. The mixture should be pale and airy. This step is crucial for creating a tender cake.
- Add Eggs and Vanilla: Beat in the eggs one at a time, making sure each egg is fully incorporated before adding the next. Then, stir in the vanilla extract.
- Alternate Wet and Dry Ingredients: Gradually add the dry ingredients to the wet ingredients, alternating with the buttermilk. Begin and end with the dry ingredients. So, add about 1/3 of the dry ingredients, then 1/2 of the buttermilk, then another 1/3 of the dry ingredients, then the remaining buttermilk, and finally the last 1/3 of the dry ingredients. Mix until just combined. Be careful not to overmix, as this can lead to a tough cake.
- Add Pistachios and Pistachio Paste: Stir in the finely ground pistachios and pistachio paste (if using). If you want a more vibrant green color, add a few drops of green food coloring at this stage. Mix until everything is evenly distributed.
- Divide and Bake: Divide the batter evenly among the prepared cake pans. Bake for 25-30 minutes, or until a toothpick inserted into the center comes out clean.
- Cool Completely: Let the cakes cool in the pans for 10 minutes before inverting them onto a wire rack to cool completely. Make sure the cakes are completely cool before frosting.
Making the Raspberry Filling:
- Combine Ingredients: In a medium saucepan, combine the fresh raspberries, granulated sugar, lemon juice, and cornstarch.
- Cook and Thicken: Cook over medium heat, stirring constantly, until the raspberries break down and the mixture thickens. This usually takes about 5-7 minutes.
- Cool Completely: Remove from heat and let the raspberry filling cool completely before using. This prevents the frosting from melting.
Preparing the Pistachio Buttercream Frosting:
- Cream Butter: In a large bowl (or the bowl of your stand mixer), cream the softened butter until light and fluffy. This usually takes about 3-5 minutes.
- Add Powdered Sugar: Gradually add the powdered sugar, one cup at a time, beating well after each addition.
- Add Heavy Cream and Vanilla: Add the heavy cream, vanilla extract, and salt. Beat until the frosting is smooth and creamy.
- Add Pistachios and Pistachio Paste: Stir in the finely ground pistachios and pistachio paste (if using). Mix until everything is evenly distributed.
- Adjust Consistency: If the frosting is too thick, add a little more heavy cream, one tablespoon at a time, until you reach the desired consistency. If it’s too thin, add a little more powdered sugar.
Assembling the Pistachio Raspberry Dream Cake:
- Level the Cakes: If necessary, level the tops of the cake layers using a serrated knife. This ensures that the cake will be even and stable.
- First Layer: Place one cake layer on a serving plate or cake stand.
- Raspberry Filling: Spread a generous layer of the raspberry filling over the cake layer, leaving a small border around the edge. This prevents the filling from oozing out when you add the next layer.
- Buttercream Layer: Spread a layer of the pistachio buttercream frosting over the raspberry filling.
- Second Layer: Place the second cake layer on top of the frosting.
- Repeat: Repeat steps 3 and 4 with the raspberry filling and buttercream frosting.
- Third Layer: Place the final cake layer on top.
- Crumb Coat: Apply a thin layer of buttercream frosting over the entire cake. This is called a crumb coat, and it helps to seal in any loose crumbs and create a smooth surface for the final layer of frosting.
- Chill: Chill the cake in the refrigerator for at least 30 minutes to allow the crumb coat to set.
- Final Frosting: Apply a final, thicker layer of buttercream frosting over the entire cake. Smooth the frosting using an offset spatula or a cake smoother.
- Decorate: Decorate the cake with fresh raspberries, chopped pistachios, and edible gold leaf (if using). Get creative and have fun with it!
- Chill and Serve: Chill the cake in the refrigerator for at least 30 minutes before serving. This allows the frosting to set and the flavors to meld together.
Tips for Success:
- Room Temperature Ingredients: Make sure your butter, eggs, and buttermilk are at room temperature. This helps them to emulsify properly, resulting in a smoother batter and a more tender cake.
- Don’t Overmix: Overmixing the batter can develop the gluten in the flour, leading to a tough cake. Mix until just combined.
- Cool Completely: Make sure the cake layers and raspberry filling are completely cool before frosting. This prevents the frosting from melting.
- Chill the Cake: Chilling the cake before serving allows the frosting to set and the flavors to meld together.
- Pistachio Flavor: For a more intense pistachio flavor, use high-quality pistachio paste and finely ground pistachios.
- Raspberry Variation: If you prefer a smoother raspberry filling, you can strain it through a fine-mesh sieve to remove the seeds.
- Buttercream Consistency: Adjust the amount of heavy cream or powdered sugar to achieve your desired buttercream consistency.
Storage Instructions:
Store the Pistachio Raspberry Dream Cake in an airtight container in the refrigerator for up to 3 days. Let the cake sit at room temperature for about 30 minutes before serving for the best flavor and texture.
Enjoy!
I hope you enjoy making and eating this Pistachio Raspberry Dream Cake as much as I do! It’s a showstopper that’s perfect for any special occasion.
Conclusion:
This Pistachio Raspberry Dream Cake isn’t just a dessert; it’s an experience. The delicate crumb, the nutty pistachio flavor, and the burst of tart raspberries create a symphony of textures and tastes that will leave you and your guests utterly delighted. It’s a showstopper that’s surprisingly simple to make, and trust me, the effort is more than worth the reward. I truly believe this cake deserves a spot in your baking repertoire.
Why is it a must-try? Because it’s more than just a cake; it’s a celebration of flavor. The pistachios add a sophisticated, earthy note that perfectly complements the sweetness of the cake and the tang of the raspberries. The combination is unexpected, yet utterly harmonious. It’s the kind of dessert that sparks conversation and leaves everyone wanting more. Plus, the vibrant colors make it a feast for the eyes as well as the palate.
But the best part? It’s incredibly versatile! While I’ve shared my favorite version with a simple vanilla buttercream frosting, the possibilities are endless. For a richer experience, try a mascarpone frosting or even a pistachio-flavored buttercream. If you’re feeling adventurous, a drizzle of white chocolate ganache would add an extra layer of decadence.
Serving Suggestions and Variations:
* Elegant Dessert: Serve slices with a dollop of whipped cream and a few fresh raspberries for an elegant dessert.
* Afternoon Tea: This cake is perfect for afternoon tea. Cut it into smaller squares and serve with a selection of teas.
* Celebration Cake: Decorate the cake with fresh flowers or edible glitter for a special occasion.
* Raspberry Swap: If you’re not a fan of raspberries, try using other berries like strawberries, blueberries, or blackberries.
* Nutty Twist: Experiment with different nuts like almonds or walnuts for a unique flavor profile.
* Citrus Zest: Add a touch of lemon or orange zest to the batter for a brighter, more vibrant flavor.
* Boozy Boost: A splash of raspberry liqueur or amaretto in the batter or frosting can add a sophisticated touch.
I’m so excited for you to try this recipe! I poured my heart into perfecting it, and I truly believe you’ll love it as much as I do. Don’t be intimidated by the layers or the ingredients; the instructions are straightforward, and the result is well worth the effort.
So, go ahead, preheat your oven, gather your ingredients, and get ready to bake something truly special. I can’t wait to hear about your experience! Please, please, please, share your photos and feedback with me. Let me know what variations you tried, what you loved, and what you might do differently next time. Your input is invaluable, and it helps me continue to create and share recipes that you’ll all enjoy. Bake this Pistachio Raspberry Dream Cake and let me know what you think! Happy baking!
Pistachio Raspberry Dream Cake: A Delicious & Easy Recipe
Moist pistachio cake layers with tangy raspberry filling and creamy pistachio buttercream frosting. Perfect for special occasions!
Ingredients
- 2 1/2 cups (300g) all-purpose flour
- 1 teaspoon baking powder
- 1/2 teaspoon baking soda
- 1/4 teaspoon salt
- 1 cup (227g) unsalted butter, softened
- 1 3/4 cups (350g) granulated sugar
- 4 large eggs
- 1 teaspoon vanilla extract
- 1 cup (240ml) buttermilk
- 1/2 cup (60g) shelled, unsalted pistachios, finely ground
- 2 tablespoons pistachio paste (optional, for enhanced flavor)
- Green food coloring (optional, for a vibrant green hue)
- 12 ounces (340g) fresh raspberries
- 1/2 cup (100g) granulated sugar
- 1 tablespoon lemon juice
- 1 tablespoon cornstarch
- 1 cup (227g) unsalted butter, softened
- 3 cups (360g) powdered sugar
- 1/4 cup (60ml) heavy cream
- 1 teaspoon vanilla extract
- 1/4 cup (30g) shelled, unsalted pistachios, finely ground
- 1-2 tablespoons pistachio paste (optional, for enhanced flavor)
- Pinch of salt
- Fresh raspberries
- Chopped pistachios
- Edible gold leaf
Instructions
- Preheat your oven to 350°F (175°C). Grease and flour three 8-inch round cake pans. Use parchment paper rounds in the bottom of the pans for extra insurance against sticking.
- In a medium bowl, whisk together the flour, baking powder, baking soda, and salt.
- In a large bowl (or the bowl of your stand mixer), cream together the softened butter and granulated sugar until light and fluffy (3-5 minutes).
- Beat in the eggs one at a time, making sure each egg is fully incorporated before adding the next. Then, stir in the vanilla extract.
- Gradually add the dry ingredients to the wet ingredients, alternating with the buttermilk. Begin and end with the dry ingredients. Mix until just combined. Be careful not to overmix.
- Stir in the finely ground pistachios and pistachio paste (if using). If you want a more vibrant green color, add a few drops of green food coloring at this stage. Mix until everything is evenly distributed.
- Divide the batter evenly among the prepared cake pans. Bake for 25-30 minutes, or until a toothpick inserted into the center comes out clean.
- Let the cakes cool in the pans for 10 minutes before inverting them onto a wire rack to cool completely. Make sure the cakes are completely cool before frosting.
- In a medium saucepan, combine the fresh raspberries, granulated sugar, lemon juice, and cornstarch.
- Cook over medium heat, stirring constantly, until the raspberries break down and the mixture thickens (5-7 minutes).
- Remove from heat and let the raspberry filling cool completely before using.
- In a large bowl (or the bowl of your stand mixer), cream the softened butter until light and fluffy (3-5 minutes).
- Gradually add the powdered sugar, one cup at a time, beating well after each addition.
- Add the heavy cream, vanilla extract, and salt. Beat until the frosting is smooth and creamy.
- Stir in the finely ground pistachios and pistachio paste (if using). Mix until everything is evenly distributed.
- If the frosting is too thick, add a little more heavy cream, one tablespoon at a time, until you reach the desired consistency. If it’s too thin, add a little more powdered sugar.
- If necessary, level the tops of the cake layers using a serrated knife.
- Place one cake layer on a serving plate or cake stand.
- Spread a generous layer of the raspberry filling over the cake layer, leaving a small border around the edge.
- Spread a layer of the pistachio buttercream frosting over the raspberry filling.
- Place the second cake layer on top of the frosting.
- Repeat steps 3 and 4 with the raspberry filling and buttercream frosting.
- Place the final cake layer on top.
- Apply a thin layer of buttercream frosting over the entire cake.
- Chill the cake in the refrigerator for at least 30 minutes to allow the crumb coat to set.
- Apply a final, thicker layer of buttercream frosting over the entire cake. Smooth the frosting using an offset spatula or a cake smoother.
- Decorate the cake with fresh raspberries, chopped pistachios, and edible gold leaf (if using).
- Chill the cake in the refrigerator for at least 30 minutes before serving.
Notes
- Make sure your butter, eggs, and buttermilk are at room temperature.
- Overmixing the batter can develop the gluten in the flour, leading to a tough cake. Mix until just combined.
- Make sure the cake layers and raspberry filling are completely cool before frosting.
- Chilling the cake before serving allows the frosting to set and the flavors to meld together.
- For a more intense pistachio flavor, use high-quality pistachio paste and finely ground pistachios.
- If you prefer a smoother raspberry filling, you can strain it through a fine-mesh sieve to remove the seeds.
- Adjust the amount of heavy cream or powdered sugar to achieve your desired buttercream consistency.
- Store the Pistachio Raspberry Dream Cake in an airtight container in the refrigerator for up to 3 days. Let the cake sit at room temperature for about 30 minutes before serving for the best flavor and texture.

Leave a Comment