
Pionono filling ideas, ah, the possibilities are endless! Have you ever encountered a dessert so versatile, so delightfully adaptable, that it begs for your creative touch? Pionono, that delicate, rolled sponge cake, is precisely that. Imagine a blank canvas, a sweet, airy foundation just waiting to be transformed into a culinary masterpiece.
While the exact origins are debated, many believe the pionono hails from Santa Fe, Argentina, where it was supposedly created in homage to Pope Pius IX (Pío Nono in Spanish). Regardless of its precise birthplace, this treat has become a beloved staple throughout Latin America and beyond.
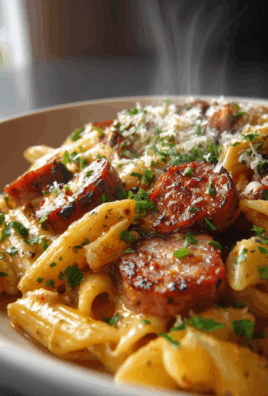
What makes pionono so irresistible? It’s the perfect balance of textures the soft, yielding sponge cake against the creamy, savory, or sweet filling of your choice. Its also incredibly convenient. Whether you’re looking for a show-stopping dessert for a special occasion or a simple yet elegant treat to enjoy with your afternoon coffee, pionono delivers. And that’s where the fun begins: exploring pionono filling ideas! Get ready to discover a world of flavor combinations that will tantalize your taste buds and impress your guests. Let’s dive in and unlock the secrets to creating the perfect pionono!

Ingredients:
- For the Pionono Sponge Cake:
- 6 large eggs, separated
- ¾ cup granulated sugar
- 1 teaspoon vanilla extract
- ½ cup all-purpose flour
- ¼ cup cornstarch
- Pinch of salt
- Powdered sugar, for dusting
- For the Savory Tuna Filling:
- 2 cans (5 ounces each) tuna in water, drained well
- ½ cup mayonnaise
- ¼ cup finely chopped red onion
- ¼ cup finely chopped celery
- 2 tablespoons chopped fresh parsley
- 1 tablespoon lemon juice
- Salt and freshly ground black pepper to taste
- Optional: Hard-boiled eggs, sliced, for garnish
- Optional: Roasted red peppers, sliced, for garnish
- Equipment:
- 15×10 inch jelly roll pan
- Parchment paper
- Mixing bowls
- Electric mixer
- Rubber spatula
- Serrated knife
Preparing the Pionono Sponge Cake:
- Preheat and Prepare: Preheat your oven to 350°F (175°C). Grease the 15×10 inch jelly roll pan and line it with parchment paper, leaving an overhang on the sides for easy removal. This is crucial to prevent sticking!
- Separate the Eggs: Carefully separate the eggs, placing the yolks in one large mixing bowl and the whites in another, impeccably clean bowl. Make sure no yolk gets into the whites, as this will prevent them from whipping properly.
- Whip the Egg Yolks: Add ½ cup of the granulated sugar to the egg yolks and beat with an electric mixer on medium-high speed until the mixture is pale yellow and thick, about 3-5 minutes. This step incorporates air and creates a stable base for the cake. Stir in the vanilla extract.
- Whip the Egg Whites: In the separate bowl with the egg whites, add a pinch of salt. Beat with an electric mixer on medium speed until soft peaks form. Gradually add the remaining ¼ cup of granulated sugar, beating until stiff, glossy peaks form. Be careful not to overwhip, or the whites will become dry and grainy.
- Combine the Mixtures: Gently fold about one-third of the whipped egg whites into the egg yolk mixture to lighten it. This makes it easier to incorporate the remaining whites without deflating them.
- Gently Fold in the Remaining Whites: Carefully fold in the remaining whipped egg whites in two additions, being very gentle to maintain the volume. Use a rubber spatula and fold from the bottom up, rotating the bowl as you go.
- Sift and Fold in the Dry Ingredients: In a separate bowl, whisk together the all-purpose flour and cornstarch. Sift the flour mixture over the egg mixture in two additions, gently folding it in after each addition until just combined. Be careful not to overmix, as this will develop the gluten in the flour and result in a tough cake.
- Bake the Cake: Pour the batter into the prepared jelly roll pan and spread it evenly. Bake for 12-15 minutes, or until the cake is lightly golden brown and springs back when lightly touched. Keep a close eye on it, as it can burn easily.
- Cool and Roll: While the cake is baking, prepare a clean kitchen towel and dust it generously with powdered sugar. Once the cake is done, immediately invert it onto the prepared towel. Carefully peel off the parchment paper. Starting from one of the short ends, gently roll the cake up in the towel. Let it cool completely in the rolled-up towel. This helps the cake retain its shape and prevents it from cracking when you fill it.
Preparing the Savory Tuna Filling:
- Drain the Tuna: Drain the tuna very well. You want to remove as much excess water as possible to prevent the filling from being soggy.
- Combine Ingredients: In a medium bowl, combine the drained tuna, mayonnaise, red onion, celery, parsley, and lemon juice.
- Season to Taste: Season the tuna mixture with salt and freshly ground black pepper to taste. Adjust the seasonings as needed to suit your preferences.
- Mix Well: Mix all the ingredients together until well combined. The filling should be creamy and evenly distributed.
Assembling the Pionono:
- Unroll the Cake: Carefully unroll the cooled cake from the towel. Be gentle to avoid cracking.
- Spread the Filling: Spread the tuna filling evenly over the cake, leaving a small border at the edge. This will prevent the filling from squeezing out when you roll it up.
- Roll Up the Pionono: Starting from the same end you rolled it up with the towel, gently roll the cake up tightly. Use the towel to help you roll it evenly and tightly.
- Wrap and Chill: Wrap the pionono tightly in plastic wrap and refrigerate for at least 30 minutes, or up to several hours, to allow the filling to set and the flavors to meld. This also makes it easier to slice.
- Slice and Serve: Before serving, remove the pionono from the refrigerator and unwrap it. Trim the ends with a serrated knife for a clean presentation. Slice the pionono into 1-inch thick slices.
- Garnish (Optional): Garnish the slices with hard-boiled egg slices and roasted red pepper slices for an extra touch of flavor and visual appeal.
- Serve: Serve the pionono slices chilled. They are perfect as an appetizer, a light lunch, or a snack.
Additional Filling Ideas (Beyond Tuna):
While the tuna filling is a classic, don’t be afraid to experiment! Here are a few other savory filling ideas to inspire you:
- Chicken Salad: Use shredded cooked chicken, mayonnaise, celery, grapes, and walnuts for a creamy and flavorful filling.
- Ham and Cheese: Spread with cream cheese and layer with thinly sliced ham and Swiss cheese.
- Spinach and Artichoke: Combine cooked spinach, artichoke hearts, cream cheese, Parmesan cheese, and garlic for a rich and savory filling.
- Smoked Salmon: Spread with cream cheese and layer with thinly sliced smoked salmon, capers, and red onion.
- Vegetarian: Hummus, roasted vegetables (like zucchini, eggplant, and bell peppers), and feta cheese make a delicious and healthy filling.
Tips for Success:
- Don’t Overbake: Overbaking the sponge cake will make it dry and prone to cracking. Keep a close eye on it and remove it from the oven as soon as it’s lightly golden brown and springs back when touched.
- Roll While Warm: Rolling the cake while it’s still warm helps it retain its shape and prevents it from cracking.
- Use Parchment Paper: Lining the jelly roll pan with parchment paper is essential for easy removal of the cake.
- Chill Before Slicing: Chilling the pionono before slicing makes it easier to cut clean slices and prevents the filling from squishing out.
- Get Creative with Fillings: Don’t be afraid to experiment with different fillings to find your favorite combination. The possibilities are endless!
Enjoy your homemade Pionono!

Conclusion:
This isn’t just another recipe; it’s an invitation to create something truly special. The versatility and sheer deliciousness of this pionono filling make it a must-try for anyone looking to impress, whether you’re a seasoned baker or just starting out. The delicate balance of sweet and savory, the creamy texture, and the endless possibilities for customization it all adds up to a culinary experience that’s both rewarding and unforgettable.
Think of it: a light and airy pionono, swirled with a vibrant filling that bursts with flavor. It’s the perfect centerpiece for a party, a delightful addition to a brunch spread, or even a sophisticated dessert to end a memorable meal. And the best part? You can tailor it to your own tastes and preferences!
For a classic approach, stick with the traditional dulce de leche and whipped cream combination. It’s a timeless pairing that never fails to please. But don’t be afraid to experiment! Consider adding chopped nuts, such as pecans or walnuts, for a delightful crunch. Or, for a more decadent treat, incorporate chocolate shavings or a drizzle of melted chocolate.
If you’re feeling adventurous, why not explore some savory options? A creamy spinach and artichoke filling would be absolutely divine, or perhaps a smoked salmon and cream cheese spread. The possibilities are truly endless! You could even create a “pionono bar” where guests can customize their own fillings with a variety of ingredients. Imagine the fun!
Serving suggestions are just as varied. Slice the pionono into individual portions for an elegant presentation. Or, for a more casual gathering, simply place the entire roll on a platter and let your guests help themselves. It pairs beautifully with a cup of coffee or tea, or even a glass of chilled white wine.
And remember, presentation is key! A sprinkle of powdered sugar, a few fresh berries, or a sprig of mint can elevate your pionono from simple to stunning. Don’t be afraid to get creative and let your personality shine through.
I truly believe that this recipe will become a staple in your kitchen. It’s easy to make, incredibly versatile, and always a crowd-pleaser. But don’t just take my word for it try it yourself! I’m confident that you’ll be amazed by the results.
So, go ahead, gather your ingredients, and get ready to embark on a culinary adventure. I can’t wait to hear about your creations! Please, share your photos and stories with me. Let me know what variations you tried, what your guests thought, and any tips or tricks you discovered along the way. Your feedback is invaluable, and it helps me to continue creating recipes that you’ll love.
I am so excited for you to try this pionono filling recipe! Happy baking, and I look forward to hearing from you soon! Let’s spread the joy of delicious food, one pionono at a time.
Pionono Filling Ideas: Delicious & Easy Recipes
Rolled sponge cake filled with a creamy tuna salad mixture. Perfect as an appetizer, light lunch, or snack!
Ingredients
- 6 large eggs, separated
- ¾ cup granulated sugar
- 1 teaspoon vanilla extract
- ½ cup all-purpose flour
- ¼ cup cornstarch
- Pinch of salt
- Powdered sugar, for dusting
- 2 cans (5 ounces each) tuna in water, drained well
- ½ cup mayonnaise
- ¼ cup finely chopped red onion
- ¼ cup finely chopped celery
- 2 tablespoons chopped fresh parsley
- 1 tablespoon lemon juice
- Salt and freshly ground black pepper to taste
- Optional: Hard-boiled eggs, sliced, for garnish
- Optional: Roasted red peppers, sliced, for garnish
Instructions
- Combine the Juices: In a large punch bowl or pitcher, pour in the pineapple juice, orange juice, and guava juice.
- Add the Frozen Concentrates: Add the thawed limeade and lemonade concentrates to the punch bowl.
- Stir Well: Stir the juices and concentrates until completely combined and the concentrates are dissolved.
- Pour in the Ginger Ale: Slowly pour in the chilled ginger ale.
- Add Club Soda (Optional): If desired, slowly pour in the chilled club soda.
- Stir Gently: Stir the punch gently to incorporate the bubbles.
- Chill (Optional): Chill the punch for at least an hour before serving for best flavor.
- Add Ice: Just before serving, add plenty of ice to the punch bowl or pitcher.
- Garnish (Optional): Garnish with fresh fruit like pineapple wedges, orange slices, and maraschino cherries.
- Serve and Enjoy!
Notes
- Marinating the pork longer (up to 2 hours in the refrigerator) will result in more flavorful and tender pork.
- Ensure the oil is at the correct temperature for frying to prevent greasy or burnt pork.
- Don’t overcrowd the pot when frying the pork, as this will lower the oil temperature and result in soggy pork.
- A second fry is optional but highly recommended for extra crispy pork.
- Adjust the sweetness and sourness of the sauce to your preference by adding more sugar or vinegar.

Leave a Comment