
Mini Apple Pies are truly a delightful culinary invention, taking the beloved classic and transforming it into a charming, individual-sized treat. There’s something undeniably magical about holding a perfectly portioned pie, especially one that evokes such warm memories and comforting flavors. For centuries, apple pie has held a special place at tables worldwide, from its humble European origins to becoming an iconic American dessert. While the traditional large pie is wonderfully satisfying, these delightful miniature versions offer an unparalleled convenience and charm that makes them incredibly popular today.
Why We Adore These Individual Apple Delights
I find that the irresistible allure of Mini Apple Pies lies not only in their adorable appearance but also in their perfect balance of taste and texture. Each bite delivers that quintessential flaky, golden crust, generously filled with tender, warmly spiced apples that practically melt in your mouth. They eliminate the fuss of slicing and serving, making them ideal for gatherings, school lunches, or simply a cozy evening dessert for one. This recipe is designed to bring you all the nostalgic comfort of a classic apple pie, but in a format that’s effortlessly elegant and incredibly satisfying. Get ready to experience the pure joy of these bite-sized wonders!

Ingredients:
-
For the Flaky Pie Crust (makes enough for 12 Mini Apple Pies):
- 2 ½ cups (300g) all-purpose flour, plus more for dusting your work surface.
- 1 teaspoon granulated sugar (just a touch to enhance flavor).
- 1 teaspoon salt (essential for balancing the sweetness).
- 1 cup (226g) unsalted butter, very cold and cut into ½-inch cubes. This is crucial for that perfect flaky texture in your homemade Mini Apple Pies.
- ½ cup (120ml) ice water, possibly a tablespoon or two more, depending on the flour and humidity. Keep it super cold!
-
For the Delicious Apple Pie Filling:
- 5-6 medium apples (about 5-6 cups diced), a mix of Granny Smith, Honeycrisp, or Fuji works wonderfully for complex flavor and texture. Peeled, cored, and finely diced into ¼ to ½-inch pieces.
- ½ cup (100g) granulated sugar, adjust to your preference and apple sweetness.
- ¼ cup (50g) packed light brown sugar, for a richer, more caramel-like depth.
- 1 tablespoon all-purpose flour or cornstarch, to thicken the filling beautifully and prevent sogginess.
- 1 teaspoon ground cinnamon, the quintessential apple pie spice.
- ¼ teaspoon ground nutmeg, for warmth.
- ⅛ teaspoon ground cloves or allspice (optional, for an extra layer of spice complexity).
- 1 tablespoon fresh lemon juice, to brighten the flavors and prevent apples from browning.
- 1 tablespoon unsalted butter, melted (optional, but adds richness to the filling).
-
For Assembly & Finishing:
- 1 large egg, beaten with 1 tablespoon of water (for an egg wash that gives a beautiful golden sheen to your Mini Apple Pies).
- 1-2 tablespoons coarse sugar or granulated sugar, for sprinkling on top (adds sparkle and a delightful crunch).
- Standard 12-cup muffin tin, lightly greased or lined with parchment paper cups for easy removal.
- 2 ½ to 3-inch round cookie cutter (or a drinking glass rim).
- Small decorative cookie cutters (e.g., leaf shapes, stars) if you want to create fun top crusts.
Preparing the Flaky Pie Crust for Your Mini Apple Pies
Creating your own pie crust for these Mini Apple Pies is a truly rewarding experience, and it makes all the difference in taste and texture. Don’t be intimidated; with a few simple tricks, you’ll achieve a perfect flaky crust every time.
- Combine Dry Ingredients: In a large mixing bowl, or the bowl of a food processor, whisk together the 2 ½ cups all-purpose flour, 1 teaspoon granulated sugar, and 1 teaspoon salt. This ensures all the dry ingredients are evenly distributed, leading to a consistent flavor throughout your Mini Apple Pies.
-
Incorporate Cold Butter:
If using a food processor: Add the very cold, cubed unsalted butter to the dry ingredients. Pulse about 8-10 times, in 1-second bursts, until the mixture resembles coarse meal with some pea-sized butter chunks remaining. It’s crucial not to over-process here; those larger butter pieces are what create the pockets of steam and ultimately the flakiness in your Mini Apple Pies.
If mixing by hand: Add the cold butter cubes to the dry ingredients. Using a pastry blender, two knives, or even your fingertips, cut the butter into the flour mixture. Work quickly to prevent the butter from warming up too much. Continue until you have a mixture resembling coarse meal with some pea-sized butter pieces. The goal is to break the butter down without fully melting it into the flour.
- Add Ice Water Gradually: Start by adding ½ cup of ice water, one tablespoon at a time, to the flour and butter mixture. Pulse the food processor or mix with a fork or your hands between additions. Add just enough water for the dough to come together when pinched between your fingers. Be careful not to add too much water, as this can lead to a tough crust. The dough should still look a bit shaggy, but it should hold its shape. A good rule of thumb is to err on the side of slightly dry rather than too wet, as you can always add a tiny bit more water if needed.
- Form and Chill the Dough: Turn the dough out onto a lightly floured surface. Gently gather it into a cohesive ball, then divide it into two equal portions. Flatten each portion into a disk, wrap tightly in plastic wrap, and refrigerate for at least 1 hour, or preferably 2 hours. This chilling step is absolutely essential. It allows the gluten to relax (which makes the dough easier to roll out and prevents shrinking) and firms up the butter, which is key for achieving those wonderfully flaky layers in your Mini Apple Pies. You can even make the dough a day or two in advance.
Crafting the Delicious Mini Apple Pie Filling
The heart of your Mini Apple Pies lies in the filling, and a perfect balance of sweet, tart, and spicy makes all the difference. Let’s get those apples ready!
- Prepare the Apples: Peel, core, and finely dice your chosen apples into ¼ to ½-inch pieces. I find a mix of apple varieties truly elevates the flavor of these Mini Apple Pies. Granny Smith provides a nice tartness that cuts through the sweetness, while Honeycrisp or Fuji add a delightful crispness and natural sweetness. Aim for consistent sizing in your diced apples so they cook evenly. Place the diced apples in a large mixing bowl.
- Season the Apples: To the bowl of diced apples, add ½ cup granulated sugar, ¼ cup light brown sugar, 1 tablespoon all-purpose flour (or cornstarch for a gluten-free option), 1 teaspoon ground cinnamon, ¼ teaspoon ground nutmeg, and optionally, ⅛ teaspoon ground cloves or allspice for a deeper, more complex spice profile. Sprinkle in 1 tablespoon of fresh lemon juice – this isn’t just to prevent browning, but also to brighten the flavors and balance the sweetness.
- Toss and Mix: Gently toss all the ingredients together until the apples are thoroughly coated with the sugars and spices. You’ll notice the sugars starting to draw out some of the moisture from the apples, creating a beautiful syrupy mixture. If you’re feeling extra indulgent, you can melt 1 tablespoon of unsalted butter and drizzle it over the apples before tossing; it adds a lovely richness to the filling of your Mini Apple Pies. Let the filling sit for about 10-15 minutes while you prepare your crusts; this allows the flavors to meld and the thickener to start working its magic.
Assembling Your Adorable Mini Apple Pies
Now comes the fun part – bringing all the components together to create your charming Mini Apple Pies! This is where you can get a little creative with your top crusts.
- Preheat Oven & Prep Muffin Tin: Preheat your oven to 375°F (190°C). Lightly grease a standard 12-cup muffin tin. While traditional Mini Apple Pies are baked directly in the tin, I sometimes like to line them with parchment paper cups for even easier removal and a beautiful presentation.
- Roll Out the Dough: Remove one disk of chilled pie dough from the refrigerator. On a lightly floured surface, roll out the dough to about ⅛-inch thickness. Try to keep it as round as possible, but don’t stress too much about perfection. The key is even thickness for consistent baking.
- Cut Out Bottom Crusts: Using a 2 ½ to 3-inch round cookie cutter (the size will depend on your muffin tin and how much overhang you prefer), cut out 12 circles from the rolled-out dough. Gather the scraps, gently re-roll them, and cut out any additional circles needed. If your dough becomes too warm, pop it back into the fridge for 10-15 minutes.
- Place Bottom Crusts in Muffin Tin: Carefully press each dough circle into the cups of your prepared muffin tin. Gently ease the dough into the bottom and up the sides, ensuring there are no air bubbles trapped underneath. A little overhang is fine, as we’ll use it to seal the Mini Apple Pies.
- Fill with Apple Mixture: Spoon the prepared apple filling into each dough-lined cup. Don’t overfill! Aim for about 2-3 tablespoons of filling per pie, leaving a little space at the top for expansion and to accommodate the top crust. If there’s any liquid pooling at the bottom of your apple mixture, try to use more of the apples and less of the excess liquid in the initial scoop to prevent a soggy bottom crust.
-
Prepare Top Crusts: Roll out the second disk of chilled pie dough to ⅛-inch thickness. Now you have a few options for the top of your Mini Apple Pies:
- Solid Tops: Use a slightly smaller cookie cutter (e.g., 2-inch) to cut out 12 solid circles. These will cover the filling completely. You can cut a small vent in the center of each with a knife to allow steam to escape.
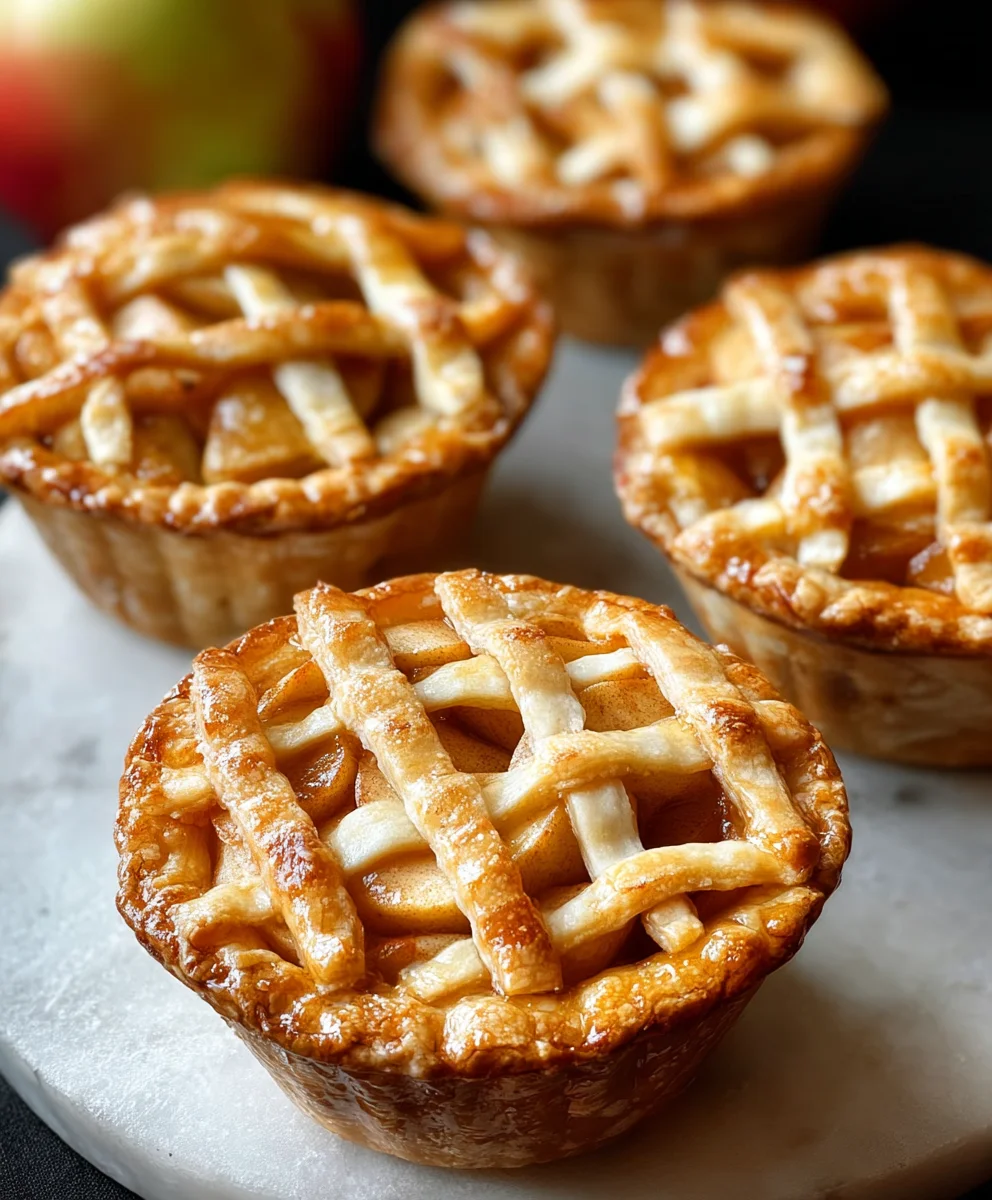
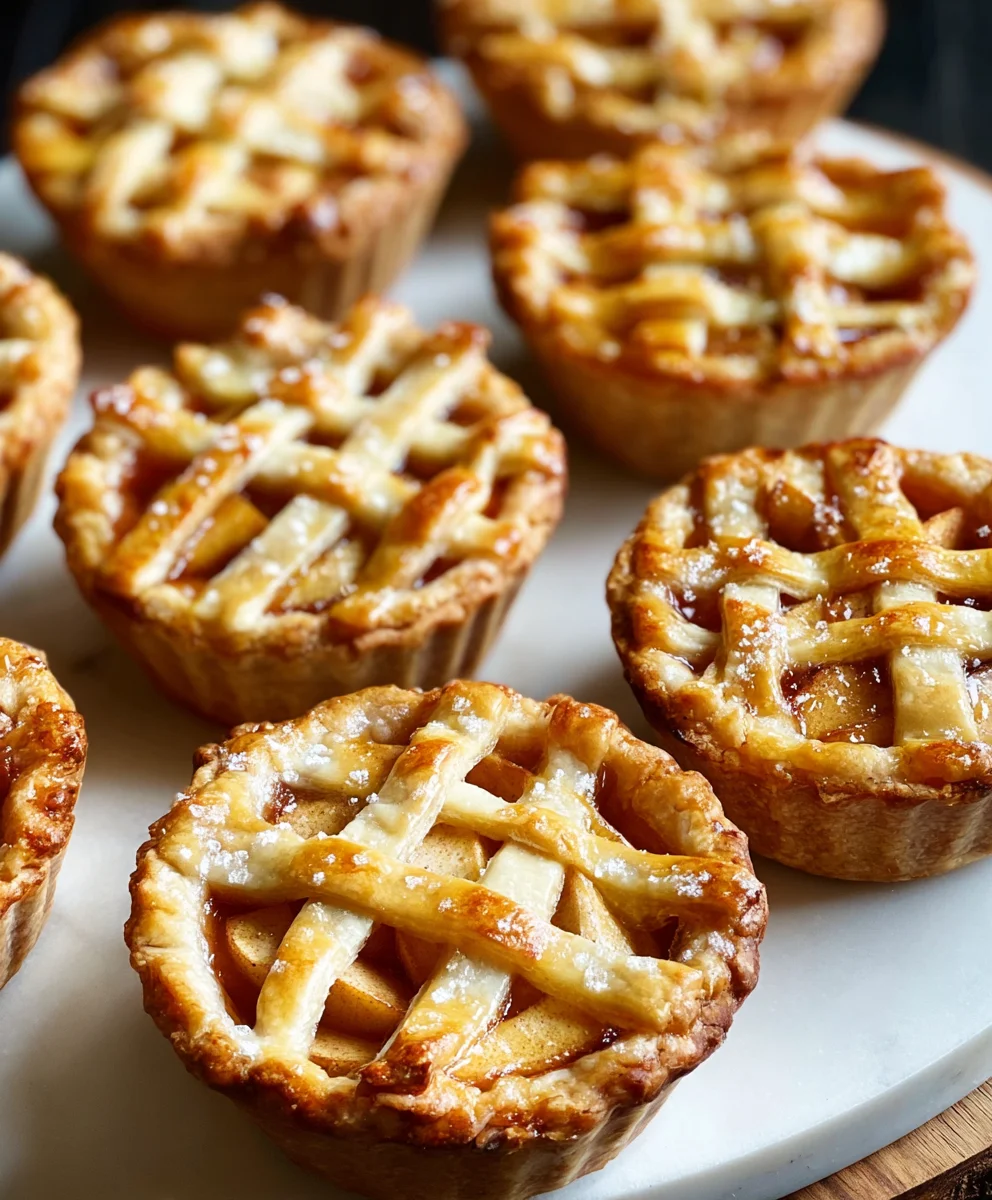
- Lattice Tops: Cut the dough into thin strips (about ¼ to ½-inch wide). Create a mini lattice pattern over each pie. This looks beautiful and allows steam to escape naturally. This is a bit more time-consuming but results in a stunning visual for your Mini Apple Pies.
- Cut-out Tops: Use small decorative cookie cutters (like mini leaves, stars, or hearts) to create charming shapes to place on top of the filling, leaving some of the apples visible. This is my favorite method for a truly “mini” and adorable look.
Gather and re-roll any scraps if necessary.
- Add Top Crusts and Seal: Place your chosen top crust onto each filled mini pie. If using solid tops, gently press the edges of the top crust to the edges of the bottom crust. If using lattice or cut-outs, simply place them on top. For the solid tops, you can then crimp the edges together to seal them. If there’s a slight overhang of the bottom crust, you can fold it over the top crust and crimp for a more enclosed pie.
- Egg Wash and Sugar Sprinkle: In a small bowl, whisk together the large egg with 1 tablespoon of water to create an egg wash. Lightly brush the tops of all your Mini Apple Pies with this egg wash. This will give them a gorgeous golden-brown color and a lovely sheen. Finally, sprinkle each pie generously with coarse sugar or granulated sugar. This adds a delightful sparkle and a pleasant crunch to the crust of your finished Mini Apple Pies.
Baking Your Golden Mini Apple Pies
The aroma filling your kitchen as these Mini Apple Pies bake is truly heavenly. Here’s how to ensure they bake to perfection.
- Initial High Heat Bake: Place the muffin tin with your Mini Apple Pies into the preheated 375°F (190°C) oven. Bake for 15-20 minutes, or until the crust edges begin to turn golden. The initial higher temperature helps to set the crust and promote flakiness.
- Reduce Heat and Continue Baking: After the initial bake, reduce the oven temperature to 350°F (175°C). Continue baking for an additional 20-30 minutes, or until the crusts are deeply golden brown and the filling is bubbly and tender. You might see some of the delicious apple filling bubbling up through the vents or around the edges, which is a good sign that the apples are softening and the sugars are caramelizing. If your crusts are browning too quickly, you can loosely tent the muffin tin with aluminum foil.
- Check for Doneness: To ensure the apples are cooked through, carefully insert a thin skewer or toothpick into the center of one of the pies. If it goes in easily without resistance, the apples are tender. The crust should also be firm and uniformly golden.
- Cooling is Key: Once baked, carefully remove the muffin tin from the oven. Let the Mini Apple Pies cool in the muffin tin for at least 15-20 minutes before attempting to remove them. This cooling period is important because it allows the filling to set further and prevents the pies from falling apart. If you try to remove them too soon, the hot, soft crusts might tear, and the filling might spill.
- Final Cooling: After the initial cooling, gently run a thin knife or offset spatula around the edges of each pie to loosen it, then carefully transfer the Mini Apple Pies to a wire rack to cool completely. Allowing them to cool completely (or at least to warm room temperature) on a wire rack ensures the bottom crust doesn’t become soggy from trapped steam.
Serving and Storing Your Homemade Mini Apple Pies
You’ve put in the effort, and now it’s time to enjoy the fruits of your labor! These Mini Apple Pies are perfect for any occasion.
- Serving Suggestions: These Mini Apple Pies are absolutely delightful served warm, perhaps with a scoop of vanilla bean ice cream or a dollop of freshly whipped cream. The contrast of the warm, spiced apple filling with cold, creamy toppings is simply heavenly. They also make a fantastic portable dessert for picnics, lunchboxes, or holiday gatherings. The individual portion size is perfect for controlled indulgence!
-
Storage Instructions:
Room Temperature: If you plan to eat them within 1-2 days, you can store your Mini Apple Pies loosely covered at room temperature. However, for best freshness and to prevent the crust from becoming soft, I recommend refrigeration, especially if your kitchen is warm.
Refrigeration: For longer storage, place the cooled Mini Apple Pies in an airtight container and refrigerate for up to 3-4 days. You can gently reheat them in a toaster oven or conventional oven (at 300°F/150°C for about 10-15 minutes) before serving to restore some of that fresh-baked crispness.
Freezing: These Mini Apple Pies freeze wonderfully! Once completely cooled, arrange them in a single layer on a baking sheet and freeze until solid (about 2-3 hours). Then, transfer the frozen pies to a freezer-safe bag or airtight container. They can be stored in the freezer for up to 2-3 months. To reheat from frozen, bake in a preheated oven at 350°F (175°C) for about 20-30 minutes, or until warmed through and the crust is crisp again. This makes them an excellent make-ahead dessert for when unexpected guests drop by or for a quick sweet treat during the week.
- Enjoy Every Bite: There’s nothing quite like the satisfaction of a homemade dessert, and these Mini Apple Pies truly embody that comforting, nostalgic feeling. Each bite offers a perfect balance of tender, spiced apples and a wonderfully flaky, buttery crust. They are a testament to simple, wholesome ingredients creating something truly spectacular. Enjoy sharing them with loved ones, or savor them all yourself – you’ve earned it!
Conclusion:
So, there you have it! We’ve journeyed through the simple yet incredibly rewarding process of creating these delightful individual treats. I truly believe this recipe is an absolute game-changer for anyone who loves the comforting taste of apple pie but might be intimidated by a full-sized dessert, or simply wants the perfect portion every single time. What makes these so special? It’s the impeccable balance of a buttery, flaky crust with a warmly spiced, tender apple filling that simply melts in your mouth. The aroma alone, as they bake to golden perfection, is enough to transport you to a cozy autumn day, no matter the season. They are not just delicious; they are incredibly charming and elegant, making them ideal for everything from a casual family dessert to a sophisticated dinner party. Forget the struggle of slicing and serving a whole pie; with these, everyone gets their own beautiful, perfectly portioned masterpiece. These Mini Apple Pies are a testament to how small treats can deliver monumental flavor and bring immense joy.
Elevate Your Mini Apple Pies: Serving Suggestions & Creative Variations
While these adorable pies are absolutely spectacular straight from the oven, perhaps with just a moment to cool enough not to scald your tongue, there are countless ways to elevate the experience further. Imagine a scoop of rich vanilla bean ice cream slowly melting over the warm, cinnamon-kissed apples – pure bliss! A dollop of freshly whipped cream, perhaps infused with a hint of maple or bourbon, adds an extra layer of luxury. Don’t forget the magic of a drizzle of homemade caramel sauce or a sprinkle of toasted pecans for added texture and nutty flavor. A light dusting of cinnamon sugar or a delicate lattice crust can also add a visually appealing touch that makes these individual desserts even more special for guests or a weekend treat.
But why stop there? The beauty of this recipe lies in its adaptability. For a twist on the classic filling, consider adding a handful of mixed berries like raspberries or blueberries alongside the apples for a burst of tartness and color. A hint of pear or quince can also introduce a lovely complexity to the fruit blend. Experiment with your spices; a pinch of cardamom, a grating of fresh nutmeg, or even a tiny amount of ground ginger can wonderfully complement the apple’s natural sweetness. For those who love a citrusy note, a little lemon zest in the filling can brighten everything up beautifully, cutting through the richness and adding a vibrant zing. You could even swap out some of the apples for a firmer fruit like peaches or plums when they are in season for a completely different yet equally delicious seasonal treat.
Beyond the filling, the crust offers a canvas for creativity. While a simple top crust is wonderful, you could try a delicate lattice pattern for a more decorative look, or even a streusel topping made with oats, brown sugar, and butter for an irresistible crumbly texture that adds a textural contrast to the soft apple filling. If you’re looking for gluten-free options, many excellent ready-made gluten-free pie crusts are available that work wonderfully, or you could experiment with an almond flour-based crust for a unique flavor profile and a slightly denser texture. For those managing sugar intake, a sugar substitute designed for baking can be used in the filling without compromising flavor, ensuring everyone can enjoy these delightful desserts. These pies also freeze beautifully once baked, so you can always have a stash ready for unexpected guests or a sudden craving.
Your Baking Adventure Awaits!
I genuinely hope that reading through this recipe has inspired you to preheat your oven and embark on your own Mini Apple Pies baking adventure. There’s an immense sense of satisfaction that comes from creating something so delicious and beautiful with your own hands. Don’t be afraid to personalize it; make it truly yours! Whether you stick to the classic or venture into new flavor combinations, the process is part of the joy. The aroma filling your kitchen, the anticipation of that first bite, and the smiles on the faces of those you share them with are truly priceless moments that this simple recipe can help create.
And once you’ve pulled these golden treasures from your oven, filling your home with the most incredible aroma, I would absolutely love to hear about your experience. Did you add a secret ingredient? Did you get creative with your crust designs? Perhaps you discovered an unexpected perfect pairing for serving. Please, share your triumphs, your photos, and any brilliant variations you discover. Your feedback and creativity not only inspire me but also become a valuable resource for other home bakers in our community. Join the conversation and let us know how your individual apple pies turned out!
Remember, baking is an act of love – for yourself, for your family, and for your friends. These individual pies are more than just a dessert; they’re a symbol of warmth, comfort, and shared joy. So, roll up your sleeves, gather your ingredients, and get ready to create something truly magical. I can’t wait to see what deliciousness you bring to life!
Perfect Mini Apple Pies: Sweet, Easy Individual Apple Desserts
Mini Apple Pies are truly a delightful culinary invention, transforming the beloved classic into charming, individual-sized treats. There’s something undeniably magical about holding a perfectly portioned pie, evoking warm memories and comforting flavors. While traditional large pies are satisfying, these miniature versions offer unparalleled convenience and charm. These mini apple pies are an absolute favorite fall baking project, with all the warm, cozy flavors of a traditional apple pie, but in adorable single-serving portions perfect for gatherings, lunchboxes, and holiday dinners.
Ingredients
-
2 ½ cups (300g) all-purpose flour
-
1 tsp granulated sugar
-
1 tsp salt
-
1 cup (226g) very cold unsalted butter, cubed
-
½ cup (120ml) ice water, plus 1-2 tbsp more if needed
-
5-6 medium apples (5-6 cups diced), peeled, cored, diced
-
½ cup (100g) granulated sugar
-
¼ cup (50g) packed light brown sugar
-
1 tbsp all-purpose flour or cornstarch
-
1 tsp ground cinnamon
-
¼ tsp ground nutmeg
-
⅛ tsp ground cloves or allspice (optional)
-
1 tbsp fresh lemon juice
-
1 tbsp unsalted butter, melted (optional)
-
1 large egg, beaten with 1 tbsp water (for egg wash)
-
1-2 tbsp coarse or granulated sugar (for sprinkling)
Instructions
-
Step 1
In a large bowl or food processor, combine flour, 1 tsp sugar, and 1 tsp salt. Cut in cold butter until mixture resembles coarse meal with pea-sized chunks. -
Step 2
Gradually add ice water, mixing until dough just comes together. Do not overmix. Divide dough into two disks, wrap tightly, and refrigerate for at least 1 hour (preferably 2 hours). -
Step 3
Peel, core, and finely dice 5-6 apples (¼-½ inch pieces). Place in a large bowl. Add ½ cup granulated sugar, brown sugar, flour/cornstarch, cinnamon, nutmeg, optional cloves/allspice, and lemon juice. Toss gently until coated. Drizzle with optional melted butter. Let sit for 10-15 minutes. -
Step 4
Preheat oven to 375°F (190°C). Lightly grease a 12-cup muffin tin. Roll out one dough disk to ⅛-inch thickness. Cut out 12 circles (2.5-3 inch) for bottom crusts and press into muffin cups. -
Step 5
Spoon 2-3 tablespoons of apple filling into each dough-lined muffin cup. Roll out the second dough disk and cut out tops (solid, lattice, or decorative shapes). Place chosen top crusts on pies, sealing edges if using solid tops. -
Step 6
Whisk 1 large egg with 1 tbsp water for an egg wash. Lightly brush the tops of the pies with egg wash, then sprinkle generously with coarse or granulated sugar. -
Step 7
Bake at 375°F (190°C) for 15-20 minutes, until crust edges begin to turn golden. Reduce oven to 350°F (175°C) and bake for another 20-30 minutes, until crusts are deeply golden brown and filling is bubbly. (Tent with aluminum foil if browning too quickly.) -
Step 8
Cool in the muffin tin for at least 15-20 minutes, then carefully transfer to a wire rack to cool completely. Serve warm, optionally with ice cream or whipped cream. -
Step 9
Store loosely covered at room temperature for 1-2 days, or refrigerate in an airtight container for 3-4 days. Reheat in a 300°F (150°C) oven for 10-15 minutes. For longer storage, freeze cooled pies, then transfer to a freezer-safe container for up to 2-3 months. To reheat from frozen, bake at 350°F (175°C) for 20-30 minutes.
Important Information
Nutrition Facts (Per Serving)
It is important to consider this information as approximate and not to use it as definitive health advice.
Allergy Information
Please check ingredients for potential allergens and consult a health professional if in doubt.


Leave a Comment