
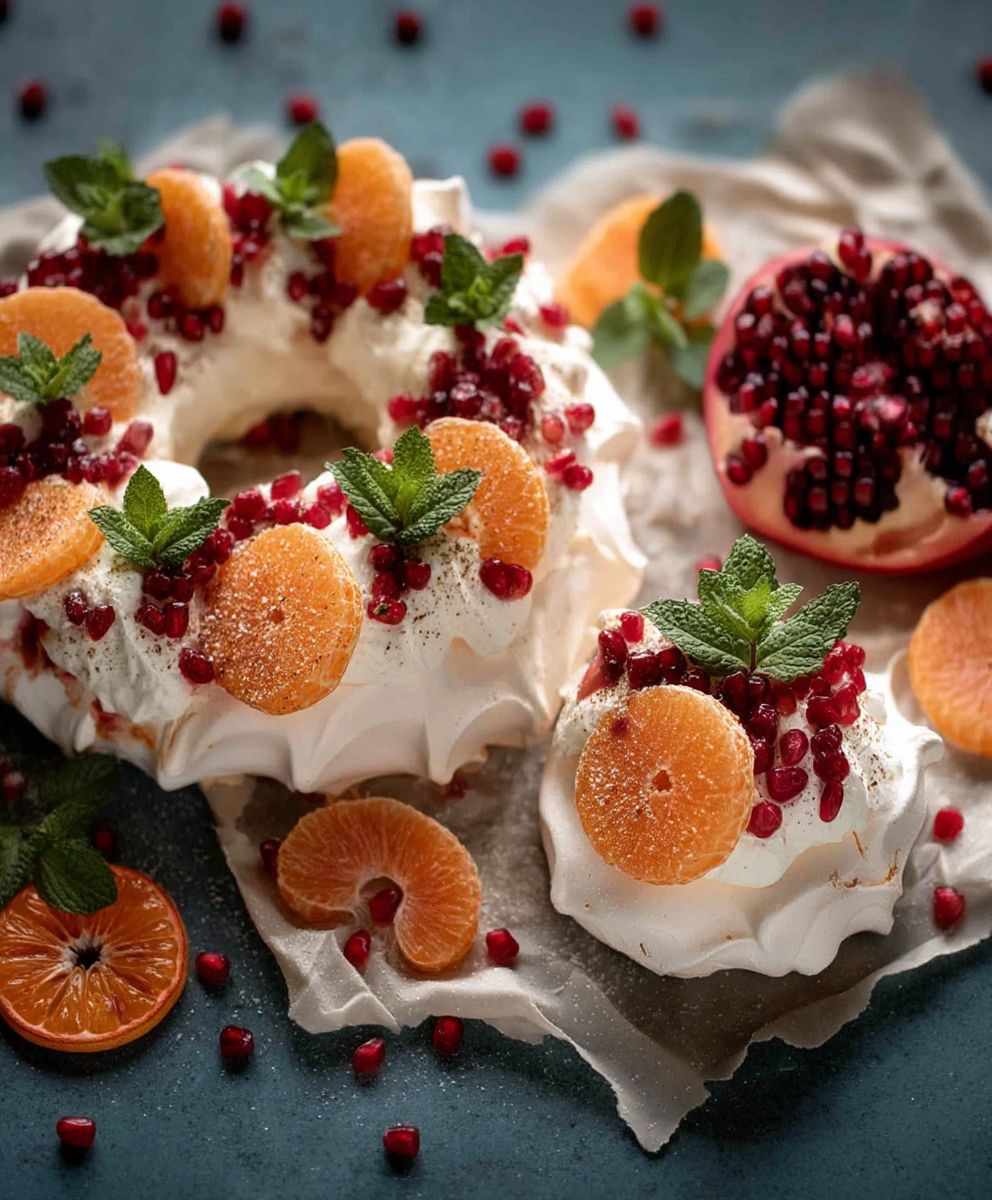
Pavlova Wreath Christmas Dessert: Is there anything more show-stopping than a perfectly crisp meringue wreath adorned with jewel-toned berries and a cloud of whipped cream? This isn’t just a dessert; it’s a centerpiece, a conversation starter, and a guaranteed “wow” factor for your Christmas table. I remember the first time I saw a pavlova wreath; it was at my grandmother’s Christmas Eve dinner, and it instantly became the star of the show.
Pavlova, named in honor of the Russian ballerina Anna Pavlova, has a fascinating history, with both Australia and New Zealand claiming its origin in the 1920s. Regardless of its true birthplace, this meringue-based dessert has become a beloved classic worldwide, particularly during festive seasons. Its delicate, crisp exterior gives way to a soft, marshmallowy interior, creating a delightful textural contrast that’s simply irresistible.
People adore pavlova for its ethereal lightness and its versatility. It’s a blank canvas for creativity! The subtle sweetness of the meringue perfectly complements the tartness of fresh berries, the richness of whipped cream, and the tang of passionfruit curd (my personal favorite!). Plus, while it looks incredibly impressive, a Pavlova Wreath Christmas Dessert is surprisingly simple to make, especially if you break down the steps. So, this year, ditch the traditional fruitcake and embrace the elegance and deliciousness of this stunning dessert. I promise, it will become a new Christmas tradition!

Ingredients:
- For the Meringue:
- 6 large egg whites, at room temperature
- 1 ½ cups (300g) granulated sugar
- 1 teaspoon cream of tartar
- 1 teaspoon vanilla extract
- 1 teaspoon white vinegar or lemon juice
- 2 tablespoons cornstarch
- For the Whipped Cream Filling:
- 2 cups (480ml) heavy cream, cold
- ¼ cup (30g) powdered sugar, sifted
- 1 teaspoon vanilla extract
- For the Christmas Decoration:
- 1 pint fresh raspberries
- 1 pint fresh strawberries, hulled and halved
- ½ pint fresh blueberries
- Fresh mint sprigs
- Powdered sugar, for dusting (optional)
- Edible glitter (optional)
- Rosemary sprigs (optional, for a more rustic look)
- Cranberries (optional, for extra color)
Preparing the Meringue
Okay, let’s get started with the meringue! This is the foundation of our beautiful Pavlova Wreath, so it’s important to get it right. Don’t be intimidated; I’ll walk you through it step-by-step.
- Preheat and Prepare: Preheat your oven to 250°F (120°C). This low temperature is crucial for drying out the meringue rather than baking it. Line a large baking sheet with parchment paper. I like to trace a 10-inch circle onto the parchment paper as a guide for the wreath shape. You can use a cake pan or a large bowl as a template. Flip the parchment paper over so the pencil marks don’t touch the meringue.
- Whip the Egg Whites: In a clean, grease-free bowl (this is super important!), beat the egg whites with an electric mixer on medium speed until soft peaks form. Soft peaks mean the peaks curl over when you lift the beaters.
- Gradually Add Sugar: Gradually add the granulated sugar, about a tablespoon at a time, while continuing to beat on medium speed. Make sure each addition of sugar is fully incorporated before adding the next. This process can take about 5-7 minutes. The mixture should become glossy and smooth.
- Add Cream of Tartar and Vanilla: Add the cream of tartar and vanilla extract and beat for another minute until well combined. The cream of tartar helps stabilize the egg whites and gives the meringue a nice structure.
- Add Vinegar and Cornstarch: In a small bowl, whisk together the white vinegar (or lemon juice) and cornstarch. This mixture helps create a chewy center in the meringue. Add this to the egg white mixture and beat for another minute until everything is thoroughly combined. The meringue should be thick, glossy, and hold stiff, shiny peaks. Stiff peaks mean the peaks stand straight up when you lift the beaters.
Shaping the Pavlova Wreath
Now comes the fun part shaping our wreath! We’ll use the traced circle as a guide to create a beautiful, even base for our decorations.
- Transfer to Baking Sheet: Spoon or pipe the meringue onto the prepared baking sheet, following the traced circle as a guide. You can create a smooth, even surface or create swirls and peaks for a more rustic look. I personally love the look of swirls and peaks!
- Create the Wreath Shape: Using the back of a spoon, create a slight indentation in the center of the meringue wreath. This will help hold the whipped cream and berries later. Don’t make it too deep, just enough to create a well.
Baking the Meringue
Patience is key here! We want to dry out the meringue slowly, not bake it. This will give us that perfect crispy exterior and soft, marshmallowy interior.
- Bake: Place the baking sheet in the preheated oven and immediately reduce the oven temperature to 200°F (95°C). Bake for 1 ½ to 2 hours, or until the meringue is dry and crisp to the touch. The baking time will depend on your oven, so keep an eye on it.
- Cool Completely: Turn off the oven and leave the meringue in the oven with the door slightly ajar for at least 1 hour, or preferably overnight. This allows the meringue to cool slowly and prevents cracking. Resist the urge to open the oven completely!
Preparing the Whipped Cream
While the meringue is cooling, let’s whip up the cream. This is a simple step, but using cold ingredients is essential for achieving a stable and fluffy whipped cream.
- Chill Bowl and Beaters: Place your mixing bowl and beaters in the freezer for at least 15 minutes before starting. This will help the cream whip up faster and hold its shape better.
- Whip the Cream: Pour the cold heavy cream into the chilled bowl and beat with an electric mixer on medium speed until soft peaks form.
- Add Sugar and Vanilla: Gradually add the sifted powdered sugar and vanilla extract and continue to beat until stiff peaks form. Be careful not to over-beat the cream, or it will turn grainy.
- Keep Cold: Cover the whipped cream and refrigerate until ready to use.
Assembling the Pavlova Wreath
Now for the grand finale! This is where your creativity can shine. Arrange the berries and mint sprigs in a way that is visually appealing and festive.
- Carefully Remove Meringue: Once the meringue is completely cool, carefully remove it from the parchment paper and place it on a serving platter. Be gentle, as meringue can be fragile.
- Spread Whipped Cream: Spread the whipped cream evenly over the top of the meringue wreath, filling the indentation you created earlier.
- Decorate with Berries: Arrange the raspberries, strawberries, and blueberries on top of the whipped cream in a decorative pattern. I like to create a mix of colors and textures. You can arrange them in rows, clusters, or a random pattern whatever looks best to you!
- Add Mint Sprigs: Tuck fresh mint sprigs among the berries for a touch of greenery and freshness.
- Optional Decorations: If desired, dust the wreath with powdered sugar for a snowy effect. You can also sprinkle edible glitter for extra sparkle. For a more rustic look, add rosemary sprigs and cranberries.
- Serve Immediately: The Pavlova Wreath is best served immediately after assembling, as the meringue will start to soften over time. However, you can assemble it a few hours in advance and keep it refrigerated until serving.
Tips for Success
- Room Temperature Egg Whites: Using room temperature egg whites helps them whip up to a greater volume.
- Clean Bowl and Beaters: Make sure your bowl and beaters are completely clean and grease-free. Even a tiny bit of grease can prevent the egg whites from whipping properly.
- Low and Slow Baking: Baking the meringue at a low temperature for a long time is crucial for achieving the perfect texture.
- Don’t Open the Oven: Avoid opening the oven door frequently while the meringue is baking, as this can cause temperature fluctuations and lead to cracking.
- Fresh Berries: Use the freshest berries you can find for the best flavor and appearance.
- Get Creative: Don’t be afraid to experiment with different decorations and flavors. You can use other types of fruit, such as kiwi, mango, or passion fruit. You can also add a drizzle of chocolate sauce or a sprinkle of chopped nuts.
Storage Instructions
Pavlova is best enjoyed fresh, but if you have leftovers, store them in an airtight container in the refrigerator. The meringue will soften over time, but it will still taste delicious. It’s best to store the meringue separately from the whipped cream and berries to prevent it from becoming too soggy.
Enjoy!
I hope you enjoy making and eating this beautiful Pavlova Wreath! It’s the perfect dessert for Christmas or any special occasion. Happy baking!
Conclusion:
And there you have it! Our Pavlova Wreath Christmas Dessert a showstopper that’s surprisingly simple to create. I truly believe this recipe is a must-try this holiday season. It’s not just a dessert; it’s an experience, a centerpiece that will have your guests oohing and aahing. The crisp meringue, the light and airy whipped cream, and the burst of fresh, seasonal berries create a symphony of textures and flavors that’s simply irresistible.
But why is this Pavlova Wreath Christmas Dessert so special? It’s more than just the taste. It’s the visual impact, the festive spirit it embodies. Imagine presenting this beautiful wreath at your Christmas gathering it’s guaranteed to be the star of the dessert table. Plus, it’s a fantastic way to use up any leftover egg whites you might have from other holiday baking projects!
Serving Suggestions and Variations:
Don’t be afraid to get creative with your Pavlova Wreath! While I’ve suggested a classic combination of berries, the possibilities are endless.
* Tropical Twist: Swap the berries for mango, kiwi, and passionfruit for a tropical Christmas vibe.
* Chocolate Indulgence: Drizzle melted dark chocolate over the meringue and top with chocolate shavings. Add some cocoa powder to the whipped cream for an extra chocolatey kick.
* Nutty Delight: Sprinkle toasted almonds, pecans, or hazelnuts over the finished wreath for added crunch and flavor.
* Citrus Zest: Add a touch of lemon or orange zest to the whipped cream for a bright and refreshing flavor.
* Mini Pavlovas: If you’re not feeling the wreath shape, you can easily make individual mini pavlovas using the same recipe. They’re perfect for a smaller gathering or as individual desserts.
* Boozy Berries: Macerate your berries in a little Grand Marnier or Cointreau for an extra touch of festive cheer (adults only, of course!).
The beauty of this recipe is its versatility. Feel free to adapt it to your own tastes and preferences. Don’t be intimidated by the meringue with a little patience and attention to detail, you’ll be amazed at how easy it is to create. Remember to whip your egg whites until stiff peaks form, and bake the meringue low and slow for that perfect crisp exterior and marshmallowy interior.
I’m so excited for you to try this recipe and create your own stunning Pavlova Wreath Christmas Dessert. It’s a dessert that’s sure to impress and create lasting memories.
Now, it’s your turn! I encourage you to give this recipe a try and let me know how it turns out. Share your photos and experiences in the comments below. I can’t wait to see your beautiful creations and hear about your variations. Happy baking, and Merry Christmas! I hope this recipe brings joy and sweetness to your holiday celebrations. Don’t forget to tag me in your photos I’d love to see your festive masterpieces!
Pavlova Wreath Christmas Dessert: A Festive & Delicious Recipe
Crispy meringue wreath topped with whipped cream and festive fresh berries, perfect for Christmas!
Ingredients
- 6 large egg whites, at room temperature
- 1 ½ cups (300g) granulated sugar
- 1 teaspoon cream of tartar
- 1 teaspoon vanilla extract
- 1 teaspoon white vinegar or lemon juice
- 2 tablespoons cornstarch
- 2 cups (480ml) heavy cream, cold
- ¼ cup (30g) powdered sugar, sifted
- 1 teaspoon vanilla extract
- 1 pint fresh raspberries
- 1 pint fresh strawberries, hulled and halved
- ½ pint fresh blueberries
- Fresh mint sprigs
- Powdered sugar, for dusting (optional)
- Edible glitter (optional)
- Rosemary sprigs (optional, for a more rustic look)
- Cranberries (optional, for extra color)
Instructions
- Preheat and Prepare: Preheat your oven to 250°F (120°C). Line a large baking sheet with parchment paper. Trace a 10-inch circle onto the parchment paper as a guide for the wreath shape. Flip the parchment paper over so the pencil marks don’t touch the meringue.
- Whip the Egg Whites: In a clean, grease-free bowl, beat the egg whites with an electric mixer on medium speed until soft peaks form.
- Gradually Add Sugar: Gradually add the granulated sugar, about a tablespoon at a time, while continuing to beat on medium speed. Make sure each addition of sugar is fully incorporated before adding the next. This process can take about 5-7 minutes. The mixture should become glossy and smooth.
- Add Cream of Tartar and Vanilla: Add the cream of tartar and vanilla extract and beat for another minute until well combined.
- Add Vinegar and Cornstarch: In a small bowl, whisk together the white vinegar (or lemon juice) and cornstarch. Add this to the egg white mixture and beat for another minute until everything is thoroughly combined. The meringue should be thick, glossy, and hold stiff, shiny peaks.
- Transfer to Baking Sheet: Spoon or pipe the meringue onto the prepared baking sheet, following the traced circle as a guide. You can create a smooth, even surface or create swirls and peaks for a more rustic look.
- Create the Wreath Shape: Using the back of a spoon, create a slight indentation in the center of the meringue wreath. This will help hold the whipped cream and berries later.
- Bake: Place the baking sheet in the preheated oven and immediately reduce the oven temperature to 200°F (95°C). Bake for 1 ½ to 2 hours, or until the meringue is dry and crisp to the touch. The baking time will depend on your oven, so keep an eye on it.
- Cool Completely: Turn off the oven and leave the meringue in the oven with the door slightly ajar for at least 1 hour, or preferably overnight. This allows the meringue to cool slowly and prevents cracking.
- Chill Bowl and Beaters: Place your mixing bowl and beaters in the freezer for at least 15 minutes before starting.
- Whip the Cream: Pour the cold heavy cream into the chilled bowl and beat with an electric mixer on medium speed until soft peaks form.
- Add Sugar and Vanilla: Gradually add the sifted powdered sugar and vanilla extract and continue to beat until stiff peaks form. Be careful not to over-beat the cream, or it will turn grainy.
- Keep Cold: Cover the whipped cream and refrigerate until ready to use.
- Carefully Remove Meringue: Once the meringue is completely cool, carefully remove it from the parchment paper and place it on a serving platter.
- Spread Whipped Cream: Spread the whipped cream evenly over the top of the meringue wreath, filling the indentation you created earlier.
- Decorate with Berries: Arrange the raspberries, strawberries, and blueberries on top of the whipped cream in a decorative pattern.
- Add Mint Sprigs: Tuck fresh mint sprigs among the berries for a touch of greenery and freshness.
- Optional Decorations: If desired, dust the wreath with powdered sugar for a snowy effect. You can also sprinkle edible glitter for extra sparkle. For a more rustic look, add rosemary sprigs and cranberries.
- Serve Immediately: The Pavlova Wreath is best served immediately after assembling, as the meringue will start to soften over time. However, you can assemble it a few hours in advance and keep it refrigerated until serving.
Notes
- Room Temperature Egg Whites: Using room temperature egg whites helps them whip up to a greater volume.
- Clean Bowl and Beaters: Make sure your bowl and beaters are completely clean and grease-free. Even a tiny bit of grease can prevent the egg whites from whipping properly.
- Low and Slow Baking: Baking the meringue at a low temperature for a long time is crucial for achieving the perfect texture.
- Don’t Open the Oven: Avoid opening the oven door frequently while the meringue is baking, as this can cause temperature fluctuations and lead to cracking.
- Fresh Berries: Use the freshest berries you can find for the best flavor and appearance.
- Get Creative: Don’t be afraid to experiment with different decorations and flavors. You can use other types of fruit, such as kiwi, mango, or passion fruit. You can also add a drizzle of chocolate sauce or a sprinkle of chopped nuts.
- Storage Instructions: Pavlova is best enjoyed fresh, but if you have leftovers, store them in an airtight container in the refrigerator. The meringue will soften over time, but it will still taste delicious. It’s best to store the meringue separately from the whipped cream and berries to prevent it from becoming too soggy.
Leave a Comment