
Orange Creamsicle Truffles bring forth a wave of delightful nostalgia, don’t they? I remember those warm summer days, eagerly unwrapping a classic orange creamsicle, the vibrant citrus tang perfectly mellowed by the smooth, sweet vanilla ice cream. It’s a flavor combination that has enchanted generations, synonymous with carefree moments and simple pleasures. Now, imagine capturing that exact essence and transforming it into an elegant, bite-sized confection that melts in your mouth.
This recipe is my love letter to that timeless classic. While truffles might sound intimidating, these are incredibly easy to make, offering all the sophisticated appeal without any of the fuss. People adore this dish not just for its undeniable deliciousness – the bright, zesty orange notes harmonizing with a rich, creamy white chocolate base – but also for its beautiful texture and vibrant presentation. Each bite delivers that iconic, refreshing pop of orange followed by a luxurious, velvety finish, making it an instant favorite for any occasion.
They are truly a celebration of flavor and a testament to how beloved a simple combination can become. I am absolutely thrilled to share with you how to create these irresistible Orange Creamsicle Truffles that promise to be a showstopper at your next gathering or a perfect little indulgence for yourself. Get ready to embark on a sweet journey down memory lane!

Ingredients:
For these absolutely delightful Orange Creamsicle Truffles, you’ll want to gather the freshest ingredients to ensure that vibrant citrus flavor truly shines through. I always recommend using real zest and juice for an authentic taste that simply can’t be replicated by extracts alone.
- For the Truffle Base:
- 8 ounces (226g) full-fat cream cheese, softened to room temperature
- 1/2 cup (113g) unsalted butter, softened to room temperature
- 4 cups (480g) powdered sugar (also known as confectioners’ sugar), sifted
- 1/4 cup (25g) non-fat dry milk powder (this is key for that “creamsicle” creaminess!)
- Zest of 2 large oranges (about 2 tablespoons) – make sure to only get the orange part, not the bitter white pith!
- 2 tablespoons fresh orange juice (from those same oranges)
- 1 teaspoon pure vanilla extract
- Pinch of salt (just a tiny bit to enhance all those lovely flavors)
- For the White Chocolate Coating:
- 16 ounces (450g) good quality white chocolate, finely chopped or in melting wafers/discs (I find good quality chocolate melts smoother and tastes better)
- 1 tablespoon coconut oil or vegetable shortening (this helps achieve a smoother, thinner coating and prevents cracking)
- For Decoration (Optional, but highly recommended for that signature “Orange Creamsicle Truffles” look):
- Additional orange zest, finely grated
- Orange sanding sugar or sprinkles
- A few squares of dark or milk chocolate for drizzling (if you want a contrast)
Preparing the Orange Creamsicle Truffle Base
This is where the magic begins for our incredible Orange Creamsicle Truffles! The base is wonderfully creamy, tangy, and bursting with citrus. Take your time with these steps to ensure a perfectly smooth and flavorful foundation for your no-bake treats.
- First things first, let’s get our cream cheese and butter ready. I always make sure both are truly at room temperature. This is absolutely crucial for achieving a smooth, lump-free mixture. If they’re too cold, they won’t cream properly, and you’ll end up with lumps, which we definitely don’t want in our delicate truffles. In a large mixing bowl, using an electric mixer (either a stand mixer with a paddle attachment or a hand mixer will work beautifully), beat the softened cream cheese and unsalted butter together on medium speed until the mixture is incredibly light, fluffy, and completely smooth. This usually takes about 2-3 minutes. Scrape down the sides of the bowl frequently to ensure everything is well incorporated. You’re looking for a consistency that’s almost airy.
- Now it’s time to bring in the sweetness and that signature “creamsicle” texture. Gradually add the sifted powdered sugar to the cream cheese and butter mixture. I can’t stress enough how important sifting is here – it prevents lumps and ensures a silky-smooth base. Add it about a cup at a time, mixing on low speed until combined after each addition, then increasing to medium-low until it’s fully incorporated. Once all the powdered sugar is in, add the non-fat dry milk powder. This ingredient is my secret weapon for achieving that distinctive, nostalgic creamsicle flavor and a wonderfully rich, creamy texture without adding extra liquid. Continue mixing until everything is smooth and well blended. The mixture will be quite thick and luscious at this point.
- Next, let’s infuse our base with that bright, zesty orange flavor. Carefully add the orange zest (remember, only the orange part!), the fresh orange juice, the pure vanilla extract, and that tiny pinch of salt to the bowl. Mix on low speed until these new additions are just combined, then increase the speed to medium and beat for another minute or two. You’ll notice the aroma immediately – it’s just heavenly! Taste a tiny bit to make sure the balance of orange and sweetness is perfect for your palate. If you feel it needs a bit more zest, now’s the time to add it.
- Once your truffle base is perfectly mixed and flavored, it needs a good chill. Transfer the entire mixture to an airtight container. Cover it tightly and refrigerate for at least 2 to 4 hours, or ideally, overnight. This chilling step is non-negotiable! It firms up the mixture significantly, making it much easier to roll into perfect truffle balls. Without adequate chilling, your truffle base will be too sticky and soft to handle, and you’ll end up with a messy, frustrating experience. Trust me, patience here pays off.
Shaping the Orange Creamsicle Truffles
After a good chill, your truffle base is now ready to be transformed into perfectly portioned spheres. This stage requires a bit of gentle handling, but with these tips, you’ll be rolling beautiful Orange Creamsicle Truffles in no time.
- Before you even take the truffle base out of the fridge, prepare your workspace. Line a baking sheet with parchment paper or a silicone baking mat. This will be where your rolled truffles will rest and get their final chill before coating. I also like to have a small bowl of warm water and a clean towel nearby for rinsing and wiping my hands, as the mixture can get a bit sticky.
- Remove the chilled truffle base from the refrigerator. It should be quite firm now, similar to a dense cookie dough. Using a small cookie scoop (I find a 1-tablespoon scoop is ideal for bite-sized truffles) or two spoons, scoop out portions of the mixture. Try to make them as uniform in size as possible – this ensures even cooking (if they were baked, but ours are no-bake!) and a beautiful presentation.
- Now for the rolling! Gently roll each scooped portion between the palms of your hands to form smooth, round balls. If the mixture starts to get too soft and sticky as you work, pop it back into the fridge for 10-15 minutes to firm up again. This is especially common if your kitchen is warm. Don’t be afraid to take a short break; it makes the process much more enjoyable. Aim for truffles that are roughly 1 inch to 1.5 inches in diameter.
- As you finish rolling each truffle, place it onto your prepared baking sheet. Once all the truffle balls are rolled, return the entire baking sheet to the refrigerator for another chill, for at least 30 minutes to 1 hour. This second chill is also very important. It ensures the truffles are firm and cold when they hit the warm chocolate coating, which helps the chocolate set quickly and evenly, giving you that beautiful, smooth finish we’re aiming for with our Orange Creamsicle Truffles.
Coating the Orange Creamsicle Truffles
This is arguably the most visually satisfying part of making these Orange Creamsicle Truffles! A smooth, crisp white chocolate shell is the perfect complement to the creamy, tangy orange interior. Melting chocolate can be a little tricky, but I’ll walk you through my preferred method for the best results.
- While your truffles are getting their final chill, let’s prepare the white chocolate coating. I strongly recommend using a double boiler method for melting white chocolate, as it provides gentle, even heat and significantly reduces the risk of scorching or seizing. If you don’t have a dedicated double boiler, you can easily create one: place a heatproof bowl (glass or stainless steel works best) over a saucepan filled with about an inch or two of simmering water, making sure the bottom of the bowl does not touch the water. The steam will gently melt the chocolate.
- Add your finely chopped white chocolate or melting wafers to the heatproof bowl. Add the coconut oil or vegetable shortening. The addition of this fat is crucial for creating a smoother, more fluid chocolate coating that will beautifully enrobe your truffles without being too thick or prone to cracking. Stir occasionally with a clean, dry spatula as the chocolate melts. Continue to heat, stirring, until the chocolate is completely melted and smooth. Be careful not to let any water or steam get into the chocolate, as this will cause it to seize and become grainy. Once melted, remove the bowl from the heat, but keep it over the warm water (off the stove) to maintain its liquid state while you work.
- Retrieve your chilled truffle balls from the refrigerator. They should be very firm and cold. Using a dipping tool, a fork, or even a toothpick (though a fork allows excess chocolate to drip off easily), gently drop one truffle ball into the melted white chocolate. Make sure it’s fully submerged.
- Using your dipping tool or fork, carefully lift the truffle out of the chocolate, allowing any excess chocolate to drip back into the bowl. Tap the fork gently against the side of the bowl to encourage more dripping. You want a thin, even coating. Too much chocolate can overpower the delicate truffle flavor and make it difficult to eat.
- Immediately after coating, place the dipped truffle onto a clean sheet of parchment paper or back onto your silicone-lined baking sheet. This is the moment for decoration! While the white chocolate is still wet, sprinkle it with extra orange zest for a pop of color and intense citrus aroma, or use some pretty orange sanding sugar or sprinkles to enhance that creamsicle aesthetic. If you’re drizzling with dark chocolate, you can do that after the white chocolate has set, or do it on a separate batch of truffles for variation.
- Repeat this process with the remaining truffle balls, working efficiently to ensure the white chocolate stays warm and fluid. If your chocolate starts to thicken as you work, you can briefly place it back over the simmering water for a few seconds, stirring constantly, to re-liquefy it. Continue coating and decorating until all your delicious Orange Creamsicle Truffles are beautifully enrobed and adorned.
Finishing and Storing Your Orange Creamsicle Truffles
You’re almost there! Once coated and decorated, your beautiful Orange Creamsicle Truffles just need a little time to set before they’re ready to be enjoyed. Proper storage will keep them fresh and delicious for days.
- Once all the truffles are coated and decorated, transfer the baking sheet back to the refrigerator. Allow them to chill for at least 30 minutes to 1 hour, or until the white chocolate coating is completely firm to the touch. This setting time is crucial for the coating to harden and protect the creamy interior, giving you that satisfying snap when you bite into them.
- Once fully set, you can carefully transfer your finished Orange Creamsicle Truffles to an airtight container. If you need to stack them, I recommend placing a sheet of parchment paper between layers to prevent them from sticking together or damaging their beautiful coating.
- Storage: These truffles are best stored in the refrigerator due to their cream cheese and butter base. They will keep well for up to 1 week in an airtight container. I’ve even frozen them successfully for up to 1 month; just make sure they are in a freezer-safe container, and thaw them in the refrigerator before serving for the best texture.
- Serving Suggestion: While they are delicious straight from the fridge, I find that letting them sit at room temperature for about 10-15 minutes before serving allows the flavors to truly bloom and the interior to soften slightly, enhancing that luxurious, melt-in-your-mouth experience. They make a fantastic addition to any dessert platter, a thoughtful homemade gift, or simply a delightful treat for yourself! Enjoy the bright, nostalgic flavors of these incredible Orange Creamsicle Truffles.
Conclusion:
Well, my friends, we’ve reached the sweet end of our journey, and I genuinely hope you’re as excited as I am about this incredible recipe. If you’ve been searching for that perfect treat to brighten your day, impress your guests, or simply indulge in a moment of pure bliss, then look no further. This recipe isn’t just about making a dessert; it’s about crafting an experience, a little bite-sized parcel of joy that takes you straight back to the sun-drenched days of childhood summers. The moment you taste these truffles, you’ll understand why I’m so passionate about them. The smooth, velvety texture melts in your mouth, releasing an explosion of vibrant orange zest perfectly balanced by a sweet, creamy undertone. It’s truly a symphony of flavors that dances on your palate, leaving a refreshing, yet decadent, aftertaste that will have you reaching for another, and another!
I can confidently say that these Orange Creamsicle Truffles are destined to become a staple in your dessert repertoire. They embody everything delightful about that classic frozen treat but elevated into a sophisticated, yet utterly approachable, confection. Imagine the delightful surprise on your friends’ faces when they pop one of these into their mouths! They are surprisingly simple to prepare, requiring no baking whatsoever, which makes them an absolute dream for busy schedules or when you just want a quick, impressive dessert without the fuss. The process itself is quite therapeutic, and the reward is absolutely worth every minute spent in the kitchen. You’re not just making truffles; you’re creating edible sunshine, a little burst of happiness that’s perfect for any occasion. Their vibrant flavor profile and delightful texture make them an unforgettable sweet ending to any meal, or a fantastic pick-me-up any time of day. They truly stand out as a unique and refreshing alternative to more traditional dessert options.
Serving Suggestions for Your Irresistible Truffles
Once you’ve lovingly crafted your batch of these delightful treats, the possibilities for serving are wonderfully varied. They make an exquisite after-dinner mint alternative, especially when paired with a fresh cup of coffee or a delicate herbal tea. Imagine hosting a brunch and presenting a small platter of these; they’d add an unexpected, yet welcome, burst of color and flavor. For parties, arrange them artfully on a tiered stand alongside other small bites. They are also absolutely perfect for gifting! Place a few in a decorative box tied with a pretty ribbon, and you have a thoughtful, homemade present that speaks volumes. Think about surprising a neighbor, bringing them to a potluck, or simply having a stash in your fridge for when that inevitable sweet craving strikes. They hold up beautifully, making them ideal for preparing ahead of time, which is a lifesaver when entertaining. Consider serving them chilled for an even more pronounced “creamsicle” effect, especially on a warm day. They’re also a fantastic addition to a dessert charcuterie board, offering a bright, zesty counterpoint to richer chocolates or nuts.
Creative Variations to Make Them Uniquely Yours
While the classic version is undeniably perfect, don’t hesitate to get creative and put your own spin on these marvelous truffles! For a different visual and flavor profile, consider rolling some of your truffles in finely shredded coconut for a tropical twist, or perhaps finely chopped pistachios for a lovely green hue and nutty crunch. If you’re a chocolate lover, a drizzle of melted dark chocolate or a dip in tempered white chocolate (perhaps colored with a tiny drop of food coloring for a fun pop) could elevate them further. You could even experiment with different citrus zests – imagine a batch made with lemon or lime zest for a brighter, more tart flavor, or even a combination for a “citrus burst” truffle. A tiny splash of pure vanilla extract or even a hint of almond extract could also add another layer of complexity to the creamy base. Feel free to adjust the sweetness to your liking, adding a touch more powdered sugar if you prefer a sweeter truffle, or a bit less if you like the orange zest to truly sing. The beauty of this recipe lies in its adaptability; it’s a canvas for your culinary creativity. Don’t be afraid to experiment with different coatings, different sizes, or even adding a tiny surprise in the center, like a small piece of candied orange peel. The world is your oyster, or rather, your truffle! You might even try mixing in some very finely chopped dried cranberries or apricots for a chewy texture contrast and a subtle tartness.
So, what are you waiting for? I wholeheartedly encourage you to roll up your sleeves, gather your ingredients, and embark on this delicious adventure. You’re going to be so proud of the delectable treats you create. Once you’ve experienced the sheer delight of making and tasting these incredible truffles, I would absolutely love to hear about it! Please, share your experiences in the comments section below. Did you try a fun variation? What did your family and friends think? Did they transport you back to childhood summers just like they do for me? Your feedback and stories are what make this community so vibrant and inspiring. Don’t forget to snap a picture and share your beautiful creations – I can’t wait to see them! Happy truffle-making, and prepare to fall in love with your new favorite no-bake dessert that truly captures the essence of sunshine and sweet nostalgia in every single bite.
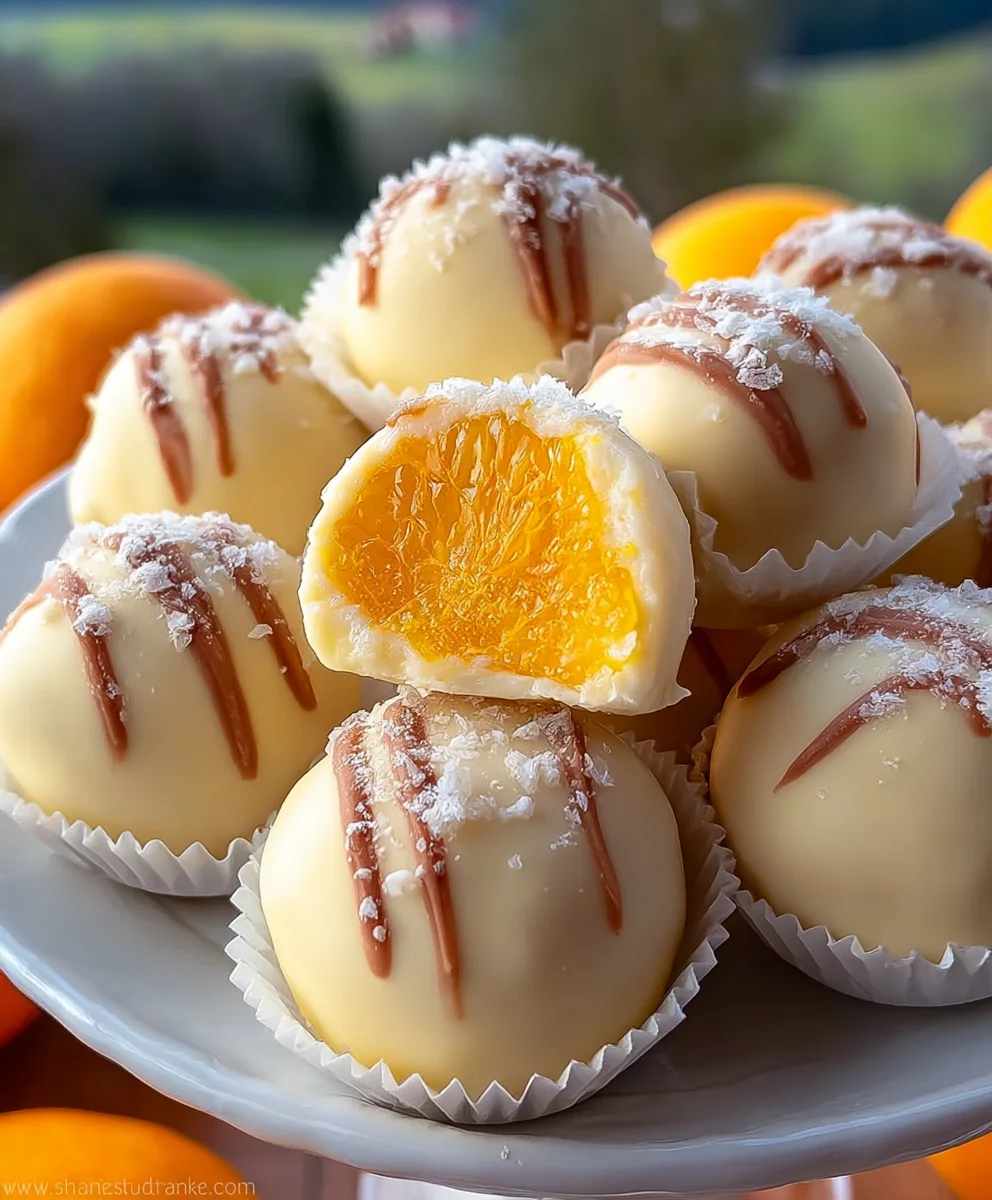
Orange Creamsicle Truffles
Capture the nostalgic flavor of orange creamsicles in these easy-to-make, no-bake truffles. Featuring a zesty orange and creamy white chocolate base, each bite offers a delightful blend of citrus and velvety sweetness.
Ingredients
-
8 oz (226g) full-fat cream cheese, softened
-
1/2 cup (113g) unsalted butter, softened
-
4 cups (480g) powdered sugar, sifted
-
1/4 cup (25g) non-fat dry milk powder
-
Zest of 2 large oranges (approx. 2 tbsp)
-
2 tbsp fresh orange juice
-
1 tsp pure vanilla extract
-
Pinch of salt
-
16 oz (450g) white chocolate, chopped or wafers
-
1 tbsp coconut oil or vegetable shortening
-
Optional: Additional orange zest, orange sanding sugar, or dark chocolate for decoration
Instructions
-
Step 1
In a large bowl, beat softened cream cheese and butter until light and fluffy (2-3 min). Gradually add sifted powdered sugar and non-fat dry milk powder, mixing until smooth. Stir in orange zest, fresh orange juice, vanilla extract, and a pinch of salt until just combined. -
Step 2
Transfer the mixture to an airtight container and refrigerate for 2-4 hours, or ideally overnight, until firm. This step is crucial for easy rolling. -
Step 3
Line a baking sheet with parchment paper. Scoop out 1-tablespoon portions of the chilled base. Roll each portion between your palms to form smooth, round balls (1 to 1.5 inches diameter). Place on the prepared baking sheet. -
Step 4
Refrigerate the rolled truffles for another 30 minutes to 1 hour until very firm. This ensures a clean coating. -
Step 5
While truffles chill, melt white chocolate and coconut oil/shortening using a double boiler method until smooth. Keep warm over simmering water (off the heat) to maintain fluidity. -
Step 6
Dip each cold truffle into the melted white chocolate, allowing excess to drip off. Immediately place on parchment paper and sprinkle with optional decorations (additional orange zest, orange sanding sugar, or a drizzle of dark chocolate) while the chocolate is still wet. -
Step 7
Return coated truffles to the refrigerator for 30 minutes to 1 hour until the coating is completely firm. Store in an airtight container in the refrigerator for up to 1 week, or freeze for up to 1 month. Thaw in the refrigerator before serving. -
Step 8
For best flavor and texture, let truffles sit at room temperature for about 10-15 minutes before serving to allow the flavors to bloom and the interior to soften slightly.
Important Information
Nutrition Facts (Per Serving)
It is important to consider this information as approximate and not to use it as definitive health advice.
Allergy Information
Please check ingredients for potential allergens and consult a health professional if in doubt.


Leave a Comment