
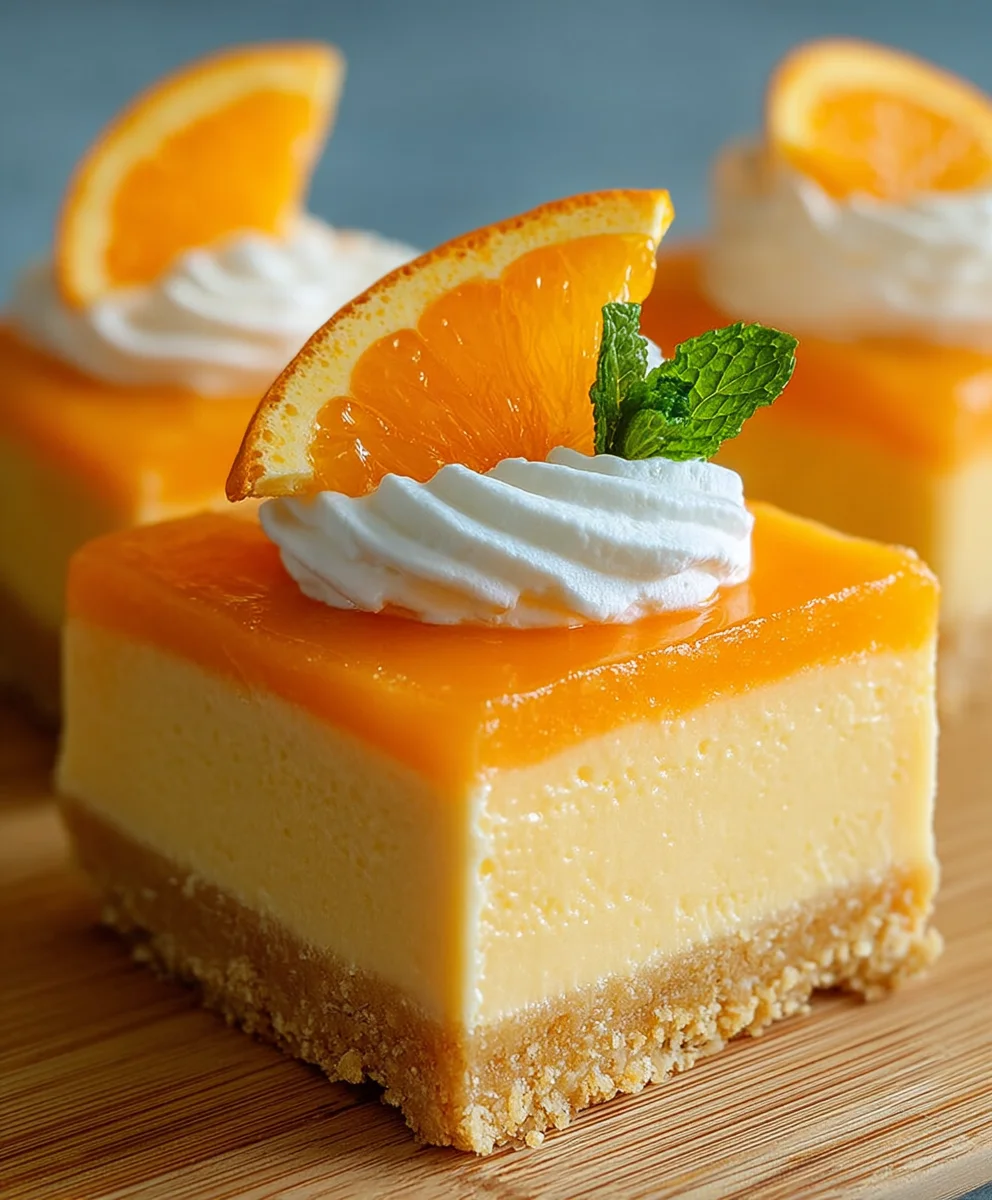
Orange Creamsicle Bars transport you straight back to carefree summer days, encapsulating the very essence of sunshine and nostalgic joy in every delightful square. I remember those endless summer afternoons, the distant jingle of the ice cream truck, and the irresistible allure of that iconic swirl of vibrant orange and creamy vanilla. It’s a flavor profile deeply embedded in our collective memory, a simple pleasure that defines warmth and relaxation.
While the original Creamsicle, serendipitously invented by Frank Epperson in the early 20th century, has long been a beloved symbol of childhood summers, this particular bar reimagines that cherished treat into a wonderfully shareable and conveniently delightful dessert. It’s the perfect harmony of bright, tangy orange zest and the smooth, comforting sweetness of vanilla cream that makes this rendition utterly irresistible. People adore these bars not only for their incredible taste – a perfect balance of refreshing citrus and a rich, velvety texture that melts in your mouth – but also for the effortless charm and pure, unadulterated happiness they bring to any gathering.
These Orange Creamsicle Bars are not just a dessert; they are a celebration of flavor, a memory in the making, promising a delightful culinary experience that’s both comforting and exhilarating. I am genuinely thrilled to share this recipe with you, inviting you to recreate that cherished summer feeling right in your own kitchen, any time of the year.

Ingredients:
For the Shortbread Crust:
-
1 ½ cups (180g) all-purpose flour: I always use unbleached for the best flavor and texture.
-
½ cup (100g) granulated sugar: Just enough sweetness to complement the citrus.
-
¼ teaspoon salt: A little touch to bring out all those lovely flavors.
-
¾ cup (1 ½ sticks or 170g) unsalted butter: Make sure it’s cold and cut into small cubes. This is key for a flaky, tender crust!
-
1 teaspoon vanilla extract: Pure vanilla is always my choice; it adds such a comforting aroma.
-
1 teaspoon orange zest: Finely grated zest from one small orange – for that subtle citrus kiss right in the base.
For the Orange Creamsicle Filling:
-
1 cup (200g) granulated sugar: Balances the tartness of the oranges beautifully.
-
¼ cup (30g) cornstarch: Our secret weapon for a perfectly set, yet tender, filling.
-
¼ teaspoon salt: Again, just a pinch to enhance the sweetness and orange notes.
-
1 cup (240ml) fresh orange juice: About 2-3 medium oranges. Please, use freshly squeezed – it makes all the difference in these Orange Creamsicle Bars!
-
2 tablespoons fresh lemon juice: A little lemon really brightens the orange flavor.
-
2 large eggs: Lightly beaten and at room temperature for smooth incorporation.
-
½ cup (1 stick or 113g) unsalted butter: Cut into pieces, ready to melt into our glorious filling.
-
2 tablespoons orange zest: Finely grated, from about 1-2 oranges. This is where a lot of that intense orange flavor comes from!
-
1 teaspoon vanilla extract: Complements the “creamsicle” vibe so perfectly.
-
A few drops of orange food coloring (optional): For that vibrant, sunny orange hue that just screams “creamsicle.”
For the Cream Cheese Layer:
-
8 ounces (226g) cream cheese: Full-fat, softened to room temperature. This is essential for a smooth, lump-free filling.
-
¼ cup (56g) unsalted butter: Softened to room temperature. Another critical element for creaminess.
-
1 cup (120g) powdered sugar: Sifted to ensure a silky-smooth texture.
-
1 large egg: At room temperature. Helps the layer set beautifully.
-
1 teaspoon vanilla extract: Enhances the sweet, creamy notes.
For the Orange Glaze (Optional, but highly recommended!):
-
1 cup (120g) powdered sugar: Sifted. This forms the base of our lovely drizzle.
-
2-3 tablespoons fresh orange juice: Start with 2 and add more slowly until you reach the perfect drizzling consistency.
-
½ teaspoon orange zest: For an extra burst of fresh orange aroma and flavor.
Let’s Get Baking! Your Guide to Perfect Orange Creamsicle Bars
Oh, I am so excited for you to make these! These Orange Creamsicle Bars are a true delight, combining the zesty brightness of orange with a luscious, creamy texture, all atop a buttery shortbread crust. They are incredibly refreshing and surprisingly straightforward to make, especially when we break it down. Let’s dive in!
Phase 1: Preparing the Irresistible Shortbread Crust
-
Preheat and Prepare: First things first, preheat your oven to a cozy 350°F (175°C). Then, grab a 9×13-inch baking pan. I like to line mine with parchment paper, leaving an overhang on the two longer sides. This creates “handles” which make lifting the cooled bars out of the pan an absolute breeze, ensuring perfect, clean cuts every time. If you don’t have parchment, a good spray with non-stick baking spray or a generous greasing and flouring will do, but I really can’t recommend parchment enough for these bars!
-
Combine Dry Ingredients: In a medium bowl, whisk together the 1 ½ cups of all-purpose flour, ½ cup of granulated sugar, and ¼ teaspoon of salt. Make sure they are thoroughly combined. Whisking here isn’t just about mixing; it also lightly aerates the flour, which contributes to a more tender crust.
-
Incorporate the Butter: Now, for the magic! Add your ¾ cup of cold, cubed unsalted butter to the dry ingredients. You want to work the butter into the flour mixture until it resembles coarse crumbs, much like a sandy texture with some pea-sized pieces of butter remaining. I usually do this with a pastry blender, but two forks or even your fingertips (working quickly to avoid melting the butter too much) will work beautifully. If you have a food processor, a few quick pulses will get the job done in seconds. The key here is to keep the butter cold; this creates little pockets of steam during baking, giving us that lovely, flaky shortbread texture.
-
Add Flavor Boosters: Stir in the 1 teaspoon of vanilla extract and 1 teaspoon of finely grated orange zest. Give it a good mix until everything is evenly distributed. Oh, the aroma already is starting to build!
-
Press and Bake: Pour the crumbly mixture into your prepared 9×13-inch baking pan. Using the bottom of a flat glass or your fingers, firmly and evenly press the mixture into the bottom of the pan. Make sure it’s packed tightly from edge to edge; a well-compacted crust is crucial for holding up to our luscious fillings. Pop it into your preheated oven and bake for 18-22 minutes, or until the edges are lightly golden brown. You’ll smell that wonderful buttery aroma filling your kitchen! Once baked, remove the crust from the oven and set it aside to cool completely on a wire rack. It needs to be cool to the touch before we add our next layers. Patience is a virtue here!
Phase 2: Crafting the Zesty Orange Creamsicle Filling
-
Prepare Your Oranges: If you haven’t already, zest your oranges and then juice them. Remember, when zesting, only get the bright orange part, avoiding the bitter white pith underneath. For the juice, make sure to strain it to remove any pulp or seeds for a super smooth filling. This fresh juice is the heart of our Orange Creamsicle Bars!
-
Whisk Dry Ingredients: In a medium saucepan (I prefer a non-stick one for easy cleanup), combine the 1 cup of granulated sugar, ¼ cup of cornstarch, and ¼ teaspoon of salt. Whisk them together thoroughly. This step is important to prevent lumps when we add the liquids, ensuring a silky-smooth filling.
-
Add Liquids and Eggs: Gradually whisk in the 1 cup of fresh orange juice and 2 tablespoons of fresh lemon juice until smooth. Then, whisk in the 2 lightly beaten large eggs until fully incorporated. You’re creating the base for a truly vibrant and tangy filling.
-
Cook to Perfection: Place the saucepan over medium heat. Cook, whisking constantly, for 5-8 minutes, or until the mixture thickens considerably. It should become thick enough to coat the back of a spoon and begin to bubble gently, almost like a thin pudding. It’s important to keep whisking, especially around the edges and bottom of the pan, to prevent scorching and ensure even thickening. Once it’s thick, remove it immediately from the heat.
-
Enrich and Flavor: Take the saucepan off the heat and stir in the ½ cup of cubed unsalted butter until it’s completely melted and incorporated. Then, stir in the 2 tablespoons of orange zest and 1 teaspoon of vanilla extract. If you want that iconic “creamsicle” orange hue, now is the time to add a few drops of orange food coloring; mix until you achieve your desired shade. The aroma at this stage is absolutely intoxicating!
-
Cool Slightly: Allow the orange filling to cool for about 10-15 minutes, stirring occasionally, before spreading it over the crust. This allows it to set up just a tiny bit more and prevents it from being too hot when it meets our next layer.
Phase 3: Whipping Up the Dreamy Cream Cheese Layer
-
Cream the Cheese and Butter: In a medium mixing bowl, using an electric mixer (either a stand mixer with a paddle attachment or a hand mixer), beat the 8 ounces of softened cream cheese and ¼ cup of softened unsalted butter together on medium speed until the mixture is incredibly smooth and creamy, with no lumps remaining. Make sure to scrape down the sides of the bowl frequently to ensure everything is evenly combined. This is the foundation of the “creamsicle” creaminess, so don’t rush it!
-
Add Sugar and Vanilla: Reduce the mixer speed to low and gradually add the 1 cup of sifted powdered sugar. Once it’s mostly incorporated, increase the speed to medium and beat until light and fluffy, scraping down the sides as needed. Stir in the 1 teaspoon of vanilla extract. The mixture should be wonderfully smooth and inviting.
-
Incorporate the Egg: Beat in the 1 large egg on low speed just until it’s combined. Be careful not to overmix at this stage, as overbeating eggs can sometimes lead to a tougher texture in baked goods. We want this layer to be light and delicate.
Phase 4: Assembling and Baking Your Orange Creamsicle Bars Masterpiece
-
Layer the Orange: Once your shortbread crust has completely cooled (this is critical!), carefully pour the slightly cooled orange filling over the crust. Using an offset spatula or the back of a spoon, gently spread it into an even layer, leaving a small border around the edges. You want a consistent thickness of this bright, zesty filling across the entire crust.
-
Add the Cream Cheese Layer: Now, for the creamy contrast! Carefully dollop spoonfuls of the cream cheese mixture over the orange filling. This helps to prevent the cream cheese from mixing too much with the orange layer as you spread it. Gently spread the cream cheese mixture over the orange layer, extending it to the edges. Take your time here; a gentle touch will keep the layers distinct and beautiful.
-
Bake to Golden Perfection: Place your pan of assembled Orange Creamsicle Bars back into your preheated 350°F (175°C) oven. Bake for 25-30 minutes, or until the cream cheese layer is lightly golden around the edges and appears set with only a slight jiggle in the center when gently shaken. Every oven is a little different, so keep an eye on it. The light golden hue is what we’re aiming for!
-
Cooling Down: Once baked, remove the pan from the oven and place it on a wire rack to cool completely at room temperature. This step is crucial for the bars to set up properly. Do not rush this process! It can take 1-2 hours.
Phase 5: The Finishing Touch – Optional Orange Glaze and Chilling
-
Prepare the Glaze (If Using): In a small bowl, whisk together the 1 cup of sifted powdered sugar, 2-3 tablespoons of fresh orange juice, and ½ teaspoon of orange zest. Start with 2 tablespoons of juice and add more, a teaspoon at a time, until you achieve a smooth, pourable, but still thick, drizzling consistency. We want it to be thick enough to hold its shape but thin enough to flow beautifully over the bars. This glaze adds an extra layer of sweetness and a pop of citrus that really elevates these Orange Creamsicle Bars to another level.
-
Glaze and Chill: Once the bars are completely cool (and I mean completely cool), drizzle the orange glaze evenly over the top. You can use a spoon for a rustic look or transfer the glaze to a piping bag with a small round tip for more precise lines. After glazing, transfer the pan to the refrigerator and chill for at least 3-4 hours, or ideally overnight. Chilling is absolutely essential! It allows all the layers to firm up and meld together, making them much easier to cut into neat squares and giving them that perfect “bar” texture.
-
Slice and Serve: When you’re ready to serve, lift the cooled and chilled bars out of the pan using the parchment paper overhangs. Place them on a cutting board. For the cleanest cuts, I like to use a large, sharp knife, wiping the blade clean with a damp cloth after each cut. Cut them into 16-24 squares, depending on your desired portion size. Each square is a delightful bite of sunshine!
-
Storage: Store any leftover Orange Creamsicle Bars in an airtight container in the refrigerator for up to 4-5 days. They actually taste even better the next day as the flavors continue to develop and marry! Enjoy every refreshing, creamy, zesty bite of your homemade creation.
Conclusion:
Well, my friends, we’ve reached the sweet finale of our culinary journey, and I genuinely hope you’re feeling inspired to bring a slice of sunshine into your kitchen. If there’s one recipe I could implore you to try this season, it would be this one. These aren’t just any dessert bars; they are a vibrant celebration of flavor, a truly irresistible combination that consistently earns rave reviews from everyone who tastes them. The magic of these bars lies in their ability to perfectly balance the zesty, bright tang of fresh orange with the velvety, sweet creaminess that evokes pure nostalgia. It’s like capturing the essence of that beloved frozen treat from your childhood, but elevating it into a sophisticated, yet utterly comforting, dessert that’s perfect for any occasion. From the first tantalizing aroma that fills your kitchen to the last delightful bite, you’ll understand exactly why I call this recipe a must-try.
What makes these particular Orange Creamsicle Bars stand out is their incredible depth of flavor. We’re not talking about artificial orange; we’re using real citrus to ensure that every morsel bursts with authentic, refreshing zest. This freshness is beautifully mellowed by the creamy, dreamy filling, creating a harmonious symphony on your palate. They’re delightfully cool and refreshing, making them the ultimate antidote to a warm afternoon or a perfect ending to a hearty meal. I find that they offer a unique textural experience too – the tender, slightly crumbly crust providing a wonderful counterpoint to the silky-smooth, melt-in-your-mouth filling. They’re surprisingly easy to make, a fantastic option even for novice bakers, yet they present beautifully, looking like they came straight from a gourmet bakery. This blend of simplicity, stunning aesthetics, and unparalleled flavor truly solidifies their position as a dessert champion in my personal recipe collection.
Now, let’s talk about how to elevate your Orange Creamsicle Bar experience even further. While they are absolutely divine on their own, served straight from the refrigerator, a few simple additions can transform them into an even grander affair. Imagine serving a chilled square with a delicate dollop of freshly whipped cream, perhaps infused with a touch of vanilla or even a hint of Grand Marnier for an adult twist. A sprinkle of candied orange zest or a few fresh mint leaves can add a beautiful pop of color and an extra layer of freshness. For a truly decadent treat, pair a bar with a scoop of premium vanilla bean ice cream, allowing the flavors to meld into an even more luxurious experience. If you’re feeling extra fancy, a light drizzle of a raspberry coulis or a passion fruit sauce could introduce another fruity dimension that complements the orange beautifully. They’re also fantastic for potlucks and gatherings; arrange them on a platter with a garnish of fresh berries – blueberries, raspberries, and strawberries all pair wonderfully with orange – and watch them disappear!
But don’t stop there! These bars are also incredibly versatile, lending themselves wonderfully to creative variations. If you’re a fan of other citrus flavors, consider experimenting with lemon or lime zest and juice to create Lemon Meringue-inspired or Key Lime Pie-esque bars. You could even do a beautiful swirl, combining a batch of orange filling with a smaller portion of lemon filling for a citrus medley. For a richer crust, try swapping out the graham crackers for shortbread cookies or even ginger snaps, which would add a spicy warmth to the sweet and tangy filling. Chocolate lovers might enjoy a light drizzle of melted white chocolate or a scattering of white chocolate chips over the top once the bars have set. To add a delightful crunch, toasted coconut flakes could be folded into the filling or sprinkled over the top. The possibilities are truly endless, allowing you to customize this recipe to perfectly suit your taste preferences or whatever ingredients you happen to have on hand. Don’t be afraid to make it your own; that’s part of the fun of baking!
So, there you have it. My heartfelt plea for you to give these incredible Orange Creamsicle Bars a try. They are more than just a recipe; they are an experience waiting to happen, a guaranteed crowd-pleaser that will bring smiles to faces and joy to taste buds. I genuinely believe that once you taste them, they will become a cherished addition to your own baking repertoire, just as they have for me. I pour my heart into sharing recipes that I truly adore, and this one holds a very special place. When you do whip up a batch, please, please come back and share your experience with me! I absolutely love hearing about your kitchen adventures, your successes, and even your creative variations. Leave a comment below, tell me what you loved, what you tried differently, or who you shared them with. Your feedback and stories are the sweetest reward for me, and they inspire me to keep sharing deliciousness with all of you. Happy baking, and enjoy every single delightful bite!
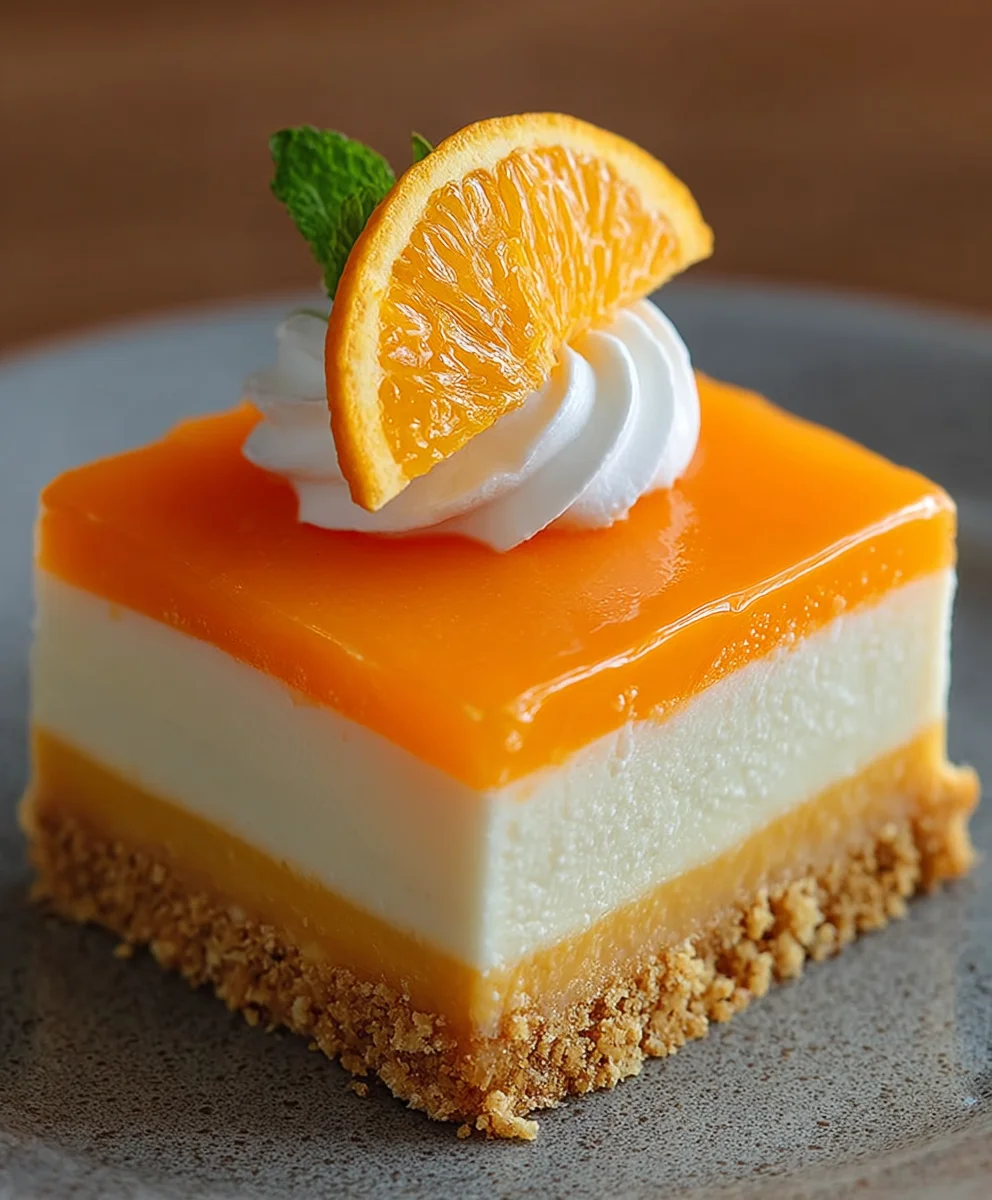
Orange Creamsicle Bars
These Orange Creamsicle Bars combine bright, tangy orange zest with smooth vanilla cream on a buttery shortbread crust. A perfect nostalgic dessert, offering a delightful harmony of citrus and sweetness for any occasion.
Ingredients
-
1 ½ cups (180g) all-purpose flour
-
½ cup (100g) granulated sugar
-
¼ teaspoon salt
-
¾ cup (1 ½ sticks or 170g) unsalted butter, cold, cubed
-
1 teaspoon vanilla extract
-
1 teaspoon orange zest, finely grated
-
1 cup (200g) granulated sugar
-
¼ cup (30g) cornstarch
-
¼ teaspoon salt
-
1 cup (240ml) fresh orange juice
-
2 tablespoons fresh lemon juice
-
2 large eggs, lightly beaten, room temperature
-
½ cup (1 stick or 113g) unsalted butter, cubed
-
2 tablespoons orange zest, finely grated
-
1 teaspoon vanilla extract
-
A few drops of orange food coloring (optional)
-
8 ounces (226g) cream cheese, full-fat, softened
-
¼ cup (56g) unsalted butter, softened
-
1 cup (120g) powdered sugar, sifted
-
1 large egg, room temperature
-
1 teaspoon vanilla extract
-
1 cup (120g) powdered sugar, sifted
-
2-3 tablespoons fresh orange juice
-
½ teaspoon orange zest
Instructions
-
Step 1
Preheat oven to 350°F (175°C). Line a 9×13-inch baking pan with parchment paper. In a medium bowl, whisk 1 ½ cups flour, ½ cup granulated sugar, and ¼ teaspoon salt. Cut ¾ cup cold, cubed unsalted butter into dry ingredients until coarse crumbs form. Stir in 1 teaspoon vanilla extract and 1 teaspoon orange zest. Press mixture firmly into the prepared pan. Bake 18-22 minutes until edges are lightly golden. Cool completely on a wire rack. -
Step 2
Zest and juice oranges; strain juice. In a medium saucepan, whisk 1 cup granulated sugar, ¼ cup cornstarch, and ¼ teaspoon salt. Gradually whisk in 1 cup fresh orange juice, 2 tablespoons fresh lemon juice, and 2 lightly beaten large eggs. Cook over medium heat, whisking constantly, for 5-8 minutes until mixture thickens and coats the back of a spoon. Remove from heat. Stir in ½ cup cubed unsalted butter until melted, then stir in 2 tablespoons orange zest and 1 teaspoon vanilla extract. Add orange food coloring if desired. Cool filling for 10-15 minutes, stirring occasionally. -
Step 3
In a mixing bowl, beat 8 ounces softened cream cheese and ¼ cup softened unsalted butter until smooth. Reduce speed to low, gradually add 1 cup sifted powdered sugar; beat until light and fluffy. Stir in 1 teaspoon vanilla extract. Beat in 1 large egg on low speed until just combined. -
Step 4
Once crust is completely cool, pour cooled orange filling over it, spreading evenly. Carefully dollop and gently spread cream cheese mixture over the orange filling. Bake at 350°F (175°C) for 25-30 minutes, until the cream cheese layer is lightly golden and set with a slight jiggle. Cool completely on a wire rack at room temperature (1-2 hours). -
Step 5
If using glaze: whisk 1 cup sifted powdered sugar, 2-3 tablespoons fresh orange juice, and ½ teaspoon orange zest until smooth and drizzling consistency. Drizzle glaze over cooled bars. Transfer pan to refrigerator and chill for at least 3-4 hours, or overnight. Lift chilled bars from pan using parchment overhangs. Slice into 16-24 squares with a sharp knife. Store leftovers in an airtight container in the refrigerator for up to 4-5 days.
Important Information
Nutrition Facts (Per Serving)
It is important to consider this information as approximate and not to use it as definitive health advice.
Allergy Information
Please check ingredients for potential allergens and consult a health professional if in doubt.
Leave a Comment