
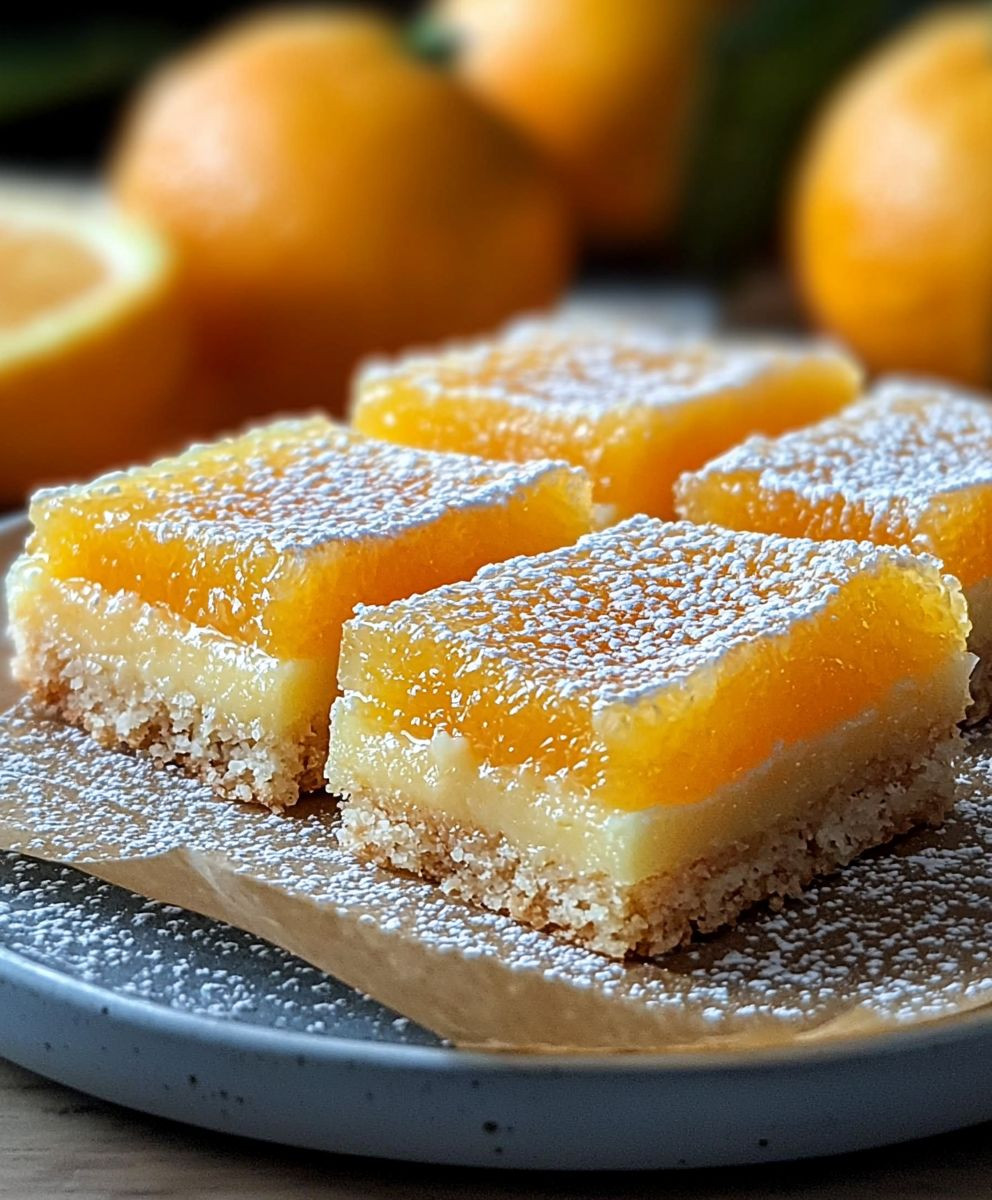
Orange Bars: Prepare to be transported to citrusy paradise with this incredibly easy and utterly irresistible recipe! Imagine sinking your teeth into a buttery, crumbly shortbread crust, topped with a vibrant, tangy, and perfectly sweet orange filling. These aren’t just any dessert bars; they’re sunshine on a plate, guaranteed to brighten even the gloomiest of days.
While the exact origins of orange bars are a little hazy, citrus desserts have a long and celebrated history, particularly in regions where oranges thrive. Think of the Mediterranean, where oranges have been cultivated for centuries, inspiring countless sweet treats. This recipe draws inspiration from those traditions, offering a delightful combination of simple ingredients and bright, bold flavor.
What makes these bars so universally loved? It’s the perfect balance of textures and tastes. The shortbread provides a satisfyingly crisp and buttery base, while the orange filling is smooth, creamy, and bursting with citrusy goodness. Plus, they’re incredibly convenient to make! Whether you’re baking for a potluck, a holiday gathering, or simply craving a sweet treat, these orange bars are always a crowd-pleaser. Get ready to experience a burst of sunshine in every bite!

Ingredients:
- For the Crust:
- 1 ½ cups all-purpose flour
- ½ cup (1 stick) unsalted butter, cold and cubed
- ½ cup powdered sugar
- ¼ teaspoon salt
- 2 tablespoons ice water
- For the Filling:
- 4 large eggs
- 2 cups granulated sugar
- ¼ cup all-purpose flour
- ¼ teaspoon baking powder
- ½ teaspoon salt
- ½ cup (1 stick) unsalted butter, melted
- ½ cup freshly squeezed orange juice (from about 2-3 oranges)
- 2 tablespoons orange zest (from about 2-3 oranges)
- For the Optional Glaze:
- 1 cup powdered sugar
- 2-3 tablespoons orange juice (or milk, if preferred)
- ½ teaspoon orange zest (optional)
Preparing the Crust:
- Combine Dry Ingredients: In a large bowl, whisk together the flour, powdered sugar, and salt. This ensures that the powdered sugar is evenly distributed, which is crucial for a tender crust.
- Cut in the Butter: Add the cold, cubed butter to the flour mixture. Using a pastry blender or your fingertips, cut the butter into the flour until the mixture resembles coarse crumbs. The key here is to work quickly so the butter stays cold. Cold butter is what creates those flaky layers in the crust. If you don’t have a pastry blender, you can use two knives to cut the butter in.
- Add Ice Water: Gradually add the ice water, one tablespoon at a time, mixing gently after each addition. The dough should just come together and form a ball. Be careful not to overmix, as this will develop the gluten in the flour and result in a tough crust. I usually start with 2 tablespoons and add more only if needed.
- Press into Pan: Press the dough evenly into the bottom of a 9×13 inch baking pan. You can use your fingers or the bottom of a measuring cup to get a nice, even layer. Make sure to press it firmly so it doesn’t crumble later.
- Pre-bake the Crust: Bake the crust in a preheated oven at 350°F (175°C) for 15-20 minutes, or until lightly golden brown. Pre-baking the crust helps prevent it from becoming soggy when the filling is added. Keep a close eye on it, as oven temperatures can vary. You want it to be lightly golden, not deeply browned.
Making the Orange Filling:
- Whisk Eggs and Sugar: In a large bowl, whisk together the eggs and granulated sugar until light and fluffy. This usually takes about 2-3 minutes. The mixture should be pale yellow and slightly thickened.
- Combine Dry Ingredients: In a separate bowl, whisk together the flour, baking powder, and salt. This ensures that the baking powder is evenly distributed, which will help the filling rise properly.
- Add Dry Ingredients to Wet Ingredients: Gradually add the dry ingredients to the egg mixture, whisking until just combined. Be careful not to overmix, as this can develop the gluten in the flour and result in a tough filling.
- Add Melted Butter, Orange Juice, and Zest: Stir in the melted butter, orange juice, and orange zest until well combined. The mixture should be smooth and slightly runny. The orange zest is what really gives these bars that intense orange flavor, so don’t skimp on it!
Baking the Orange Bars:
- Pour Filling into Crust: Pour the orange filling evenly over the pre-baked crust. Make sure the filling is spread evenly so the bars bake uniformly.
- Bake: Bake in the preheated oven at 350°F (175°C) for 25-30 minutes, or until the filling is set and lightly golden brown. The center should be set, but still have a slight jiggle. If the edges are browning too quickly, you can loosely tent the pan with foil.
- Cool Completely: Let the bars cool completely in the pan before cutting. This is important because the filling will continue to set as it cools. If you try to cut them while they’re still warm, they’ll be messy and won’t hold their shape. I usually let them cool for at least 2-3 hours, or even overnight.
Making the Optional Glaze:
- Combine Ingredients: In a small bowl, whisk together the powdered sugar and orange juice (or milk) until smooth. Add the orange zest, if using. The glaze should be thick enough to coat the bars, but thin enough to drizzle easily. If it’s too thick, add a little more orange juice (or milk). If it’s too thin, add a little more powdered sugar.
- Drizzle over Bars: Drizzle the glaze evenly over the cooled bars. You can use a spoon or a fork to drizzle the glaze.
- Let Glaze Set: Let the glaze set for about 15-20 minutes before cutting the bars. This will prevent the glaze from smearing when you cut them.
Cutting and Serving:
- Cut into Bars: Cut the cooled bars into squares or rectangles. I usually cut them into 24 bars, but you can cut them into any size you like.
- Serve: Serve the orange bars and enjoy! They’re delicious on their own, or you can serve them with a scoop of vanilla ice cream or a dollop of whipped cream.
Tips and Variations:
- Use Freshly Squeezed Orange Juice: Freshly squeezed orange juice will give the bars the best flavor. Bottled orange juice just doesn’t compare.
- Don’t Overbake: Overbaking the bars will make them dry and crumbly. The filling should be set, but still have a slight jiggle in the center.
- Add Nuts: You can add chopped nuts, such as pecans or walnuts, to the crust or the filling for added texture and flavor. I like to toast the nuts before adding them to bring out their flavor.
- Use Different Citrus: You can substitute other citrus fruits, such as lemons or limes, for the oranges. Just be sure to adjust the amount of sugar accordingly, as some citrus fruits are more tart than others.
- Add Chocolate: You can add chocolate chips to the filling or drizzle melted chocolate over the bars after they’ve cooled. Orange and chocolate is a classic combination!
- Make it Gluten-Free: To make these bars gluten-free, simply substitute the all-purpose flour with a gluten-free all-purpose flour blend. Be sure to use a blend that contains xanthan gum, as this will help bind the ingredients together.
- Storage: Store the orange bars in an airtight container at room temperature for up to 3 days, or in the refrigerator for up to 5 days. They can also be frozen for up to 2 months.
Troubleshooting:
- Crust is too crumbly: If your crust is too crumbly, you may have added too much flour or not enough water. Try adding a little more ice water, one tablespoon at a time, until the dough comes together.
- Filling is too runny: If your filling is too runny, you may have added too much orange juice or not enough flour. Try adding a little more flour, one tablespoon at a time, until the filling thickens.
- Bars are too dry: If your bars are too dry, you may have overbaked them. Be sure to check them frequently while they’re baking and remove them from the oven as soon as the filling is set.
- Bars are too soggy: If your bars are too soggy, you may not have pre-baked the crust long enough. Be sure to pre-bake the crust until it’s lightly golden brown.
Enjoy your homemade orange bars! I hope you love them as much as I do!
Conclusion:
So, there you have it! These orange bars are truly a ray of sunshine baked into a delightful treat. I genuinely believe this recipe is a must-try for anyone who loves a burst of citrus flavor, a satisfyingly chewy texture, and a dessert that’s both easy to make and incredibly impressive. From the zesty aroma that fills your kitchen as they bake to the sweet and tangy taste that dances on your tongue, these bars are a sensory experience you won’t soon forget. But why are they a must-try, you ask? Well, beyond the obvious deliciousness, these orange bars are incredibly versatile. They’re perfect for a casual afternoon snack with a cup of tea, a sophisticated addition to a brunch spread, or even a delightful dessert to end a special meal. They’re also surprisingly portable, making them ideal for picnics, potlucks, or even a sweet treat to pack in your lunchbox. And let’s not forget how incredibly easy they are to make! With just a few simple ingredients and straightforward instructions, you can whip up a batch of these beauties in no time.Serving Suggestions and Variations:
The possibilities are truly endless when it comes to serving and customizing these orange bars. For a classic presentation, simply dust them with powdered sugar after they’ve cooled completely. This adds a touch of elegance and a subtle sweetness that complements the citrus flavor perfectly. If you’re feeling a bit more adventurous, consider drizzling them with a simple glaze made from powdered sugar and orange juice. This will add an extra layer of sweetness and a beautiful glossy finish. You could even add a touch of orange zest to the glaze for an extra burst of citrus flavor. For a truly decadent treat, try serving these bars with a scoop of vanilla ice cream or a dollop of whipped cream. The cool creaminess of the ice cream or whipped cream perfectly complements the tangy sweetness of the bars. And if you’re looking to experiment with different flavors, feel free to get creative with the ingredients. You could add a handful of chopped nuts, such as pecans or walnuts, to the batter for a bit of crunch. Or, you could substitute the orange zest and juice with lemon or grapefruit for a different citrus twist. A sprinkle of shredded coconut on top before baking would also add a lovely texture and flavor. For a chocolatey twist, consider adding chocolate chips to the batter or drizzling melted chocolate over the cooled bars.Don’t be afraid to experiment and make this recipe your own!
I truly hope you’ll give these orange bars a try. I’m confident that you’ll love them as much as I do. They’re a simple, delicious, and versatile treat that’s perfect for any occasion. Once you’ve baked your own batch of these sunshine-filled bars, I’d absolutely love to hear about your experience! Did you try any of the variations I suggested? Did you come up with your own unique twist? Share your photos and stories in the comments below! I can’t wait to see what you create. Happy baking, and enjoy every single bite of these delightful orange bars! I am sure you will love this recipe as much as I do. Print
Orange Bars: The Ultimate Guide to Delicious and Nutritious Snacks
- Total Time: 70 minutes
- Yield: 24 bars 1x
Description
Tangy and sweet orange bars with a buttery shortbread crust and a bright citrus glaze. These easy-to-make bars are perfect for a dessert or snack.
Ingredients
- 1 ½ cups all-purpose flour
- ½ cup (1 stick) unsalted butter, cold and cubed
- ½ cup powdered sugar
- ¼ teaspoon salt
- 2 tablespoons ice water
- 4 large eggs
- 2 cups granulated sugar
- ¼ cup all-purpose flour
- ¼ teaspoon baking powder
- ½ teaspoon salt
- ½ cup (1 stick) unsalted butter, melted
- ½ cup freshly squeezed orange juice (from about 2–3 oranges)
- 2 tablespoons orange zest (from about 2–3 oranges)
- 1 cup powdered sugar
- 2–3 tablespoons orange juice (or milk, if preferred)
- ½ teaspoon orange zest (optional)
Instructions
- In a large bowl, whisk together the flour, powdered sugar, and salt.
- Cut in the cold, cubed butter using a pastry blender or your fingertips until the mixture resembles coarse crumbs.
- Gradually add the ice water, one tablespoon at a time, mixing gently after each addition, until the dough just comes together.
- Press the dough evenly into the bottom of a 9×13 inch baking pan.
- Bake in a preheated oven at 350°F (175°C) for 15-20 minutes, or until lightly golden brown.
- In a large bowl, whisk together the eggs and granulated sugar until light and fluffy.
- In a separate bowl, whisk together the flour, baking powder, and salt.
- Gradually add the dry ingredients to the egg mixture, whisking until just combined.
- Stir in the melted butter, orange juice, and orange zest until well combined.
- Pour the orange filling evenly over the pre-baked crust.
- Bake in the preheated oven at 350°F (175°C) for 25-30 minutes, or until the filling is set and lightly golden brown.
- Let the bars cool completely in the pan before cutting.
- In a small bowl, whisk together the powdered sugar and orange juice (or milk) until smooth. Add the orange zest, if using.
- Drizzle the glaze evenly over the cooled bars.
- Let the glaze set for about 15-20 minutes before cutting the bars.
- Cut the cooled bars into squares or rectangles.
- Serve and enjoy!
Notes
- Use freshly squeezed orange juice for the best flavor.
- Don’t overbake the bars; the filling should be set but still have a slight jiggle in the center.
- Add chopped nuts (pecans or walnuts) to the crust or filling for added texture.
- Substitute other citrus fruits like lemons or limes for the oranges.
- Add chocolate chips to the filling or drizzle melted chocolate over the cooled bars.
- To make gluten-free, use a gluten-free all-purpose flour blend.
- Store in an airtight container at room temperature for up to 3 days, or in the refrigerator for up to 5 days. Can be frozen for up to 2 months.
- Prep Time: 25 minutes
- Cook Time: 45 minutes


Leave a Comment