
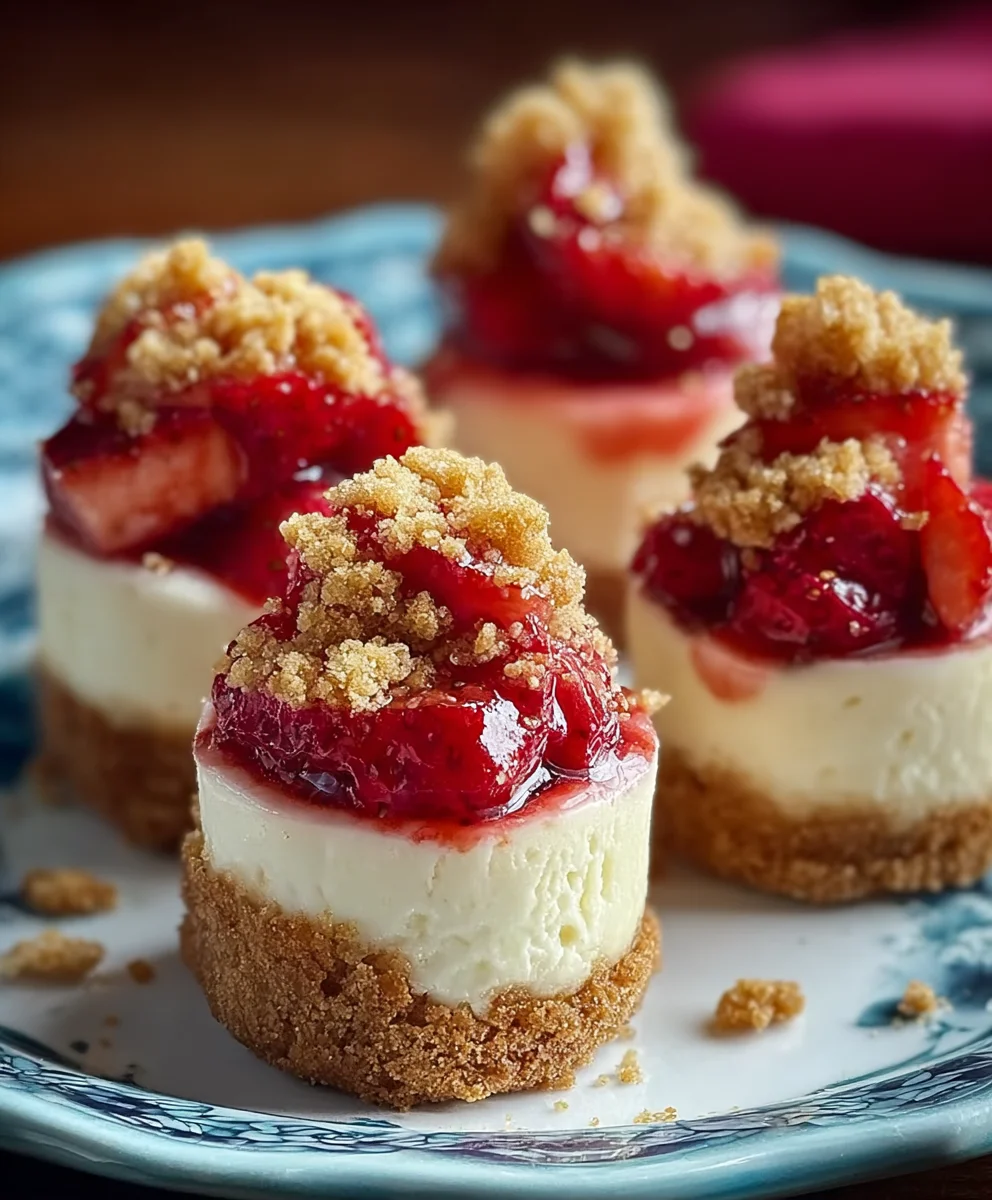
Mini Strawberry Crunch Cheesecake Bites! Prepare to be utterly enchanted by a dessert that’s as delightful to behold as it is to taste. I am absolutely thrilled to share a recipe that promises to transform your dessert table and leave a lasting impression on anyone lucky enough to try them.
Cheesecake has long been a beloved culinary staple, evolving from ancient delicacies into the sophisticated, versatile treat we adore today. While its history spans centuries and continents, these modern, individual bites represent a playful and convenient evolution, perfect for contemporary gatherings. The “strawberry crunch” element, inspired by nostalgic ice cream truck favorites, adds a whimsical touch that truly sets this recipe apart.
I’ve found that people simply adore these for a multitude of reasons. Beyond their undeniable charm and vibrant visual appeal, they offer the perfect balance of creamy, tangy cheesecake, a delicate, buttery graham cracker crust, and that utterly irresistible, sweet, and crunchy strawberry topping. They’re effortlessly portioned, making them ideal for parties, picnics, or simply a luxurious personal treat without the fuss of slicing. Every bite delivers a symphony of textures and flavors, ensuring each indulgence is a moment to savor. I am confident that these Mini Strawberry Crunch Cheesecake Bites will quickly become a cherished favorite in your repertoire.

Ingredients:
- For the Graham Cracker Crust:
- 1 ½ cups (approximately 170g) finely crushed graham cracker crumbs (about 10-12 full graham cracker sheets)
- ¼ cup (50g) granulated sugar
- 6 tablespoons (85g) unsalted butter, melted
- Pinch of salt
- For the Creamy Cheesecake Filling:
- 24 ounces (680g) full-fat cream cheese, softened to room temperature (three 8-ounce blocks)
- 1 cup (200g) granulated sugar
- 2 large eggs, at room temperature
- 1 teaspoon pure vanilla extract
- ¼ cup (60g) sour cream, at room temperature (full-fat is best for richness)
- 1 tablespoon all-purpose flour (optional, helps prevent cracking)
- Pinch of salt
- For the Irresistible Strawberry Crunch Topping:
- 1 cup (about 70g) freeze-dried strawberries
- 2 cups (about 12-15 Golden Oreo cookies, without filling, or Nilla Wafers) crushed Golden Oreo cookies or Nilla Wafers
- ½ cup (113g) unsalted butter, melted
- ¼ cup (50g) granulated sugar
- ½ teaspoon pure vanilla extract
- Pinch of salt
For the Graham Cracker Crust:
- Prepare Your Muffin Tin: First things first, let’s get our equipment ready. You’ll need a standard 12-cup muffin tin for these delightful Mini Strawberry Crunch Cheesecake Bites. Line each cup with paper cupcake liners. This is absolutely crucial for easy removal and a clean presentation. I always give the liners a quick spray with non-stick cooking spray, just to be extra safe and ensure no sticking whatsoever. Trust me, it makes a big difference when it’s time to unmold them.
- Crush the Graham Crackers: If you’re starting with whole graham crackers, now’s the time to crush them. You can do this by placing them in a Ziploc bag and crushing them with a rolling pin until they are very fine crumbs. Or, for a quicker method, a food processor works wonders. Pulse them until you have a fine, sand-like consistency. Aim for about 1 ½ cups of crumbs. The finer the crumbs, the more cohesive and sturdy your crust will be.
- Combine Dry Ingredients: In a medium-sized mixing bowl, combine the finely crushed graham cracker crumbs, ¼ cup of granulated sugar, and a pinch of salt. Give these a good stir with a fork or whisk to ensure they are thoroughly mixed. The sugar adds a touch of sweetness, and the salt helps to balance out the flavors, enhancing the graham cracker taste.
- Add Melted Butter: Pour the 6 tablespoons of melted unsalted butter into the dry graham cracker mixture. Using a fork, or even your clean hands, mix everything together until the crumbs are uniformly moistened. The mixture should resemble wet sand and hold together when you press it between your fingers. If it feels too dry, you can add another teaspoon or two of melted butter, but be careful not to overdo it, or the crust will be greasy. This is the binder that will hold our crust together.
- Press into Liners: Divide the graham cracker mixture evenly among the 12 prepared cupcake liners. I find that a heaping tablespoon or about 25g per liner is usually perfect. Using the bottom of a small glass, a tart tamper, or even your fingers, firmly press the crumbs down into an even layer at the bottom of each liner. Compacting the crust well is essential for a sturdy base for your Mini Strawberry Crunch Cheesecake Bites. If the crust isn’t pressed firmly enough, it can crumble when you try to eat it later.
- Pre-bake (Optional but Recommended): For an extra firm and slightly toasted crust, I like to pre-bake my crusts. Pop the muffin tin into a preheated oven at 325°F (160°C) for about 5-7 minutes. This short bake helps to set the crust and prevents it from becoming soggy once the cheesecake filling is added. After pre-baking, remove the tin from the oven and let the crusts cool completely on a wire rack while you prepare the cheesecake filling. You can even place them in the freezer for 10 minutes to speed up the cooling process.
For the Creamy Cheesecake Filling:
- Soften Cream Cheese: This is arguably one of the most critical steps for a lump-free, silky-smooth cheesecake filling. Ensure your three 8-ounce blocks of full-fat cream cheese are truly softened to room temperature. This usually takes about 1-2 hours on the countertop, or you can carefully microwave them for 15-20 second intervals until pliable but not melted. If the cream cheese is too cold, it will be impossible to mix smoothly, resulting in lumps in your final cheesecake.
- Cream the Cream Cheese and Sugar: In a large mixing bowl, using an electric mixer (either a stand mixer with the paddle attachment or a hand mixer), beat the softened cream cheese on medium speed for about 2-3 minutes until it’s completely smooth and creamy, with no lumps in sight. Then, gradually add the 1 cup of granulated sugar, beating on medium-low speed until just combined and smooth, scraping down the sides of the bowl as needed. Avoid overmixing at this stage, as incorporating too much air can lead to cracks in your cheesecake during baking. We’re aiming for smooth, not fluffy.
- Incorporate Eggs, One at a Time: Add the two large eggs, one at a time, beating on low speed only until each egg is just incorporated before adding the next. This step requires patience and a gentle hand. Overmixing once the eggs are added is the number one culprit for cracked cheesecakes. The eggs provide structure, and too much air can cause them to puff up dramatically in the oven and then fall, creating fissures. Scrape down the bowl after each egg addition to ensure everything is evenly mixed.
- Add Flavorings and Stabilizer: Gently mix in the 1 teaspoon of pure vanilla extract, ¼ cup of sour cream, and a pinch of salt. The vanilla adds warmth and depth of flavor, while the sour cream contributes to the cheesecake’s characteristic tang and incredibly smooth, rich texture. The pinch of salt balances the sweetness. If you’re using it, now is also the time to very lightly mix in the 1 tablespoon of all-purpose flour. The flour acts as a mild stabilizer, further helping to prevent cracks, especially useful for mini cheesecakes where temperature fluctuations can be more pronounced. Mix just until combined.
- Final Check and Prepare for Baking: Give the entire mixture one last gentle scrape down and fold with a spatula to ensure there are no unmixed pockets at the bottom of the bowl. The filling should be incredibly smooth and pourable, without any lumps. Your oven should still be preheating to 325°F (160°C). If you’ve pre-baked your crusts, they should be cool by now.
For the Irresistible Strawberry Crunch Topping:
This strawberry crunch is what truly elevates these from simple cheesecakes to extraordinary Mini Strawberry Crunch Cheesecake Bites. It’s incredibly flavorful and adds a fantastic textural contrast.
- Prepare the Freeze-Dried Strawberries: The star of our crunch, the freeze-dried strawberries, needs to be crushed. You can achieve this using a food processor for a fine powder, or by placing them in a sturdy Ziploc bag and crushing them with a rolling pin until they are a coarse powder with some smaller pieces remaining. I personally love having a mix of fine powder and tiny chunks for visual appeal and varied texture. Measure out 1 cup of these crushed strawberries.
- Crush the Golden Oreos/Nilla Wafers: Next, we need our cookie component. If using Golden Oreos, twist them apart and scrape off the cream filling (you can save this for another treat!). Crush the cookie wafers in a food processor or a Ziploc bag until they are fine crumbs. If using Nilla Wafers, simply crush them. Aim for 2 cups of finely crushed cookies. These add a wonderful vanilla base to the crunch.
- Combine Dry Ingredients: In a medium mixing bowl, combine the crushed freeze-dried strawberries and the crushed Golden Oreo/Nilla Wafer crumbs. Add ¼ cup of granulated sugar and a pinch of salt. Stir these dry ingredients together thoroughly with a fork until they are uniformly mixed. The sugar adds extra sweetness, and the salt again works to enhance the overall flavor profile.
- Add Wet Ingredients: Pour the ½ cup of melted unsalted butter and ½ teaspoon of pure vanilla extract into the dry strawberry-cookie mixture. Mix everything together with a fork or your hands until the mixture is fully moistened and clumpy. It should resemble a coarse, clumpy streusel. This mixture is absolutely divine and smells incredible! Make sure there are no dry spots. This is the crunchy topping that will set your Mini Strawberry Crunch Cheesecake Bites apart.
- Set Aside: Once perfectly mixed, set the strawberry crunch topping aside. We won’t be adding it until after the cheesecakes have baked and cooled slightly, to ensure it retains its vibrant color and amazing crunch.
Assembling and Baking Your Mini Strawberry Crunch Cheesecake Bites:
- Fill the Crusts: Carefully spoon or pour the creamy cheesecake filling over the pre-baked graham cracker crusts in each cupcake liner. Fill each liner about ¾ full. Be careful not to overfill, as the cheesecake will rise slightly during baking. I like to use a small ladle or an ice cream scoop for consistent portions.
- Prepare for Water Bath (Optional but Recommended for Even Baking): While these are mini cheesecakes, a water bath can still significantly improve their texture and prevent cracking, leading to even baking and a super creamy consistency. Place your muffin tin inside a larger roasting pan. Carefully pour hot water into the roasting pan, ensuring the water level comes about halfway up the sides of the muffin tin cups. Be extremely cautious not to get any water into the cheesecake batter itself, as this can ruin the texture. If you choose not to use a water bath, that’s perfectly fine; just know there’s a slightly higher chance of small cracks forming, which our crunch topping will conveniently hide!
- Bake: Carefully transfer the roasting pan (with the muffin tin inside and the water bath, if using) to your preheated 325°F (160°C) oven. Bake for approximately 20-25 minutes. The baking time can vary depending on your oven, so it’s important to look for visual cues. The edges of the cheesecakes should appear set, but the centers should still have a slight jiggle to them when you gently shake the pan. This slight jiggle is key; it means they are cooked through but not overbaked, which would result in a dry, crumbly texture. Overbaking is the enemy of a creamy cheesecake!
- Cool Gradually: Once baked, turn off the oven but leave the oven door ajar (using a wooden spoon to prop it open works well) for about 15-20 minutes. This slow cooling process prevents drastic temperature changes that can cause cheesecakes to crack. If you used a water bath, carefully remove the muffin tin from the roasting pan after this initial cooling period.
- Cool Completely at Room Temperature: Remove the muffin tin from the oven and transfer it to a wire rack. Let the Mini Strawberry Crunch Cheesecake Bites cool completely at room temperature for at least 1 hour. During this time, they will continue to set and firm up. Resist the urge to rush this step!
Chilling and Serving Your Perfect Bites:
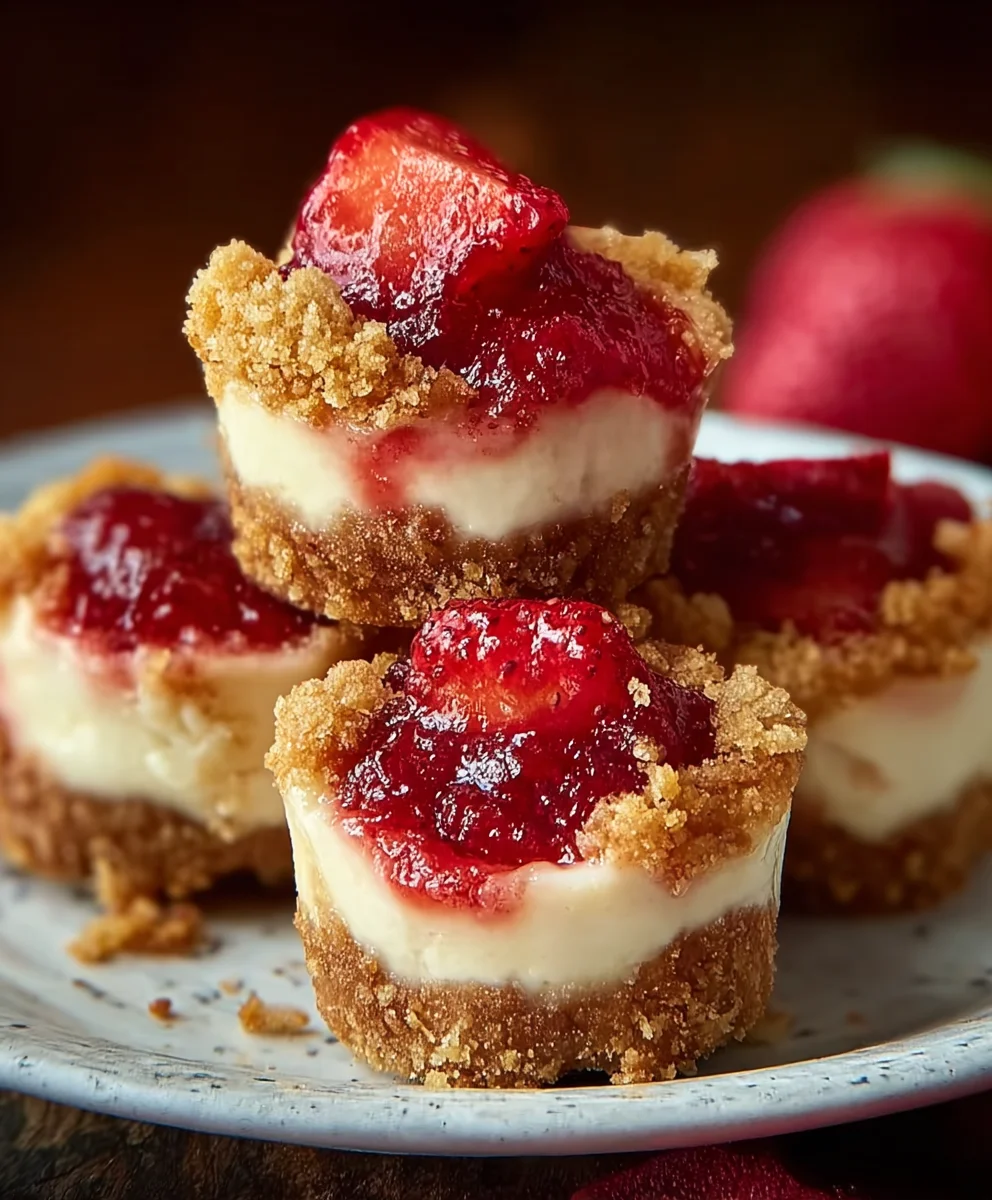
- Add the Strawberry Crunch Topping: Once the cheesecakes are completely cooled to room temperature, it’s time for the grand finale – adding our beautiful strawberry crunch! Take your prepared strawberry crunch mixture and generously sprinkle an even layer over the top of each cooled cheesecake bite. You can gently press it down a little to help it adhere, but don’t compact it too much. The vibrant color and irresistible aroma of the crunch are already making these look incredible. This is the stage where the magic really happens for your Mini Strawberry Crunch Cheesecake Bites.
- Chill Thoroughly: This is a crucial step for achieving the perfect cheesecake texture and making them easy to handle. Cover the muffin tin loosely with plastic wrap and transfer it to the refrigerator. Chill the Mini Strawberry Crunch Cheesecake Bites for at least 4 hours, but preferably overnight. Chilling allows the flavors to meld, the cheesecake to firm up completely, and makes them much easier to remove from the liners and serve. A well-chilled cheesecake is always the best cheesecake!
- Serve and Enjoy: Once thoroughly chilled, carefully remove each cheesecake bite from its cupcake liner. The paper liners should peel away cleanly, revealing a perfectly formed mini cheesecake. Arrange them on a serving platter. These Mini Strawberry Crunch Cheesecake Bites are not only a feast for the eyes but an absolute delight for the palate, combining the creamy tang of cheesecake with the sweet, fruity crunch. They are perfect for parties, gatherings, or a delightful treat just for yourself.
- Storage: Leftover Mini Strawberry Crunch Cheesecake Bites can be stored in an airtight container in the refrigerator for up to 3-4 days. While they are best enjoyed fresh for maximum crunch, they will still be delicious for a few days. You can even make the cheesecake portion ahead of time and add the crunch topping just before serving to maintain its crispness, though I find the topping holds up remarkably well in the fridge.
Conclusion:
And there you have it, my friends! We’ve journeyed together through the delightful process of creating what I truly believe will become your new favorite dessert. These are not just any treats; they are a celebration of flavor, texture, and pure joy. From the very first bite, you’ll understand why these bites are an absolute game-changer. The velvety smoothness of the cheesecake base, perfectly balanced with the sweet, bright notes of fresh strawberries, and crowned with that utterly irresistible, buttery strawberry crunch topping – it’s a symphony for your taste buds. I’ve personally made these countless times for gatherings, family dinners, and even just for a special weeknight treat, and they never, ever disappoint. They bring smiles to faces, spark conversations, and invariably lead to requests for the recipe, which you now have right at your fingertips!
Why are these a must-try, you ask? Well, beyond their undeniably delicious taste, they offer an elegant presentation without the fuss of a full-sized cheesecake. Each bite is a perfectly portioned piece of heaven, making them ideal for entertaining or simply indulging without overdoing it. They are surprisingly simple to put together, even for novice bakers, yet they look incredibly impressive. The combination of creamy, tangy, sweet, and crunchy is meticulously balanced, creating an experience that is both comforting and exciting. They embody the essence of homemade goodness with a gourmet touch, proving that you don’t need to be a pastry chef to create something extraordinary in your own kitchen. I promise you, the effort, minimal as it is, is more than worth the reward.
Now, let’s talk about how to truly make these your own, or how best to enjoy them. While they are perfect just as they are, there are so many fun ways to serve and personalize your creations. For an extra touch of sophistication, I love to arrange them on a beautiful platter with a scattering of fresh mint leaves or a few extra strawberry slices. Imagine them as the star of your next brunch spread, a delightful addition to a dessert bar at a party, or even a thoughtful, homemade gift for a loved one. They pair wonderfully with a strong cup of coffee or a delicate herbal tea for an afternoon pick-me-up. For those truly decadent moments, a small dollop of homemade whipped cream or a scoop of vanilla bean ice cream served alongside these bites elevates the experience even further.
Feeling adventurous? While the classic strawberry crunch is divine, don’t hesitate to experiment with variations! You could easily swap out the strawberries for other berries in the crunch topping – imagine a blueberry crunch or a raspberry crunch for a different fruit profile. Or, for a chocolate lover’s dream, try a chocolate cookie crunch made with crushed Oreos or graham crackers, perhaps with a drizzle of melted dark chocolate over the top. A lemon zest infusion into the cheesecake batter could add a lovely tangy counterpoint, or a hint of almond extract could bring a warm, nutty aroma. The possibilities are truly endless, and that’s part of the fun! These treats are incredibly versatile, acting as a perfect canvas for your culinary creativity. You might even consider a mini lime cheesecake bite with a graham cracker crust and a different fruit crunch for a zesty twist in the future!
So, what are you waiting for? I genuinely encourage you to roll up your sleeves, gather your ingredients, and immerse yourself in the delightful process of creating these incredible Mini Strawberry Crunch Cheesecake Bites. Trust me, the aroma alone as they chill in your fridge will be enough to get you excited! This recipe is more than just instructions; it’s an invitation to create, to share, and to savor. It’s a chance to make something truly special with your own hands. I cannot wait to hear about your experience. Please, when you whip up your batch, snap a photo and share your masterpieces! Leave a comment below, tell me what you loved most, or tag me on social media. Your feedback and beautiful creations are what truly make this community so vibrant and inspiring. Happy baking, everyone!
Recipe
A delicious recipe
Ingredients
Instructions
Important Information
Nutrition Facts (Per Serving)
It is important to consider this information as approximate and not to use it as definitive health advice.
Allergy Information
Please check ingredients for potential allergens and consult a health professional if in doubt.


Leave a Comment