
Mini Blackberry Mousse Cakes are truly a revelation, promising to elevate any occasion from a simple gathering to a sophisticated celebration. Imagine sinking your teeth into a cloud-like confection, where the vibrant tang of fresh blackberries meets the ethereal lightness of a delicate mousse, all nestled atop a tender base. These individual treats are not just desserts; they are miniature works of art, offering a perfect portion of pure bliss and an undeniable charm.
Dating back to the refined patisseries of France, mousse cakes have long symbolized culinary elegance and a mastery of delicate textures. Our take, the “mini” version, embraces this cherished heritage while adding a modern touch of convenience and personalized indulgence. I believe there’s something inherently delightful about a dessert designed for individual enjoyment, making each guest feel truly special without the fuss of slicing.
People adore these Mini Blackberry Mousse Cakes for their unparalleled combination of flavors and textures—the refreshing burst of fruit, the creamy, airy mousse that melts effortlessly in your mouth, and the elegant presentation that belies their surprisingly straightforward preparation. They are perfect for dinner parties, brunches, or simply as a luxurious treat to brighten an ordinary day. Prepare to captivate your taste buds and impress your guests with these exquisite little gems, which are far simpler to create than their gourmet appearance suggests!

Ingredients:
For the Vanilla Sponge Cake Base:
- 1 cup (125g) all-purpose flour, sifted
- 1 teaspoon baking powder
- ½ teaspoon salt
- ½ cup (113g) unsalted butter, softened
- 1 cup (200g) granulated sugar
- 2 large eggs, at room temperature
- 1 teaspoon pure vanilla extract
- ½ cup (120ml) whole milk, at room temperature
For the Blackberry Mousse:
- 2 cups (about 300g) fresh blackberries, plus extra for garnish
- ½ cup (100g) granulated sugar (adjust to taste based on blackberry sweetness)
- 2 tablespoons fresh lemon juice
- 2 ½ teaspoons unflavored gelatin powder (about 2 ½ sachets, 7.5g total)
- ¼ cup (60ml) cold water
- 1 ½ cups (360ml) heavy cream, very cold
- 2 tablespoons powdered sugar (optional, for whipped cream)
For the Blackberry Mirror Glaze:
- 1 cup (about 150g) fresh blackberries
- ¼ cup (50g) granulated sugar
- 2 tablespoons water
- 1 teaspoon fresh lemon juice
- 1 ½ teaspoons unflavored gelatin powder (about 1 ½ sachets, 4.5g total)
- 2 tablespoons cold water (for gelatin)
- Optional: ½ teaspoon white gel food coloring (to make glaze opaque, if desired)
For Garnish (Optional):
- Fresh blackberries
- Fresh mint leaves
- Edible silver dust or gold flakes
- Small amount of lemon zest
Instructions:
Part 1: Preparing the Vanilla Sponge Cake Base
- Preheat and Prepare: Begin by preheating your oven to 350°F (175°C). Lightly grease and flour an 8×8-inch (20x20cm) square baking pan, or line a 9-inch (23cm) round cake pan with parchment paper. This will be the foundation for your delightful Mini Blackberry Mousse Cakes, so ensuring it’s properly prepped is key.
- Combine Dry Ingredients: In a medium bowl, whisk together the sifted all-purpose flour, baking powder, and salt. Sifting the flour is a crucial step that helps to aerate it, preventing lumps and contributing to a lighter, more tender crumb in your finished sponge cake. Set this dry mixture aside for a moment.
- Cream Butter and Sugar: In a large mixing bowl, using an electric mixer fitted with a paddle attachment, cream together the softened unsalted butter and granulated sugar on medium-high speed until the mixture is light, fluffy, and pale in color. This process typically takes about 3-5 minutes. This creaming action incorporates air, which is essential for a tender cake. Scrape down the sides of the bowl occasionally to ensure even mixing.
- Add Eggs and Vanilla: Beat in the eggs one at a time, mixing well after each addition until fully incorporated. Make sure to scrape down the sides of the bowl after each egg. Once both eggs are in, stir in the pure vanilla extract. Continue beating for another minute until the mixture is smooth and slightly increased in volume.
- Alternate Dry and Wet Ingredients: With the mixer on low speed, gradually add the dry ingredient mixture to the wet mixture in three additions, alternating with the milk in two additions. Begin and end with the dry ingredients. For example, add one-third of the flour mixture, mix until just combined, then half of the milk, mix, then another third of flour, mix, the remaining milk, mix, and finally the last third of the flour. Be careful not to overmix the batter at this stage, as overmixing can develop the gluten in the flour, leading to a tough cake. Mix only until just combined and no streaks of flour remain.
- Bake the Sponge: Pour the prepared batter evenly into your greased and floured (or parchment-lined) baking pan. Gently tap the pan on the counter a few times to release any large air bubbles. Bake for 25-30 minutes, or until a wooden skewer or toothpick inserted into the center of the cake comes out clean. The cake should be lightly golden brown on top and spring back when gently pressed.
- Cool and Cut: Once baked, remove the cake from the oven and let it cool in the pan on a wire rack for about 10-15 minutes. Then, invert the cake onto the wire rack to cool completely. Once fully cooled, using a small round cookie cutter (approximately 1.5 to 2 inches or 4-5 cm in diameter), cut out as many small cake rounds as possible. These will serve as the bases for your Mini Blackberry Mousse Cakes. You might get around 12-16 rounds, depending on your cutter size. You can save any leftover cake scraps for another use, perhaps a trifle or cake pops!
Part 2: Crafting the Silky Blackberry Mousse
- Bloom the Gelatin: In a small bowl, sprinkle the 2 ½ teaspoons of unflavored gelatin powder over ¼ cup (60ml) of cold water. Stir briefly and let it sit for 5-10 minutes. This process, known as “blooming,” allows the gelatin granules to absorb the liquid and swell, ensuring it dissolves smoothly later on. You’ll see it transform into a thick, jelly-like consistency.
- Prepare Blackberry Puree: In a medium saucepan, combine the 2 cups of fresh blackberries, ½ cup of granulated sugar, and 2 tablespoons of fresh lemon juice. Cook over medium heat, stirring occasionally, until the blackberries break down and release their juices, forming a thick sauce. This usually takes about 8-10 minutes. Use a potato masher or the back of a spoon to help crush the berries.
- Strain the Puree: Once the blackberry mixture is cooked down, remove it from the heat. Carefully pass the warm blackberry mixture through a fine-mesh sieve set over a clean bowl, pressing firmly on the solids with a rubber spatula to extract as much liquid and pulp as possible. This step is vital for achieving a smooth, seedless mousse. Discard the seeds and any remaining solids. You should be left with a vibrant, smooth blackberry puree.
- Dissolve Gelatin into Puree: While the blackberry puree is still warm (but not boiling hot), add the bloomed gelatin to it. Stir continuously until the gelatin is completely dissolved and no granules remain. The warmth of the puree will melt the gelatin. If your puree has cooled too much, you can gently warm it again over low heat, ensuring it doesn’t boil. Set the blackberry puree aside to cool down to room temperature. It’s important that it’s cool before folding in the whipped cream.
- Whip the Heavy Cream: In a separate, chilled large mixing bowl, pour the 1 ½ cups of very cold heavy cream. Using an electric mixer (with a whisk attachment if available), beat the cream on medium-high speed until soft peaks form. If desired, you can add 2 tablespoons of powdered sugar for a slightly sweeter cream, but remember the blackberry puree already contains sugar. Continue beating until the cream holds firm peaks, but be careful not to over-whip it into butter.
- Fold in Whipped Cream: Once the blackberry puree has cooled to room temperature (it should be thick but still pourable), gently fold a generous spoonful of the whipped cream into the puree. This lightens the puree and makes it easier to incorporate the rest of the cream without deflating it. Then, carefully fold in the remaining whipped cream in two additions, using a rubber spatula. Use a gentle, lifting motion from the bottom of the bowl upwards, turning the bowl as you go. The goal here is to maintain as much air in the mixture as possible for a light and airy mousse. Stop folding as soon as the mixture is uniformly combined and no streaks of white cream remain.
Part 3: Assembling the Mini Blackberry Mousse Cakes
- Prepare Your Molds: For perfectly shaped Mini Blackberry Mousse Cakes, silicone molds are ideal (individual round molds, hemisphere molds, or even mini springform pans if you have them). If using metal ring molds, line a baking sheet with parchment paper or a silicone mat, and then place your ring molds on top. For easier unmolding, you can lightly spray the inside of the molds with non-stick spray, or if using rings, line the inside walls with acetate strips.
- Place Cake Bases: Carefully place one of your prepared vanilla sponge cake rounds at the bottom of each silicone mold cavity or ring mold. Ensure it sits flat and provides a stable base for your mousse. This creates a delightful contrast in texture for your “Mini Blackberry Mousse Cakes.”
- Fill with Mousse: Transfer the prepared blackberry mousse into a piping bag (with or without a tip, just cut the end) or use a spoon. Fill each mold with the blackberry mousse, leaving a small amount of space at the top (about ¼ inch or 0.5 cm) if you plan to add a mirror glaze. Gently tap the molds on your counter a few times to release any trapped air bubbles and ensure the mousse settles evenly.
- Freeze for Setting: Place the filled molds carefully into the freezer. Freeze for at least 4-6 hours, or preferably overnight, until the mousse cakes are completely solid. This thorough freezing is crucial for easy unmolding and for the mirror glaze to set properly. Do not rush this step.
Part 4: Creating the Dazzling Blackberry Mirror Glaze
- Bloom Gelatin for Glaze: In a small, heatproof bowl, sprinkle the 1 ½ teaspoons of unflavored gelatin powder over 2 tablespoons of cold water. Let it sit and bloom for 5-10 minutes, just as you did for the mousse.
- Prepare Glaze Base: In a small saucepan, combine the 1 cup of fresh blackberries, ¼ cup of granulated sugar, 2 tablespoons of water, and 1 teaspoon of fresh lemon juice. Cook over medium heat, stirring frequently, until the blackberries break down and the sugar is fully dissolved. This should take about 5-7 minutes.
- Strain for Smoothness: Pass the warm blackberry mixture through a fine-mesh sieve into a clean bowl, pressing firmly on the solids to extract all the flavorful juice and pulp. Discard the seeds. You should have a smooth, vibrant blackberry liquid. This step is essential for a truly “mirror-like” glaze.
- Dissolve Glaze Gelatin: Add the bloomed gelatin to the warm (but not boiling) strained blackberry liquid. Stir continuously until the gelatin is completely dissolved. If the liquid has cooled too much, you can gently warm it again over very low heat until the gelatin is fully melted.
- Achieve Opacity (Optional): If you desire a more opaque glaze that completely covers the mousse color, now is the time to stir in ½ teaspoon of white gel food coloring. This will give the glaze a more vibrant, solid color.
- Cool to Pouring Consistency: Allow the mirror glaze to cool down significantly. This is the most critical step for a successful mirror glaze. It needs to be between 85-95°F (29-35°C) for optimal pouring. If it’s too hot, it will run off the cakes; if it’s too cold, it will be too thick and clumpy. You can check the temperature with an instant-read thermometer. Stir occasionally as it cools to prevent a skin from forming. The consistency should be like warm honey.
Part 5: Glazing and Final Touches for Your Mini Blackberry Mousse Cakes
- Prepare for Glazing: Remove the frozen Mini Blackberry Mousse Cakes from the freezer. Gently unmold them from their silicone molds or carefully remove them from the ring molds (using a small offset spatula or thin knife around the edges if needed, though with freezing, they should pop out easily). Place the frozen cakes on a wire rack set over a baking sheet. The baking sheet will catch the excess glaze. Work quickly as the cakes will start to defrost.
- Glaze the Cakes: Once your mirror glaze is at the ideal pouring temperature, generously pour it over each frozen mousse cake, ensuring the entire surface and sides are coated. The coldness of the cakes will help the glaze set quickly and beautifully. You may need to pour twice for a very even coating. Allow any excess glaze to drip off through the wire rack.
- Chill to Set: Carefully transfer the glazed Mini Blackberry Mousse Cakes from the wire rack to a clean serving platter or individual dessert plates using a small offset spatula. Place them in the refrigerator to chill for at least 2-3 hours. This allows the mousse to fully defrost to a creamy, smooth texture and ensures the glaze is perfectly set and shiny.
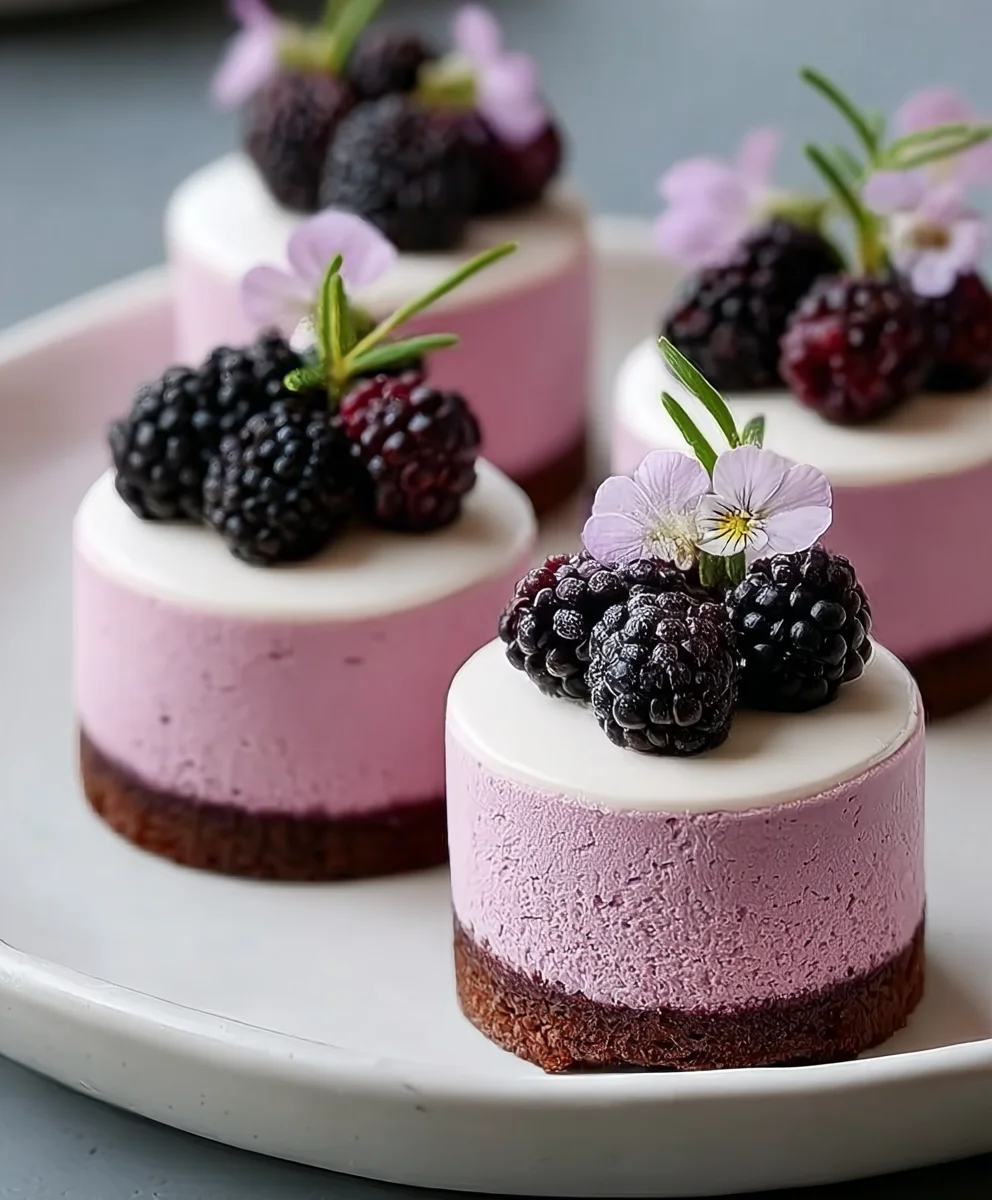
- Garnish and Serve: Just before serving, unleash your creativity! Garnish each Mini Blackberry Mousse Cake with fresh blackberries, a delicate sprig of fresh mint, a sprinkle of edible silver dust for a touch of sparkle, or a tiny amount of lemon zest for a fragrant finish. These finishing touches truly elevate the presentation of your homemade Mini Blackberry Mousse Cakes.
- Enjoy: Serve these elegant and delicious Mini Blackberry Mousse Cakes chilled. They are a perfect balance of sweet and tart, with a delightful interplay of textures from the soft sponge base, creamy mousse, and glossy glaze. These are truly a showstopper!
Conclusion:
And there you have it, my friends! We’ve reached the sweet finale of our journey together, delving into the creation of these absolutely exquisite desserts. I truly hope you’ve enjoyed exploring every step of this recipe, from crushing the cookies for the base to gently folding the airy mousse, and finally, assembling your very own Mini Blackberry Mousse Cakes. This isn’t just a recipe; it’s an invitation to create something truly special, something that looks incredibly impressive but is, I promise you, surprisingly accessible to make at home.
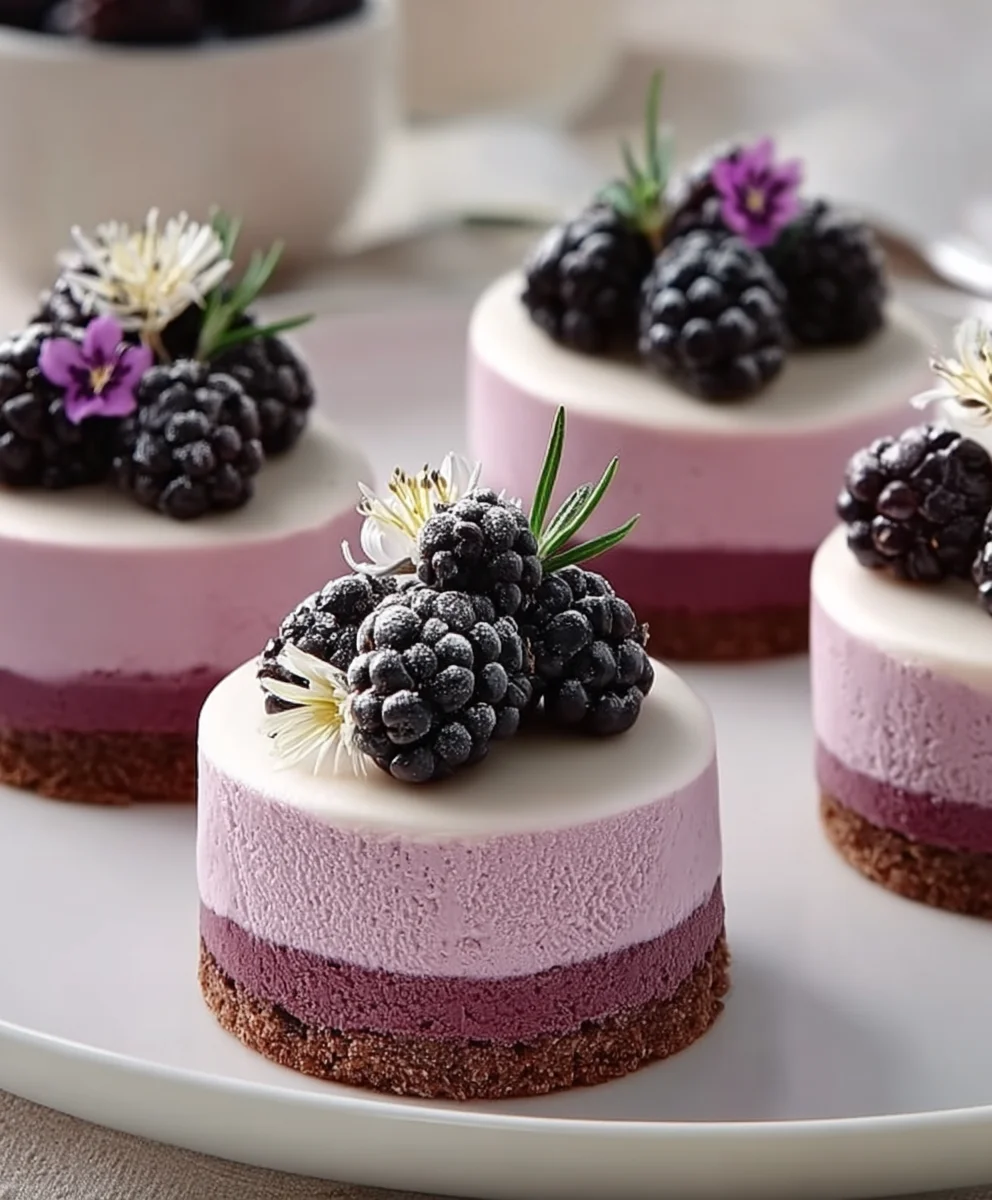
So, why are these Mini Blackberry Mousse Cakes an absolute must-try for any dessert enthusiast? Beyond their undeniable visual appeal, which instantly elevates any dessert spread, it’s the symphony of textures and flavors that truly sets them apart. Imagine biting into the crisp, buttery cookie base, followed by the silken, light-as-air mousse, bursting with the vibrant, naturally sweet-tart essence of fresh blackberries. It’s a delightful dance on the palate – the richness perfectly balanced by the fruit’s refreshing tang. The delicate, almost cloud-like texture of the mousse, combined with the slight crunch of the base, creates a captivating experience that will leave everyone asking for more. They’re elegant without being fussy, sophisticated yet comforting, and undeniably delicious. Trust me, once you make these, they’ll quickly become a cherished part of your dessert repertoire, ready to impress guests or simply treat yourself to a moment of pure bliss.
Now, let’s talk about how to present these beauties, and more importantly, how you can put your own creative spin on them! When it comes to serving, I love to keep it simple and elegant. A single Mini Blackberry Mousse Cake on a delicate dessert plate, perhaps with a few fresh blackberries artfully placed alongside, a dusting of powdered sugar, or a small sprig of fresh mint, instantly transforms it into a gourmet offering. For a truly luxurious touch, a delicate drizzle of a white chocolate ganache or a very thin chocolate curl on top can add an extra layer of decadence and visual appeal. They are perfect for individual servings at dinner parties, afternoon tea, or even as a chic weekend treat.
Endless Possibilities: Your Creative Variations
One of the things I adore most about this recipe is its incredible versatility. While the blackberry version is truly spectacular, don’t hesitate to experiment with other fruits! Imagine the possibilities: a raspberry mousse cake, offering a similar tart-sweet profile with its own unique aroma, or a strawberry version, leaning into classic sweetness. For a tropical twist, you could even try a mango or passion fruit puree – just ensure your fruit puree is smooth and well-strained to maintain that perfect mousse consistency. You could also experiment with the base; instead of the classic vanilla wafer or graham cracker, consider a dark chocolate cookie for a dramatic contrast, or a shortbread base for a richer, buttery foundation.
Furthermore, consider adding an extra layer of surprise! A thin layer of white chocolate ganache poured over the chilled mousse before it fully sets, creating a beautiful cap, or even a small amount of a different fruit jelly or coulis piped into the center of the mousse for a hidden burst of flavor. You could also incorporate different extracts into the mousse itself – a touch of almond extract alongside the blackberry, or even a hint of rosewater for an exotic floral note. The possibilities truly are endless, and I encourage you to let your culinary imagination run wild!
Your Turn to Create and Share!
Now it’s your turn to bring this magic to life in your own kitchen! I genuinely hope you feel inspired and confident to whip up a batch of these glorious Mini Blackberry Mousse Cakes. They are a testament to the joy of baking and the simple pleasure of creating something beautiful and delicious with your own hands. Don’t be intimidated by the multi-step process; each stage is straightforward, and the reward is immeasurable.
Once you’ve made them, I would absolutely love to hear about your experience! Did you stick to the original recipe, or did you venture into some exciting variations? How did your family and friends react? Please, share your stories, your tips, and especially, your gorgeous photos. There’s nothing I love more than seeing your culinary triumphs and hearing about the joy my recipes bring to your homes. Your feedback and creativity are what make this community so vibrant and inspiring.
Thank you for joining me on this delicious adventure. Happy baking, and enjoy every single delightful bite of your homemade Mini Blackberry Mousse Cakes!
Mini Blackberry Mousse Cakes
Mini Blackberry Mousse Cakes are a revelation, promising to elevate any occasion. These individual treats are miniature works of art, offering a perfect portion of pure bliss and undeniable charm.
Ingredients
-
1 1/2 cups chocolate sandwich cookies, crushed
-
1/4 cup unsalted butter, melted
-
1 1/2 cups fresh or frozen blackberries
-
1/4 cup granulated sugar
-
2 tbsp water
-
1 tbsp fresh lemon juice
-
1 tsp unflavored gelatin
-
1 cup heavy cream, very cold
-
1/2 tsp pure vanilla extract
-
1 cup white chocolate chips
-
1/2 cup heavy cream
-
Fresh blackberries (for garnish)
-
Edible violets or pansies (for garnish)
Instructions
-
Step 1
Combine crushed chocolate sandwich cookies and melted butter. Press mixture firmly into the bottom of individual silicone molds or lined ring molds. Chill for at least 30 minutes until set. -
Step 2
Sprinkle 1 tsp unflavored gelatin over 2 tbsp cold water; let bloom for 5 minutes. In a saucepan, combine 1 1/2 cups blackberries, 1/4 cup granulated sugar, and 1 tbsp fresh lemon juice. Cook over medium heat until berries break down. Strain through a fine-mesh sieve, pressing solids, to get a smooth puree. Stir bloomed gelatin into the warm blackberry puree until fully dissolved. Cool puree to room temperature. -
Step 3
Heat 1/2 cup heavy cream until simmering. Pour hot cream over 1 cup white chocolate chips in a bowl. Let sit for 1-2 minutes, then stir until smooth and fully melted. Let cool slightly. -
Step 4
In a chilled bowl, whip 1 cup very cold heavy cream with 1/2 tsp pure vanilla extract until soft peaks form. Gently fold the cooled blackberry puree and cooled white chocolate ganache into the whipped cream until just combined, maintaining airiness. -
Step 5
Spoon the mousse mixture over the chilled cookie crusts in the molds. Gently tap to release air bubbles. Freeze for at least 4-6 hours, or preferably overnight, until completely solid. -
Step 6
Carefully unmold the frozen mousse cakes. Transfer to a serving platter. Allow to defrost in the refrigerator for 2-3 hours until creamy. Garnish (optional) with fresh blackberries and edible violets or pansies before serving.
Important Information
Nutrition Facts (Per Serving)
It is important to consider this information as approximate and not to use it as definitive health advice.
Allergy Information
Please check ingredients for potential allergens and consult a health professional if in doubt.

Leave a Comment