
Mediterranean Charcuterie Board – just reading those words conjures images of vibrant colors, fresh ingredients, and effortless elegance, doesn’t it? I am absolutely thrilled to share with you today the art of creating a spread that is not only visually stunning but also incredibly delicious and wonderfully versatile. Imagine a beautiful mosaic of flavors and textures, inviting everyone to gather, share, and savor each delightful bite. This isn’t just an appetizer; it’s a culinary experience that celebrates the healthful and communal spirit of the Mediterranean diet.
While the concept of charcuterie traditionally leans into cured meats, the Mediterranean interpretation elevates it by embracing an abundance of fresh vegetables, briny olives, creamy cheeses, savory dips like hummus and baba ghanoush, and wholesome whole-grain breads. This approach taps into a rich cultural history, offering a modern twist on the ancient tradition of communal feasting, where wholesome, local ingredients take center stage. I find its soaring popularity lies in its perfect blend of convenience, customization, and that undeniable “wow” factor. Whether you’re hosting a sophisticated dinner party or simply seeking a relaxed, flavorful meal for your family, a well-crafted Mediterranean Charcuterie Board is always a magnificent choice, promising a symphony of tastes that truly captivates the senses.

Ingredients:
- For the Cheeses:
- 8 ounces Feta cheese, block or crumbled
- 8 ounces Halloumi cheese, sliced ½ inch thick
- 6 ounces Manchego cheese, aged 3-6 months, thinly sliced or cut into wedges
- 4 ounces creamy Goat cheese log, plain or herb-crusted
- For the Cured Meats:
- 4 ounces Prosciutto di Parma, thinly sliced
- 4 ounces Genovese Salami or Sopressata, thinly sliced
- 4 ounces Mortadella, thinly sliced
- For the Olives & Pickled Items:
- 1 cup Kalamata olives, pitted, drained
- 1 cup Castelvetrano olives or other large green olives, pitted, drained
- 6 ounces Marinated Artichoke hearts, drained
- 6 ounces Roasted Red Peppers, jarred, drained and sliced
- ½ cup Pepperoncini, drained
- For the Dips & Spreads:
- 1 (10-12 ounce) container Hummus, store-bought or homemade
- 1 (8 ounce) container Tzatziki, store-bought or homemade (see recipe below if making from scratch)
- 1 (8 ounce) container Baba Ghanoush, store-bought or homemade
- ½ cup Fig jam or apricot preserves
- For the Fresh Produce:
- 1 pint Cherry tomatoes, halved or left whole
- 1 English cucumber, thinly sliced or cut into spears
- 1 Red bell pepper, thinly sliced
- 1 Yellow bell pepper, thinly sliced
- 1 bunch Red grapes
- 2-3 Fresh figs, quartered (seasonal, optional)
- 1 Orange, thinly sliced into rounds
- ½ Pomegranate, seeds removed (seasonal, optional)
- Small handful Fresh mint leaves
- Small handful Fresh parsley leaves
- 1 Lemon, cut into wedges
- For the Nuts & Dried Fruit:
- ½ cup Marcona almonds or regular almonds, roasted and salted
- ½ cup Pistachios, shelled
- ½ cup Dried apricots
- ½ cup Dried figs or dates
- For the Breads & Crackers:
- 1 loaf Ciabatta or crusty baguette, sliced
- 1 package Pita bread, warmed and cut into wedges
- 1 package Water crackers or other plain, sturdy crackers
- 1 package Seeded crackers
- For Garnish & Drizzle:
- Extra virgin olive oil
- Fresh rosemary sprigs
- A pinch of red pepper flakes (optional)
Phase 1: Preparing the Dips and Spreads for Your Mediterranean Charcuterie Board
-
Prepare Your Hummus, Tzatziki, and Baba Ghanoush: If you’re using store-bought dips, simply spoon them into small, attractive serving bowls. I find that using different sized and shaped bowls adds visual interest to the board. For homemade dips, prepare them according to your preferred recipes.
- Homemade Tzatziki (Quick Version): I love making my own tzatziki, it’s so fresh! To make it, you’ll need 1 cup of full-fat Greek yogurt. Grate half an English cucumber and squeeze out as much excess water as possible using a clean kitchen towel. Mix the strained cucumber with the yogurt, 1-2 cloves of minced garlic, 1 tablespoon of fresh lemon juice, 1 tablespoon of finely chopped fresh dill (or mint, if you prefer), and a good pinch of salt and black pepper. Stir everything together until well combined. Taste and adjust seasonings as needed. This simple, refreshing dip is an absolute must-have for any Mediterranean Charcuterie Board.
Once your dips are ready, cover them and set them aside in the refrigerator until you’re ready to assemble your board. This step is crucial because cold dips stay fresh and delicious. Don’t forget to include small spoons or spreaders with each bowl for easy serving.
- Arrange Your Fig Jam or Apricot Preserves: Spoon the fig jam or apricot preserves into a small, elegant dish. These sweet elements provide a wonderful counterpoint to the savory and salty items on your Mediterranean Charcuterie Board. The deep color of fig jam also adds a lovely visual pop.
Phase 2: Prepping the Fresh Produce and Pickled Delights
-
Wash and Prepare All Fresh Vegetables: This is where the vibrant colors of your Mediterranean Charcuterie Board really come to life!
- Rinse the cherry tomatoes thoroughly. You can leave them whole or, for easier eating and a different texture, slice them in half.
- Wash the English cucumber. You can either slice it into thin rounds, which are great for scooping dips, or cut it into longer spears for a more substantial bite.
- Wash the red and yellow bell peppers. Remove the seeds and white membranes, then slice them into thin strips. The mix of colors from the peppers adds fantastic visual appeal and crunch.
Pat all vegetables dry after washing to ensure they don’t make other items on the board soggy. Arrange them attractively on your cutting board as you go, thinking about how you’ll place them later.
-
Prepare Your Fresh Fruits: Fruits add a touch of sweetness and often a beautiful pop of color.
- Wash the red grapes and, if you like, cut them into smaller clusters of 3-5 grapes. This makes them easier to grab and distribute on the board.
- If using fresh figs, wash them gently and quarter them lengthwise. Their unique shape and deep purple interior are incredibly inviting.
- For the orange, wash it well and slice it into thin rounds. You can even cut some of these rounds in half to create crescent shapes. The citrus offers a refreshing burst of flavor.
- If using pomegranate, carefully remove the arils (seeds). These jewel-like additions are gorgeous and add a lovely texture.
The seasonal availability of some fruits means your Mediterranean Charcuterie Board can look different and exciting throughout the year!
-
Drain and Arrange Pickled Items and Olives: These briny, tangy elements are essential for a true Mediterranean flavor profile.
- Open the jars of marinated artichoke hearts, roasted red peppers, Kalamata olives, Castelvetrano olives, and pepperoncini.
- Thoroughly drain all the liquids. Excess liquid can make your board messy and compromise the texture of other items.
- Slice the roasted red peppers into strips if they aren’t already.
- Place the different types of olives and pickled items into small, individual bowls. This prevents their briny liquid from spreading and also helps separate the distinct flavors. I often find a mix of green and black olives, like Kalamata and Castelvetrano, offers a great variety in both flavor and appearance for my Mediterranean Charcuterie Board.
These components are crucial for adding a sharp, contrasting flavor to the richer cheeses and meats.
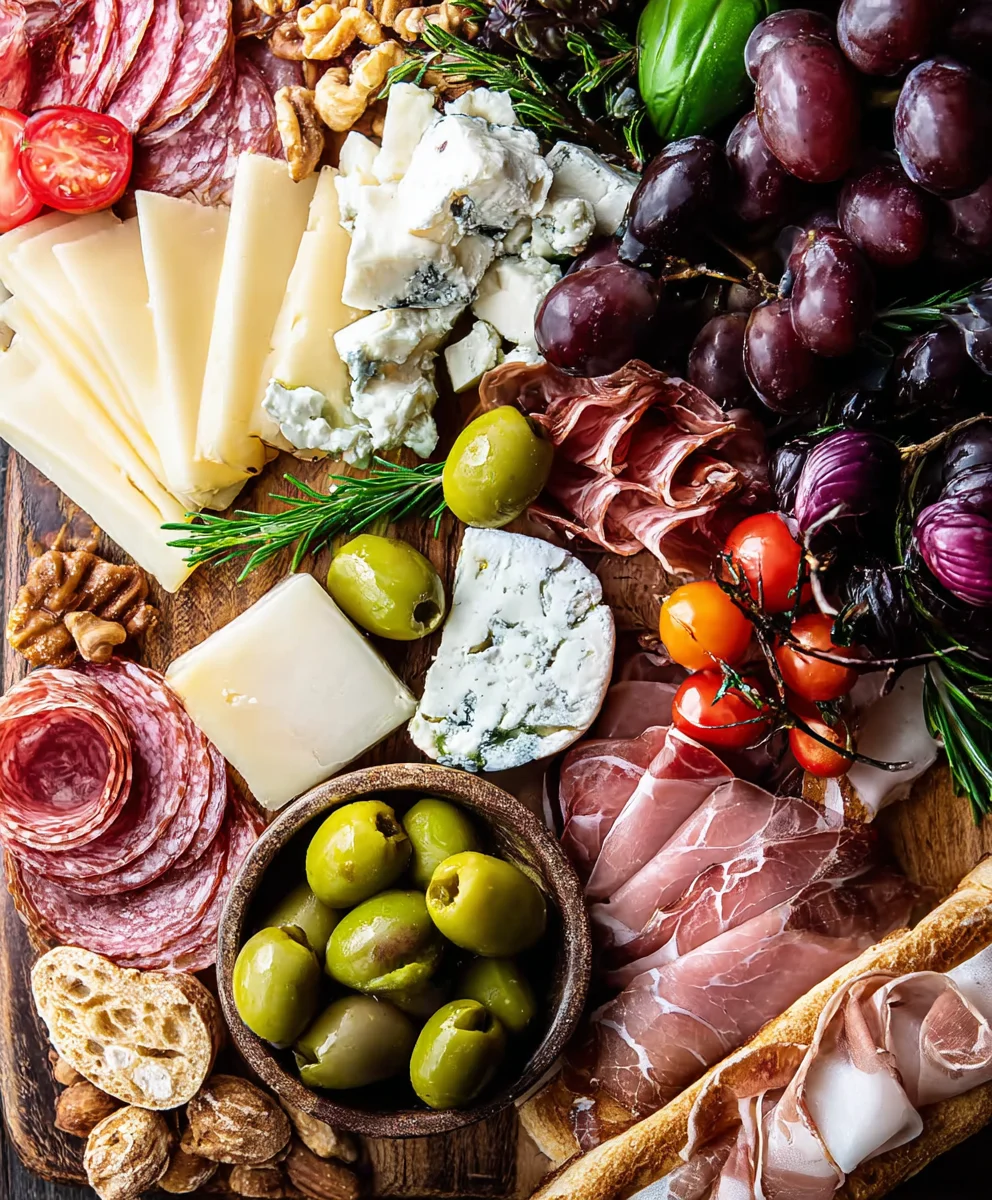
Phase 3: Arranging the Cheeses and Cured Meats
-
Prepare and Cut the Cheeses: Cheeses are often the star of any charcuterie board, and a Mediterranean Charcuterie Board is no exception.
- Feta Cheese: If you have a block of feta, cut it into small, even cubes. You can drizzle a little olive oil over it and sprinkle with a touch of fresh oregano or red pepper flakes for extra flavor. If using crumbled feta, simply place it in a small bowl.
- Halloumi Cheese: This cheese is fantastic grilled, but for a board, I love it pan-fried. Slice the halloumi into ½-inch thick pieces. In a non-stick pan over medium heat, cook for 2-3 minutes per side until golden brown and slightly softened. This brings out its salty, chewy goodness. Let it cool slightly before arranging.
- Manchego Cheese: Slice the Manchego into thin wedges or triangles. Its firm texture and nutty flavor are a perfect complement.
- Goat Cheese: Leave the goat cheese log whole, or cut it into thicker rounds. You can gently press some fresh herbs (like dill or chives) or a sprinkle of cracked black pepper onto the sides for added visual appeal and flavor.
Varying the shapes and textures of your cheeses makes your Mediterranean Charcuterie Board much more interesting and appealing.
-
Artfully Arrange the Cured Meats: The way you present your meats can elevate the entire board.
- Prosciutto di Parma: This delicate, salty ham is best when artfully draped. Try folding each slice into a loose ribbon or rose shape. Arrange these in small, inviting piles.
- Genovese Salami or Sopressata: For these firmer salamis, you can fold slices into quarters, roll them tightly into small tubes, or simply layer them in a stack. The goal is to create volume and texture.
- Mortadella: This thinly sliced, mild deli meat is beautiful when folded into quarters or gently ruffled. Its light pink color provides a nice contrast to the darker salamis.
When arranging meats, think about separating different types to allow guests to appreciate each flavor profile individually. The variety of cured meats is a cornerstone of a well-rounded Mediterranean Charcuterie Board.
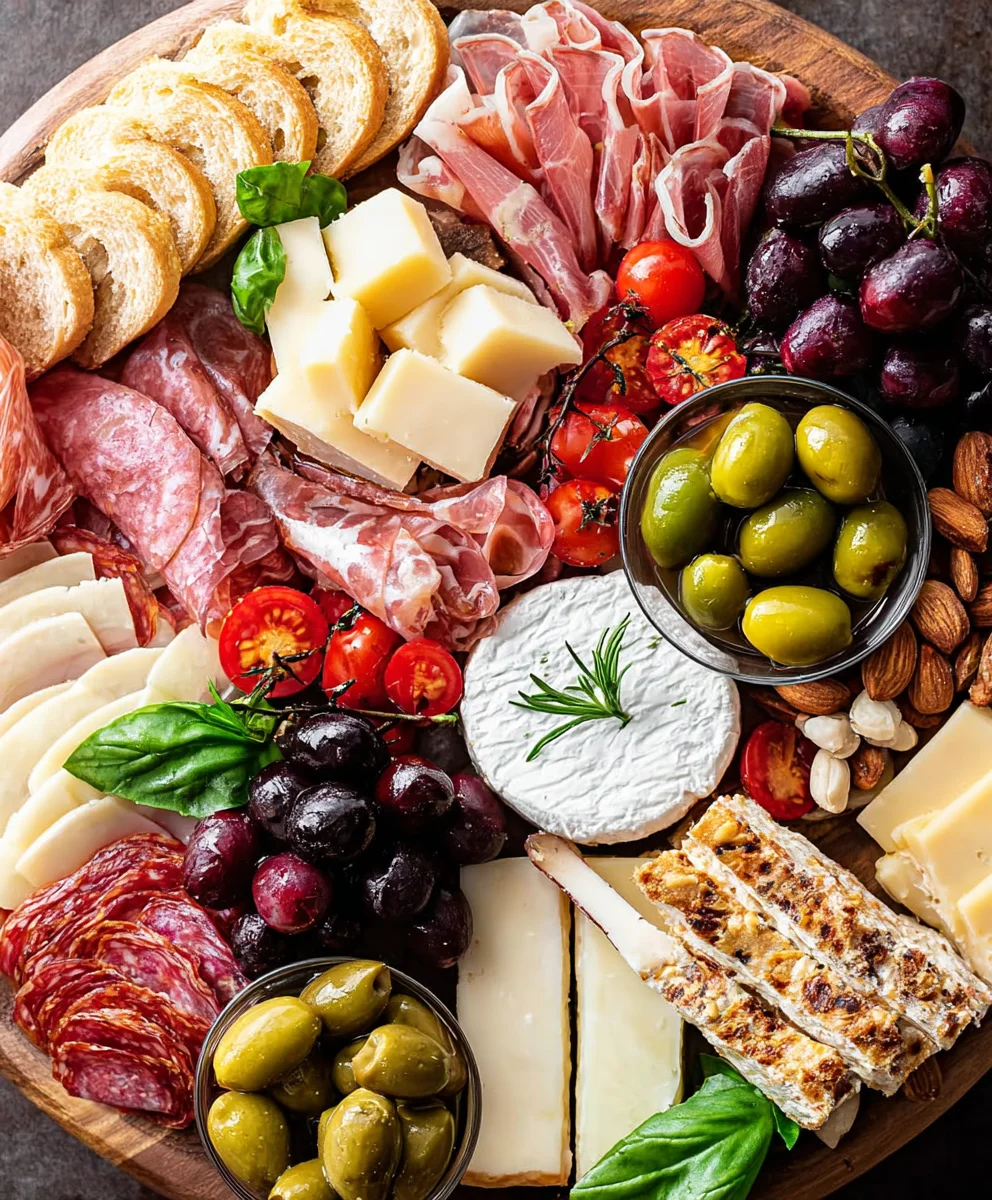
Phase 4: Assembling Your Magnificent Mediterranean Charcuterie Board
-
Choose Your Board and Anchor with Bowls: Start with a large wooden cutting board, a slate platter, or even a large ceramic tray. The size will depend on how many people you’re serving.
- First, place your small bowls filled with dips (hummus, tzatziki, baba ghanoush), olives, and fig jam onto the board. These bowls act as anchors and create distinct sections, making it easier to build around them. I like to spread them out a bit to encourage guests to move around the board.
- Think about the color of your bowls too – contrasting colors can make the dips stand out more!
-
Strategically Place the Cheeses: After your bowls are in place, arrange your prepared cheeses.
- Distribute the different cheese types around the board, ensuring there’s a variety in each “zone.” For example, place the feta cubes near the olives, and the Halloumi near some of the fresh vegetables.
- Leave a little space between each cheese cluster to allow for crackers and other accompaniments.
- Vary the placement of textures and colors: the bright white feta, the golden-brown halloumi, the pale yellow Manchego, and the creamy goat cheese all contribute to the visual feast of your Mediterranean Charcuterie Board.
-
Weave in the Cured Meats: Now it’s time to add the cured meats.
- Place your artfully arranged prosciutto, salami, and mortadella in various spots around the board. Drape them around the bowls or nestle them beside the cheeses.
- Remember to create some height and volume with the meats – don’t just lay them flat. Folding and ruffling them makes the board look more abundant and inviting.
- Ensure that the meats are accessible without disturbing other elements. I always aim for a balance of savory and creamy items around the board, so guests can easily create delicious combinations.
-
Fill Gaps with Fresh Fruits and Vegetables: This is where your Mediterranean Charcuterie Board truly gets its vibrant, healthy appeal.
- Begin to fill in the larger empty spaces on the board with your prepped fresh produce.
- Arrange the cucumber slices, bell pepper strips, and cherry tomatoes in colorful clusters.
- Place the grape clusters strategically, perhaps cascading over the edge of a bowl or nestled between cheeses.
- Add the fresh fig quarters and orange slices, using their unique shapes and colors to break up any monotony. Sprinkle the pomegranate arils for that jewel-like sparkle if using.
- The goal here is to make the board look bountiful and lush. Don’t be afraid to let some items slightly overlap, giving a sense of abundance.
-
Incorporate Pickled Items, Nuts, and Dried Fruits: These smaller items are perfect for filling in the remaining nooks and crannies and adding contrasting textures and flavors.
- Place your small bowls of drained artichoke hearts, roasted red peppers, and pepperoncini around the board, ensuring they are easily reachable.
- Scatter the Marcona almonds, pistachios, dried apricots, and dried figs/dates in the remaining open spaces. These add wonderful crunch, chewiness, and sweet-salty notes that round out the flavors of a quintessential Mediterranean Charcuterie Board.
- Don’t just dump them; arrange them in small, inviting piles or lines.
-
Arrange Breads and Crackers: These are the vehicles for all the deliciousness!
- Slice your ciabatta or baguette into ½-inch thick pieces. Warm your pita bread and cut it into wedges.
- Arrange the various breads and crackers around the perimeter of the board, or create small piles within any larger empty sections. I like to offer a variety of textures – soft pita, crusty baguette, and crisp crackers – to cater to different preferences.
- If space is limited on your main board, you can place some of the breads and crackers on a separate smaller board or in a basket nearby. This keeps your main Mediterranean Charcuterie Board from looking too cluttered.
-
The Final Garnish and Drizzle: These finishing touches elevate your board from good to gorgeous!
- Tuck fresh sprigs of rosemary, mint, or parsley into various spots on the board. These herbs not only add beautiful greenery and aroma but also hint at the fresh, Mediterranean flavors.
- Drizzle a little high-quality extra virgin olive oil over some of the feta, tomatoes, or even a section of the board itself. This adds a beautiful sheen and rich flavor.
- Place a few lemon wedges strategically. Their bright yellow color is lovely, and their fresh juice can be squeezed over cheeses or grilled halloumi.
- If you like a little heat, a tiny sprinkle of red pepper flakes over some of the feta or a dip can be a nice surprise.
Creating Visual Interest: A Key to a Stunning Mediterranean Charcuterie Board
When you’re putting it all together, remember to think about balance: balance of colors, textures, and heights. You want a board that looks abundant and inviting, not sparse or messy. Aim for a mix of vibrant hues from the fruits and vegetables, the varying shades of cheese and meat, and the earthy tones of nuts and crackers. Use contrasting elements next to each other – a dark olive next to a white feta, or bright red grapes next to pale green cucumber. This artistic approach is what makes a Mediterranean Charcuterie Board truly spectacular and appealing to everyone.
Phase 5: Serving and Enjoying Your Mediterranean Charcuterie Board
- Optimal Serving Temperature: While dips should be kept chilled until serving, it’s best to let your cheeses come to room temperature for about 30 minutes before serving. This allows their flavors and aromas to fully develop, offering a much richer tasting experience. Take the board out of the fridge just before your guests arrive, allowing the chilled items to slowly warm while the cheeses come to their ideal temperature. This small detail truly enhances the enjoyment of your Mediterranean Charcuterie Board.
- Provide Proper Utensils: Don’t forget to include small forks, tongs, and cheese knives for easy serving. A separate spoon for each dip is also essential for hygiene and convenience. Having a variety of utensils makes it easy for guests to navigate the board and choose their desired items without making a mess or cross-contaminating flavors. This thoughtfulness is a mark of a well-prepared Mediterranean Charcuterie Board.
- Drink Pairings: Suggesting drink pairings can enhance the overall experience. A crisp, dry white wine like a Sauvignon Blanc or a light-bodied Rosé complements the fresh, savory, and tangy flavors of a Mediterranean Charcuterie Board beautifully. For non-alcoholic options, sparkling water with fresh lemon and mint, or even a quality unsweetened iced tea, works wonderfully. These beverage choices echo the refreshing nature of Mediterranean cuisine.
-
Encourage Exploration and Interaction: The beauty of a Mediterranean Charcuterie Board is in its interactive nature. Encourage your guests to mix and match different components, creating their own unique flavor combinations. Point out some of your favorite pairings, like Halloumi with fig jam, or feta with roasted red peppers on a pita wedge. This fosters conversation and makes the meal a communal experience.
Making it an Experience: More Than Just Food
A Mediterranean Charcuterie Board is more than just a collection of ingredients; it’s an invitation to savor, share, and connect. It embodies the generous spirit of Mediterranean hospitality, offering a feast for the eyes as much as for the palate. Whether you’re hosting a small gathering or a larger party, this board provides a relaxed, enjoyable way to entertain, allowing guests to graze and socialize at their own pace. It’s a wonderful centerpiece that encourages exploration of diverse textures and bold, fresh flavors, making every bite an exciting journey to the sun-drenched coasts of the Mediterranean. Enjoy creating and sharing your masterpiece!
Conclusion:
What an incredible culinary journey we’ve taken together! I truly hope you’ve enjoyed exploring the vibrant flavors and simple elegance of this dish, or perhaps, more accurately, the art of assembling a truly magnificent spread. If there’s one thing I want you to take away from this experience, it’s that creating something utterly delicious and visually stunning doesn’t have to be complicated. It’s about celebrating fresh, high-quality ingredients and letting their natural goodness shine through. This isn’t just a recipe; it’s an invitation to savor life’s simple pleasures, shared with those you cherish.
I genuinely believe this particular assembly, whether you focused on making the accompanying dips from scratch or simply curated the finest ingredients from your local market, is an absolute must-try. Why, you ask? Because it effortlessly elevates any gathering, transforming a casual get-together into an event. Imagine the burst of sunshine-kissed tomatoes, the creamy tang of feta, the salty bite of olives, and the subtle perfume of fresh herbs all coming together on one beautiful platter. It’s a feast for the eyes as much as it is for the palate, designed to spark conversation and encourage lingering moments around the table. The ease of preparation belies the sophisticated outcome, making you look like a culinary genius without breaking a sweat. It’s versatile, largely make-ahead friendly, and caters to a wide range of dietary preferences, ensuring everyone at your table finds something to adore. This isn’t merely food; it’s an experience waiting to unfold.
Elevate Your Experience: Serving Suggestions & Variations
While the core elements we’ve discussed form a fantastic foundation, the true beauty of this concept lies in its endless adaptability. Think of our base recipe as a springboard for your own creativity. For an even grander presentation, consider adding a vibrant swirl of roasted red pepper hummus alongside the classic chickpea variety, or perhaps a homemade fig jam for a touch of sweet sophistication that pairs wonderfully with sharp cheeses. Don’t be shy about experimenting with different types of olives – briny Kalamatas are a classic, but bright green Castelvetranos or meaty Gaeta olives can add a delightful contrast. If you’re looking to make this a more substantial light meal, consider adding thinly sliced grilled halloumi cheese, which crisps beautifully and offers a satisfying chew. For the meat lovers, thin slices of prosciutto or a robust cured salami would be right at home, complementing the fresh produce without overpowering it. And when it comes to dipping vessels, beyond the warm pita and crusty bread, try some crisp lavash crackers, hearty seed crackers, or even slices of fresh cucumber and bell pepper for a lighter, gluten-free option. For a touch of fruit, a scattering of fresh figs when in season, or juicy red grapes, can provide a welcome burst of sweetness that cleanses the palate. Don’t forget to drizzle some truly good quality extra virgin olive oil over your cheeses and vegetables just before serving, perhaps even with a sprinkle of flaky sea salt and fresh black pepper. And for a refreshing beverage pairing, a crisp, dry white wine like a Sauvignon Blanc or an unoaked Chardonnay would be perfect, or even a sparkling water infused with lemon and mint for a non-alcoholic option. This entire concept is not just about a single meal; it’s about a lifestyle of fresh, wholesome, and delicious eating.
Make It Your Own and Share Your Journey!
I can’t emphasize enough how much I want you to make this recipe your own. Feel empowered to swap ingredients, introduce new flavors, or simply use it as a guide to creating your perfect spread. Perhaps you’ll discover a new favorite cheese, a divine new dip, or a combination of ingredients that becomes your signature. This is where the real magic happens, when you infuse a recipe with your own personality and preferences. So, go ahead, gather your ingredients, turn on some music, and enjoy the process of creating something truly special. Once you’ve assembled your magnificent Mediterranean Charcuterie Board and delighted your family and friends, I would absolutely love to hear about your experience! Did you discover a brilliant substitution? Did you find a unique serving suggestion? What were your guests’ favorite elements? Please, come back and share your stories, photos, and any creative twists you added in the comments below. Your insights and adventures are invaluable, and they help build a wonderful community of food lovers. Happy assembling, and bon appétit!
Mediterranean Charcuterie Board: Easy, Flavorful Platter
Just reading those words conjures images of vibrant colors, fresh ingredients, and effortless elegance, doesn’t it? I am absolutely thrilled to share with you today the art of creating a spread that is not only visually stunning but also incredibly delicious and wonderfully versatile. Imagine a beautiful mosaic of flavors and textures, inviting everyone to gather, share, and savor each delightful bite. This isn’t just an appetizer; it’s a culinary experience that celebrates the healthful and communal spirit of the Mediterranean diet.
Ingredients
-
5oz (150g) beef prosciutto
-
7oz (200g) cooked beef prosciutto or beef ham
-
7oz (200g) beef salami (plain, peppered, or parmesan coated)
-
7oz (200g) beef mortadella
-
5oz (150g) bresaola
-
5oz (150g) cured beef sausage (mini sticks or sliced)
-
7oz (200g) Gravera cheese (or Gruyere)
-
7oz (200g) cheddar cheese
-
7oz (200g) blue cheese
-
5oz (150g) mini mozzarella balls
-
Feta cheese (block or crumbled)
-
Halloumi cheese (sliced)
-
Manchego cheese (aged)
-
Goat cheese log
-
1 cup cherry tomatoes
-
1 cup cucumber sticks
-
1 cup olives
-
Marinated artichoke hearts
-
Roasted red peppers (jarred, drained)
-
Pepperoncini
-
Hummus (store-bought or homemade)
-
Tzatziki (store-bought or homemade)
-
Baba Ghanoush (store-bought or homemade)
-
Fig jam or apricot preserves
-
1 cup fresh fruit (e.g., grapes, pomegranate, sliced apple, fresh figs, orange)
-
Red bell pepper (thinly sliced)
-
Yellow bell pepper (thinly sliced)
-
Fresh mint leaves
-
Fresh parsley leaves
-
Lemon (cut into wedges)
-
½ cup dried fruit (e.g., prunes, dried apricots)
-
Marcona almonds or regular almonds (roasted and salted)
-
Pistachios (shelled)
-
Ciabatta or crusty baguette (sliced)
-
Pita bread (warmed and cut into wedges)
-
Water crackers or other plain, sturdy crackers
-
Seeded crackers
-
Extra virgin olive oil
-
Fresh rosemary sprigs
-
Red pepper flakes (optional)
Instructions
-
Step 1
Spoon store-bought hummus, tzatziki, and baba ghanoush into small serving bowls. For homemade tzatziki, mix 1 cup Greek yogurt, grated and squeezed cucumber, minced garlic, lemon juice, chopped dill (or mint), salt, and pepper. Spoon fig jam or apricot preserves into a separate small dish. Refrigerate dips until assembly. -
Step 2
Wash and prepare all fresh vegetables: halve cherry tomatoes, slice cucumber into rounds or spears, slice bell peppers into strips. Wash fresh fruits: cut grapes into clusters, quarter fresh figs (if using), slice orange into rounds, and remove pomegranate arils (if using). Drain all liquids from olives, marinated artichoke hearts, roasted red peppers (slice if needed), and pepperoncini. Place pickled items and olives into small, individual bowls. -
Step 3
Cut feta into cubes or use crumbled. Pan-fry sliced halloumi for 2-3 minutes per side until golden; let cool. Slice Manchego into wedges or triangles. Leave goat cheese log whole or slice into rounds, optionally pressing herbs onto sides. Vary shapes and textures for visual interest. -
Step 4
Artfully arrange beef prosciutto by folding slices into loose ribbons. Fold or roll beef salami and beef mortadella slices for volume and texture. Separate different types of meats to highlight each flavor profile. -
Step 5
Choose a large board or platter. Place your small bowls of dips, olives, and fig jam as anchors, spreading them out to create distinct sections. Then, strategically arrange the prepared cheeses around the bowls, ensuring a variety in each zone. -
Step 6
Weave in the artfully arranged cured beef meats around the bowls and cheeses, creating height and volume. Fill larger empty spaces with fresh fruits and vegetables, arranging them in colorful clusters. Incorporate pickled items, nuts, and dried fruits into remaining nooks and crannies, scattering them in inviting piles for contrasting textures and flavors. -
Step 7
Arrange sliced ciabatta or baguette, warmed pita wedges, and various crackers around the perimeter or in empty sections. Finish by tucking fresh rosemary, mint, or parsley sprigs into the board. Drizzle extra virgin olive oil over feta or tomatoes, and place lemon wedges strategically. Add red pepper flakes for optional heat. -
Step 8
Allow cheeses to come to room temperature for about 30 minutes before serving for optimal flavor. Provide small forks, tongs, and cheese knives, with a separate spoon for each dip. Suggest drink pairings like sparkling water with lemon and mint, or non-alcoholic dry white wine alternative or rosé alternative. Encourage guests to explore and create their own flavor combinations.
Important Information
Nutrition Facts (Per Serving)
It is important to consider this information as approximate and not to use it as definitive health advice.
Allergy Information
Please check ingredients for potential allergens and consult a health professional if in doubt.


Leave a Comment