
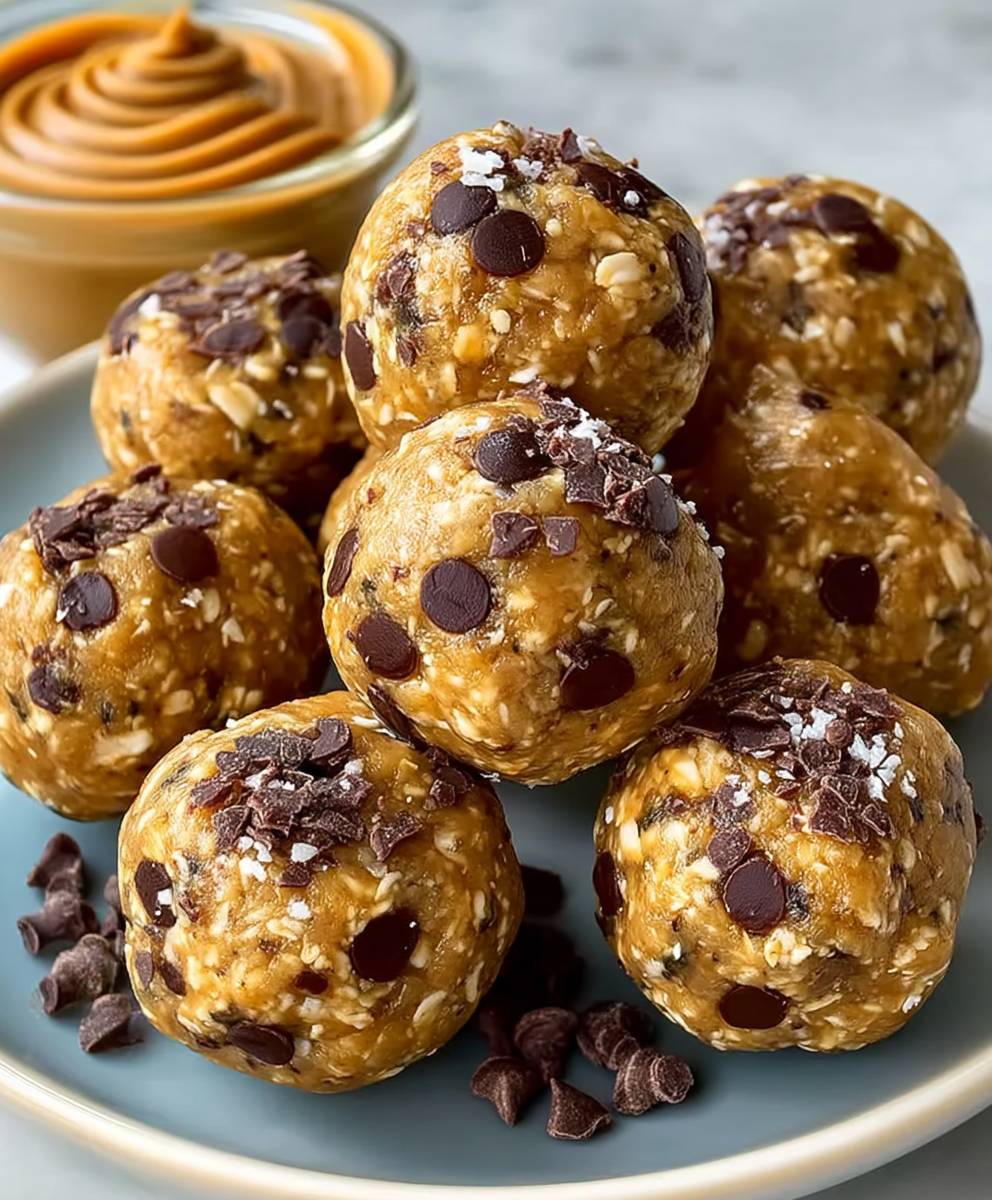
Maple Peanut Butter Energy Balls: the perfect bite-sized solution to your afternoon slump! Are you tired of reaching for processed snacks when your energy dips? Do you crave something delicious, nutritious, and incredibly easy to make? Then look no further! These little powerhouses are packed with protein, healthy fats, and natural sweetness, making them an ideal treat for busy professionals, active families, or anyone seeking a guilt-free indulgence.
While the exact origins of energy balls are difficult to pinpoint, the concept of combining nutrient-rich ingredients into portable snacks has been around for centuries. Think of pemmican, the traditional Native American travel food made from dried meat, berries, and fat. Our modern Maple Peanut Butter Energy Balls draw inspiration from this idea, offering a convenient and satisfying way to fuel your body with wholesome goodness.
People adore these energy balls for several reasons. First, the taste is simply irresistible the creamy peanut butter perfectly complements the rich maple syrup, creating a flavor profile that’s both comforting and energizing. Second, the texture is delightful, with a satisfying chewiness and a slight crunch from the optional add-ins like chopped nuts or seeds. Finally, and perhaps most importantly, they are incredibly convenient. No baking is required, and they can be whipped up in minutes, making them a lifesaver when you’re short on time. So, get ready to experience the deliciousness and convenience of homemade energy with this fantastic recipe!

“`html
Ingredients:
- 1 cup rolled oats (not instant)
- ½ cup natural peanut butter (creamy or crunchy)
- ? cup pure maple syrup
- 2 tablespoons chia seeds
- 1 teaspoon vanilla extract
- ¼ teaspoon sea salt
- Optional toppings: shredded coconut, chopped nuts, mini chocolate chips
Preparing the Energy Ball Mixture
Okay, let’s get started! These energy balls are seriously the easiest thing you’ll ever make, and they’re perfect for a quick snack or a pre-workout boost. First things first, make sure you have all your ingredients measured out and ready to go. It makes the whole process so much smoother.
- Combine the oats, peanut butter, maple syrup, chia seeds, vanilla extract, and salt in a large bowl. I like to use a big bowl so I have plenty of room to mix everything without making a mess. Don’t be afraid to get your hands in there!
- Mix everything together really well. This is where a little elbow grease comes in. You want to make sure the peanut butter and maple syrup are evenly distributed throughout the oats. Keep stirring until you have a sticky, uniform mixture. It might take a few minutes, but trust me, it’s worth it.
- If the mixture seems too dry, add a teaspoon of maple syrup or water at a time until it comes together easily. Sometimes the peanut butter can be a little dry, so don’t be afraid to adjust the moisture level. You want the mixture to be sticky enough to hold its shape when you roll it into balls.
- If the mixture seems too wet, add a tablespoon of rolled oats at a time until it reaches the right consistency. On the other hand, if your peanut butter is extra oily, you might need to add a little more oats to absorb the excess moisture. Just add a little at a time until you get the perfect consistency.
Chilling the Mixture (Important!)
This step is crucial! Don’t skip it. Chilling the mixture helps the ingredients bind together and makes it much easier to roll the energy balls.
- Cover the bowl with plastic wrap or a lid. Make sure it’s sealed tightly to prevent the mixture from drying out.
- Refrigerate the mixture for at least 30 minutes. I usually chill it for an hour, but 30 minutes will do in a pinch. The longer it chills, the easier it will be to roll.
Rolling and Coating the Energy Balls
Now for the fun part! This is where you get to turn that sticky mixture into adorable little energy balls.
- Remove the mixture from the refrigerator. It should be much firmer now and easier to handle.
- Prepare your toppings (if using). If you’re using shredded coconut, chopped nuts, or mini chocolate chips, put them in separate small bowls. This will make it easy to roll the energy balls in the toppings.
- Using a spoon or a small cookie scoop, scoop out about 1 tablespoon of the mixture. I find that a cookie scoop helps to keep the energy balls uniform in size.
- Roll the mixture between your palms to form a ball. Don’t worry if they’re not perfectly round. Imperfection is part of the charm!
- If desired, roll the energy ball in your chosen topping. Gently press the energy ball into the topping to make sure it adheres.
- Place the finished energy ball on a baking sheet lined with parchment paper. This will prevent the energy balls from sticking to the baking sheet.
- Repeat steps 3-6 until all the mixture is used.
Storing Your Energy Balls
These energy balls are best stored in the refrigerator to maintain their freshness and texture. They’ll keep for about a week, but I doubt they’ll last that long!
- Place the energy balls in an airtight container. This will prevent them from drying out.
- Store the energy balls in the refrigerator for up to 1 week.
- You can also freeze the energy balls for up to 2 months. Just thaw them in the refrigerator before eating.
Tips and Variations
These energy balls are super versatile, so feel free to experiment with different ingredients and flavors. Here are a few ideas to get you started:
- Add protein powder: For an extra protein boost, add a scoop of your favorite protein powder to the mixture.
- Use different nut butters: Almond butter, cashew butter, or sunflower seed butter would all work well in this recipe.
- Add dried fruit: Raisins, cranberries, or chopped dates would add a chewy texture and extra sweetness.
- Add spices: A pinch of cinnamon, nutmeg, or ginger would add a warm and cozy flavor.
- Make them chocolatey: Add a tablespoon of cocoa powder to the mixture for a chocolatey treat.
- Add chopped nuts: Walnuts, pecans, or almonds would add a crunchy texture.
- Use different sweeteners: Honey or agave nectar could be used in place of maple syrup.
- Make them vegan: Ensure your peanut butter and maple syrup are vegan-friendly.
- For a smoother texture: Pulse the oats in a food processor a few times before adding them to the mixture. This will create a finer texture in the energy balls.
- If you don’t have chia seeds: You can substitute flax seeds or hemp seeds. They offer similar nutritional benefits.
- To prevent sticking: Lightly dampen your hands with water before rolling the energy balls. This will prevent the mixture from sticking to your hands.
Troubleshooting
Sometimes things don’t go exactly as planned. Here are a few common issues and how to fix them:
- Energy balls are too sticky: Add more rolled oats, one tablespoon at a time, until the mixture reaches the right consistency.
- Energy balls are too dry: Add more maple syrup or water, one teaspoon at a time, until the mixture comes together easily.
- Energy balls are falling apart: Make sure you chill the mixture for at least 30 minutes. This will help the ingredients bind together.
- Toppings aren’t sticking: Gently press the energy balls into the toppings to make sure they adhere. You can also lightly dampen the energy balls with water before rolling them in the toppings.
Nutritional Information (Approximate)
Please note that the nutritional information is an estimate and may vary depending on the specific ingredients you use.
- Serving Size: 1 energy ball
- Calories: Approximately 80-100 calories per ball
- Fat: 4-6 grams
- Protein: 2-3 grams
- Carbohydrates: 8-10 grams
- Fiber: 1-2 grams
These Maple Peanut Butter Energy Balls are a delicious and healthy snack that you can feel good about eating. They’re packed with protein, fiber, and healthy fats, and they’re perfect for a quick energy boost. Enjoy!
“`
Conclusion:
And there you have it! These Maple Peanut Butter Energy Balls are truly a game-changer when it comes to satisfying your sweet cravings and boosting your energy levels. I genuinely believe this recipe is a must-try for anyone looking for a healthy, delicious, and incredibly easy snack option. The combination of creamy peanut butter, the natural sweetness of maple syrup, and the satisfying chewiness of oats creates a flavor profile that’s simply irresistible. But it’s not just about the taste; it’s about the convenience and the nutritional benefits packed into each little ball of goodness.
Why are these energy balls a must-try? Because they are quick to make, require no baking, and are perfect for meal prepping. They are also incredibly versatile, allowing you to customize them to your liking. Need a pre-workout boost? Grab a couple before hitting the gym. Craving something sweet after dinner? These energy balls are a guilt-free indulgence. Looking for a healthy snack for your kids? They’ll love these!
Serving Suggestions and Variations:
The possibilities are endless when it comes to serving and customizing these Maple Peanut Butter Energy Balls. Here are a few ideas to get you started:
* Chocolate Chip Delight: Add a handful of mini chocolate chips for an extra touch of sweetness and indulgence. Dark chocolate chips are a great option for a healthier twist.
* Coconut Craze: Roll the finished energy balls in shredded coconut for added texture and a tropical flavor.
* Nutty Goodness: Incorporate chopped nuts like almonds, walnuts, or pecans for extra crunch and healthy fats.
* Seed Power: Add chia seeds, flax seeds, or sunflower seeds for an extra boost of fiber and nutrients.
* Spice It Up: A dash of cinnamon or nutmeg can add warmth and depth to the flavor.
* Protein Powerhouse: Add a scoop of your favorite protein powder to increase the protein content.
* Breakfast On-the-Go: Pair a few energy balls with a piece of fruit and a yogurt for a quick and healthy breakfast.
* Dessert Upgrade: Serve alongside a scoop of vanilla ice cream for a simple yet satisfying dessert.
* Holiday Treat: During the holidays, add a sprinkle of festive sprinkles or chopped dried cranberries for a festive touch.
* Freezer Friendly: These energy balls freeze beautifully! Store them in an airtight container in the freezer for up to 2 months. Just thaw them for a few minutes before enjoying.
I’ve personally experimented with many variations, and I’ve found that adding a pinch of sea salt really enhances the sweetness of the maple syrup and the richness of the peanut butter. Don’t be afraid to get creative and experiment with different ingredients to find your perfect combination!
I truly hope you give this recipe a try. I’m confident that you’ll love these Maple Peanut Butter Energy Balls as much as I do. They’ve become a staple in my household, and I know they’ll become a favorite in yours too.
Once you’ve made them, I’d absolutely love to hear about your experience! Share your photos and variations on social media using [Your Hashtag Here] so I can see your creations. Let me know what you think in the comments below what did you add? What did you change? What did you love? Your feedback is invaluable, and I’m always looking for new ways to improve and share delicious recipes. Happy snacking!
Maple Peanut Butter Energy Balls: The Ultimate No-Bake Recipe
Easy no-bake energy balls with oats, peanut butter, maple syrup, and chia seeds. A quick, healthy snack or pre-workout boost!
Ingredients
- 1 cup rolled oats (not instant)
- ½ cup natural peanut butter (creamy or crunchy)
- ? cup pure maple syrup
- 2 tablespoons chia seeds
- 1 teaspoon vanilla extract
- ¼ teaspoon sea salt
Instructions
- Combine Ingredients: In a large bowl, combine the oats, peanut butter, maple syrup, chia seeds, vanilla extract, and salt.
- Mix Well: Mix everything together thoroughly until the peanut butter and maple syrup are evenly distributed. The mixture should be sticky and uniform.
- Adjust Consistency (if needed):
- If the mixture is too dry, add maple syrup or water, 1 teaspoon at a time, until it comes together easily.
- If the mixture is too wet, add rolled oats, 1 tablespoon at a time, until it reaches the right consistency.
- Chill: Cover the bowl with plastic wrap or a lid and refrigerate for at least 30 minutes (or up to an hour).
- Prepare Toppings (if using): Place desired toppings (shredded coconut, chopped nuts, mini chocolate chips) in separate small bowls.
- Roll into Balls: Remove the mixture from the refrigerator. Using a spoon or small cookie scoop, scoop out about 1 tablespoon of the mixture.
- Shape and Coat: Roll the mixture between your palms to form a ball. If desired, roll the energy ball in your chosen topping, gently pressing to adhere.
- Arrange: Place the finished energy ball on a baking sheet lined with parchment paper.
- Repeat: Repeat steps 6-8 until all the mixture is used.
- Store: Place the energy balls in an airtight container and store in the refrigerator for up to 1 week, or freeze for up to 2 months. Thaw in the refrigerator before eating.
Notes
- Variations:
- Add a scoop of protein powder for an extra protein boost.
- Use different nut butters like almond, cashew, or sunflower seed butter.
- Add dried fruit like raisins, cranberries, or chopped dates.
- Add spices like cinnamon, nutmeg, or ginger.
- Add a tablespoon of cocoa powder for a chocolatey treat.
- Add chopped nuts like walnuts, pecans, or almonds.
- Use honey or agave nectar in place of maple syrup.
- Ensure peanut butter and maple syrup are vegan-friendly for a vegan version.
- Pulse oats in a food processor for a smoother texture.
- Substitute flax seeds or hemp seeds for chia seeds.
- Lightly dampen hands with water to prevent sticking while rolling.
- Troubleshooting:
- If too sticky, add more rolled oats, 1 tablespoon at a time.
- If too dry, add more maple syrup or water, 1 teaspoon at a time.
- If falling apart, ensure the mixture is chilled for at least 30 minutes.
- If toppings aren’t sticking, gently press the energy balls into the toppings or lightly dampen the energy balls with water before rolling.


Leave a Comment