
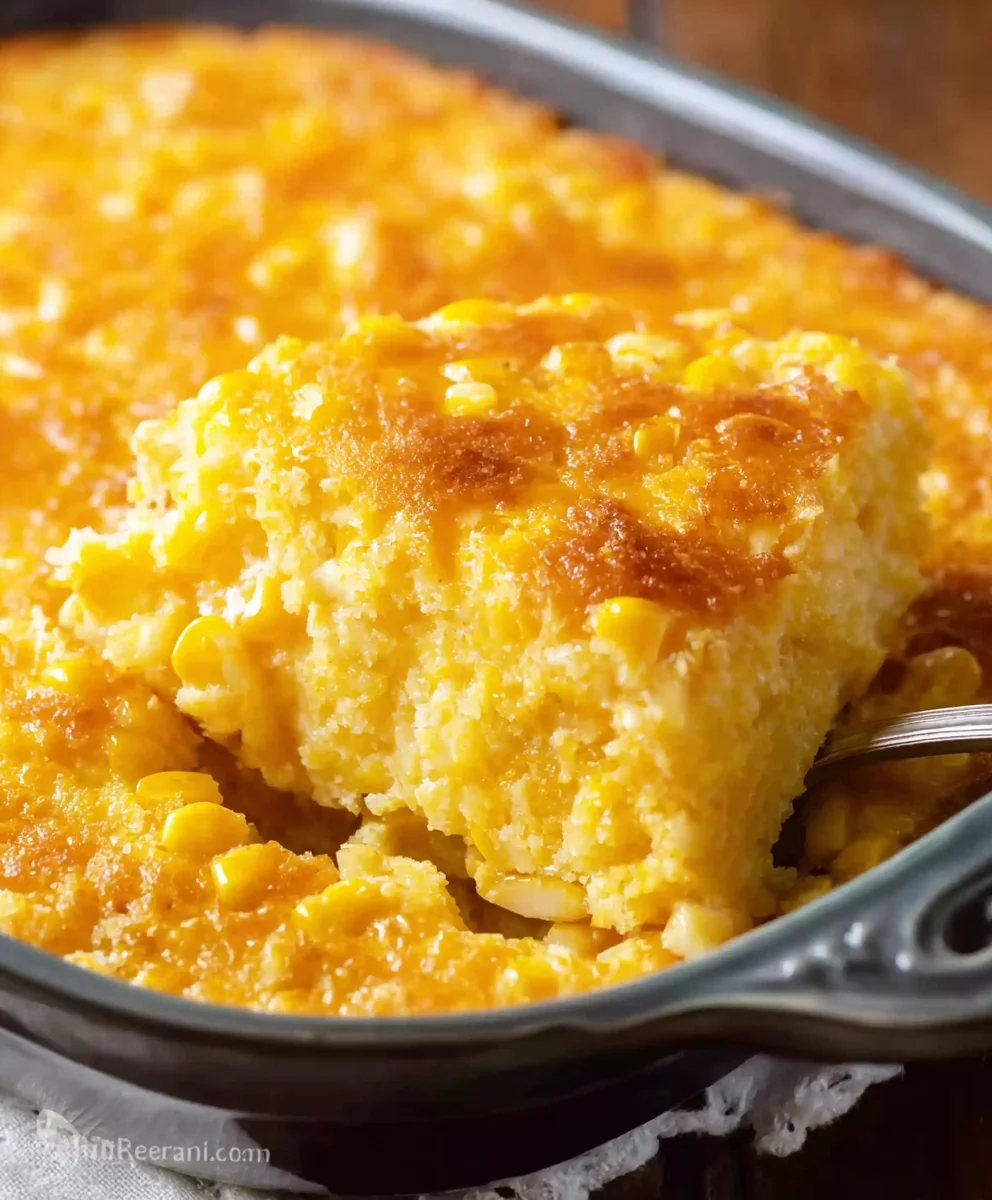
Recipe:paula Deen Corn Casserole?utm_source=pinzk is more than just a side dish; it’s a warm, comforting embrace from the heart of Southern cooking. Imagine a spoonful of creamy, sweet corn, perfectly seasoned and baked until golden brown, offering a delightful texture that’s both soft and slightly firm. This iconic casserole, championed by the beloved queen of Southern cuisine, Paula Deen, has cemented its place on countless family tables, especially during holidays and special gatherings, becoming synonymous with heartfelt hospitality and delicious gatherings.
Its enduring appeal lies in its beautiful simplicity and profound flavor. This dish perfectly encapsulates the generosity and warmth of Southern tradition, transforming humble ingredients into something truly extraordinary. People adore this particular corn casserole for its incredibly satisfying taste, its smooth yet delightful texture, and the sheer convenience of preparing a show-stopping side dish with minimal fuss. You’ll find that making your own Recipe:paula Deen Corn Casserole?utm_source=pinzk is surprisingly easy, yielding results that taste like pure Southern sunshine. Get ready to impress your loved ones with this timeless comfort food classic!

Ingredients:
Alright, gather ‘round, y’all! This Paula Deen Corn Casserole is a true Southern comfort classic, and it’s surprisingly simple to pull together. Here’s what you’ll need to make this delightfully creamy, savory, and slightly sweet side dish that practically melts in your mouth. I always tell folks, good ingredients make for good food, so let’s get started!
- Canned Whole Kernel Corn: One (15-ounce) can, thoroughly drained. I usually give it a good press in a colander to get rid of any excess liquid. We want corn, not watery casserole!
- Canned Creamed Corn: One (15-ounce) can, undrained. This is the secret to that luscious, creamy texture, folks. Don’t you dare drain this one!
- Sour Cream: One (8-ounce) container. For that authentic richness and a slight tangy kick that balances the sweetness of the corn, full-fat sour cream is my go-to. Trust me on this, it makes all the difference!
- Unsalted Butter: Half a cup (which is one stick), melted. You can melt it gently in a saucepan or pop it in the microwave for a minute or two. Just make sure it’s not piping hot when you add it to the other ingredients.
- Corn Muffin Mix: One (8.5-ounce) package. I always reach for Jiffy brand, as it’s a classic and works perfectly for this recipe, adding structure and that unmistakable corn bread flavor. This is what truly transforms it from just corn to a glorious casserole!
- Optional Cheese: One to two cups of shredded sharp cheddar or Colby Jack cheese. Now, some folks prefer this casserole without cheese, and that’s perfectly fine! But if you’re like me and believe cheese makes everything better, a generous helping of sharp cheddar truly elevates this dish. I often use about 1.5 cups, but you can adjust to your cheesy preference!
- Optional Seasoning: A pinch of salt and a few grinds of freshly ground black pepper to taste. The corn muffin mix and butter already bring a good deal of flavor, but sometimes a little extra seasoning can really make the flavors pop. I like to add just a touch, especially if I’m using unsalted butter.
Preparing Your Workspace and Oven
Before we even think about mixing, let’s get our kitchen ready. A little prep work goes a long way to ensure a smooth cooking experience, and that’s something I always preach!
-
Preheat Your Oven:
First things first, let’s get that oven nice and hot. Preheat your oven to 350°F (175°C). A properly preheated oven is crucial for even baking, ensuring your casserole cooks through beautifully and gets that lovely golden crust without any raw spots in the middle. I like to let mine preheat for at least 15-20 minutes after it signals it’s reached temperature, just to be sure.
-
Prepare Your Baking Dish:
Next up, grab a 2-quart baking dish. This is typically an 8×8-inch square dish or a similar-sized oval or rectangular dish. You’ll want to lightly grease the bottom and sides of the dish with a little bit of butter, cooking spray, or even some vegetable oil. This step is important because it prevents the casserole from sticking and makes for easy serving and clean-up later. Nothing’s worse than trying to scrape a delicious casserole from the bottom of a pan!
-
Melt Your Butter:
If you haven’t already, go ahead and melt your half-cup (one stick) of unsalted butter. You can do this in a small saucepan over low heat, stirring occasionally until it’s fully liquid, or in a microwave-safe bowl. If using the microwave, heat it in 15-second intervals, stirring in between, until melted. Just make sure it’s not boiling hot; we want it warm and liquid, not scorching.
Mixing the Casserole Base: Where the Magic Happens!
This is where all those wonderful ingredients come together to form the heart of our Paula Deen Corn Casserole. It’s a simple process, but paying attention to how you mix makes a difference in the final texture.
-
Combine the Wet Ingredients (Mostly!):
In a large mixing bowl – and I mean a good-sized one, because we’re going to be adding a few things here – add your thoroughly drained whole kernel corn and your undrained creamed corn. Next, spoon in that luscious 8-ounce container of sour cream. These three ingredients form the creamy, corny base. Give them a gentle stir with a spoon or a rubber spatula to combine them well. You don’t need to be vigorous, just ensure they’re mostly incorporated.
-
Introduce the Melted Butter:
Now, pour your melted, slightly cooled butter into the bowl with the corn and sour cream mixture. Give it another good stir. The butter is going to add incredible richness and moisture to our casserole, helping it to stay incredibly tender and flavorful. Make sure it’s well mixed throughout the corn mixture. You want every bite to benefit from that buttery goodness!
-
Add the Corn Muffin Mix:
This is the ingredient that binds everything together and gives our casserole that wonderful cornbread-like texture. Carefully pour the entire 8.5-ounce package of corn muffin mix into your bowl. Now, here’s a crucial tip: mix just until combined. You don’t want to overmix! Overmixing can develop the gluten in the flour, leading to a tough, dense casserole. We’re aiming for tender and moist. So, stir gently with your spatula or spoon until there are no dry streaks of mix visible, but stop as soon as it’s incorporated. A few small lumps are perfectly fine and even desirable!
-
Optional Cheese Integration:
If you’re opting for cheese in your Paula Deen Corn Casserole, now’s the time to fold it in. Add your 1 to 2 cups of shredded sharp cheddar or Colby Jack cheese to the mixture. Gently fold it in until it’s evenly distributed throughout the batter. I find that about 1.5 cups gives a wonderful cheesy presence without overpowering the corn. This cheese will melt beautifully into the casserole, creating pockets of savory delight!
-
Taste and Adjust Seasoning:
At this point, you can take a tiny, tiny spoonful of the mixture (before baking, of course!) and taste it. If you feel it needs a little extra something, add a pinch of salt and/or a few grinds of fresh black pepper. Remember, the corn muffin mix and butter already provide some seasoning, so go easy. You can always add more at the table, but you can’t take it away once it’s in!
Baking to Perfection: The Heart of the Casserole
Now that our incredible mixture is ready, it’s time to transform it into that golden, bubbly, irresistible Paula Deen Corn Casserole we all know and love. Baking is where all those flavors meld and deepen.
-
Transfer to the Baking Dish:
Carefully spoon the entire corn casserole mixture into your previously greased 2-quart baking dish. Use your spatula to spread it evenly across the bottom of the dish. Make sure it’s distributed relatively flat so it bakes uniformly. You’ll notice it’s a fairly thick, rustic batter – that’s exactly what we want!
-
Into the Hot Oven:
Place the baking dish into your preheated 350°F (175°C) oven. I always put it on the center rack. This is typically the sweet spot for most casseroles, as it allows for even heat circulation around the dish, promoting consistent baking from top to bottom.
-
Baking Time and Visual Cues:
Bake the casserole for approximately 45 to 60 minutes. The exact baking time can vary depending on your oven, the material of your baking dish, and even the altitude you’re cooking at. So, don’t just set a timer and walk away! Here’s what you’re looking for:
- The top should be beautifully golden brown and slightly puffed up.
- The edges should be set and pulling away ever so slightly from the sides of the dish.
- If you gently jiggle the dish, the center should appear mostly set, with just a tiny bit of wobble, rather than being soupy.
- For a definitive test, insert a toothpick or a thin knife into the center of the casserole. If it comes out clean or with just a few moist crumbs attached, it’s ready! If it comes out with wet batter, give it another 5-10 minutes and test again.
If you notice the top browning too quickly before the inside is fully cooked, you can loosely tent the dish with aluminum foil for the last 10-15 minutes of baking. This helps protect the top from over-browning while allowing the inside to finish cooking.
Cooling, Serving, and Enjoying Your Masterpiece!
The hardest part is waiting, but a little patience here makes all the difference for the best texture and flavor. Trust me, it’s worth it!
-
Resting Period:
Once your Paula Deen Corn Casserole is golden and glorious, carefully remove the dish from the oven and place it on a wire rack to cool. Now, this is important: let it rest for at least 10 to 15 minutes before serving. This resting time allows the casserole to set up properly, preventing it from crumbling when you scoop it out. It also allows the residual heat to finish cooking, deepening the flavors even more. It’s like letting a steak rest – all the juices redistribute, making it perfect.
-
Serve Warm:
This casserole is absolutely best served warm. Grab a serving spoon, scoop out generous portions, and prepare for smiles all around! It makes an incredible side dish for so many meals, from a holiday turkey or ham to a weeknight roast chicken or barbecue. It’s comforting, savory, and just a little bit sweet – hitting all the right notes.
-
Garnish (Optional):
If you’re feeling fancy, a sprinkle of fresh chopped chives or parsley just before serving can add a lovely pop of color and freshness. Sometimes, I even like to add a tiny pat of butter on top of each serving for an extra decadent touch, but that’s totally up to you!
Tips, Tricks, and Variations for Your Corn Casserole
I always encourage folks to make a recipe their own, and this Paula Deen Corn Casserole is no exception! Here are some ideas to customize it or ensure success every time.
-
Spice It Up:
If you like a little kick, consider adding a finely diced jalapeño (remove seeds for less heat!) to the mixture with the corn. You could also stir in a pinch of cayenne pepper or a dash of your favorite hot sauce. It adds a wonderful zing that complements the sweetness of the corn beautifully.
-
Herbaceous Goodness:
Fresh herbs can really brighten up this dish. Try adding a tablespoon of fresh chopped chives, parsley, or even a little bit of fresh thyme to the batter. These flavors can add another layer of complexity without overpowering the main star.
-
Make it a Meal:
To turn this side dish into a more substantial meal, you can add cooked, crumbled bacon, or even some cooked, shredded chicken. Just fold it into the batter before baking. It creates a hearty and satisfying casserole that’s perfect for a comforting dinner.
-
Crispy Topping:
For an extra textural element, some people love to sprinkle a little extra corn muffin mix, a handful of crushed butter crackers (like Ritz), or even some extra shredded cheese on top during the last 15-20 minutes of baking. This creates a delightful crunchy crust that contrasts with the creamy interior.
-
Testing for Doneness (Again!):
I can’t stress enough the importance of the toothpick test. Every oven is different, and the casserole can look done on top but still be a little jiggly in the middle. If your toothpick comes out gooey, it needs more time. Don’t be afraid to give it an extra 5-10 minutes if needed, covering with foil if the top is already perfectly golden.
-
Dairy Alternatives (Use with Caution):
While I always recommend full-fat dairy for the best results in this particular recipe, some folks might wonder about alternatives. You could try using light sour cream, but be aware that it might slightly affect the richness and texture. For butter, margarine could be substituted, but again, the flavor profile will be different. I’d really stick to the full-fat versions for that classic Paula Deen taste!
Storage and Reheating Your Delicious Leftovers
It’s rare to have leftovers of this amazing Paula Deen Corn Casserole, but if you do, here’s how to keep it tasting great!
-
Storing Leftovers:
Allow any leftover casserole to cool completely to room temperature. Then, transfer it to an airtight container. It can be stored in the refrigerator for up to 3-4 days. Make sure it’s sealed well to prevent it from drying out or absorbing other fridge odors.
-
Reheating in the Oven:
For the best results, I always recommend reheating this casserole in the oven. Preheat your oven to 300°F (150°C). Place the desired portion of casserole in an oven-safe dish, cover it loosely with aluminum foil, and bake for about 15-25 minutes, or until heated through. The foil helps to retain moisture and prevents the casserole from drying out. This method helps to bring back some of that lovely texture.
-
Reheating in the Microwave:
If you’re in a hurry, you can certainly reheat individual servings in the microwave. Place a portion on a microwave-safe plate, cover it with a microwave-safe lid or damp paper towel (this helps to keep it moist), and heat on medium power for 1-2 minutes, stirring halfway through, until heated to your liking. Be careful not to overheat, as this can make the casserole a bit rubbery. While quicker, it might not yield the same crisp edges as oven reheating.
-
Freezing (Not Recommended):
While you technically can freeze corn casserole, I don’t typically recommend it for this particular recipe. The texture of the sour cream and creamed corn can change significantly upon thawing, sometimes becoming a bit grainy or watery. It won’t have that delightful, fresh-baked creaminess we strive for. This casserole is truly best enjoyed fresh or within a few days from the refrigerator.
And there you have it, folks! Everything you need to know to whip up the most incredible, comforting Paula Deen Corn Casserole. It’s a dish that brings smiles to faces and warmth to the soul. Enjoy every single creamy, corny bite!
Conclusion:
Well, my friends, we’ve come to the end of our delicious journey, and I genuinely hope you’re as excited as I am about this incredible dish! If there’s one recipe that truly embodies comfort, simplicity, and crowd-pleasing flavor, it’s the one we’ve just explored. This isn’t just a side dish; it’s a culinary hug, a warm embrace from your kitchen to your soul. The creamy texture, the sweet burst of corn, the subtle savory notes – it all comes together in a symphony of taste that makes it an absolute must-try. You’ll find yourself reaching for this recipe time and time again, not just for special occasions, but for those weeknights when you need something effortlessly delicious to brighten your table. It’s the kind of dish that makes people ask for the recipe, every single time, and believe me, sharing this kind of happiness is one of the greatest joys of cooking.
But don’t just take my word for it; let’s talk about how you can truly make this dish shine on your own table!
Serving Suggestions & Creative Variations:
While this corn casserole is undeniably a superstar on its own, its versatility is truly one of its greatest strengths. Traditionally, it’s the perfect companion to nearly any main course. Imagine a scoop alongside a smoky barbecue pulled pork sandwich, a juicy roasted chicken, or a perfectly grilled steak. It’s an indispensable staple for holiday feasts – Thanksgiving, Christmas, Easter – it fits right in, often outshining other sides with its irresistible charm. For a lighter meal, consider serving a generous portion with a crisp green salad and some crusty bread; it’s surprisingly satisfying and filling enough to be a vegetarian main course. I’ve even enjoyed it as part of a hearty brunch spread, proving that its appeal truly knows no bounds throughout the day.
Now, let’s talk about making it your own. The beauty of this recipe lies in its adaptability. Feeling a little adventurous? Spice things up! A pinch of cayenne pepper or a finely diced jalapeño (seeds removed for less heat, or left in for a fiery kick!) can add a wonderful warmth. For a richer, more savory profile, crumble in some crispy bacon bits or cooked sausage during the last few minutes of baking. A sprinkle of fresh chives or chopped cilantro just before serving can add a vibrant freshness and a pop of color. Don’t be afraid to play with cheeses either – while cream cheese offers that signature smoothness, a touch of sharp cheddar, Monterey Jack, or even a smoked gouda stirred in can elevate the flavor significantly.
If you’re looking for dietary adaptations, this recipe is surprisingly flexible. For a gluten-free version, simply ensure your corn bread mix is certified gluten-free. Dairy-free? No problem! Many excellent plant-based milks and cream cheese alternatives are available now that will yield a similarly luscious result without compromising on flavor. You can also experiment with different types of corn: a mix of sweet yellow and white corn, or even grilled corn cut off the cob for a smoky undertone, can add a new dimension.
The specific dish we’ve celebrated today, the Recipe:paula Deen Corn Casserole?utm_source=pinzk, stands as a testament to simple ingredients coming together to create something truly extraordinary. It’s a recipe that invites experimentation while still delivering reliable deliciousness. This isn’t just about following instructions; it’s about finding joy in the kitchen and sharing that joy with others.
So, what are you waiting for? Head into your kitchen, gather those simple ingredients, and whip up this sensational corn casserole. I promise, you won’t regret it. Once you’ve tried it, I would absolutely love to hear about your experience! Did you stick to the classic? Did you add your own creative twist? What did your family and friends think? Please, share your stories, your photos, and your delicious results with me. Your feedback and culinary adventures inspire me, and I can’t wait to see how this incredible dish becomes a beloved staple in your home too. Happy cooking, and enjoy every single delightful bite!

Paula Deen Corn Casserole
A warm, comforting, creamy, sweet, and cheesy corn casserole, championed by Paula Deen. Perfect for holidays and gatherings, this simple side dish is baked until golden brown and offers a delightful texture.
Ingredients
-
1 (15-ounce) can whole kernel corn, thoroughly drained
-
1 (15-ounce) can creamed corn, undrained
-
1 (8-ounce) container full-fat sour cream
-
1/2 cup (1 stick) unsalted butter, melted
-
1 (8.5-ounce) package corn muffin mix (e.g., Jiffy)
-
1-2 cups shredded sharp cheddar or Colby Jack cheese (optional)
-
Pinch salt and freshly ground black pepper (optional, to taste)
Instructions
-
Step 1
Preheat oven to 350°F (175°C). Lightly grease a 2-quart baking dish. Melt 1/2 cup (1 stick) unsalted butter. -
Step 2
In a large mixing bowl, combine the thoroughly drained whole kernel corn, undrained creamed corn, sour cream, and melted butter. Stir gently to incorporate. -
Step 3
Add the entire 8.5-ounce package of corn muffin mix to the bowl. Mix *just until combined*, being careful not to overmix. If using, gently fold in 1-2 cups of shredded sharp cheddar or Colby Jack cheese and optional salt/pepper. -
Step 4
Carefully spoon the corn casserole mixture into the prepared 2-quart baking dish, spreading evenly across the bottom. -
Step 5
Place the baking dish into the preheated oven on the center rack. Bake for approximately 45-60 minutes, or until the top is golden brown, the edges are set, and a toothpick inserted into the center comes out clean. If the top browns too quickly, loosely tent with aluminum foil for the remaining baking time. -
Step 6
Once baked, carefully remove the casserole from the oven and let it rest on a wire rack for at least 10-15 minutes before serving. This allows it to set properly. Serve warm, garnished with fresh chopped chives or parsley if desired.
Important Information
Nutrition Facts (Per Serving)
It is important to consider this information as approximate and not to use it as definitive health advice.
Allergy Information
Please check ingredients for potential allergens and consult a health professional if in doubt.

Leave a Comment