Description
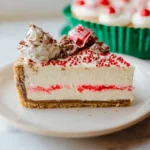
Indulge in the festive flavors of the season with this delightful Little Debbie Christmas Tree Cheesecake. Layered with creamy cheesecake filling and soft Christmas Tree Cakes, this no-bake dessert is perfect for holiday gatherings and will surely impress your guests!
Ingredients
Scale
- 1 package of Little Debbie Christmas Tree Cakes (10 cakes)
- 1 ½ cups cream cheese, softened
- 1 cup powdered sugar
- 1 teaspoon vanilla extract
- 1 cup heavy whipping cream
- 1 tablespoon sugar (for whipping cream)
- 1 cup mini chocolate chips (optional)
- 1 cup crushed peppermint candies (optional, for garnish)
- 1 tablespoon cocoa powder (optional, for dusting)
Instructions
- In a large mixing bowl, add the softened cream cheese. Make sure its at room temperature for easy mixing.
- Using a hand mixer or a stand mixer, beat the cream cheese on medium speed until its smooth and creamy, about 2-3 minutes.
- Gradually add the powdered sugar to the cream cheese, mixing on low speed until combined. Once combined, increase the speed to medium and mix for another minute until fluffy.
- Add the vanilla extract and mix until fully incorporated.
- In a separate bowl, pour in the heavy whipping cream. Using a clean mixer, whip the cream on medium-high speed until soft peaks form, about 3-4 minutes.
- Once you have soft peaks, add the tablespoon of sugar and continue whipping until stiff peaks form. Be careful not to over-whip, as it can turn into butter!
- Gently fold the whipped cream into the cream cheese mixture using a spatula. Be careful to maintain the light and airy texture of the whipped cream.
- If youre using mini chocolate chips, fold them in at this stage for an extra touch of sweetness and texture.
- Take the package of Little Debbie Christmas Tree Cakes and carefully unwrap each cake.
- Using a sharp knife, cut each cake in half horizontally. This will give you two layers from each cake.
- In a 9×13 inch baking dish, arrange half of the cut cakes at the bottom, laying them flat. This will serve as the base of your cheesecake.
- Once the base is set, spread half of the cheesecake filling over the layer of cakes, smoothing it out evenly with a spatula.
- Next, take the remaining half of the cut cakes and layer them on top of the cheesecake filling.
- Spread the remaining cheesecake filling over the second layer of cakes, smoothing it out to create an even top.
- Cover the baking dish with plastic wrap or aluminum foil to prevent any odors from the fridge from affecting the cheesecake.
- Place the cheesecake in the refrigerator and let it chill for at least 4 hours, but overnight is even better. This allows the flavors to meld and the cheesecake to firm up.
- Remove the cheesecake from the refrigerator and take off the cover.
- If youd like to add a dusting of cocoa powder, use a fine mesh sieve to sprinkle it evenly over the top of the cheesecake.
- For a festive touch, sprinkle crushed peppermint candies over the top. This adds a nice crunch and a pop of color!
- If youre feeling extra indulgent, you can also drizzle some chocolate sauce over the top or add more mini chocolate chips.
- Using a sharp knife, cut the cheesecake into squares or rectangles, depending on your preference.
- Serve each piece on a plate and enjoy the delightful combination of flavors and textures!
Notes
- For a lighter cheesecake, you can use reduced-fat cream cheese.
- Feel free to customize the garnishes based on your preferences; crushed nuts or sprinkles can also be great additions!
- Prep Time: 20 minutes
- Cook Time: 0 minutes