
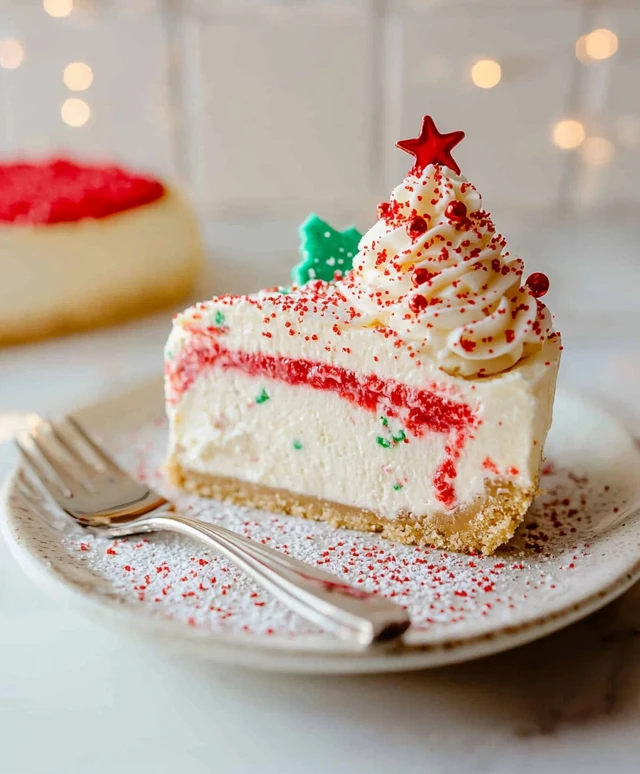
Little Debbie Christmas Tree Cheesecake is a delightful treat that brings a festive spirit to any holiday gathering. As the holiday season approaches, I find myself reminiscing about the joy of unwrapping those iconic Little Debbie Christmas Tree Cakes, with their vibrant green frosting and sweet, creamy filling. This recipe takes that nostalgic flavor and transforms it into a luscious cheesecake that is sure to impress your family and friends.
The history of Little Debbie treats dates back to the 1960s, when the McKee family created these beloved snacks that have become a staple in American households. The Little Debbie Christmas Tree Cheesecake captures the essence of those cherished cakes while adding a rich, velvety texture that elevates it to a whole new level. People adore this dish not only for its festive appearance but also for its perfect balance of sweetness and creaminess. Plus, its surprisingly easy to make, making it a convenient dessert option for busy holiday schedules. Join me in creating this delightful cheesecake that will surely become a new holiday tradition!

Ingredients:
- 1 package of Little Debbie Christmas Tree Cakes (10 cakes)
- 1 ½ cups cream cheese, softened
- 1 cup powdered sugar
- 1 teaspoon vanilla extract
- 1 cup heavy whipping cream
- 1 tablespoon sugar (for whipping cream)
- 1 cup mini chocolate chips (optional)
- 1 cup crushed peppermint candies (optional, for garnish)
- 1 tablespoon cocoa powder (optional, for dusting)
Preparing the Cheesecake Filling
Lets start by preparing the cheesecake filling. This is the heart of our Little Debbie Christmas Tree Cheesecake, and its super easy to make!
- In a large mixing bowl, add the softened cream cheese. Make sure its at room temperature for easy mixing.
- Using a hand mixer or a stand mixer, beat the cream cheese on medium speed until its smooth and creamy, about 2-3 minutes.
- Gradually add the powdered sugar to the cream cheese, mixing on low speed until combined. Once combined, increase the speed to medium and mix for another minute until fluffy.
- Add the vanilla extract and mix until fully incorporated.
- In a separate bowl, pour in the heavy whipping cream. Using a clean mixer, whip the cream on medium-high speed until soft peaks form, about 3-4 minutes.
- Once you have soft peaks, add the tablespoon of sugar and continue whipping until stiff peaks form. Be careful not to over-whip, as it can turn into butter!
- Gently fold the whipped cream into the cream cheese mixture using a spatula. Be careful to maintain the light and airy texture of the whipped cream.
- If youre using mini chocolate chips, fold them in at this stage for an extra touch of sweetness and texture.
Preparing the Base
Now that we have our cheesecake filling ready, its time to prepare the base using our Little Debbie Christmas Tree Cakes.
- Take the package of Little Debbie Christmas Tree Cakes and carefully unwrap each cake.
- Using a sharp knife, cut each cake in half horizontally. This will give you two layers from each cake.
- In a 9×13 inch baking dish, arrange half of the cut cakes at the bottom, laying them flat. This will serve as the base of your cheesecake.
- Once the base is set, spread half of the cheesecake filling over the layer of cakes, smoothing it out evenly with a spatula.
- Next, take the remaining half of the cut cakes and layer them on top of the cheesecake filling.
- Spread the remaining cheesecake filling over the second layer of cakes, smoothing it out to create an even top.
Chilling the Cheesecake
Now that we have assembled our cheesecake, its time to let it chill and set in the refrigerator.
- Cover the baking dish with plastic wrap or aluminum foil to prevent any odors from the fridge from affecting the cheesecake.
- Place the cheesecake in the refrigerator and let it chill for at least 4 hours, but overnight is even better. This allows the flavors to meld and the cheesecake to firm up.
Garnishing the Cheesecake
Once your cheesecake has chilled and set, its time to add some festive garnishes!
- Remove the cheesecake from the refrigerator and take off the cover.
- If youd like to add a dusting of cocoa powder, use a fine mesh sieve to sprinkle it evenly over the top of the cheesecake.
- For a festive touch, sprinkle crushed peppermint candies over the top. This adds a nice crunch and a pop of color!
- If youre feeling extra indulgent, you can also drizzle some chocolate sauce over the top or add more mini chocolate chips.
Serving the Cheesecake
Now comes the best partserving and enjoying your Little Debbie Christmas Tree Cheesecake!
- Using a sharp knife, cut the cheesecake into squares or rectangles, depending on
Conclusion:
In summary, the Little Debbie Christmas Tree Cheesecake is an absolute must-try for anyone looking to add a festive touch to their dessert table. This delightful recipe combines the nostalgic flavors of Little Debbie’s iconic Christmas treats with the creamy richness of cheesecake, creating a dessert that is both visually stunning and irresistibly delicious. Whether you’re hosting a holiday gathering or simply indulging in a sweet treat at home, this cheesecake is sure to impress your family and friends. For serving suggestions, consider garnishing your cheesecake with whipped cream, festive sprinkles, or even a drizzle of chocolate sauce to elevate its presentation. You can also experiment with variations by incorporating different flavors, such as peppermint or eggnog, to give it a unique twist that suits your taste. I encourage you to give this Little Debbie Christmas Tree Cheesecake a try and share your experience with friends and family. I would love to hear how it turns out for you! Dont forget to snap a picture and tag me on social media so we can celebrate your baking success together. Happy baking, and may your holiday season be filled with joy and delicious treats! Print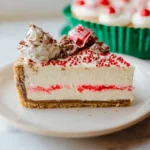
Little Debbie Christmas Tree Cheesecake: A Festive Delight for the Holidays
- Total Time: 260 minutes
- Yield: 10–12 slices 1x
Description
Indulge in the festive flavors of the season with this delightful Little Debbie Christmas Tree Cheesecake. Layered with creamy cheesecake filling and soft Christmas Tree Cakes, this no-bake dessert is perfect for holiday gatherings and will surely impress your guests!
Ingredients
- 1 package of Little Debbie Christmas Tree Cakes (10 cakes)
- 1 ½ cups cream cheese, softened
- 1 cup powdered sugar
- 1 teaspoon vanilla extract
- 1 cup heavy whipping cream
- 1 tablespoon sugar (for whipping cream)
- 1 cup mini chocolate chips (optional)
- 1 cup crushed peppermint candies (optional, for garnish)
- 1 tablespoon cocoa powder (optional, for dusting)
Instructions
- In a large mixing bowl, add the softened cream cheese. Make sure its at room temperature for easy mixing.
- Using a hand mixer or a stand mixer, beat the cream cheese on medium speed until its smooth and creamy, about 2-3 minutes.
- Gradually add the powdered sugar to the cream cheese, mixing on low speed until combined. Once combined, increase the speed to medium and mix for another minute until fluffy.
- Add the vanilla extract and mix until fully incorporated.
- In a separate bowl, pour in the heavy whipping cream. Using a clean mixer, whip the cream on medium-high speed until soft peaks form, about 3-4 minutes.
- Once you have soft peaks, add the tablespoon of sugar and continue whipping until stiff peaks form. Be careful not to over-whip, as it can turn into butter!
- Gently fold the whipped cream into the cream cheese mixture using a spatula. Be careful to maintain the light and airy texture of the whipped cream.
- If youre using mini chocolate chips, fold them in at this stage for an extra touch of sweetness and texture.
- Take the package of Little Debbie Christmas Tree Cakes and carefully unwrap each cake.
- Using a sharp knife, cut each cake in half horizontally. This will give you two layers from each cake.
- In a 9×13 inch baking dish, arrange half of the cut cakes at the bottom, laying them flat. This will serve as the base of your cheesecake.
- Once the base is set, spread half of the cheesecake filling over the layer of cakes, smoothing it out evenly with a spatula.
- Next, take the remaining half of the cut cakes and layer them on top of the cheesecake filling.
- Spread the remaining cheesecake filling over the second layer of cakes, smoothing it out to create an even top.
- Cover the baking dish with plastic wrap or aluminum foil to prevent any odors from the fridge from affecting the cheesecake.
- Place the cheesecake in the refrigerator and let it chill for at least 4 hours, but overnight is even better. This allows the flavors to meld and the cheesecake to firm up.
- Remove the cheesecake from the refrigerator and take off the cover.
- If youd like to add a dusting of cocoa powder, use a fine mesh sieve to sprinkle it evenly over the top of the cheesecake.
- For a festive touch, sprinkle crushed peppermint candies over the top. This adds a nice crunch and a pop of color!
- If youre feeling extra indulgent, you can also drizzle some chocolate sauce over the top or add more mini chocolate chips.
- Using a sharp knife, cut the cheesecake into squares or rectangles, depending on your preference.
- Serve each piece on a plate and enjoy the delightful combination of flavors and textures!
Notes
- For a lighter cheesecake, you can use reduced-fat cream cheese.
- Feel free to customize the garnishes based on your preferences; crushed nuts or sprinkles can also be great additions!
- Prep Time: 20 minutes
- Cook Time: 0 minutes

Leave a Comment