
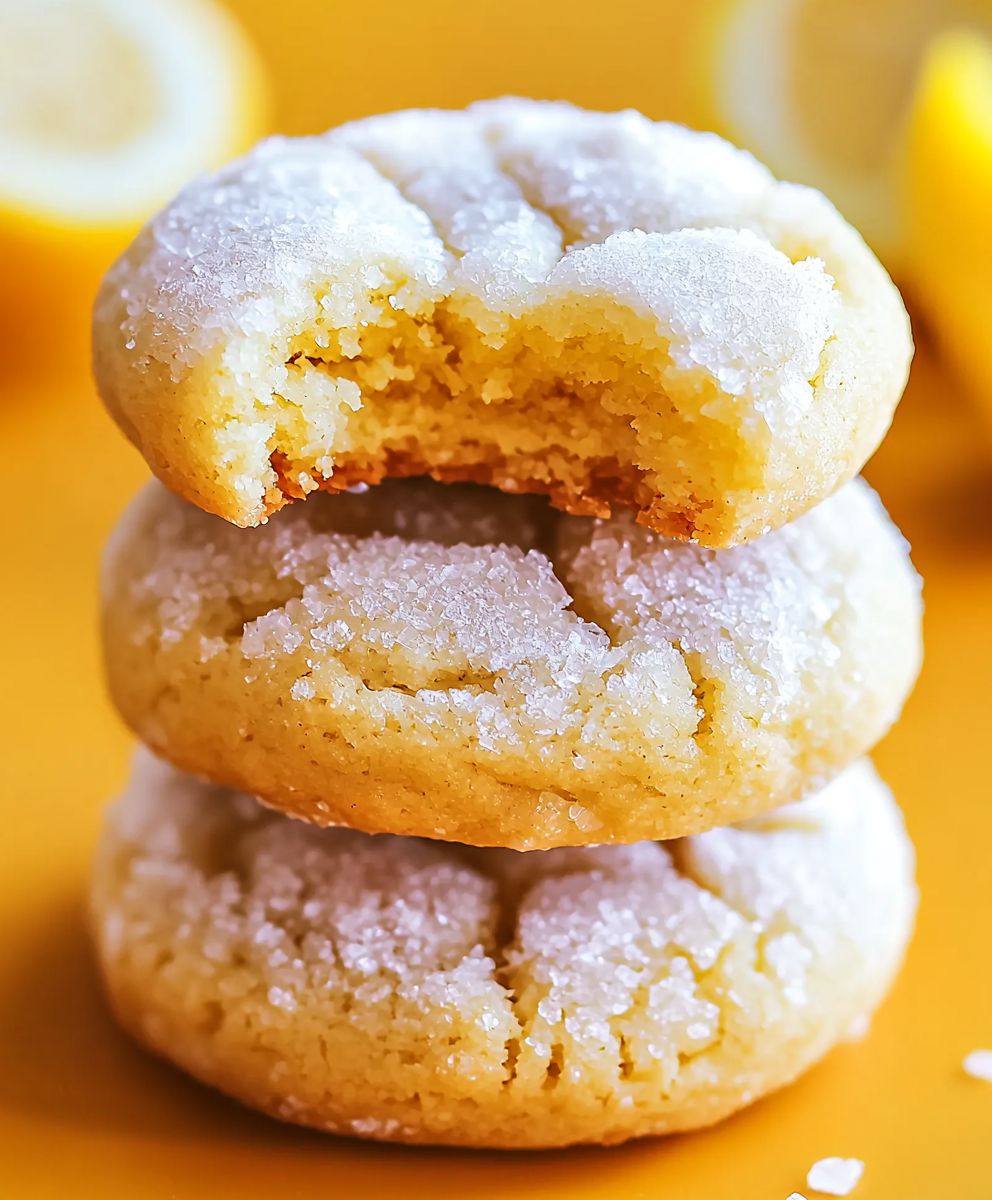
Lemon Pixie Cookies, those tiny bursts of sunshine, are about to become your new favorite treat! Imagine sinking your teeth into a delicate, melt-in-your-mouth cookie, bursting with bright, tangy lemon flavor and a hint of sweetness. These aren’t your average cookies; they’re miniature masterpieces that are as delightful to look at as they are to eat.
While the exact origins of these delightful cookies are shrouded in a bit of mystery, similar citrus-infused cookies have been enjoyed for centuries in various cultures. The use of lemon zest and juice in baking dates back to the Mediterranean, where citrus fruits have always been abundant. These Lemon Pixie Cookies capture that essence of sunshine and bring it to your kitchen.
What makes these cookies so irresistible? It’s the perfect balance of flavors and textures. The slight tang from the lemon cuts through the sweetness, preventing them from being cloying. Their delicate, almost sandy texture adds another layer of enjoyment. Plus, their small size makes them perfect for snacking, sharing, or adding a touch of elegance to any dessert platter. Get ready to experience a little bit of cookie magic!

Ingredients:
- 1 cup (2 sticks) unsalted butter, softened
- 1 ½ cups granulated sugar
- 2 large eggs
- ¼ cup lemon juice, freshly squeezed
- 2 teaspoons lemon zest, finely grated
- 1 teaspoon vanilla extract
- 3 cups all-purpose flour
- 1 teaspoon baking powder
- ½ teaspoon baking soda
- ¼ teaspoon salt
- ½ cup powdered sugar, for dusting
Preparing the Dough:
- Cream the butter and sugar: In a large mixing bowl, or the bowl of your stand mixer fitted with the paddle attachment, cream together the softened butter and granulated sugar until light and fluffy. This usually takes about 3-5 minutes. Make sure to scrape down the sides of the bowl occasionally to ensure everything is evenly mixed. You want a smooth, pale yellow mixture.
- Incorporate the wet ingredients: Add the eggs one at a time, mixing well after each addition. Then, stir in the lemon juice, lemon zest, and vanilla extract. The mixture might look slightly curdled at this point, but don’t worry, it will come together when you add the dry ingredients. The lemon zest is crucial for that bright, citrusy flavor, so don’t skip it!
- Combine the dry ingredients: In a separate medium bowl, whisk together the all-purpose flour, baking powder, baking soda, and salt. Whisking ensures that the baking powder and baking soda are evenly distributed throughout the flour, which is essential for a light and airy cookie.
- Gradually add the dry ingredients to the wet ingredients: Gradually add the dry ingredients to the wet ingredients, mixing on low speed until just combined. Be careful not to overmix the dough, as this can result in tough cookies. Overmixing develops the gluten in the flour, leading to a less tender final product. Stop mixing as soon as the flour is incorporated.
- Chill the dough: Wrap the dough tightly in plastic wrap and chill in the refrigerator for at least 2 hours, or preferably overnight. This chilling time is crucial for several reasons. First, it allows the gluten to relax, resulting in a more tender cookie. Second, it firms up the butter, which prevents the cookies from spreading too much during baking. Finally, it allows the flavors to meld together, resulting in a more flavorful cookie.
Baking the Cookies:
- Preheat the oven: Preheat your oven to 350°F (175°C). Line baking sheets with parchment paper. Parchment paper prevents the cookies from sticking to the baking sheets and makes cleanup a breeze.
- Shape the cookies: Remove the chilled dough from the refrigerator. Using a cookie scoop or a spoon, scoop out rounded tablespoons of dough and roll them into balls. If the dough is too sticky to handle, you can lightly flour your hands.
- Bake the cookies: Place the cookie dough balls onto the prepared baking sheets, leaving about 2 inches between each cookie to allow for spreading. Bake for 10-12 minutes, or until the edges are lightly golden brown and the centers are set. Keep a close eye on them, as baking times can vary depending on your oven. You want the cookies to be just barely golden around the edges.
- Cool the cookies: Remove the baking sheets from the oven and let the cookies cool on the baking sheets for a few minutes before transferring them to a wire rack to cool completely. This prevents the cookies from breaking while they are still soft and warm.
Dusting with Powdered Sugar:
- Dust with powdered sugar: Once the cookies are completely cool, dust them generously with powdered sugar. You can use a sifter or a small strainer to evenly distribute the powdered sugar. The powdered sugar adds a touch of sweetness and a beautiful presentation to these cookies.
Tips and Tricks for Perfect Lemon Pixie Cookies:
- Use high-quality ingredients: The quality of your ingredients will directly impact the flavor of your cookies. Use good quality butter, fresh lemon juice, and pure vanilla extract for the best results.
- Don’t overmix the dough: Overmixing the dough will develop the gluten in the flour, resulting in tough cookies. Mix the dough until just combined.
- Chill the dough: Chilling the dough is crucial for preventing the cookies from spreading too much during baking and for developing the flavors.
- Don’t overbake the cookies: Overbaking the cookies will result in dry, crumbly cookies. Bake them until the edges are lightly golden brown and the centers are set.
- Let the cookies cool completely before dusting with powdered sugar: If you dust the cookies with powdered sugar while they are still warm, the powdered sugar will melt and disappear.
- Variations: You can add other ingredients to these cookies to customize them to your liking. Some popular variations include adding white chocolate chips, dried cranberries, or chopped nuts.
- Storage: Store the cookies in an airtight container at room temperature for up to 3 days.
- Freezing: You can freeze the cookie dough or the baked cookies. To freeze the cookie dough, scoop the dough into balls and place them on a baking sheet lined with parchment paper. Freeze for 30 minutes, or until solid. Then, transfer the frozen dough balls to a freezer bag and store in the freezer for up to 3 months. To bake the frozen cookie dough, simply bake as directed, adding a few extra minutes to the baking time. To freeze the baked cookies, let them cool completely and then place them in a freezer bag or airtight container. Store in the freezer for up to 3 months. Thaw the cookies at room temperature before serving.
Troubleshooting:
- Cookies are spreading too much: If your cookies are spreading too much, it could be due to several factors. First, make sure that your butter is not too soft. It should be softened, but not melted. Second, make sure that you are chilling the dough for at least 2 hours. Third, make sure that your oven is at the correct temperature. Finally, you can try adding a tablespoon or two of flour to the dough.
- Cookies are too dry: If your cookies are too dry, it could be due to overbaking. Make sure that you are not overbaking the cookies. Bake them until the edges are lightly golden brown and the centers are set. You can also try adding a tablespoon or two of milk or lemon juice to the dough.
- Cookies are too tough: If your cookies are too tough, it could be due to overmixing the dough. Mix the dough until just combined.
- Cookies are not flavorful enough: If your cookies are not flavorful enough, make sure that you are using high-quality ingredients. Use good quality butter, fresh lemon juice, and pure vanilla extract for the best results. You can also try adding more lemon zest to the dough.
Why These Cookies Are Special:
These Lemon Pixie Cookies are more than just a sweet treat; they’re a burst of sunshine in every bite! The combination of the tangy lemon flavor and the delicate sweetness of the powdered sugar creates a truly irresistible cookie. They’re perfect for any occasion, from a casual afternoon snack to a special celebration. Plus, they’re so easy to make, even a beginner baker can whip up a batch in no time. The bright, cheerful flavor makes them a crowd-pleaser, and they’re always a welcome addition to any cookie platter. I love making these for friends and family because they always bring a smile to everyone’s face. The slightly chewy texture and the melt-in-your-mouth goodness make them simply addictive. Trust me, once you try these Lemon Pixie Cookies, you’ll be hooked!
Serving Suggestions:
These cookies are delicious on their own, but they also pair well with a variety of beverages. Try serving them with a glass of cold milk, a cup of hot tea, or a refreshing lemonade. They’re also a great addition to a dessert platter or a gift basket. For a special treat, try sandwiching two cookies together with a layer of lemon curd or cream cheese frosting. You can also crumble them over ice cream or yogurt for a delicious topping.
Nutritional Information (approximate, per cookie):
Please note that the following nutritional information is an estimate and may vary depending on the specific ingredients used and portion sizes.
- Calories: 120
- Fat: 6g
- Saturated Fat: 4g
- Cholesterol: 30mg
- Sodium: 50mg
- Carbohydrates: 16g
- Sugar: 9g
- Protein: 1g
Enjoy your Lemon Pixie Cookies!
Conclusion:
And there you have it! These Lemon Pixie Cookies are more than just a sweet treat; they’re a burst of sunshine in every bite. I truly believe this recipe is a must-try for anyone who loves bright, citrusy flavors and a perfectly tender cookie. The combination of the zesty lemon, the delicate sweetness, and that melt-in-your-mouth texture is simply irresistible. I’ve made these for countless gatherings, and they’re always the first to disappear.
But why are these cookies so special? It’s the simplicity, really. The ingredients are straightforward, the steps are easy to follow, and the result is a cookie that tastes like it came from a high-end bakery. Plus, the vibrant lemon flavor is a welcome change from the usual chocolate chip or peanut butter fare. They’re perfect for brightening up a gloomy day or adding a touch of elegance to a special occasion.
Now, let’s talk about serving suggestions and variations because the possibilities are endless! These Lemon Pixie Cookies are fantastic on their own, of course, but they also pair beautifully with a variety of accompaniments. Imagine enjoying them with a scoop of vanilla bean ice cream on a warm summer evening. Or perhaps alongside a cup of Earl Grey tea for a sophisticated afternoon treat. They’re also wonderful crumbled over yogurt or used as a base for mini lemon cheesecakes.
If you’re feeling adventurous, you can easily adapt this recipe to suit your own tastes. Try adding a sprinkle of poppy seeds to the dough for a subtle textural contrast. Or, for an extra layer of flavor, incorporate a teaspoon of lemon extract along with the zest. You could even dip the cooled cookies in melted white chocolate and sprinkle them with chopped pistachios for a truly decadent treat. Another fun variation is to add a few drops of food coloring to the glaze to create colorful and festive cookies for holidays or parties. Think pastel pink for Valentine’s Day or vibrant green for St. Patrick’s Day!
For a more intense lemon flavor, you can also try using Meyer lemons instead of regular lemons. Meyer lemons are sweeter and less acidic, which will result in a cookie with a more nuanced citrus flavor. Just be sure to adjust the amount of sugar accordingly, as Meyer lemons are naturally sweeter.
I’m so excited for you to try this recipe and experience the joy of baking these delightful Lemon Pixie Cookies. I’ve poured my heart into perfecting this recipe, and I’m confident that you’ll love them as much as I do. Don’t be intimidated by baking; this recipe is truly foolproof. Just follow the instructions carefully, and you’ll be rewarded with a batch of cookies that are sure to impress.
So, what are you waiting for? Preheat your oven, gather your ingredients, and get ready to bake some magic! And most importantly, don’t forget to share your creations with me! I’d love to see your photos and hear about your experiences. Tag me on social media using #LemonPixieCookies or leave a comment below to let me know how they turned out. Happy baking, and I hope these cookies bring a little bit of sunshine into your day! I can’t wait to hear all about your Lemon Pixie Cookies adventures!
Lemon Pixie Cookies: A Zesty Delight You'll Love
Bright and cheerful Lemon Pixie Cookies, bursting with tangy lemon flavor and dusted with sweet powdered sugar. Easy to make and perfect for any occasion!
Ingredients
- 1 cup (2 sticks) unsalted butter, softened
- 1 ½ cups granulated sugar
- 2 large eggs
- ¼ cup lemon juice, freshly squeezed
- 2 teaspoons lemon zest, finely grated
- 1 teaspoon vanilla extract
- 3 cups all-purpose flour
- 1 teaspoon baking powder
- ½ teaspoon baking soda
- ¼ teaspoon salt
- ½ cup powdered sugar, for dusting
Instructions
- Cream the butter and sugar: In a large mixing bowl, cream together the softened butter and granulated sugar until light and fluffy (3-5 minutes). Scrape down the sides of the bowl.
- Incorporate the wet ingredients: Add the eggs one at a time, mixing well after each addition. Stir in the lemon juice, lemon zest, and vanilla extract.
- Combine the dry ingredients: In a separate medium bowl, whisk together the all-purpose flour, baking powder, baking soda, and salt.
- Gradually add the dry ingredients to the wet ingredients: Gradually add the dry ingredients to the wet ingredients, mixing on low speed until just combined. Be careful not to overmix the dough.
- Chill the dough: Wrap the dough tightly in plastic wrap and chill in the refrigerator for at least 2 hours, or preferably overnight.
- Preheat the oven: Preheat your oven to 350°F (175°C). Line baking sheets with parchment paper.
- Shape the cookies: Remove the chilled dough from the refrigerator. Using a cookie scoop or a spoon, scoop out rounded tablespoons of dough and roll them into balls. If the dough is too sticky to handle, you can lightly flour your hands.
- Bake the cookies: Place the cookie dough balls onto the prepared baking sheets, leaving about 2 inches between each cookie to allow for spreading. Bake for 10-12 minutes, or until the edges are lightly golden brown and the centers are set.
- Cool the cookies: Remove the baking sheets from the oven and let the cookies cool on the baking sheets for a few minutes before transferring them to a wire rack to cool completely.
- Dust with powdered sugar: Once the cookies are completely cool, dust them generously with powdered sugar.
Notes
- Use high-quality ingredients for the best flavor.
- Don’t overmix the dough.
- Chilling the dough is crucial.
- Don’t overbake the cookies.
- Let the cookies cool completely before dusting with powdered sugar.
- Store the cookies in an airtight container at room temperature for up to 3 days.
- You can freeze the cookie dough or the baked cookies.

Leave a Comment