
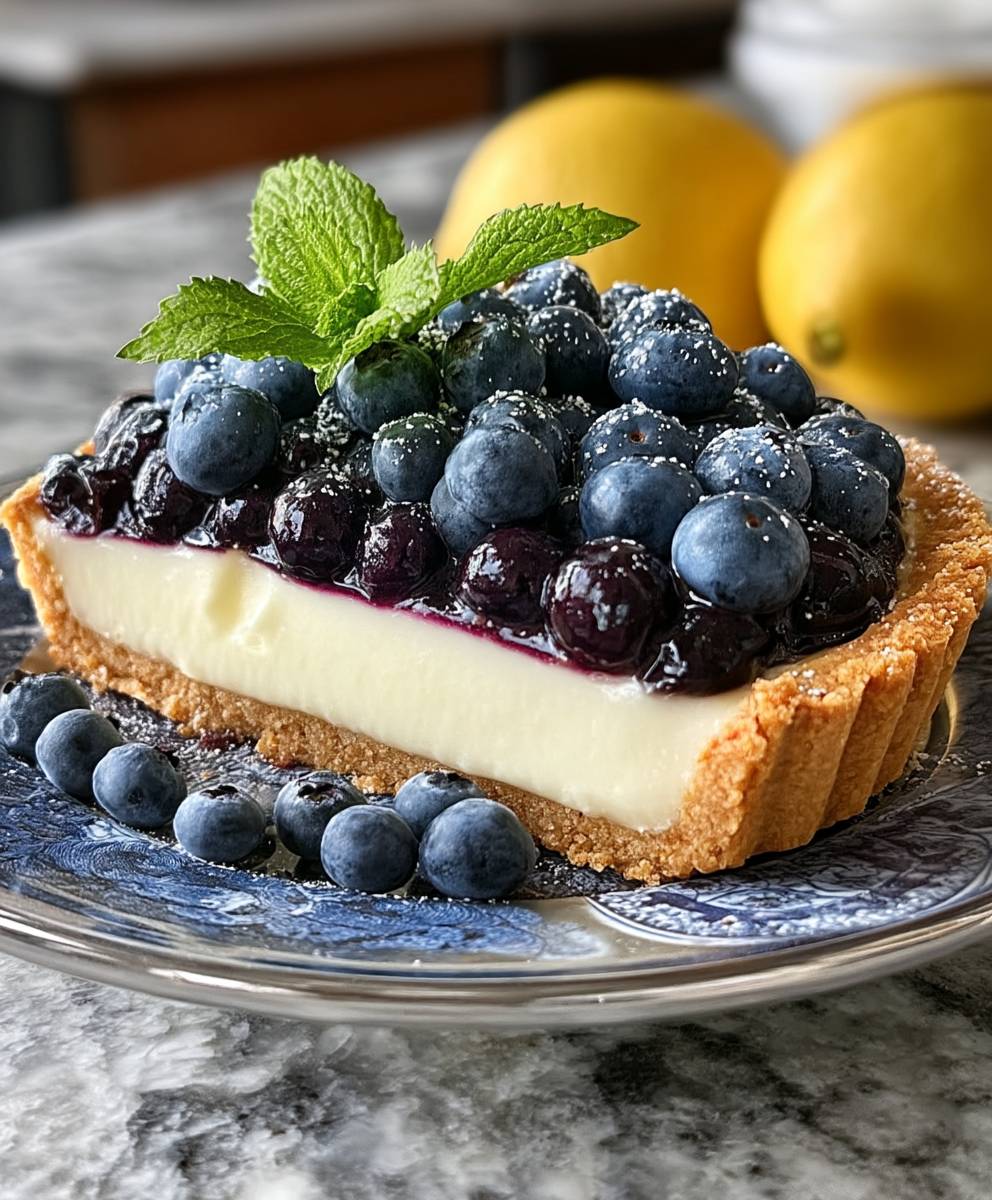
Lemon Blueberry Tart: Prepare to be transported to a sun-drenched summer afternoon with every single bite of this delightful dessert! Imagine the bright, tangy burst of lemon perfectly complementing the sweet, juicy pop of blueberries, all nestled in a buttery, flaky crust. It’s a symphony of flavors and textures that will leave you craving more.
Tarts, in general, have a rich history, dating back to ancient Rome. While the exact origins of the Lemon Blueberry Tart are a bit more modern, it draws inspiration from classic fruit tarts enjoyed throughout Europe and America. The combination of lemon and blueberries, however, feels particularly American, evoking images of summer picnics and Fourth of July celebrations.
What makes this Lemon Blueberry Tart so irresistible? It’s the perfect balance of sweet and tart, the creamy smoothness of the lemon filling against the slight resistance of the blueberries, and the satisfying crunch of the crust. It’s elegant enough for a special occasion but simple enough to whip up for a casual gathering. Plus, the vibrant colors make it a stunning centerpiece for any table. I find that people love this tart because it’s both comforting and refreshing, a truly versatile dessert that appeals to everyone.

Ingredients:
- For the Crust:
- 1 ½ cups all-purpose flour
- ½ cup (1 stick) unsalted butter, cold and cubed
- ¼ cup granulated sugar
- ¼ teaspoon salt
- 4-6 tablespoons ice water
- For the Lemon Filling:
- 1 cup granulated sugar
- ¼ cup all-purpose flour
- ¼ teaspoon salt
- 1 cup heavy cream
- 4 large egg yolks
- ½ cup freshly squeezed lemon juice (from about 3-4 lemons)
- 2 tablespoons lemon zest
- 2 tablespoons unsalted butter, cut into small pieces
- For the Blueberry Topping:
- 2 cups fresh blueberries, rinsed and patted dry
- 2 tablespoons granulated sugar
- 1 tablespoon lemon juice
- 1 teaspoon cornstarch
- Optional:
- Powdered sugar, for dusting
- Fresh mint sprigs, for garnish
Making the Tart Crust
- Combine Dry Ingredients: In a large bowl, whisk together the flour, sugar, and salt. This ensures the salt and sugar are evenly distributed throughout the flour, which is crucial for a consistent crust.
- Cut in the Butter: Add the cold, cubed butter to the flour mixture. Using a pastry blender or your fingertips, cut the butter into the flour until the mixture resembles coarse crumbs. The key here is to work quickly and keep the butter cold. If the butter gets too warm, it will melt and the crust will be tough. You should see small pieces of butter still visible in the mixture.
- Add Ice Water: Gradually add the ice water, one tablespoon at a time, mixing gently after each addition. Continue adding water until the dough just comes together. Be careful not to overmix, as this will develop the gluten in the flour and result in a tough crust. The dough should be slightly shaggy but hold together when pressed.
- Form the Dough: Turn the dough out onto a lightly floured surface and gently form it into a disc. Wrap the disc tightly in plastic wrap and refrigerate for at least 30 minutes, or up to 2 hours. This chilling time allows the gluten to relax, making the crust easier to roll out and preventing it from shrinking during baking.
- Roll Out the Dough: On a lightly floured surface, roll out the chilled dough into a 12-inch circle. The dough should be about 1/8 inch thick. If the dough is sticking to the surface, sprinkle a little more flour underneath.
- Transfer to Tart Pan: Carefully transfer the rolled-out dough to a 9-inch tart pan with a removable bottom. Gently press the dough into the bottom and up the sides of the pan. Make sure the dough is evenly distributed and there are no air pockets.
- Trim and Crimp the Edges: Trim any excess dough from the edges of the pan. You can use a rolling pin to roll over the top of the pan, or simply trim the dough with a knife. Crimp the edges of the crust using a fork or your fingers to create a decorative border. This will also help to prevent the crust from shrinking during baking.
- Pre-Bake the Crust: Preheat your oven to 375°F (190°C). Line the tart crust with parchment paper and fill it with pie weights or dried beans. This will prevent the crust from puffing up during baking. Bake for 15-20 minutes, or until the edges are lightly golden brown.
- Remove Weights and Bake Again: Remove the parchment paper and pie weights. Return the crust to the oven and bake for another 5-10 minutes, or until the bottom of the crust is golden brown. This second bake ensures that the crust is fully cooked and will not be soggy when filled.
- Cool Completely: Remove the tart crust from the oven and let it cool completely on a wire rack before filling.
Preparing the Lemon Filling
- Whisk Dry Ingredients: In a medium saucepan, whisk together the sugar, flour, and salt. This step is important to ensure that the flour is evenly distributed and will not clump when the wet ingredients are added.
- Combine Wet Ingredients: In a separate bowl, whisk together the heavy cream and egg yolks. The heavy cream adds richness and the egg yolks provide structure and a beautiful yellow color to the filling.
- Temper the Egg Yolks: Gradually whisk the cream and egg yolk mixture into the dry ingredients in the saucepan. Whisk constantly to prevent the egg yolks from scrambling.
- Cook the Filling: Place the saucepan over medium heat and cook, stirring constantly, until the mixture thickens and comes to a simmer. This should take about 5-7 minutes. Be patient and continue stirring to prevent the filling from sticking to the bottom of the pan.
- Remove from Heat: Remove the saucepan from the heat and stir in the lemon juice, lemon zest, and butter. The lemon juice adds the characteristic tartness of the filling, while the lemon zest provides a bright, citrusy aroma. The butter adds richness and shine.
- Strain the Filling: Pour the lemon filling through a fine-mesh sieve into a bowl. This will remove any lumps and ensure a smooth, creamy texture.
- Cool Slightly: Let the lemon filling cool slightly for about 10-15 minutes before pouring it into the prepared tart crust. This will prevent the crust from becoming soggy.
Assembling the Tart
- Pour in the Filling: Pour the slightly cooled lemon filling into the cooled tart crust. Spread the filling evenly to ensure a uniform layer.
- Refrigerate: Cover the tart with plastic wrap, pressing it gently onto the surface of the filling to prevent a skin from forming. Refrigerate for at least 2 hours, or preferably overnight, to allow the filling to set completely.
Making the Blueberry Topping
- Combine Blueberries and Sugar: In a medium bowl, combine the blueberries and sugar. Gently toss to coat the blueberries evenly with the sugar.
- Add Lemon Juice and Cornstarch: Add the lemon juice and cornstarch to the blueberry mixture. The lemon juice enhances the flavor of the blueberries, while the cornstarch helps to thicken the sauce.
- Cook the Topping: Pour the blueberry mixture into a small saucepan and cook over medium heat, stirring occasionally, until the blueberries have softened and the sauce has thickened. This should take about 5-7 minutes.
- Cool Slightly: Remove the saucepan from the heat and let the blueberry topping cool slightly before spooning it over the tart.
Finishing Touches
- Arrange the Topping: Spoon the cooled blueberry topping over the chilled lemon filling. You can arrange the blueberries in a decorative pattern, or simply spread them evenly over the surface.
- Chill Again (Optional): If desired, chill the tart for another 30 minutes to allow the blueberry topping to set slightly.
- Garnish and Serve: Before serving, dust the tart with powdered sugar and garnish with fresh mint sprigs, if desired. This adds a touch of elegance and freshness to the presentation.
- Serving Suggestions: Slice the tart into wedges and serve chilled. This Lemon Blueberry Tart is perfect for dessert, brunch, or any special occasion. Enjoy!
Conclusion:
This Lemon Blueberry Tart isn’t just a dessert; it’s a burst of sunshine on a plate, a symphony of flavors that will leave you craving more. The tangy lemon curd perfectly complements the sweet, juicy blueberries, all nestled in a buttery, crumbly crust. It’s the kind of treat that elevates any occasion, from a casual brunch to a sophisticated dinner party. Trust me, once you take that first bite, you’ll understand why I’m so passionate about this recipe.
But what truly makes this tart a must-try is its versatility. While it’s absolutely divine as is, there are so many ways to customize it to your liking. For a richer, more decadent experience, try adding a layer of mascarpone cheese between the crust and the lemon curd. The creamy texture and subtle sweetness of the mascarpone will create an unforgettable flavor combination. Alternatively, if you’re looking for a lighter option, you can substitute the traditional pastry crust with a graham cracker crust. This will give the tart a delightful crunch and a slightly different flavor profile.
Serving suggestions? The possibilities are endless! A dollop of freshly whipped cream or a scoop of vanilla ice cream are classic pairings that never disappoint. For a more sophisticated touch, consider garnishing the tart with a few sprigs of fresh mint or a sprinkle of powdered sugar. And if you’re feeling adventurous, why not try drizzling a bit of blueberry compote over the top? The extra burst of blueberry flavor will take this tart to the next level.
Beyond the variations and serving suggestions, the real magic of this recipe lies in its simplicity. It’s surprisingly easy to make, even for beginner bakers. The ingredients are readily available, and the instructions are straightforward and easy to follow. Plus, the aroma that fills your kitchen as the tart bakes is simply intoxicating. It’s a sensory experience that will bring joy to your heart and a smile to your face.
I truly believe that everyone should have this Lemon Blueberry Tart recipe in their repertoire. It’s a crowd-pleaser, a guaranteed success, and a surefire way to impress your friends and family. So, what are you waiting for? Gather your ingredients, preheat your oven, and get ready to embark on a baking adventure.
I’m so excited for you to try this recipe and experience the magic for yourself. And once you do, I’d love to hear about your experience! Did you make any variations? What did your friends and family think? Share your photos and stories in the comments below. Let’s create a community of tart-loving bakers who are passionate about sharing delicious food and creating lasting memories. Happy baking!
Lemon Blueberry Tart: A Delicious & Easy Recipe
A bright Lemon Blueberry Tart with buttery crust, tangy lemon filling, and sweet blueberry topping. Perfect for any occasion!
Ingredients
- 1 ½ cups all-purpose flour
- ½ cup (1 stick) unsalted butter, cold and cubed
- ¼ cup granulated sugar
- ¼ teaspoon salt
- 4-6 tablespoons ice water
- 1 cup granulated sugar
- ¼ cup all-purpose flour
- ¼ teaspoon salt
- 1 cup heavy cream
- 4 large egg yolks
- ½ cup freshly squeezed lemon juice (from about 3-4 lemons)
- 2 tablespoons lemon zest
- 2 tablespoons unsalted butter, cut into small pieces
- 2 cups fresh blueberries, rinsed and patted dry
- 2 tablespoons granulated sugar
- 1 tablespoon lemon juice
- 1 teaspoon cornstarch
- Powdered sugar, for dusting
- Fresh mint sprigs, for garnish
Instructions
- In a large bowl, whisk together the flour, sugar, and salt.
- Add the cold, cubed butter to the flour mixture. Using a pastry blender or your fingertips, cut the butter into the flour until the mixture resembles coarse crumbs. Work quickly and keep the butter cold.
- Gradually add the ice water, one tablespoon at a time, mixing gently after each addition. Continue adding water until the dough just comes together. Be careful not to overmix.
- Turn the dough out onto a lightly floured surface and gently form it into a disc. Wrap the disc tightly in plastic wrap and refrigerate for at least 30 minutes, or up to 2 hours.
- On a lightly floured surface, roll out the chilled dough into a 12-inch circle, about 1/8 inch thick.
- Carefully transfer the rolled-out dough to a 9-inch tart pan with a removable bottom. Gently press the dough into the bottom and up the sides of the pan.
- Trim any excess dough from the edges of the pan. Crimp the edges of the crust using a fork or your fingers to create a decorative border.
- Preheat your oven to 375°F (190°C). Line the tart crust with parchment paper and fill it with pie weights or dried beans. Bake for 15-20 minutes, or until the edges are lightly golden brown.
- Remove the parchment paper and pie weights. Return the crust to the oven and bake for another 5-10 minutes, or until the bottom of the crust is golden brown.
- Remove the tart crust from the oven and let it cool completely on a wire rack before filling.
- In a medium saucepan, whisk together the sugar, flour, and salt.
- In a separate bowl, whisk together the heavy cream and egg yolks.
- Gradually whisk the cream and egg yolk mixture into the dry ingredients in the saucepan. Whisk constantly to prevent the egg yolks from scrambling.
- Place the saucepan over medium heat and cook, stirring constantly, until the mixture thickens and comes to a simmer. This should take about 5-7 minutes.
- Remove the saucepan from the heat and stir in the lemon juice, lemon zest, and butter.
- Pour the lemon filling through a fine-mesh sieve into a bowl.
- Let the lemon filling cool slightly for about 10-15 minutes before pouring it into the prepared tart crust.
- Pour the slightly cooled lemon filling into the cooled tart crust. Spread the filling evenly.
- Cover the tart with plastic wrap, pressing it gently onto the surface of the filling to prevent a skin from forming. Refrigerate for at least 2 hours, or preferably overnight, to allow the filling to set completely.
- In a medium bowl, combine the blueberries and sugar. Gently toss to coat the blueberries evenly with the sugar.
- Add the lemon juice and cornstarch to the blueberry mixture.
- Pour the blueberry mixture into a small saucepan and cook over medium heat, stirring occasionally, until the blueberries have softened and the sauce has thickened. This should take about 5-7 minutes.
- Remove the saucepan from the heat and let the blueberry topping cool slightly before spooning it over the tart.
- Spoon the cooled blueberry topping over the chilled lemon filling.
- If desired, chill the tart for another 30 minutes to allow the blueberry topping to set slightly.
- Before serving, dust the tart with powdered sugar and garnish with fresh mint sprigs, if desired.
- Slice the tart into wedges and serve chilled.
Notes
- Keep the butter cold when making the crust to ensure a flaky texture.
- Don’t overmix the crust dough, as this will develop the gluten and result in a tough crust.
- Use pie weights or dried beans when pre-baking the crust to prevent it from puffing up.
- Strain the lemon filling to remove any lumps and ensure a smooth, creamy texture.
- Refrigerate the tart for at least 2 hours, or preferably overnight, to allow the filling to set completely.

Leave a Comment