
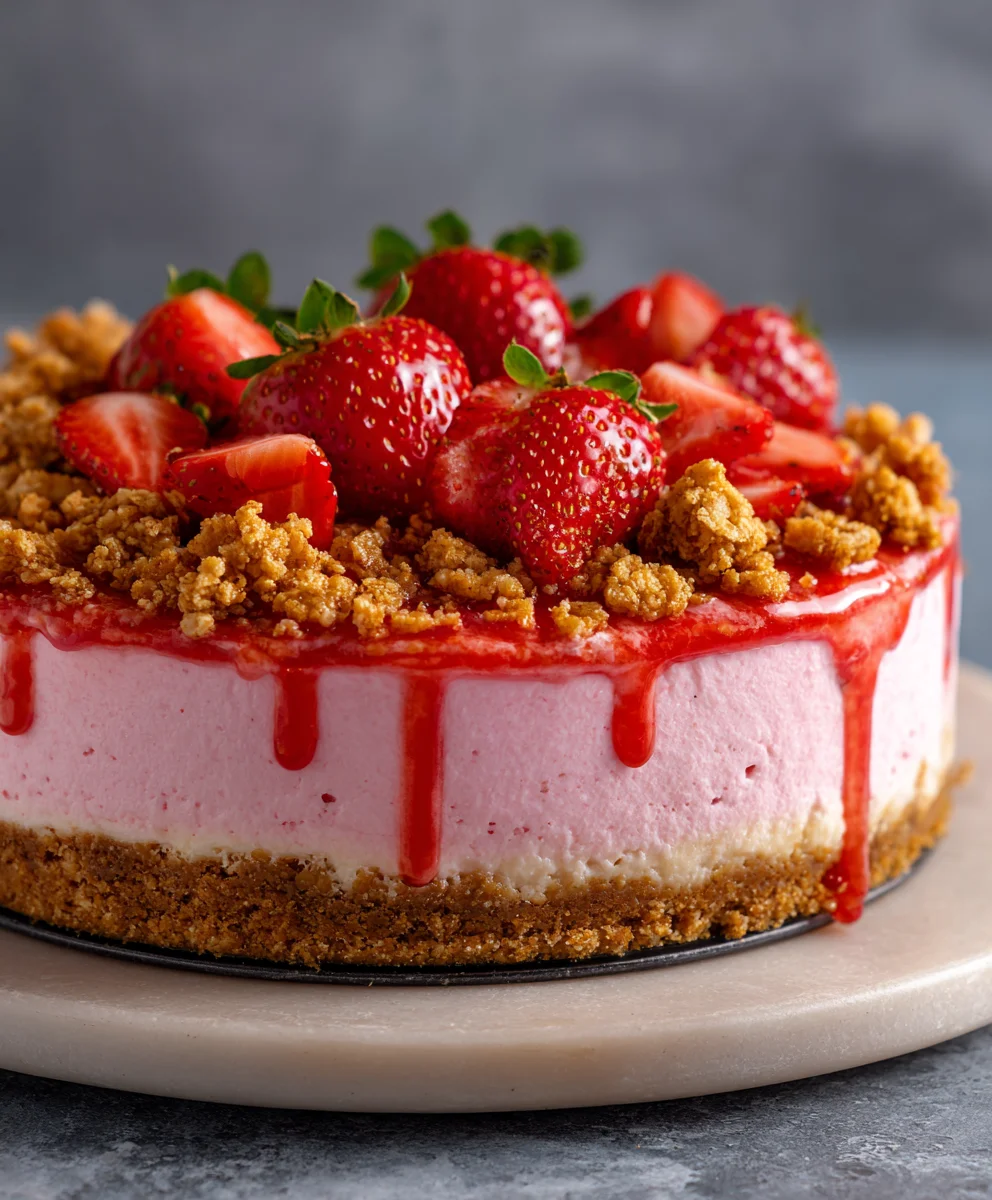
Pink Strawberry Crunch Cheesecake is not merely a dessert; it is an experience, a delightful fusion of classic comfort and whimsical charm that promises to captivate both the eye and the palate. Imagine sinking your fork into a luxurious, velvety-smooth cheesecake, only to encounter a joyous explosion of sweet, crisp strawberry crunch in the very next bite. This is the magic we’re about to uncover, a culinary journey that marries elegance with playful nostalgia.
While the beloved cheesecake boasts a rich history dating back to ancient Greece, this particular rendition takes a vibrant, modern leap. It cleverly reinterprets the nostalgic joy of classic ice cream truck crunch bars, transforming them into an elegant, yet fun, topping for a sophisticated dessert. People adore this dish for its irresistible contrast: the rich, tangy creaminess of the cheesecake base harmonizes exquisitely with the sweet, crumbly texture of the strawberry crunch. Its captivating pink hue makes it an instant showstopper, perfect for celebrations, gatherings, or simply elevating an ordinary evening into something special. I believe you’ll find that the combination of familiar flavors with an exciting textural twist makes this Pink Strawberry Crunch Cheesecake an unforgettable treat.

Ingredients:
-
For the Graham Cracker Crust:
- 1 ½ cups (approximately 170g) finely crushed graham cracker crumbs (about 12 full sheets)
- ¼ cup (50g) granulated sugar
- ½ cup (113g) unsalted butter, melted
- A pinch of salt (optional, but I always find it enhances the flavor!)
-
For the Pink Strawberry Cheesecake Filling:
- 32 ounces (approximately 900g) full-fat cream cheese, softened to room temperature (that’s four 8-ounce blocks for us)
- 1 ½ cups (300g) granulated sugar
- 1 tablespoon all-purpose flour (this little secret helps prevent cracks!)
- 1 cup (240g) sour cream, full-fat, at room temperature
- 2 teaspoons pure vanilla extract
- ¼ cup (60ml) heavy cream (for an extra silky texture)
- ½ cup (about 120g) strawberry puree (I make this from fresh or frozen strawberries, blended until smooth and then strained to remove seeds)
- 3 large eggs, at room temperature
- 1 large egg yolk, at room temperature (for richness and a denser set)
- A few drops of red or pink gel food coloring (optional, but highly recommended for that signature pink hue!)
-
For the Strawberry Crunch Topping:
- 1 ½ cups (approximately 150g) Golden Oreo cookies, crushed into fine crumbs (about 15-18 cookies, cream filling included)
- 1 cup (approximately 28g) freeze-dried strawberries, finely crushed (you can use a food processor or a bag and rolling pin)
- ½ cup (113g) unsalted butter, melted
- ¼ cup (25g) all-purpose flour (helps bind and crisp)
- 2 tablespoons granulated sugar
- A pinch of salt
- Optional: 2 tablespoons white chocolate chips, melted (to help bind the crunch and add a touch of sweetness)
-
For Garnish (Optional but highly encouraged!):
- 1 cup (240ml) heavy cream, chilled
- 2 tablespoons powdered sugar
- ½ teaspoon vanilla extract
- Fresh strawberries, sliced or whole
Preparing the Strawberry Crunch Topping: The Heart of Our Pink Strawberry Crunch Cheesecake
- Gather Your Crunch Ingredients: Before we dive into the cheesecake, let’s get our glorious strawberry crunch topping ready. I like to start here because it needs to cool completely. Grab your Golden Oreos and your freeze-dried strawberries.
- Crush Those Golden Oreos: In a food processor, pulse the Golden Oreo cookies until they resemble fine crumbs. If you don’t have a food processor, no worries! Place them in a large Ziploc bag and crush them with a rolling pin or the bottom of a heavy pan until they are uniformly fine. Transfer these crumbs to a medium-sized bowl.
- Pulverize Freeze-Dried Strawberries: Next, take your freeze-dried strawberries and, using the same food processor (no need to clean it if you just used it for cookies!) or a separate Ziploc bag, crush them into a fine powder. This is where the vibrant strawberry flavor and natural pink color for our crunch come from. Add these powdered strawberries to the bowl with the Golden Oreo crumbs.
- Combine Dry Crunch Ingredients: To the bowl of crushed cookies and strawberries, add the ¼ cup of all-purpose flour, 2 tablespoons of granulated sugar, and a pinch of salt. Give everything a good stir with a fork or whisk to ensure it’s evenly combined.
- Add Melted Butter and Optional White Chocolate: Pour the ½ cup of melted unsalted butter over the dry mixture. If you’re using the optional melted white chocolate, add it now. Stir with a spoon until everything is thoroughly moistened and clumps together. It should feel like wet sand.
- Bake for Optimal Crunch: Spread the mixture evenly onto a baking sheet lined with parchment paper. I like to break up any large clumps to ensure even baking. Bake in a preheated oven at 300°F (150°C) for about 10-15 minutes, stirring halfway through. You’re looking for a lightly toasted, golden-brown color and a wonderfully fragrant aroma. The flour helps it crisp up without getting too dark too fast.
- Cool Completely: Remove the crunch topping from the oven and let it cool completely on the baking sheet. As it cools, it will crisp up even more. Once cool, gently break up any large clusters and set aside. This step is crucial for the perfect texture of your “Pink Strawberry Crunch Cheesecake.”
Crafting the Graham Cracker Crust: The Foundation of Flavor
- Preheat and Prep: Begin by preheating your oven to 350°F (175°C). Lightly grease a 9-inch springform pan. For cheesecake, I always recommend wrapping the outside of the springform pan tightly with heavy-duty aluminum foil. I usually use two layers, extending all the way up the sides, to prevent any water from seeping in during the water bath later.
- Crush Graham Crackers: In a food processor, pulse the graham crackers until they are finely ground into crumbs. Alternatively, place them in a large Ziploc bag and crush them with a rolling pin until uniformly fine. Transfer the crumbs to a medium bowl.
- Mix the Crust: Add the ¼ cup of granulated sugar and the pinch of salt to the graham cracker crumbs. Stir to combine. Then, pour in the ½ cup of melted unsalted butter. Mix thoroughly with a fork until all the crumbs are moistened and resemble wet sand.
- Press into Pan: Pour the crumb mixture into the prepared springform pan. Using the bottom of a flat-bottomed glass or your fingers, press the mixture firmly and evenly onto the bottom and slightly up the sides of the pan. I like to aim for about an inch up the sides. A well-pressed crust is essential for a sturdy base that won’t crumble when you slice your “Pink Strawberry Crunch Cheesecake.”
- Pre-bake for Sturdiness: Bake the crust in the preheated oven for 10-12 minutes, or until lightly golden brown and fragrant. This pre-baking step helps the crust set and prevents it from becoming soggy under the cheesecake filling.
- Cool Down: Remove the crust from the oven and place it on a wire rack to cool completely while you prepare the cheesecake filling.
Whipping Up the Pink Strawberry Crunch Cheesecake Filling: The Creamy Star
- Room Temperature is Key: This is arguably the most important step for a smooth, lump-free cheesecake! Ensure your cream cheese, sour cream, eggs, and egg yolk are all at room temperature. I usually take them out of the fridge at least 1-2 hours before I plan to bake. Cold ingredients don’t emulsify properly and can lead to a lumpy filling.
- Prepare Strawberry Puree: If you haven’t already, prepare your strawberry puree. Blend fresh or frozen (thawed) strawberries until completely smooth. For the silkiest texture, I always press the puree through a fine-mesh sieve to remove any seeds. This yields a beautiful, seedless base for our pink cheesecake.
- Cream the Cream Cheese: In the bowl of a stand mixer fitted with the paddle attachment (or using a large bowl and a hand mixer), beat the softened cream cheese on low speed for about 2-3 minutes until it’s completely smooth and creamy, with no lumps visible. Make sure to scrape down the sides and bottom of the bowl frequently to ensure everything is incorporated.
- Add Sugar and Flour: Gradually add the 1 ½ cups of granulated sugar to the cream cheese, beating on medium-low speed. Continue to beat until the mixture is light and fluffy, about 3-4 minutes, again scraping down the bowl as needed. Then, sprinkle in the 1 tablespoon of all-purpose flour and mix until just combined. The flour helps prevent cracking by providing a little extra structure.
- Incorporate Wet Ingredients: Add the sour cream, vanilla extract, and heavy cream to the mixture. Beat on low speed until just combined. Don’t overmix at this stage; we want to keep air incorporation to a minimum to avoid cracks during baking.
- Stir in Strawberry Puree and Coloring: Gently fold in the ½ cup of strawberry puree. Now, if you want that truly vibrant “Pink Strawberry Crunch Cheesecake” color, add a few drops of red or pink gel food coloring. Mix until the color is evenly distributed throughout the filling. I usually add a little at a time until I achieve my desired shade of pink.
- Add Eggs Gradually: In a separate small bowl, lightly whisk the 3 large eggs and 1 large egg yolk. With the mixer on the lowest speed, slowly pour the egg mixture into the cream cheese mixture. Mix only until just combined. Overmixing after the eggs are added can incorporate too much air, which can cause the cheesecake to puff up too much during baking and then crack as it cools. Scrape down the bowl one last time to ensure everything is perfectly blended. You now have a gorgeous, smooth pink cheesecake batter!
Baking the Pink Strawberry Crunch Cheesecake: The Path to Perfection
- Prepare for Water Bath: Increase oven temperature to 325°F (160°C). If you haven’t already, make sure your springform pan with the cooled crust is wrapped very securely with two layers of heavy-duty aluminum foil on the outside. This is to prevent water from the water bath from seeping in and making your crust soggy.
- Pour the Filling: Carefully pour the prepared pink strawberry cheesecake filling into the cooled graham cracker crust. Gently tap the pan a few times on the counter to release any large air bubbles.
- Set Up the Water Bath: Place the foil-wrapped springform pan into a larger roasting pan. Carefully pour hot (not boiling, just very hot tap water) water into the roasting pan until it comes about halfway up the sides of the springform pan. The water bath provides a moist, even heat that helps the cheesecake bake slowly and prevents cracking, ensuring a smooth, creamy texture.
- Bake the Cheesecake: Carefully transfer the roasting pan with the cheesecake to the preheated oven. Bake for 60-75 minutes. The baking time can vary, so you’ll want to look for specific signs of doneness. The edges of the cheesecake should appear set, but the very center (about a 2-inch circle) should still have a slight jiggle when you gently shake the pan. Avoid opening the oven door too frequently during baking.
- Cool Gradually (Crucial for No Cracks!): Once the cheesecake is done, turn off the oven, but leave the cheesecake inside with the oven door ajar for 1 hour. This slow cooling prevents drastic temperature changes that can lead to cracks.
- Finish Cooling and Chill: After an hour, carefully remove the cheesecake from the water bath (be careful, the water will still be warm!) and remove the foil. Place the cheesecake on a wire rack to cool completely at room temperature for another 1-2 hours. Once it’s completely cool to the touch, cover the springform pan loosely with plastic wrap and refrigerate for at least 6 hours, or preferably overnight. A well-chilled “Pink Strawberry Crunch Cheesecake” is a happy cheesecake!
Assembling the Pink Strawberry Crunch Cheesecake: The Grand Finale
- Release from Pan: Once your cheesecake is thoroughly chilled, carefully run a thin knife or offset spatula around the edge of the cheesecake to loosen it from the springform pan. Unclasp and remove the sides of the pan. You can leave the cheesecake on the base for serving or carefully transfer it to a serving platter.
- Apply the Strawberry Crunch: Now for the moment we’ve been waiting for! Take your cooled strawberry crunch topping. Gently press some of the crunch around the sides of the cheesecake. I find it easiest to use my hands for this, softly pushing the crumbs onto the vertical edges. Then, generously sprinkle the remaining crunch topping over the top of the cheesecake. Don’t be shy; this is what makes our “Pink Strawberry Crunch Cheesecake” so special!
- Prepare Optional Whipped Cream: If you’re adding whipped cream, in a cold bowl, whip the chilled heavy cream, powdered sugar, and vanilla extract with an electric mixer on high speed until stiff peaks form.
- Garnish and Serve: You can pipe dollops of whipped cream around the edge of the cheesecake or spread a thin layer on top before adding the crunch. Arrange fresh strawberry slices or whole strawberries attractively on top or around the base.
- Final Chill (Optional): If you’ve added whipped cream, a quick 30-minute chill before serving can help it set nicely. Then, slice and serve this magnificent “Pink Strawberry Crunch Cheesecake” to rave reviews! I like to use a sharp knife warmed under hot water for clean slices.
Conclusion:
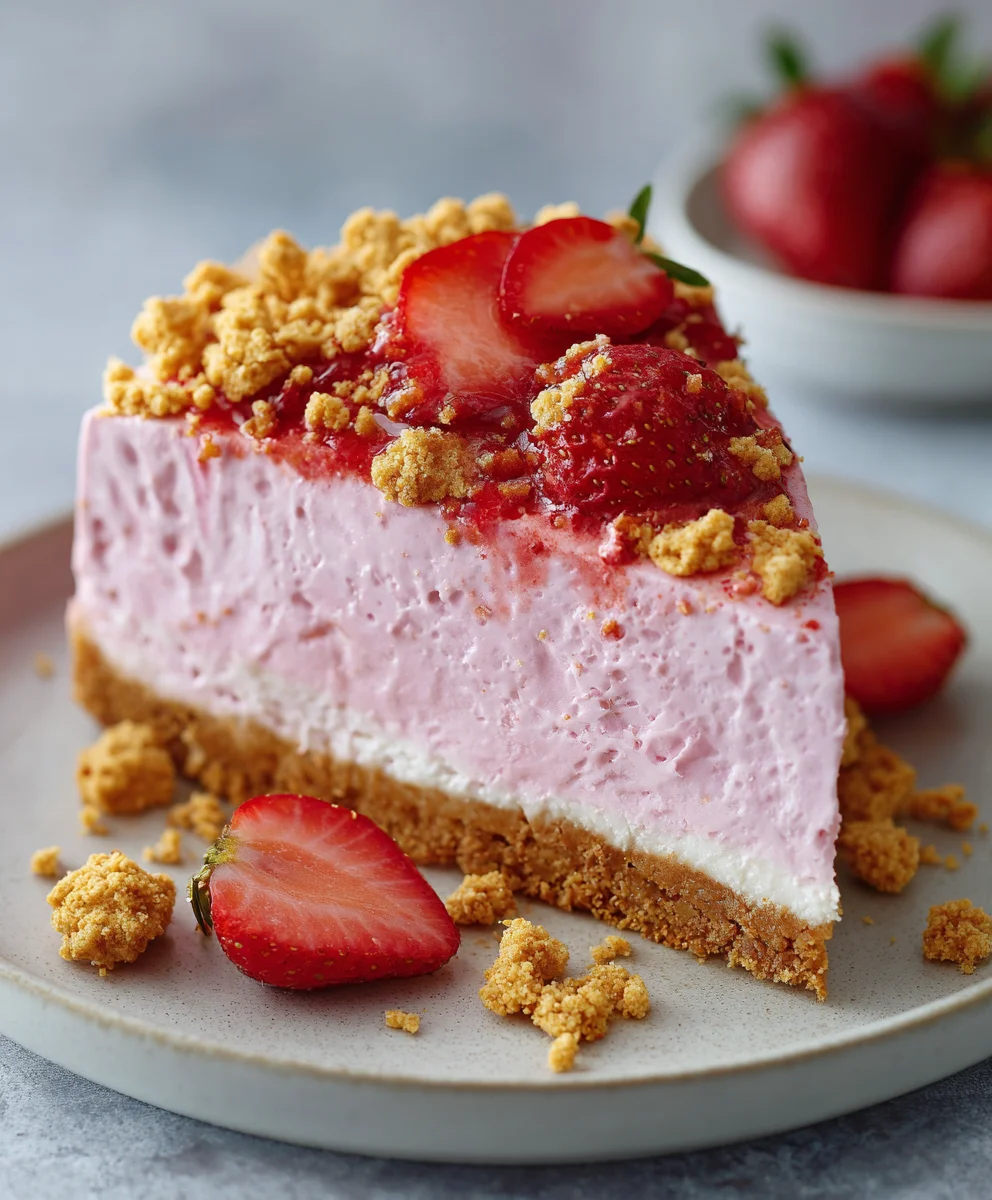
Well, my friends, we’ve reached the sweet finale of our culinary journey, and I genuinely hope you’re feeling as excited as I am about this incredible recipe. What makes this particular dessert an absolute game-changer, a true centerpiece for any occasion, is its masterful blend of textures and flavors. We’re talking about a luxuriously smooth, velvety cheesecake base that simply melts in your mouth, perfectly balanced by the vibrant, sweet-tart burst of fresh strawberries. But the real magic, the element that elevates it from merely delicious to utterly unforgettable, is that signature crunch. That delightful crumble on top isn’t just an afterthought; it’s a textural symphony, providing an exciting counterpoint to the creamy filling. It’s not just a dessert; it’s an experience, a joyous celebration of taste and texture that will leave everyone at your table asking for more. Trust me when I say, this isn’t just another cheesecake recipe; it’s the recipe you’ll want to master and share.
Unforgettable Serving Suggestions to Elevate Your Creation
Once your masterpiece, the Pink Strawberry Crunch Cheesecake, has chilled to perfection and is ready to impress, consider how you’ll present it. Presentation can truly enhance the entire experience! My personal favorite way to serve a slice is alongside a generous dollop of freshly whipped cream, lightly sweetened with a hint of vanilla, and then garnished with a few perfectly ripe, vibrant red whole strawberries or thinly sliced fanned strawberries. The freshness of the berries cuts through the richness beautifully. For an extra touch of decadence, a drizzle of homemade strawberry coulis, made from gently simmered strawberries and a touch of sugar, can add another layer of intense fruit flavor and a beautiful sheen. If you’re feeling particularly fancy, a scattering of finely chopped pistachios could introduce an unexpected, yet delightful, nutty crunch and a pop of green color, contrasting beautifully with the pink. Another fantastic option, especially for summer gatherings, is to serve it with a small scoop of high-quality vanilla bean ice cream or even a scoop of refreshing strawberry sorbet, allowing for a delightful play between warm and cold, creamy and icy. Don’t forget a simple dusting of powdered sugar over the plate for an elegant finish. Each of these suggestions aims to complement the cheesecake without overpowering its intrinsic charm, making every bite a moment to savor, truly making it Instagram-worthy!
Get Creative: Variations to Make it Uniquely Yours
While the classic version is undeniably stellar, there’s always room for personal touches and creative twists! If you’re looking to explore variations, consider changing the fruit. A raspberry crunch cheesecake would be equally stunning, offering a slightly tangier profile, or perhaps a mixed berry crunch, utilizing blueberries and blackberries alongside strawberries for a complex berry medley. You could also experiment with the crunch topping itself. Instead of the classic shortbread-like crumble, try using crushed vanilla wafers mixed with melted white chocolate for a different kind of sweet crisp, or even a chocolate cookie crumble for a richer, more intense flavor profile. For individual servings, try baking them in muffin tins lined with paper cups for adorable mini cheesecakes, perfect for parties or portion control. These smaller versions also chill faster and are a breeze to serve. Another fun idea is to layer the cheesecake mixture with fresh fruit and crunch in elegant glasses to create stunning parfaits that are visually appealing and easy to eat. Don’t be afraid to experiment with extracts too; a touch of almond extract in the crust or cream cheese filling can add an unexpected depth of flavor. The beauty of this recipe lies in its versatility, allowing you to adapt it to your preferences and seasonal availability, truly making it your signature dessert.
So, my fellow bakers, now it’s your turn. I truly, deeply encourage you to set aside some time, gather your ingredients, and embark on the joyous journey of creating this spectacular dessert. This isn’t just a recipe; it’s an invitation to create memories, to bring smiles to faces, and to savor the simple pleasure of a truly exceptional homemade treat. Once you’ve brought this beautiful creation to life, I would absolutely love to hear about your experience. Did you add any unique twists? What was the crowd’s reaction? Please, don’t hesitate to share your photos and stories with me. Your feedback and culinary adventures inspire me greatly. Go forth, bake with passion, and enjoy every single delightful bite of what I promise will be one of the best cheesecakes you’ve ever made. Happy baking!
Irresistible Pink Strawberry Crunch Cheesecake Delight
Pink Strawberry Crunch Cheesecake is not merely a dessert; it is an experience, a delightful fusion of classic comfort and whimsical charm that promises to captivate both the eye and the palate. Imagine sinking your fork into a luxurious, velvety-smooth cheesecake, only to encounter a joyous explosion of sweet, crisp strawberry crunch in the very next bite. This is the magic we’re about to uncover, a culinary journey that marries elegance with playful nostalgia.
Ingredients
-
1 ½ cups (170g) finely crushed graham cracker crumbs
-
¼ cup (50g) granulated sugar
-
½ cup (113g) unsalted butter, melted
-
Pinch of salt
-
32 ounces (900g) cream cheese, softened
-
1 ½ cups (300g) granulated sugar
-
1 tablespoon all-purpose flour
-
1 cup (240g) sour cream, at room temperature
-
2 teaspoons pure vanilla extract
-
¼ cup (60ml) heavy cream
-
½ cup (120g) strawberry puree
-
3 large eggs, at room temperature
-
1 large egg yolk, at room temperature
-
Few drops red or pink gel food coloring (optional)
-
1 ½ cups (150g) Golden Oreo cookies, crushed
-
1 cup (28g) freeze-dried strawberries, finely crushed
-
½ cup (113g) unsalted butter, melted
-
¼ cup (25g) all-purpose flour
-
2 tablespoons granulated sugar
-
Pinch of salt
-
Optional: 2 tablespoons white chocolate chips, melted
-
1 cup (240ml) heavy cream, chilled (optional garnish)
-
2 tablespoons powdered sugar (optional garnish)
-
½ teaspoon vanilla extract (optional garnish)
-
Fresh strawberries, sliced or whole (optional garnish)
Instructions
-
Step 1
Crush Golden Oreos and freeze-dried strawberries separately into fine crumbs. Combine crushed cookies, powdered strawberries, ¼ cup flour, 2 tbsp sugar, and pinch of salt. Add ½ cup melted butter and optional melted white chocolate; mix until moistened. Spread on a parchment-lined baking sheet. Bake at 300°F (150°C) for 10-15 minutes, stirring halfway. Cool completely, then break into clusters. -
Step 2
Preheat oven to 350°F (175°C). Grease a 9-inch springform pan; wrap outside with foil. Combine graham cracker crumbs, ¼ cup sugar, and pinch of salt. Mix in ½ cup melted butter. Press firmly onto bottom and 1 inch up sides of pan. Bake for 10-12 minutes. Cool completely. -
Step 3
Ensure cream cheese, sour cream, and eggs are at room temperature. Prepare strawberry puree. Beat softened cream cheese until smooth (2-3 minutes). Gradually add 1 ½ cups sugar, beat until fluffy (3-4 minutes). Mix in 1 tbsp flour. Add sour cream, 2 tsp vanilla, and ¼ cup heavy cream; beat until just combined. Fold in ½ cup strawberry puree and optional red/pink food coloring. Lightly whisk 3 eggs and 1 egg yolk. With mixer on lowest speed, slowly pour into cream cheese mixture; mix only until just combined. -
Step 4
Increase oven to 325°F (160°C). Pour filling into the cooled crust. Place foil-wrapped pan into a larger roasting pan. Pour hot water into roasting pan until halfway up springform sides. Bake for 60-75 minutes until edges are set and center jiggles slightly. Turn off oven, leave cheesecake inside with door ajar for 1 hour. Remove from water bath and foil. Cool on wire rack at room temperature for 1-2 hours. Cover and refrigerate for at least 6 hours, or overnight. -
Step 5
Once chilled, run a thin knife around the edge of the pan; remove sides. Gently press strawberry crunch around the sides, then generously sprinkle remaining crunch over the top. Optional: Whip 1 cup heavy cream, 2 tbsp powdered sugar, and ½ tsp vanilla until stiff peaks form. Garnish with whipped cream and fresh strawberries. Slice with a warm knife and serve.
Important Information
Nutrition Facts (Per Serving)
It is important to consider this information as approximate and not to use it as definitive health advice.
Allergy Information
Please check ingredients for potential allergens and consult a health professional if in doubt.

Leave a Comment