
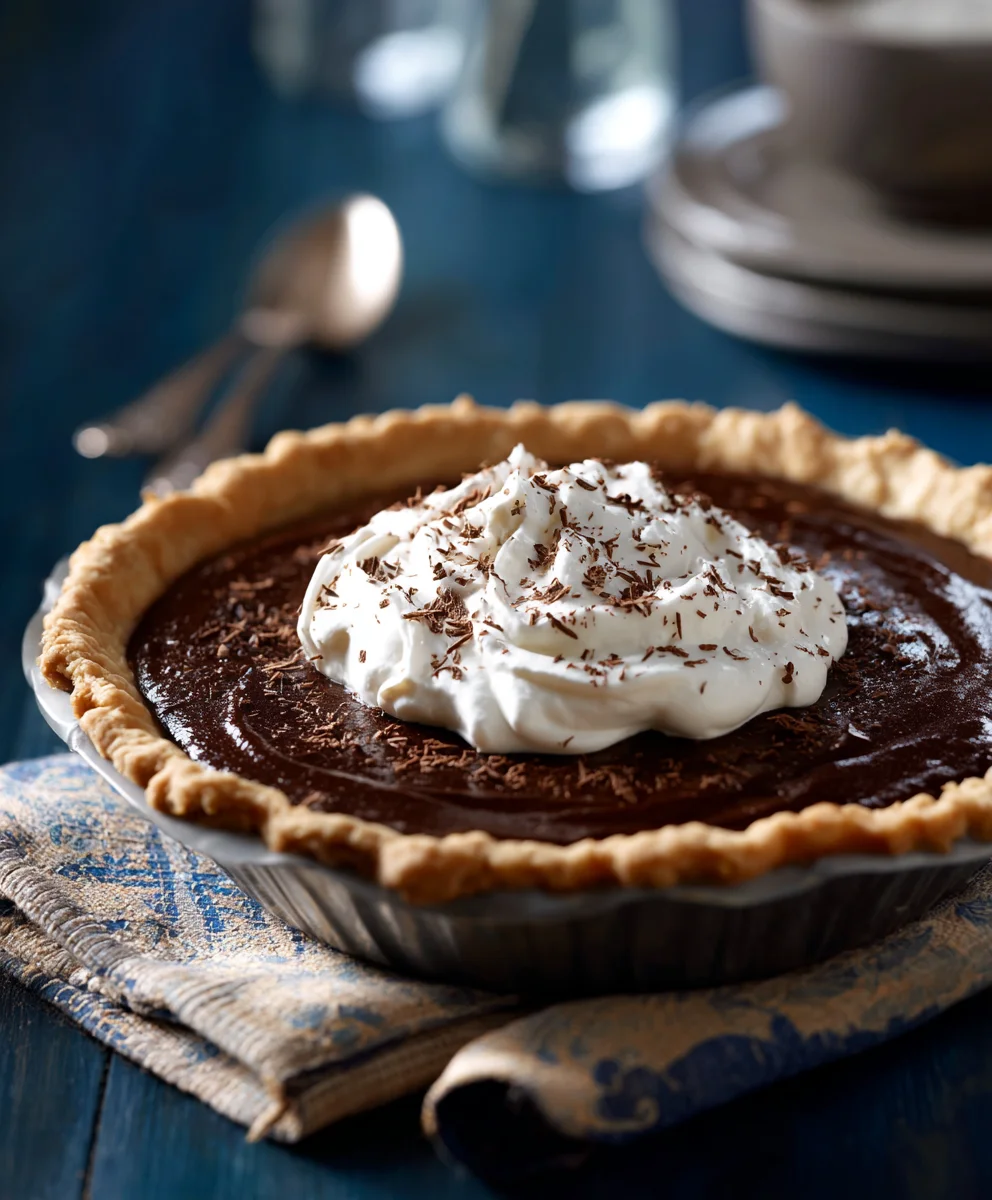
Paula Deens Chocolate Pie is more than just a dessert; it’s a slice of pure Southern comfort, a nostalgic embrace that transports you straight to Grandma’s kitchen. I’m absolutely thrilled to share with you the magic behind this iconic treat, a recipe that has charmed countless palates for generations.
This particular chocolate pie recipe hails from the legendary kitchens of Paula Deen, a name synonymous with hearty, delicious Southern cooking. Her approach to food is all about simple ingredients transforming into extraordinary flavors, and this pie is a shining example. It embodies the rich culinary traditions of the American South, where desserts are not just an afterthought but a celebrated part of any meal or gathering.
Why We Adore This Southern Classic
What makes people utterly adore this classic? It’s the irresistible combination of its velvety, intensely chocolatey filling that melts in your mouth, perfectly contrasted with a delicate, flaky crust. Each bite is a symphony of smooth sweetness and rich cocoa, often crowned with a dollop of fresh whipped cream, making Paula Deens Chocolate Pie an undeniable crowd-pleaser. Whether it’s for a holiday feast, a family potluck, or simply a treat to brighten an ordinary day, this pie delivers unparalleled satisfaction and a deeply comforting experience. Prepare to fall in love with a true classic!

Ingredients:
-
For the Flaky Pie Crust:
- 2 ½ cups all-purpose flour, plus more for dusting
- 1 teaspoon salt
- 1 cup (2 sticks) unsalted butter, very cold and cut into ½-inch cubes
- ½ cup ice water, plus 1-2 tablespoons more if needed
-
For the Rich Chocolate Filling:
- 1 ½ cups granulated sugar
- ½ cup unsweetened cocoa powder (good quality, please!)
- ¼ cup cornstarch (or all-purpose flour for a slightly softer set)
- ½ teaspoon salt
- 3 cups whole milk
- 4 large egg yolks
- ½ cup (1 stick) unsalted butter, cut into cubes
- 2 teaspoons pure vanilla extract
-
For the Decadent Whipped Topping:
- 1 ½ cups heavy cream, very cold
- ¼ cup powdered sugar (confectioners’ sugar)
- 1 teaspoon pure vanilla extract
Preparing the Homemade Flaky Pie Crust
- Combine Dry Ingredients: In a large mixing bowl, whisk together the 2 ½ cups of all-purpose flour and 1 teaspoon of salt. Make sure it’s well combined; we want that salt evenly distributed for flavor!
- Cut in the Butter: Add the very cold, cubed butter to the flour mixture. Now, here’s where the magic happens for flakiness. Using a pastry blender, two knives, or even your fingertips, cut the butter into the flour until the mixture resembles coarse crumbs with some pea-sized pieces of butter remaining. It’s crucial that your butter stays cold; this prevents it from fully incorporating and creates those wonderful pockets of steam during baking, leading to a super flaky crust. If your kitchen is warm, you might want to pop the bowl into the freezer for 5-10 minutes if the butter starts to soften too much.
- Add Ice Water: Gradually add the ½ cup of ice water, a tablespoon at a time, mixing lightly with a fork or your hands until the dough just comes together. Be careful not to add too much water; the dough should be moist enough to hold together but not sticky. If it’s still too crumbly, add another tablespoon or two of ice water, but stop as soon as it forms a cohesive ball. Overworking the dough will make your crust tough, and we definitely don’t want that for our Paula Deens Chocolate Pie!
- Chill the Dough: Divide the dough in half and gently flatten each half into a disc. Wrap each disc tightly in plastic wrap and refrigerate for at least 30 minutes, or up to 2 days. This chilling period allows the gluten to relax, which makes the dough easier to roll out and prevents shrinkage during baking. It’s a small step that makes a big difference!
- Roll Out the Dough: On a lightly floured surface, take one disc of chilled dough and roll it out into a 12-inch circle, about ⅛-inch thick. If the dough starts to stick, add a tiny bit more flour to your surface or rolling pin. Work quickly to keep the dough cold.
- Transfer to Pie Plate: Carefully transfer the rolled-out dough to a standard 9-inch pie plate. Trim any excess dough, leaving about a ½-inch overhang. You can then fold this overhang under itself and crimp the edges decoratively using your fingers or a fork. I love a good, fancy crimp, but a simple fork edge is just fine too!
- Blind Bake the Crust: Preheat your oven to 375°F (190°C). Line the pie crust with parchment paper and fill it with pie weights, dried beans, or rice. Blind bake for 15 minutes. This helps prevent the crust from puffing up and ensures a nice, even base.
- Remove Weights and Finish Baking: Carefully remove the parchment paper and pie weights. Continue to bake for another 10-12 minutes, or until the crust is lightly golden brown and cooked through. Let it cool completely on a wire rack before you even think about adding that glorious chocolate filling. A cool crust is a happy crust!
Crafting the Rich Chocolate Filling
- Whisk Dry Ingredients: In a medium-sized heavy-bottomed saucepan, whisk together the granulated sugar, unsweetened cocoa powder, cornstarch, and salt. Whisk really well to break up any cocoa lumps; we want a smooth, luxurious filling, don’t we? This is the foundation of our magnificent Paula Deens Chocolate Pie, so make it count!
- Gradually Add Milk: Slowly pour in the 3 cups of whole milk, whisking constantly to ensure there are no lumps. Continue whisking until the mixture is completely smooth.
- Cook the Mixture: Place the saucepan over medium heat and cook, whisking constantly, until the mixture thickens considerably and comes to a boil. This step requires your full attention! Once it starts to boil, continue to whisk and cook for another 1-2 minutes to ensure the cornstarch is fully cooked and the filling reaches its maximum thickness. It should be thick enough to coat the back of a spoon.
- Temper the Egg Yolks: While the chocolate mixture is cooking, lightly whisk the 4 large egg yolks in a small bowl. Once the chocolate mixture has thickened and boiled, remove about ½ cup of the hot chocolate mixture and slowly drizzle it into the whisked egg yolks, whisking continuously. This is called “tempering” and it slowly raises the temperature of the egg yolks, preventing them from scrambling when added to the hot pan.
- Incorporate Egg Yolks into Filling: Pour the tempered egg yolk mixture back into the saucepan with the remaining hot chocolate filling. Return the pan to medium-low heat and cook for another 1-2 minutes, whisking constantly, until the filling thickens even more. Do not boil this mixture once the egg yolks have been added, or you risk scrambling them. We want creamy, not lumpy!
- Remove from Heat and Finish: Remove the saucepan from the heat. Stir in the ½ cup of cubed unsalted butter and 2 teaspoons of pure vanilla extract until the butter is completely melted and incorporated, and the filling is glossy and smooth. The vanilla really brings out that deep chocolate flavor. Taste it, if you dare, but be careful, it’s hot and oh-so-tempting!
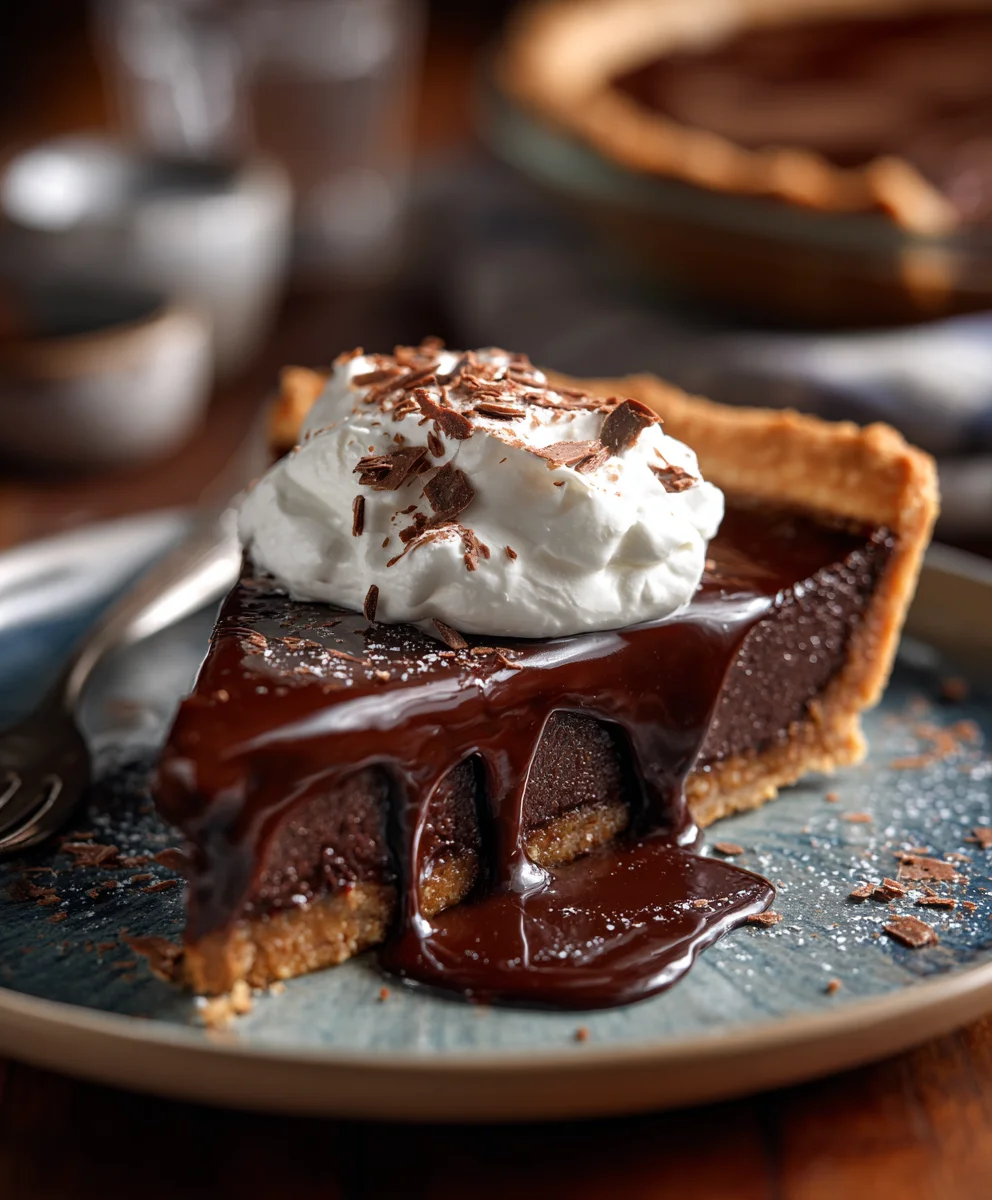
- Pour into Crust: Immediately pour the hot chocolate filling into your cooled, blind-baked pie crust. Smooth the top with a spatula.
- Chill Thoroughly: Cover the pie loosely with plastic wrap, pressing the wrap directly onto the surface of the filling to prevent a skin from forming. Refrigerate for at least 4 hours, or preferably overnight, until the pie is completely set. This chilling step is absolutely essential for the filling to firm up properly and for all those wonderful flavors to meld together. Patience, darling, it will be worth it for this classic Paula Deens Chocolate Pie!
Whipping Up the Decadent Topping and Assembling Your Pie
- Prepare the Whipped Topping: In a large, very cold mixing bowl (you can chill the bowl and whisk attachment in the freezer for 10-15 minutes beforehand for best results), combine the 1 ½ cups of very cold heavy cream, ¼ cup of powdered sugar, and 1 teaspoon of pure vanilla extract.
- Whip to Stiff Peaks: Using an electric mixer (handheld or stand mixer with a whisk attachment), beat the cream mixture on medium-high speed until it forms stiff peaks. Be careful not to overbeat, or you’ll end up with butter! We want light, airy, and luscious.
- Top the Chilled Pie: Once your Paula Deens Chocolate Pie has thoroughly chilled and is completely set, gently spread the freshly whipped cream over the top. You can use an offset spatula to create pretty swirls or pipe it on using a pastry bag with a decorative tip for an extra-fancy presentation.
- Serve and Enjoy: Slice your beautiful Paula Deens Chocolate Pie and serve immediately. It’s best enjoyed fresh, but leftovers can be stored covered in the refrigerator for up to 2-3 days. The combination of the flaky crust, the rich, creamy chocolate filling, and the light, sweet whipped cream is truly heavenly. Every bite is a little piece of Southern comfort!
- Optional Garnishes: For an extra touch of elegance and flavor, you can sprinkle a little extra cocoa powder on top, shave some chocolate curls, or even add a few chocolate chips or a drizzle of chocolate sauce just before serving. Personalize it and make it your own!
Conclusion:
So, there you have it – the journey through a recipe that’s more than just a dessert; it’s an experience. We’ve explored every delectable detail of this incredible chocolate pie, and I truly hope you’re as excited to try it as I am to share it with you. What makes this recipe a true standout, a non-negotiable addition to your baking repertoire, is its unparalleled balance of rich, velvety chocolate filling with that perfect, flaky crust. It’s not just sweet; it’s a symphony of textures and a depth of flavor that lingers, making every bite a moment of pure bliss. Forget everything you thought you knew about chocolate pies; this one sets a new standard for homemade indulgence. It’s a testament to how simple ingredients, when combined with care and attention, can create something truly extraordinary. This pie isn’t just about satisfying a sweet craving; it’s about creating a memorable centerpiece for any gathering, a comforting treat after a long day, or simply a delicious reward for your culinary efforts. The feeling of pulling a perfectly baked, glistening chocolate pie from your oven is immensely satisfying, and the accolades you’ll receive when serving it are just the icing on the cake, or rather, the whipped cream on the pie!
Its inherent simplicity belies a profound satisfaction that will surprise and delight you. You might imagine that such an extraordinary dessert would require hours of intricate work and advanced pastry skills, but I promise you, the process is wonderfully straightforward. It’s accessible for bakers of all skill levels, yielding professional-grade results right in your home kitchen. The way the chocolate melts into a smooth, decadent custard that sets just so – firm enough to hold its shape beautifully, yet soft enough to practically melt on your tongue – it’s nothing short of culinary magic. This pie isn’t just for special occasions; it’s for any moment you crave comfort, celebration, or just a really, really good slice of pie. It’s the kind of dessert that elicits gasps of delight and immediate requests for the recipe, every single time. It brings people together, sparking conversations and creating cherished memories around the table. Trust me, once you make this, it will become your signature dessert, the one everyone eagerly anticipates and asks for by name. It has a way of turning ordinary moments into something truly special, making it a valuable addition to your recipe collection.
Now, let’s talk about making this already magnificent dessert even more unforgettable. While a slice of this pie is absolutely divine on its own, there are a few wonderful ways to elevate the experience further. My personal favorite serving suggestion is with a generous dollop of freshly whipped cream, lightly sweetened with a hint of vanilla. The cool, airy cream provides a beautiful, much-needed contrast to the rich, dense chocolate, creating a perfect textural and flavor balance. For those who enjoy a little extra decadence and visual appeal, a sprinkle of finely grated chocolate shavings or a delicate drizzle of chocolate syrup can add an elegant touch that speaks volumes. And for the ultimate indulgence, imagine a slightly warmed slice of this pie alongside a scoop of premium vanilla bean ice cream – the hot-and-cold combination is truly unbeatable, a symphony of temperatures and textures that will send your taste buds into overdrive. Don’t be afraid to get creative with your garnishes; a few fresh raspberries, a sprig of mint, or even a light dusting of cocoa powder can add a pop of color and freshness, making each serving a work of art. Presentation can truly enhance the enjoyment of this already stellar dessert.
One of the true joys of home baking is the ability to personalize a beloved recipe, and this chocolate pie is surprisingly versatile, offering a canvas for your culinary creativity. While the classic preparation is spectacular in its simplicity and richness, you might consider a few delightful variations to make it uniquely yours. If you’re a fan of a subtle, intriguing kick, a tiny pinch of cayenne pepper or a dash of chili powder in the chocolate filling can add a wonderfully warming spice that enhances the chocolate’s depth without overpowering its inherent sweetness. For an even richer, darker chocolate flavor, try using a mix of high-quality semi-sweet and bittersweet chocolate, or even a high-percentage dark chocolate, adjusting the sugar slightly if necessary. You could also experiment with different crusts – a buttery graham cracker crust offers a delightful crunch and a slightly different flavor profile that pairs beautifully with chocolate, or a delicate shortbread crust for a more crumbly, European-style base. Some adventurous bakers love to add a layer of toasted pecans, walnuts, or coconut flakes to the bottom of the crust before pouring in the filling for an added layer of texture and nutty flavor. Remember, this incredible recipe, a true classic reminiscent of the iconic Paula Deens Chocolate Pie, provides a fantastic and forgiving foundation for your culinary creativity. It’s a testament to how a simple, well-loved recipe can inspire so many delicious twists, making each bake a unique adventure. You can even try adding a hint of espresso powder to the chocolate filling to really intensify the chocolate notes – it’s a game-changer that deepens the flavor profile beautifully!
So, what are you waiting for? I’ve given you all the tools, tips, and encouragement you need to embark on this incredibly delicious baking adventure. Gather your ingredients, preheat your oven, and prepare to create something truly special and memorable in your kitchen. I am so genuinely excited for you to experience the magic of this chocolate pie firsthand. Once you’ve baked it, tasted it, and proudly shared it with your loved ones, please don’t keep the experience to yourself! I would absolutely love to hear from you and see your creations. Share your baking triumphs, your delicious photos, and your personalized variations in the comments section below. Did you try it with a different crust? What was your favorite topping or unexpected flavor combination? Your feedback, your stories, and your shared experiences are what make our baking community so vibrant, supportive, and endlessly inspiring. Let’s celebrate the pure joy of home baking together, one glorious slice of chocolate pie at a time!
Baking should always be a joyful, therapeutic, and immensely rewarding process, and I promise you, this recipe delivers on all fronts. It’s a beautiful testament to the simple yet profound pleasures of life – good food, shared moments, and the deep satisfaction of creating something wonderful and delicious with your own hands. Go forth and bake, my dear friends, and prepare to fall head over heels in love with your new favorite chocolate pie. Happy baking, and enjoy every single delightful bite!
Paula Deen’s Famous Chocolate Pie
Paula Deen’s Chocolate Pie is a slice of pure Southern comfort, featuring a velvety, intensely chocolatey filling and a delicate, flaky crust, often crowned with fresh whipped cream. This recipe provides unparalleled satisfaction and a deeply comforting experience.
Ingredients
-
For the Flaky Pie Crust:
-
2 ½ cups all-purpose flour
-
1 tsp salt
-
1 cup (2 sticks) very cold unsalted butter, cubed
-
½ cup ice water (plus 1-2 tbsp more, if needed)
-
For the Rich Chocolate Filling:
-
1 1/4 cups granulated sugar
-
1/4 cup unsweetened cocoa powder
-
1/4 cup all-purpose flour
-
½ tsp salt
-
2 cups whole milk
-
4 large egg yolks
-
½ cup (1 stick) unsalted butter, cubed
-
2 tsp pure vanilla extract
-
For the Decadent Whipped Topping:
-
1 ½ cups very cold heavy cream
-
¼ cup powdered sugar
-
1 tsp pure vanilla extract
Instructions
-
Step 1
Whisk 2½ cups flour and 1 tsp salt. Cut in 1 cup cold butter until pea-sized crumbs form. Gradually add ½ cup ice water, mixing until dough forms. Divide into two discs, wrap, and refrigerate 30 mins (or up to 2 days). Roll one disc to 12 inches; transfer to a 9-inch pie plate, trim, and crimp edges. -
Step 2
Preheat oven to 375°F (190°C). Line crust with parchment, fill with pie weights, and blind bake for 15 mins. Remove weights, bake another 10-12 mins until golden. Cool completely on a wire rack. -
Step 3
In a heavy saucepan, whisk 1¼ cups sugar, ¼ cup cocoa, ¼ cup flour, and ½ tsp salt. Gradually whisk in 2 cups milk until smooth. Cook over medium heat, whisking constantly, until thickened and boiling for 1-2 mins. -
Step 4
Whisk 4 egg yolks. Slowly drizzle ½ cup hot chocolate mixture into yolks, whisking continuously. Pour tempered yolks back into saucepan. Cook over medium-low heat, whisking, for 1-2 mins until thicker; do not boil. Remove from heat. Stir in ½ cup butter and 2 tsp vanilla until melted and smooth. -
Step 5
Pour hot filling into the cooled crust. Cover surface with plastic wrap; refrigerate at least 4 hours or overnight until completely set. -
Step 6
In a very cold bowl, combine 1½ cups cold heavy cream, ¼ cup powdered sugar, and 1 tsp vanilla. Beat on medium-high until stiff peaks form. Spread whipped cream over the chilled pie. Slice and serve. Store leftovers covered in the refrigerator for 2-3 days. Garnish as desired.
Important Information
Nutrition Facts (Per Serving)
It is important to consider this information as approximate and not to use it as definitive health advice.
Allergy Information
Please check ingredients for potential allergens and consult a health professional if in doubt.

Leave a Comment