
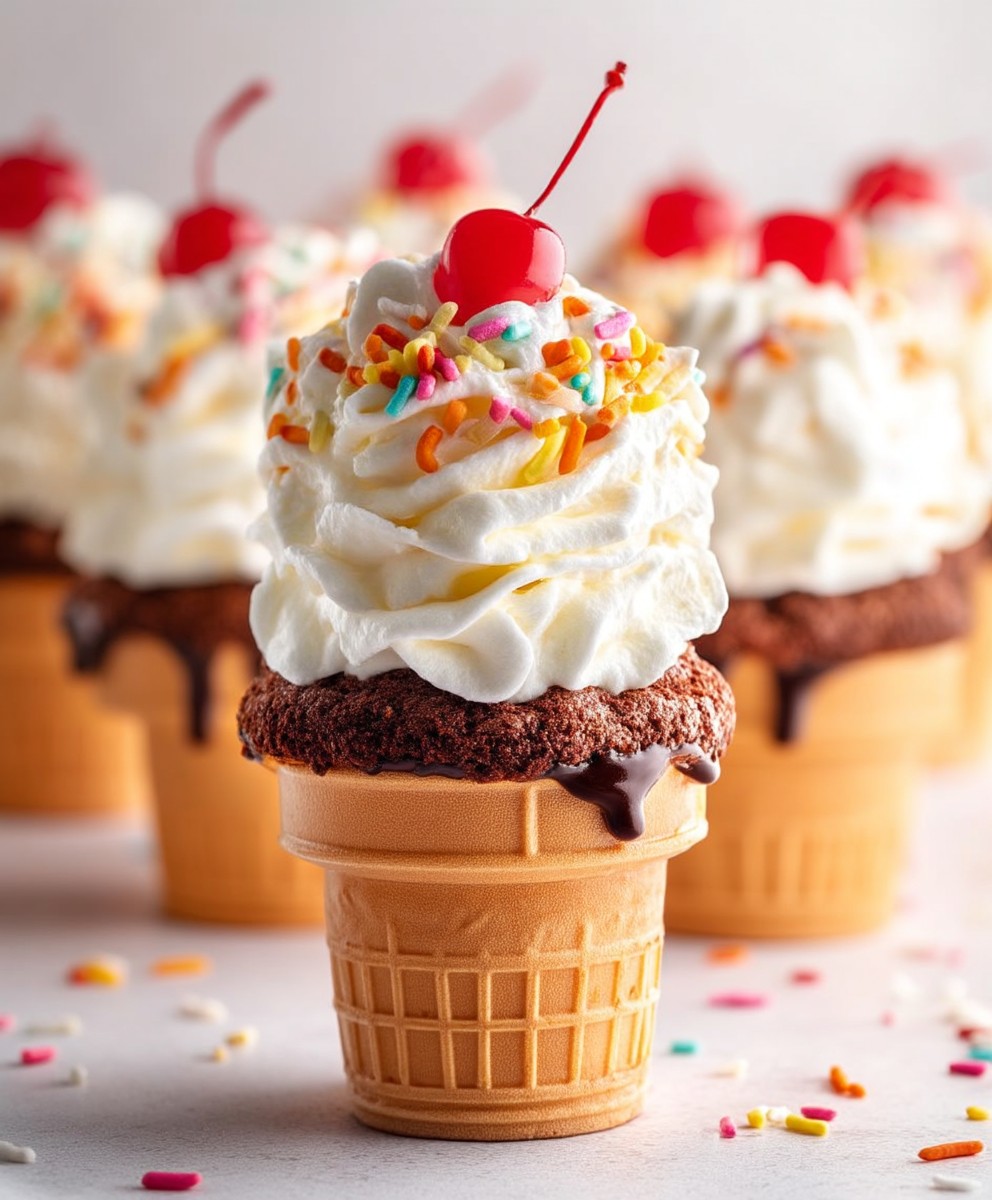
Ice Cream Cone Cupcakes: Prepare to be amazed! Imagine the delight of biting into a moist, flavorful cupcake, perfectly nestled within a crispy ice cream cone. It’s a whimsical treat that brings back childhood memories and adds a touch of magic to any occasion. These aren’t just cupcakes; they’re edible works of art that are as fun to make as they are to eat!
While the exact origins of the Ice Cream Cone Cupcake are shrouded in a bit of mystery, they’ve become a beloved staple at birthday parties, summer gatherings, and bake sales. They cleverly combine two classic desserts into one delightful package. Think of it as a portable party, a self-contained celebration of sweetness!
What makes these cupcakes so irresistible? It’s the perfect combination of textures and flavors. You get the soft, fluffy cupcake, the satisfying crunch of the cone, and the endless possibilities for customization. From vibrant sprinkles to decadent frosting, you can tailor these treats to your heart’s content. Plus, they’re incredibly convenient no plates or forks required! So, get ready to create some smiles with these adorable and delicious Ice Cream Cone Cupcakes!

Ingredients:
- 1 box (15.25 ounces) cake mix (vanilla or chocolate, your choice!)
- Ingredients called for on the cake mix box (usually eggs, oil, and water)
- 24 flat-bottom ice cream cones
- 1 container (16 ounces) vanilla frosting
- Food coloring (gel or liquid, your choice of colors)
- Sprinkles, for decoration
- Optional: Small candies, mini chocolate chips, or other toppings
Preparing the Cake Batter:
- First things first, preheat your oven to 350°F (175°C). This is crucial for even baking!
- Now, let’s get that cake batter ready. In a large mixing bowl, combine the cake mix with the ingredients listed on the box (usually eggs, oil, and water). Follow the box instructions precisely for the best results.
- Using an electric mixer (handheld or stand mixer), beat the ingredients together on low speed until just combined. Then, increase the speed to medium and beat for 2 minutes, or until the batter is smooth and creamy. Don’t overmix, or your cupcakes might be tough!
Filling the Ice Cream Cones:
- This is where the fun begins! Place the ice cream cones in a muffin tin. This will help them stand upright and prevent them from tipping over during baking. If you don’t have a muffin tin, you can create a makeshift one by using aluminum foil to create small rings to hold the cones.
- Carefully fill each ice cream cone about two-thirds full with the cake batter. Don’t overfill them, as the batter will rise during baking, and you don’t want it to overflow.
- Gently tap the muffin tin on the counter a few times to release any air bubbles in the batter. This will help ensure that your cupcakes are evenly baked.
Baking the Cupcakes:
- Place the muffin tin with the filled ice cream cones in the preheated oven.
- Bake for 20-25 minutes, or until a wooden skewer inserted into the center of a cupcake comes out clean. Keep a close eye on them, as baking times may vary depending on your oven.
- Once the cupcakes are baked, remove the muffin tin from the oven and let the cupcakes cool in the tin for a few minutes before transferring them to a wire rack to cool completely. This will prevent them from sticking to the tin.
Preparing the Frosting:
- While the cupcakes are cooling, let’s get the frosting ready. In a medium bowl, divide the vanilla frosting into separate bowls, depending on how many colors you want to use.
- Add a few drops of food coloring to each bowl and stir until the frosting is evenly colored. Start with a small amount of food coloring and add more until you achieve your desired shade. Remember, a little goes a long way!
- If you want to get fancy, you can transfer the frosting to piping bags fitted with different tips. This will allow you to create different frosting designs on your cupcakes.
Decorating the Cupcakes:
- Once the cupcakes are completely cool, it’s time to decorate! This is where you can really let your creativity shine.
- Frost each cupcake with your colored frosting. You can use a knife, a spatula, or a piping bag to apply the frosting.
- Immediately sprinkle the frosted cupcakes with sprinkles, small candies, mini chocolate chips, or any other toppings you like. The frosting will act as glue to hold the toppings in place.
- If you’re using piping bags, you can create swirls, rosettes, or any other designs you like. Get creative and have fun!
- For an extra touch, you can add a cherry on top of each cupcake to make them look even more like ice cream cones.
Tips and Tricks for Perfect Ice Cream Cone Cupcakes:
- Don’t overfill the cones: As mentioned earlier, it’s crucial not to overfill the ice cream cones with batter. The batter will rise during baking, and if you overfill them, they will overflow and make a mess.
- Use a muffin tin: Using a muffin tin is the easiest way to keep the ice cream cones upright during baking. If you don’t have a muffin tin, you can create a makeshift one using aluminum foil.
- Cool completely before frosting: Make sure the cupcakes are completely cool before frosting them. If they’re still warm, the frosting will melt and slide off.
- Get creative with the frosting: Don’t be afraid to experiment with different frosting colors and designs. You can use piping bags to create swirls, rosettes, or any other designs you like.
- Add fun toppings: Sprinkles, small candies, mini chocolate chips, and cherries are all great toppings for ice cream cone cupcakes. Let your imagination run wild!
- Store properly: Store the decorated cupcakes in an airtight container at room temperature for up to 2 days. If you need to store them for longer, you can refrigerate them, but the frosting may become slightly harder.
- Use different cake flavors: While vanilla and chocolate are classic choices, you can use any cake mix flavor you like. Strawberry, lemon, or even red velvet would all be delicious!
- Make mini cupcakes: If you want to make smaller cupcakes, you can use mini ice cream cones. Just adjust the baking time accordingly.
- Add a surprise inside: Before baking, you can add a small piece of candy or a mini chocolate chip to the bottom of each ice cream cone. This will be a fun surprise for whoever eats the cupcake!
- Make them ahead of time: You can bake the cupcakes a day or two in advance and store them in an airtight container at room temperature. Then, frost and decorate them just before serving.
Variations and Adaptations:
- Chocolate Lover’s Delight: Use a chocolate cake mix and chocolate frosting. Decorate with chocolate sprinkles, mini chocolate chips, and a drizzle of chocolate syrup.
- Strawberry Shortcake Cupcakes: Use a vanilla cake mix and strawberry frosting. Decorate with fresh strawberries and a dollop of whipped cream.
- Lemon Meringue Cupcakes: Use a lemon cake mix and top with a swirl of meringue. Toast the meringue with a kitchen torch for a beautiful presentation.
- Confetti Cupcakes: Add sprinkles to the cake batter before baking for a fun and festive treat. Use vanilla frosting and decorate with even more sprinkles!
- Peanut Butter Cup Cupcakes: Use a chocolate cake mix and peanut butter frosting. Decorate with chopped peanuts and mini peanut butter cups.
- Vegan Ice Cream Cone Cupcakes: Use a vegan cake mix and vegan frosting. There are many delicious vegan options available at most grocery stores.
- Gluten-Free Ice Cream Cone Cupcakes: Use a gluten-free cake mix and gluten-free frosting. Be sure to check the labels of all ingredients to ensure they are gluten-free.
Troubleshooting:
- Cupcakes are sinking in the middle: This can be caused by overmixing the batter or opening the oven door too frequently during baking. Make sure to follow the instructions carefully and avoid opening the oven door until the cupcakes are almost done.
- Cupcakes are dry: This can be caused by overbaking the cupcakes. Check them frequently during baking and remove them from the oven as soon as a wooden skewer inserted into the center comes out clean.
- Frosting is too thin: Add powdered sugar, one tablespoon at a time, until the frosting reaches your desired consistency.
- Frosting is too thick: Add milk or cream, one teaspoon at a time, until the frosting reaches your desired consistency.
- Ice cream cones are soggy: This can be caused by storing the cupcakes in a humid environment. Store them in an airtight container at room temperature to prevent them from becoming soggy.
Enjoy your adorable and delicious Ice Cream Cone Cupcakes! They’re perfect for birthday parties, summer gatherings, or any occasion that calls for a sweet treat.
Conclusion:
So, there you have it! These Ice Cream Cone Cupcakes are truly a must-try for anyone looking to add a touch of whimsy and deliciousness to their baking repertoire. They’re not just cupcakes; they’re edible works of art that are guaranteed to bring smiles to faces of all ages. The combination of the moist, flavorful cupcake baked right inside a crispy cone, topped with a swirl of creamy frosting and your favorite sprinkles, is simply irresistible.
Why are these Ice Cream Cone Cupcakes a must-bake? Because they’re fun, they’re easy (yes, really!), and they’re a guaranteed crowd-pleaser. Think about it: no more messy cupcake wrappers to deal with! The cone itself becomes part of the treat, adding a delightful crunch that complements the soft cupcake perfectly. Plus, they’re incredibly customizable. You can use your favorite cupcake recipe, experiment with different frosting flavors, and go wild with the toppings.
Serving Suggestions and Variations:
The possibilities are endless! For a classic touch, stick with vanilla or chocolate cupcakes and top them with vanilla buttercream frosting and rainbow sprinkles. But don’t be afraid to get creative!
* Chocolate Lovers: Use a rich chocolate cupcake recipe, top with chocolate ganache, and sprinkle with chocolate shavings.
* Strawberry Shortcake Cones: Bake vanilla cupcakes, top with whipped cream frosting, fresh strawberries, and a drizzle of strawberry sauce.
* Birthday Party Extravaganza: Use funfetti cupcakes, bright-colored frosting, and a generous helping of sprinkles, candies, and edible glitter.
* Seasonal Sensations: In the fall, try pumpkin spice cupcakes with cream cheese frosting and a sprinkle of cinnamon. In the winter, peppermint cupcakes with peppermint buttercream and crushed candy canes are a festive treat.
* Mini Ice Cream Cone Cupcakes: Use mini ice cream cones for bite-sized treats that are perfect for parties or little hands.
* Gluten-Free Option: Simply use your favorite gluten-free cupcake recipe and gluten-free ice cream cones.
For serving, you can arrange the Ice Cream Cone Cupcakes on a tiered stand for a visually stunning display. You can also place them in individual cupcake holders to prevent them from tipping over. And for an extra touch of fun, consider setting up a cupcake decorating station where guests can customize their own cones with different frostings, sprinkles, and toppings. Imagine the fun!
I truly believe that baking should be an enjoyable experience, and these Ice Cream Cone Cupcakes are the perfect way to bring a little joy into your kitchen. They’re a great project to do with kids, and they’re sure to impress your friends and family. So, grab your ingredients, preheat your oven, and get ready to create some magic!
I’m so excited for you to try this recipe! I know you’ll love the results. And more importantly, I’d love to hear about your experience. Did you try any variations? What were your favorite toppings? Did you have any challenges along the way? Share your photos and stories in the comments below! Let’s create a community of Ice Cream Cone Cupcake enthusiasts and inspire each other with our baking adventures. Happy baking! I can’t wait to see what you create!
Ice Cream Cone Cupcakes: The Ultimate Fun & Easy Recipe
Fun and easy ice cream cone cupcakes! Bake cake mix in cones, then frost and decorate. Perfect for parties and kids!
Ingredients
- 1 box (15.25 ounces) cake mix (vanilla or chocolate, your choice!)
- Ingredients called for on the cake mix box (usually eggs, oil, and water)
- 24 flat-bottom ice cream cones
- 1 container (16 ounces) vanilla frosting
- Food coloring (gel or liquid, your choice of colors)
- Sprinkles, for decoration
- Optional: Small candies, mini chocolate chips, or other toppings
Instructions
- Preheat: Preheat your oven to 350°F (175°C).
- Prepare Batter: In a large mixing bowl, combine the cake mix with the ingredients listed on the box. Beat on low until combined, then on medium for 2 minutes until smooth.
- Fill Cones: Place ice cream cones in a muffin tin. Fill each cone about two-thirds full with batter. Tap the tin gently to release air bubbles.
- Bake: Bake for 20-25 minutes, or until a wooden skewer inserted into the center comes out clean.
- Cool: Let the cupcakes cool in the tin for a few minutes, then transfer to a wire rack to cool completely.
- Prepare Frosting: Divide the vanilla frosting into separate bowls. Add food coloring to each bowl and stir until evenly colored. Transfer to piping bags if desired.
- Decorate: Frost each cupcake with colored frosting. Immediately sprinkle with sprinkles, candies, or other toppings.
Notes
- Don’t overfill the cones, as the batter will rise during baking.
- Use a muffin tin to keep the cones upright. If you don’t have a muffin tin, you can create a makeshift one using aluminum foil.
- Cool completely before frosting to prevent melting.
- Get creative with frosting colors and designs.
- Store decorated cupcakes in an airtight container at room temperature for up to 2 days.
- Use different cake flavors for variety.
- Add a surprise candy or chocolate chip to the bottom of each cone before baking.
- Bake the cupcakes a day or two in advance and store them in an airtight container at room temperature. Then, frost and decorate them just before serving.

Leave a Comment