
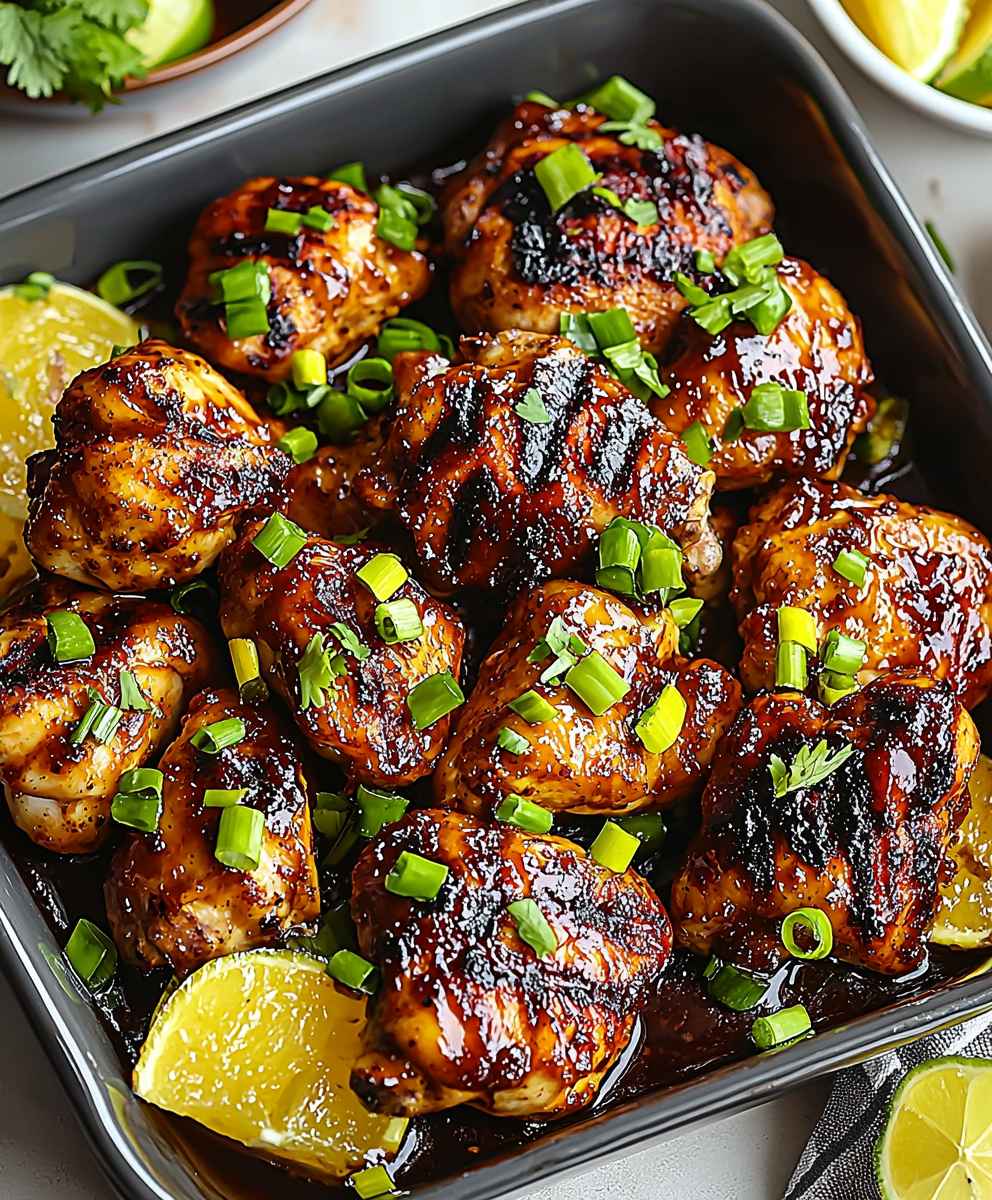
Huli Huli Chicken: Just the name conjures up images of sun-drenched Hawaiian beaches, the scent of smoky kiawe wood, and the sweet, savory glaze that makes this grilled chicken utterly irresistible. Have you ever tasted something so good that it instantly transports you to another place? That’s exactly what Huli Huli Chicken does for me, and I’m thrilled to share my version of this iconic dish with you.
The story of Huli Huli Chicken is as captivating as its flavor. Legend has it that Ernest Morgado, a businessman in Hawaii, first created this culinary masterpiece in 1955. He grilled the chicken at a farmers’ gathering, and the aroma alone drew crowds. The term “Huli,” meaning “turn” in Hawaiian, refers to the constant flipping of the chicken on the grill to ensure even cooking and that signature caramelized glaze. It quickly became a local favorite, and its popularity has only grown over the decades.
What makes Huli Huli Chicken so beloved? It’s a symphony of flavors! The marinade, typically a blend of soy sauce, brown sugar, ginger, garlic, and pineapple juice, creates a perfect balance of sweet, salty, and tangy notes. The grilling process imparts a smoky char that complements the juicy, tender chicken. Whether you’re hosting a backyard barbecue or simply craving a taste of the islands, Huli Huli Chicken is guaranteed to be a crowd-pleaser. I find it incredibly convenient to prepare, and the vibrant flavors always bring a smile to my face. So, let’s fire up the grill and get ready to experience a taste of paradise!

Ingredients:
- For the Marinade:
- 1 cup soy sauce (low sodium preferred)
- 1 cup pineapple juice
- 1/2 cup brown sugar, packed
- 1/4 cup dry sherry (or rice wine vinegar)
- 1/4 cup ketchup
- 2 tablespoons grated fresh ginger
- 4 cloves garlic, minced
- 1 tablespoon sesame oil
- 1 teaspoon ground ginger
- 1/2 teaspoon red pepper flakes (optional, for heat)
- 1/4 teaspoon black pepper
- For the Chicken:
- 3-4 lbs bone-in, skin-on chicken pieces (thighs and drumsticks work best, or a whole chicken butterflied)
- Vegetable oil, for grilling
- Optional Garnish:
- Chopped green onions
- Sesame seeds
- Pineapple wedges
Preparing the Marinade:
- In a large bowl, whisk together the soy sauce, pineapple juice, brown sugar, sherry (or rice wine vinegar), ketchup, grated fresh ginger, minced garlic, sesame oil, ground ginger, red pepper flakes (if using), and black pepper. Make sure the brown sugar is fully dissolved. This is your Huli Huli marinade!
- Taste the marinade and adjust seasonings as needed. If you prefer a sweeter marinade, add a little more brown sugar. For more heat, add more red pepper flakes. If you want a tangier flavor, add a splash more rice wine vinegar.
Marinating the Chicken:
- Place the chicken pieces in a large resealable plastic bag or a non-reactive container (glass or ceramic).
- Pour the marinade over the chicken, ensuring all pieces are well coated.
- Seal the bag or cover the container tightly.
- Refrigerate the chicken for at least 4 hours, or preferably overnight (up to 24 hours). The longer the chicken marinates, the more flavorful and tender it will become.
- Turn the bag or container occasionally to ensure even marinating.
Grilling the Chicken:
- Remove the chicken from the refrigerator about 30 minutes before grilling to allow it to come to room temperature slightly. This will help it cook more evenly.
- Prepare your grill for medium heat (around 350-400°F or 175-200°C). If using a charcoal grill, arrange the coals for indirect heat, leaving a cooler zone on one side. If using a gas grill, preheat all burners and then turn off one or two burners to create an indirect heat zone.
- Lightly oil the grill grates to prevent the chicken from sticking.
- Remove the chicken from the marinade, letting any excess drip off. Do not discard the marinade! We’ll use it later.
- Place the chicken pieces skin-side up on the cooler side of the grill (indirect heat). This will allow the chicken to cook through without burning the skin.
- Cover the grill and cook for about 30-40 minutes, or until the internal temperature of the chicken reaches 165°F (74°C) in the thickest part. Use a meat thermometer to ensure accuracy.
- While the chicken is grilling, bring the reserved marinade to a boil in a saucepan over medium heat.
- Reduce the heat to low and simmer for 10-15 minutes, or until the marinade has thickened slightly. This step is crucial to kill any bacteria from the raw chicken and create a safe and flavorful basting sauce.
- After the chicken has been grilling for about 30-40 minutes, begin basting it with the reduced marinade every 5-10 minutes.
- Flip the chicken skin-side down and continue grilling for another 10-15 minutes, basting frequently with the reduced marinade, until the skin is crispy and golden brown and the internal temperature reaches 165°F (74°C). Be careful not to burn the skin. If the skin is browning too quickly, move the chicken back to the cooler side of the grill.
- If you want to add some char, move the chicken directly over the heat for the last few minutes of grilling, but watch it closely to prevent burning.
- Remove the chicken from the grill and let it rest for 5-10 minutes before serving. This allows the juices to redistribute, resulting in more tender and flavorful chicken.
Alternative Cooking Methods:
Oven Baking:
- Preheat your oven to 400°F (200°C).
- Place the marinated chicken on a baking sheet lined with parchment paper or foil.
- Bake for 45-60 minutes, or until the internal temperature reaches 165°F (74°C).
- Baste with the reduced marinade during the last 15-20 minutes of baking.
- For crispier skin, broil for the last 2-3 minutes, watching carefully to prevent burning.
Slow Cooker:
- Place the marinated chicken in a slow cooker.
- Pour the remaining marinade over the chicken.
- Cook on low for 6-8 hours or on high for 3-4 hours, or until the chicken is cooked through and tender.
- Shred the chicken and serve with the sauce from the slow cooker.
- While this method doesn’t provide the crispy skin of grilling, it’s a convenient option for busy weeknights. You can broil the shredded chicken for a few minutes after it’s cooked to crisp it up a bit.
Serving Suggestions:
- Garnish the Huli Huli chicken with chopped green onions and sesame seeds.
- Serve with rice, macaroni salad, and pineapple wedges for a complete Hawaiian-inspired meal.
- Other great side dishes include coleslaw, potato salad, and grilled vegetables.
- Huli Huli chicken is also delicious in sandwiches or wraps.
Tips and Tricks:
- For the best flavor, marinate the chicken overnight. This allows the marinade to fully penetrate the chicken, resulting in a more flavorful and tender dish.
- Don’t skip the step of reducing the marinade. This not only ensures that it’s safe to use as a basting sauce but also concentrates the flavors.
- Use a meat thermometer to ensure the chicken is cooked to a safe internal temperature. This is the best way to prevent overcooking or undercooking.
- If you’re using a charcoal grill, maintain a consistent temperature by adding more charcoal as needed.
- If the chicken skin is browning too quickly, move it to a cooler part of the grill or reduce the heat.
- Let the chicken rest before serving. This allows the juices to redistribute, resulting in more tender and flavorful chicken.
- Adjust the marinade to your liking. If you prefer a sweeter marinade, add more brown sugar. For more heat, add more red pepper flakes.
- Experiment with different types of chicken. While bone-in, skin-on chicken thighs and drumsticks are traditional, you can also use boneless, skinless chicken breasts or a whole chicken butterflied.
- If you don’t have dry sherry, you can substitute rice wine vinegar or apple cider vinegar.
- For a smoky flavor, add a few wood chips to your charcoal grill.
Make Ahead Instructions:
- The marinade can be made up to 3 days in advance and stored in the refrigerator.
- The chicken can be marinated for up to 24 hours in the refrigerator.
- Cooked Huli Huli chicken can be stored in the refrigerator for up to 3 days. Reheat in the oven or microwave before serving.
Variations:
- Spicy Huli Huli Chicken: Add more red pepper flakes or a pinch of cayenne pepper to the marinade.
- Sweet and Sour Huli Huli Chicken: Add a tablespoon of rice vinegar and a tablespoon of honey to the marinade.
- Garlic Huli Huli Chicken: Add a few extra cloves of minced garlic to the marinade.
- Ginger Huli Huli Chicken: Add more grated fresh ginger to the marinade.
- Huli Huli Chicken Skewers: Cut the chicken into bite-sized pieces and thread them
Conclusion:
This isn’t just another chicken recipe; it’s a passport to a tropical paradise, right from your own kitchen! The sweet, savory, and smoky flavors of this Huli Huli Chicken are truly unforgettable, making it a must-try for anyone who appreciates bold, vibrant tastes. I promise, once you experience that first bite, you’ll understand why this Hawaiian classic is so beloved. The marinade, with its blend of ginger, garlic, soy sauce, and brown sugar, creates a beautiful glaze that caramelizes perfectly over the heat, resulting in a chicken that’s both incredibly flavorful and visually stunning.
But the best part? It’s surprisingly easy to make! While the marinating time is crucial for developing that signature Huli Huli flavor, the actual cooking process is straightforward, whether you choose to grill it, bake it, or even use a rotisserie. I’ve tried all three methods, and each yields fantastic results, so feel free to choose the one that best suits your equipment and preferences.
And speaking of preferences, don’t be afraid to get creative with your serving suggestions! I personally love serving this Huli Huli Chicken with a scoop of fluffy white rice and a side of tangy pineapple salsa. The sweetness of the pineapple perfectly complements the savory chicken, creating a harmonious balance of flavors. For a more substantial meal, you could also pair it with roasted vegetables like sweet potatoes, bell peppers, and zucchini.
Looking for variations? Consider adding a touch of heat to the marinade with a pinch of red pepper flakes or a dash of your favorite hot sauce. If you’re not a fan of soy sauce, you can substitute it with tamari or coconut aminos for a gluten-free option. And for a truly authentic Hawaiian experience, try grilling the chicken over kiawe wood, which imparts a unique smoky flavor that’s simply divine.
Another fantastic variation is to shred the cooked Huli Huli Chicken and use it as a filling for tacos or sliders. Top it with some coleslaw and a drizzle of sriracha mayo for a quick and easy weeknight meal that’s bursting with flavor. You could even use it in a salad with mixed greens, avocado, and a light vinaigrette for a healthy and delicious lunch. The possibilities are endless!
I truly believe that this Huli Huli Chicken recipe is a winner, and I’m confident that you’ll love it as much as I do. It’s perfect for summer barbecues, family dinners, or even just a simple weeknight meal. The vibrant flavors and easy preparation make it a recipe that you’ll want to make again and again.
So, what are you waiting for? Gather your ingredients, fire up the grill (or preheat your oven!), and get ready to experience the taste of paradise. I’m so excited for you to try this recipe and discover the magic of Huli Huli Chicken for yourself.
And most importantly, I’d love to hear about your experience! Did you try any of the variations I suggested? Did you make any modifications of your own? Share your photos and comments in the section below I can’t wait to see your culinary creations and hear your thoughts on this delicious dish. Happy cooking!
Huli Huli Chicken: The Ultimate Guide to Hawaiian BBQ
Chicken marinated in a sweet and savory pineapple-soy sauce blend, then grilled to perfection.
Ingredients
- 1 cup soy sauce (low sodium preferred)
- 1 cup pineapple juice
- 1/2 cup brown sugar, packed
- 1/4 cup dry sherry (or rice wine vinegar)
- 1/4 cup ketchup
- 2 tablespoons grated fresh ginger
- 4 cloves garlic, minced
- 1 tablespoon sesame oil
- 1 teaspoon ground ginger
- 1/2 teaspoon red pepper flakes (optional, for heat)
- 1/4 teaspoon black pepper
- 3-4 lbs bone-in, skin-on chicken pieces (thighs and drumsticks work best, or a whole chicken butterflied)
- Vegetable oil, for grilling
- Chopped green onions
- Sesame seeds
- Pineapple wedges
Instructions
- Prepare the Marinade: In a large bowl, whisk together the soy sauce, pineapple juice, brown sugar, sherry (or rice wine vinegar), ketchup, grated fresh ginger, minced garlic, sesame oil, ground ginger, red pepper flakes (if using), and black pepper. Make sure the brown sugar is fully dissolved.
- Taste the marinade and adjust seasonings as needed. If you prefer a sweeter marinade, add a little more brown sugar. For more heat, add more red pepper flakes. If you want a tangier flavor, add a splash more rice wine vinegar.
- Marinate the Chicken: Place the chicken pieces in a large resealable plastic bag or a non-reactive container (glass or ceramic).
- Pour the marinade over the chicken, ensuring all pieces are well coated.
- Seal the bag or cover the container tightly.
- Refrigerate the chicken for at least 4 hours, or preferably overnight (up to 24 hours). The longer the chicken marinates, the more flavorful and tender it will become.
- Turn the bag or container occasionally to ensure even marinating.
- Grill the Chicken: Remove the chicken from the refrigerator about 30 minutes before grilling to allow it to come to room temperature slightly.
- Prepare your grill for medium heat (around 350-400°F or 175-200°C). If using a charcoal grill, arrange the coals for indirect heat, leaving a cooler zone on one side. If using a gas grill, preheat all burners and then turn off one or two burners to create an indirect heat zone.
- Lightly oil the grill grates to prevent the chicken from sticking.
- Remove the chicken from the marinade, letting any excess drip off. Do not discard the marinade! We’ll use it later.
- Place the chicken pieces skin-side up on the cooler side of the grill (indirect heat). This will allow the chicken to cook through without burning the skin.
- Cover the grill and cook for about 30-40 minutes, or until the internal temperature of the chicken reaches 165°F (74°C) in the thickest part. Use a meat thermometer to ensure accuracy.
- While the chicken is grilling, bring the reserved marinade to a boil in a saucepan over medium heat.
- Reduce the heat to low and simmer for 10-15 minutes, or until the marinade has thickened slightly. This step is crucial to kill any bacteria from the raw chicken and create a safe and flavorful basting sauce.
- After the chicken has been grilling for about 30-40 minutes, begin basting it with the reduced marinade every 5-10 minutes.
- Flip the chicken skin-side down and continue grilling for another 10-15 minutes, basting frequently with the reduced marinade, until the skin is crispy and golden brown and the internal temperature reaches 165°F (74°C). Be careful not to burn the skin. If the skin is browning too quickly, move the chicken back to the cooler side of the grill.
- If you want to add some char, move the chicken directly over the heat for the last few minutes of grilling, but watch it closely to prevent burning.
- Remove the chicken from the grill and let it rest for 5-10 minutes before serving. This allows the juices to redistribute, resulting in more tender and flavorful chicken.
- Garnish with chopped green onions and sesame seeds. Serve with rice, macaroni salad, and pineapple wedges.
Notes
- For the best flavor, marinate the chicken overnight.
- Don’t skip the step of reducing the marinade.
- Use a meat thermometer to ensure the chicken is cooked to a safe internal temperature.
- Adjust the marinade to your liking.
- If you don’t have dry sherry, you can substitute rice wine vinegar or apple cider vinegar.


Leave a Comment