
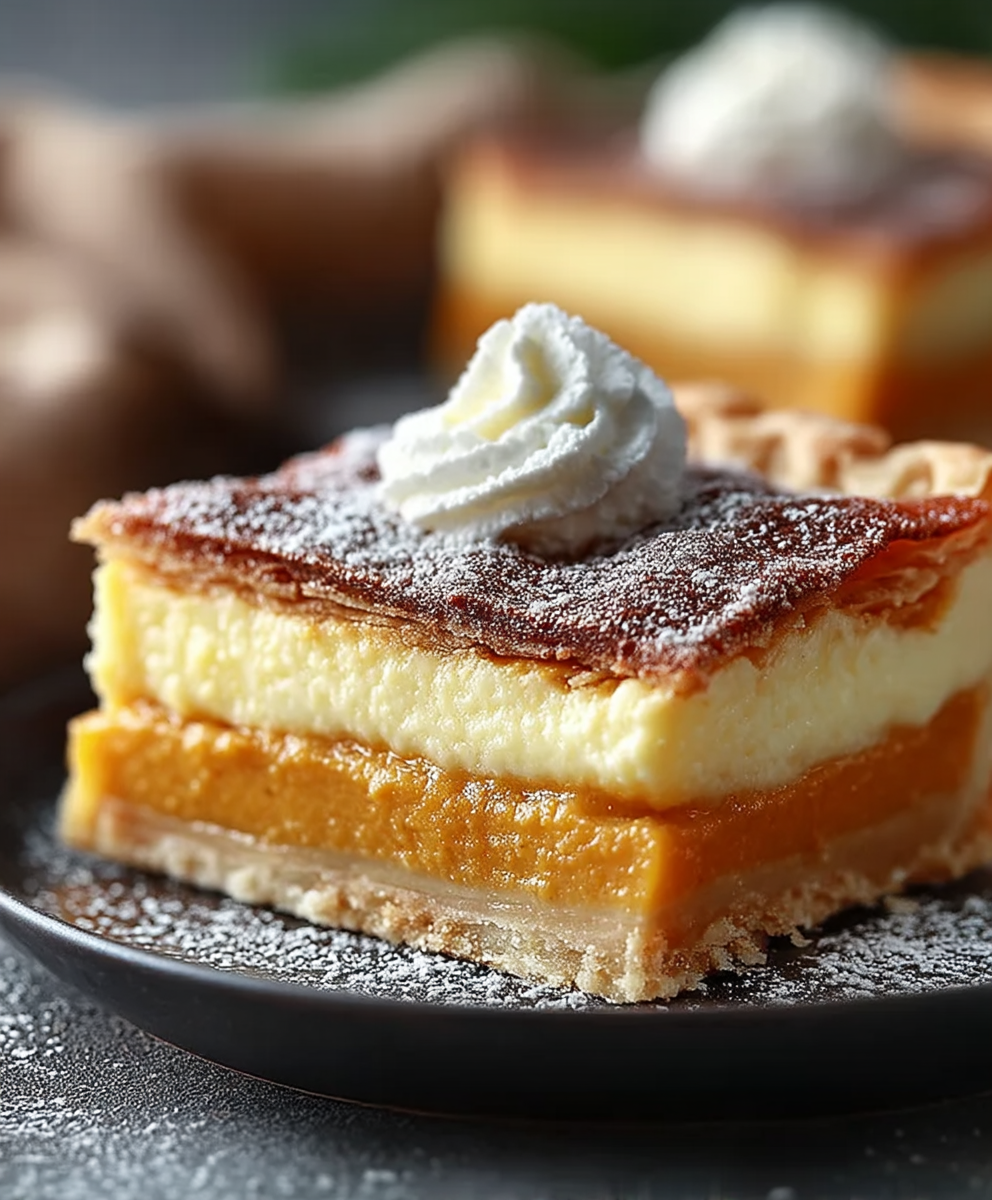
Homemade Pumpkin Pie: the quintessential dessert that embodies the warmth and comfort of autumn. Imagine the scene: crisp air, falling leaves, and the irresistible aroma of cinnamon and spice wafting from your oven. Is there anything more evocative of Thanksgiving and cozy family gatherings? This isn’t just a pie; it’s a slice of tradition.
Pumpkin pie has a rich history in American cuisine, evolving from simple pumpkin puddings brought over by early settlers to the beloved baked custard we know today. Pumpkins, native to North America, were a readily available and versatile food source for the colonists. Over time, they experimented with different spices and baking techniques, eventually perfecting the homemade pumpkin pie recipe that has graced our tables for generations.
But what is it about this dessert that makes it so universally adored? It’s the perfect balance of sweet and spice, the creamy smooth texture of the filling, and the satisfying crunch of a perfectly golden crust. It’s a dessert that’s both comforting and elegant, simple to make yet impressive to serve. Whether you’re a seasoned baker or a kitchen novice, this recipe will guide you through creating a homemade pumpkin pie that will be the star of your holiday feast. Get ready to impress your family and friends with this classic autumn treat!

Ingredients:
- For the Crust:
- 1 1/4 cups all-purpose flour, plus more for dusting
- 1/2 teaspoon salt
- 1/2 cup (1 stick) cold unsalted butter, cut into 1/2-inch cubes
- 1/4 cup cold vegetable shortening, cut into 1/2-inch cubes
- 4-6 tablespoons ice water
- For the Filling:
- 1 (15-ounce) can pumpkin puree (not pumpkin pie filling)
- 1 cup evaporated milk
- 3/4 cup packed light brown sugar
- 2 large eggs
- 1 teaspoon ground cinnamon
- 1/2 teaspoon ground ginger
- 1/4 teaspoon ground cloves
- 1/4 teaspoon ground nutmeg
- 1/2 teaspoon salt
Making the Crust:
- Combine Dry Ingredients: In a large bowl, whisk together the flour and salt. This ensures the salt is evenly distributed throughout the crust, which is crucial for flavor.
- Cut in the Fat: Add the cold butter and shortening to the flour mixture. Using a pastry blender or your fingertips (work quickly to keep the fat cold!), cut the fat into the flour until the mixture resembles coarse crumbs. You should still see some small pieces of butter and shortening these are what create flaky layers! The size of the fat pieces is key here; too small and you’ll end up with a tough crust.
- Add Ice Water: Gradually add the ice water, one tablespoon at a time, mixing gently after each addition. Use a fork to incorporate the water. Be careful not to overmix! You want just enough water to bring the dough together. The amount of water needed can vary depending on the humidity, so start with 4 tablespoons and add more as needed.
- Form the Dough: Once the dough starts to come together, gently press it into a disc. Wrap the disc tightly in plastic wrap and refrigerate for at least 30 minutes, or up to 2 days. This chilling time is essential! It allows the gluten to relax, which will prevent the crust from shrinking during baking. It also helps the fat to solidify, which contributes to flakiness.
- Roll Out the Dough: On a lightly floured surface, roll out the dough into a 12-inch circle. Work from the center outwards, rotating the dough as you go to ensure an even thickness. If the dough starts to stick, add a little more flour to the surface.
- Transfer to Pie Plate: Gently transfer the rolled-out dough to a 9-inch pie plate. You can do this by folding the dough in half or quarters and then unfolding it into the plate.
- Trim and Crimp the Edges: Trim the excess dough around the edges of the pie plate, leaving about a 1-inch overhang. Fold the overhang under and crimp the edges using your fingers or a fork. Crimp the edges decoratively to seal the crust and give it a nice finished look.
- Pre-Bake (Blind Bake) the Crust: Preheat your oven to 375°F (190°C). Line the pie crust with parchment paper and fill it with pie weights or dried beans. This will prevent the crust from puffing up during baking. Bake for 15 minutes.
- Remove Weights and Continue Baking: Remove the parchment paper and pie weights. Prick the bottom of the crust with a fork to prevent it from bubbling. Bake for another 5-10 minutes, or until the crust is lightly golden brown. This pre-baking step ensures that the bottom crust is fully cooked and doesn’t become soggy when you add the filling.
- Cool the Crust: Let the crust cool completely before adding the filling.
Making the Filling:
- Combine Ingredients: In a large bowl, whisk together the pumpkin puree, evaporated milk, brown sugar, eggs, cinnamon, ginger, cloves, nutmeg, and salt until smooth. Make sure there are no lumps of pumpkin puree remaining. The spices are what give pumpkin pie its signature flavor, so don’t skimp on them!
- Pour into Crust: Pour the pumpkin filling into the pre-baked pie crust. Be careful not to overfill the crust.
Baking the Pie:
- Bake: Bake in the preheated oven at 375°F (190°C) for 50-60 minutes, or until the filling is set but still slightly jiggly in the center. To prevent the crust from browning too quickly, you can cover the edges with foil or a pie shield during the last 20 minutes of baking.
- Cool: Let the pie cool completely on a wire rack before slicing and serving. This is important because the filling will continue to set as it cools. Cooling the pie completely also allows the flavors to meld together.
- Chill (Optional): For best results, chill the pie in the refrigerator for at least 2 hours before serving. This will further firm up the filling and enhance the flavor.
Tips for the Perfect Pumpkin Pie:
- Use Cold Ingredients: Cold butter and shortening are essential for a flaky pie crust. Make sure your ingredients are well-chilled before you start.
- Don’t Overmix the Dough: Overmixing the dough will develop the gluten, resulting in a tough crust. Mix just until the dough comes together.
- Blind Bake the Crust: Blind baking the crust prevents it from becoming soggy when you add the filling.
- Use Pumpkin Puree, Not Pie Filling: Pumpkin pie filling already contains spices and sugar, so using it will throw off the flavor balance of your pie.
- Don’t Overbake the Pie: Overbaking the pie will cause the filling to crack. The pie is done when the filling is set but still slightly jiggly in the center.
- Let the Pie Cool Completely: Cooling the pie completely allows the filling to set and the flavors to meld together.
- Add a Dollop of Whipped Cream: Serve your pumpkin pie with a dollop of whipped cream or a scoop of vanilla ice cream for the perfect finishing touch.
Variations:
- Spice it Up: Add a pinch of cayenne pepper to the filling for a subtle kick.
- Add Chocolate: Stir in 1/2 cup of chocolate chips to the filling for a chocolate pumpkin pie.
- Make it Vegan: Use a vegan pie crust and substitute the evaporated milk with coconut milk and the eggs with a flax egg (1 tablespoon flaxseed meal mixed with 3 tablespoons water).
- Add a Streusel Topping: Top the pie with a streusel topping made from flour, butter, sugar, and nuts for added texture and flavor.
Troubleshooting:
- Soggy Crust: Make sure to blind bake the crust and avoid overfilling the pie.
- Cracked Filling: Don’t overbake the pie. The filling should be set but still slightly jiggly in the center.
- Tough Crust: Don’t overmix the dough. Use cold ingredients and chill the dough before rolling it out.
- Bland Filling: Make sure to use enough spices and salt.
Storage:
- Refrigerator: Pumpkin pie can be stored in the refrigerator for up to 3-4 days. Cover it tightly with plastic wrap or store it in an airtight container.
- Freezer: Pumpkin pie can be frozen for up to 2-3 months. Wrap it tightly in plastic wrap and then in aluminum foil. Thaw it in the refrigerator overnight before serving.
Serving Suggestions:
- Serve chilled or at room temperature.
- Top with whipped cream, vanilla ice cream, or a sprinkle of cinnamon.
- Pair with a cup of coffee or tea.
- Enjoy as a dessert for Thanksgiving, Christmas, or any special occasion.
Enjoy your homemade pumpkin pie! I hope these detailed instructions help you create the perfect pie for your family and friends. Remember, baking is a science, but it’s also an art. Don’t be afraid to experiment and adjust the recipe to your liking. Happy baking!
Conclusion:
So, there you have it! This homemade pumpkin pie recipe isn’t just another pie recipe; it’s an invitation to create a memory, a tradition, and a slice of pure autumnal bliss. From the rich, spiced aroma that fills your kitchen to the creamy, comforting texture that melts in your mouth, every step of this process is designed to deliver a truly exceptional dessert. I know making a pie from scratch can seem daunting, but trust me, the reward is absolutely worth the effort. The difference between a store-bought pie and one made with love and fresh ingredients is simply undeniable.
Why is this a must-try? Because it’s more than just a dessert; it’s an experience. It’s the perfect centerpiece for your Thanksgiving table, a delightful treat for a cozy autumn evening, or a thoughtful gift for a friend or neighbor. It’s the taste of fall, captured in a single, delicious slice. And honestly, who can resist that?
But the fun doesn’t stop there! Feel free to get creative with your serving suggestions and variations. A dollop of freshly whipped cream is always a classic choice, but consider adding a sprinkle of cinnamon or nutmeg for an extra touch of warmth. For a truly decadent experience, try serving it with a scoop of vanilla bean ice cream or a drizzle of caramel sauce.
Looking for variations? You could experiment with different spices, such as cardamom or ginger, to create a unique flavor profile. For a vegan option, substitute the butter in the crust with a vegan butter alternative and use a plant-based milk in the filling. You can also add a streusel topping for extra crunch and sweetness. Simply combine flour, oats, brown sugar, and butter, then sprinkle it over the pie before baking. Another fun twist is to add a layer of chocolate ganache to the bottom of the crust before adding the pumpkin filling. The possibilities are endless!
Serving Suggestions:
- Classic: With a dollop of freshly whipped cream.
- Decadent: With vanilla bean ice cream and caramel sauce.
- Spiced: With a sprinkle of cinnamon or nutmeg.
Variations:
- Vegan: Use vegan butter and plant-based milk.
- Streusel Topping: Add a crunchy streusel topping.
- Chocolate Ganache: Layer chocolate ganache on the bottom of the crust.
I truly believe that this homemade pumpkin pie will become a staple in your recipe collection. It’s a recipe that you’ll turn to year after year, not just for the holidays, but whenever you’re craving a taste of comfort and warmth.
So, what are you waiting for? Gather your ingredients, preheat your oven, and get ready to create a masterpiece. I’m confident that you’ll be amazed by the results. And most importantly, don’t forget to have fun! Baking should be a joyful experience, so relax, enjoy the process, and savor the delicious aroma that fills your home.
I’m so excited for you to try this recipe! Once you do, please come back and share your experience in the comments below. I’d love to hear about your variations, your serving suggestions, and any tips or tricks that you discovered along the way. Let’s create a community of pumpkin pie enthusiasts and share our love for this classic dessert! Happy baking! I can’t wait to hear all about your homemade pumpkin pie success!
Homemade Pumpkin Pie: The Ultimate Recipe for Fall
Classic homemade pumpkin pie with a flaky, buttery crust and a smooth, spiced pumpkin filling. Perfect for holidays and fall gatherings!
Ingredients
- 1 1/4 cups all-purpose flour, plus more for dusting
- 1/2 teaspoon salt
- 1/2 cup (1 stick) cold unsalted butter, cut into 1/2-inch cubes
- 1/4 cup cold vegetable shortening, cut into 1/2-inch cubes
- 4-6 tablespoons ice water
- 1 (15-ounce) can pumpkin puree (not pumpkin pie filling)
- 1 cup evaporated milk
- 3/4 cup packed light brown sugar
- 2 large eggs
- 1 teaspoon ground cinnamon
- 1/2 teaspoon ground ginger
- 1/4 teaspoon ground cloves
- 1/4 teaspoon ground nutmeg
- 1/2 teaspoon salt
Instructions
- Combine Dry Ingredients: In a large bowl, whisk together the flour and salt.
- Cut in the Fat: Add the cold butter and shortening to the flour mixture. Using a pastry blender or your fingertips (work quickly to keep the fat cold!), cut the fat into the flour until the mixture resembles coarse crumbs.
- Add Ice Water: Gradually add the ice water, one tablespoon at a time, mixing gently after each addition. Use a fork to incorporate the water. Be careful not to overmix!
- Form the Dough: Once the dough starts to come together, gently press it into a disc. Wrap the disc tightly in plastic wrap and refrigerate for at least 30 minutes, or up to 2 days.
- Roll Out the Dough: On a lightly floured surface, roll out the dough into a 12-inch circle.
- Transfer to Pie Plate: Gently transfer the rolled-out dough to a 9-inch pie plate.
- Trim and Crimp the Edges: Trim the excess dough around the edges of the pie plate, leaving about a 1-inch overhang. Fold the overhang under and crimp the edges using your fingers or a fork.
- Pre-Bake (Blind Bake) the Crust: Preheat your oven to 375°F (190°C). Line the pie crust with parchment paper and fill it with pie weights or dried beans. Bake for 15 minutes.
- Remove Weights and Continue Baking: Remove the parchment paper and pie weights. Prick the bottom of the crust with a fork to prevent it from bubbling. Bake for another 5-10 minutes, or until the crust is lightly golden brown.
- Cool the Crust: Let the crust cool completely before adding the filling.
- Combine Ingredients: In a large bowl, whisk together the pumpkin puree, evaporated milk, brown sugar, eggs, cinnamon, ginger, cloves, nutmeg, and salt until smooth.
- Pour into Crust: Pour the pumpkin filling into the pre-baked pie crust.
- Bake: Bake in the preheated oven at 375°F (190°C) for 50-60 minutes, or until the filling is set but still slightly jiggly in the center. To prevent the crust from browning too quickly, you can cover the edges with foil or a pie shield during the last 20 minutes of baking.
- Cool: Let the pie cool completely on a wire rack before slicing and serving.
- Chill (Optional): For best results, chill the pie in the refrigerator for at least 2 hours before serving.
Notes
- Use cold butter and shortening for a flaky crust.
- Don’t overmix the dough.
- Blind bake the crust to prevent a soggy bottom.
- Use pumpkin puree, not pumpkin pie filling.
- Don’t overbake the pie.
- Let the pie cool completely before slicing.
- Serve with whipped cream or vanilla ice cream.

Leave a Comment