
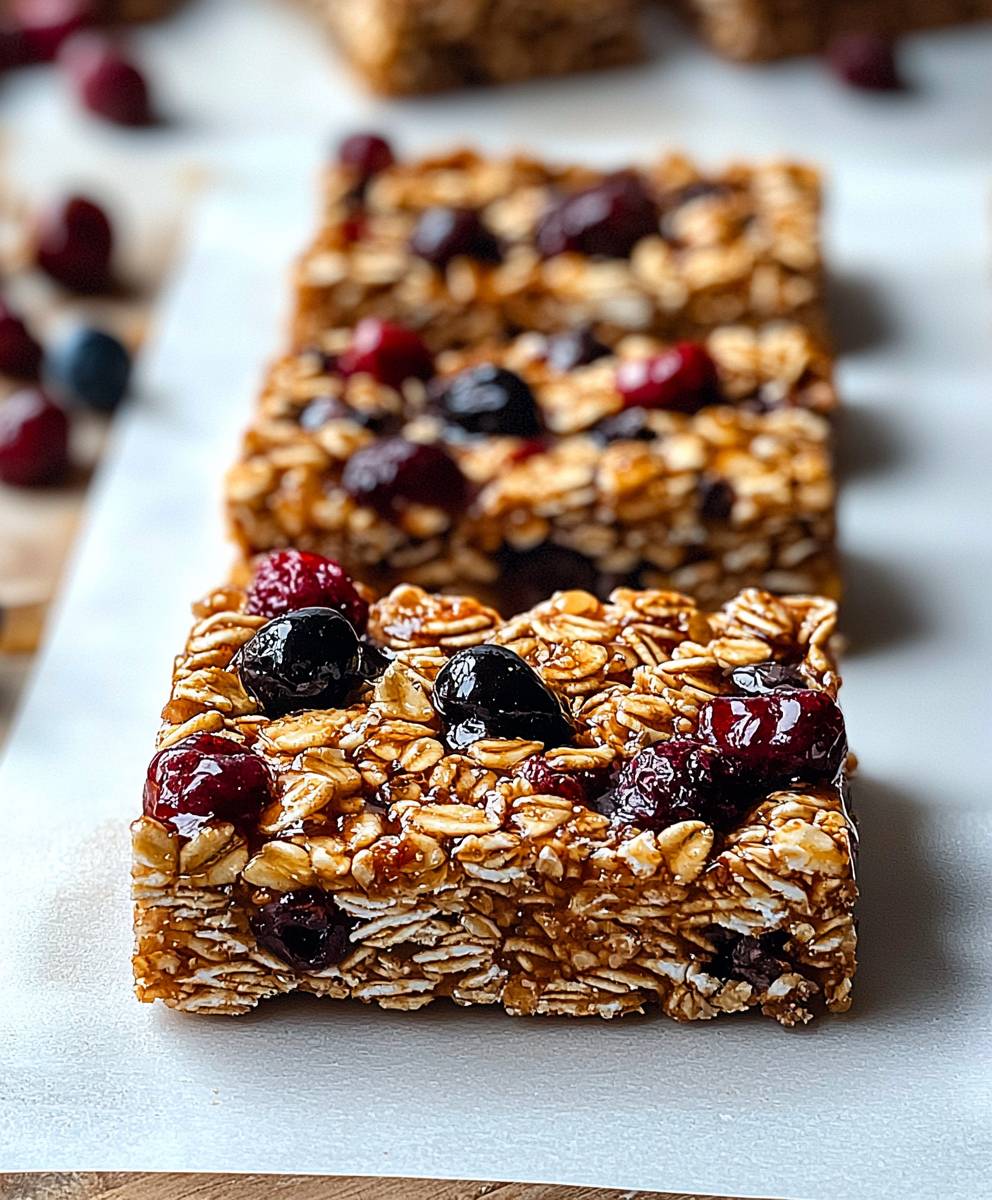
Homemade Granola Bars: the perfect on-the-go snack, breakfast, or even dessert! Forget those store-bought bars packed with preservatives and questionable ingredients. Imagine sinking your teeth into a chewy, crunchy, and utterly satisfying bar that you crafted with your own two hands. Sounds tempting, right?
Granola bars, in their essence, are a modern marvel born from the health food movement. While the concept of combining grains, nuts, and sweeteners has existed in various forms throughout history, the granola bar as we know it gained popularity in the 1970s. It was a convenient and portable way to fuel active lifestyles, and the trend has only grown since then.
What’s not to love? People adore homemade granola bars because they offer a delightful combination of textures and flavors. The satisfying crunch of toasted oats and nuts, the chewy sweetness of honey or maple syrup, and the endless possibilities for customization make them irresistible. Plus, when you make them yourself, you control exactly what goes in, ensuring a healthier and more delicious treat. I find that making them at home is also a great way to save money and reduce waste from individually wrapped bars.
Ready to ditch the processed snacks and embrace the wholesome goodness of homemade? Let’s get started!

Ingredients:
- 3 cups rolled oats (not instant)
- 1 cup mixed nuts (almonds, walnuts, pecans), roughly chopped
- 1/2 cup seeds (pumpkin, sunflower, flax), mixed
- 1/2 cup shredded coconut (unsweetened)
- 1/4 cup puffed rice cereal (optional, for extra crunch)
- 1/2 teaspoon ground cinnamon
- 1/4 teaspoon salt
- 1/2 cup honey
- 1/2 cup peanut butter (or almond butter, sunflower seed butter)
- 1/4 cup coconut oil, melted
- 1 teaspoon vanilla extract
- 1/2 cup dried cranberries (or raisins, chopped dates)
- 1/4 cup chocolate chips (optional)
Preparing the Dry Ingredients:
- First, let’s get all our dry ingredients ready. In a large bowl, combine the 3 cups of rolled oats, 1 cup of chopped mixed nuts, and the 1/2 cup of mixed seeds. Make sure everything is evenly distributed.
- Next, add the 1/2 cup of shredded coconut and the optional 1/4 cup of puffed rice cereal. I love the extra crunch the puffed rice cereal adds, but feel free to skip it if you don’t have any on hand.
- Now, for a little warmth and flavor, sprinkle in the 1/2 teaspoon of ground cinnamon and the 1/4 teaspoon of salt. Give everything a good toss to ensure the spices are evenly incorporated. This step is crucial for a well-balanced flavor in your granola bars.
Preparing the Wet Ingredients:
- In a separate, microwave-safe bowl, combine the 1/2 cup of honey, 1/2 cup of peanut butter (or your preferred nut butter), and the 1/4 cup of melted coconut oil.
- Microwave the mixture for about 30-45 seconds, or until the peanut butter is softened and the coconut oil is fully melted. Be careful not to overheat it!
- Remove the bowl from the microwave and stir the wet ingredients together until they are smooth and well combined. This will create a lovely, sticky binder for our granola bars.
- Stir in the 1 teaspoon of vanilla extract. The vanilla adds a nice depth of flavor that complements the other ingredients beautifully.
Combining Wet and Dry Ingredients:
- Pour the wet ingredients over the dry ingredients in the large bowl.
- Using a sturdy spatula or wooden spoon, mix everything together thoroughly. This is where you’ll need a little elbow grease! Make sure all the dry ingredients are coated evenly with the wet mixture. You want every oat and nut to be nice and sticky.
- Continue mixing until the mixture is well combined and holds together when you squeeze a handful. If it seems too dry, you can add a tablespoon or two more of melted coconut oil or honey.
- Finally, gently fold in the 1/2 cup of dried cranberries (or your preferred dried fruit) and the optional 1/4 cup of chocolate chips. I like to add these last to prevent the chocolate chips from melting too much during the mixing process.
Pressing and Baking (or No-Bake Option):
- Preheat your oven to 325°F (160°C).
- Line an 8×8 inch baking pan with parchment paper. Make sure the parchment paper overhangs the sides of the pan; this will make it easier to lift the granola bars out later.
- Pour the granola mixture into the prepared pan.
- Using a piece of parchment paper or the back of a measuring cup, press the mixture firmly and evenly into the pan. The firmer you press, the more compact and less crumbly your granola bars will be. This is a very important step!
- Baking Option: Bake for 20-25 minutes, or until the edges are golden brown and the center is set. Keep a close eye on them, as baking times may vary depending on your oven.
- No-Bake Option: If you prefer a no-bake version, simply place the pressed granola mixture in the refrigerator for at least 2 hours, or preferably overnight, to allow it to firm up.
Cooling and Cutting:
- Remove the pan from the oven (if baking) and let the granola bars cool completely in the pan. This will take at least an hour.
- Once the granola bars are completely cool, lift them out of the pan using the parchment paper overhang.
- Place the granola bar slab on a cutting board.
- Using a sharp knife, cut the granola bars into your desired size and shape. I usually cut them into rectangles, but you can also make squares or even triangles.
- For cleaner cuts, you can chill the granola bars in the refrigerator for about 30 minutes before cutting. This will help them hold their shape better.
Storage:
- Store the homemade granola bars in an airtight container at room temperature for up to a week, or in the refrigerator for up to two weeks.
- You can also freeze them for longer storage. Wrap each granola bar individually in plastic wrap and then place them in a freezer-safe bag or container. They can be frozen for up to two months.
- To thaw, simply remove a granola bar from the freezer and let it sit at room temperature for about 30 minutes.
Tips and Variations:
- Nut Butter Substitutions: Feel free to experiment with different nut butters, such as almond butter, cashew butter, or sunflower seed butter. Each will add a unique flavor to your granola bars.
- Dried Fruit Variations: Instead of dried cranberries, try using raisins, chopped dates, dried apricots, or even dried cherries.
- Seed Combinations: You can use any combination of seeds you like, such as pumpkin seeds, sunflower seeds, flax seeds, chia seeds, or hemp seeds.
- Spice It Up: Add a pinch of ground ginger, nutmeg, or cardamom for a warm and festive flavor.
- Add Some Protein: Stir in a scoop of protein powder for an extra boost of protein.
- Make it Vegan: Substitute the honey with maple syrup or agave nectar to make these granola bars vegan.
- Chocolate Lovers: Add more chocolate chips, or drizzle melted chocolate over the cooled granola bars for an extra decadent treat. You can also use different types of chocolate, such as dark chocolate, milk chocolate, or white chocolate.
- Texture Tweaks: If you prefer a chewier granola bar, use more honey or nut butter. If you prefer a crunchier granola bar, use more oats or nuts.
- Baking Time Adjustments: Keep a close eye on the granola bars while they are baking, as baking times may vary depending on your oven. If they start to brown too quickly, you can tent them with foil.
- Pressing Power: The key to making granola bars that hold together well is to press the mixture firmly into the pan. Don’t be afraid to really pack it in there!
Enjoy your delicious and healthy homemade granola bars! They are perfect for a quick breakfast, a midday snack, or a post-workout treat.
Conclusion:
So, there you have it! These Homemade Granola Bars are more than just a snack; they’re a powerhouse of flavor and nutrition, perfectly tailored to your taste. I truly believe this recipe is a must-try for anyone looking for a healthier, more satisfying alternative to store-bought options. Forget those overly processed bars packed with artificial ingredients and hidden sugars. With this recipe, you’re in complete control, crafting a delicious and wholesome treat that you can feel good about eating and sharing.
What makes these bars so special? It’s the combination of textures the satisfying crunch of the oats and nuts, the chewy sweetness of the dried fruit, and the subtle binding power of the honey and nut butter. But beyond the delightful sensory experience, it’s the versatility that truly shines. You can easily adapt this recipe to suit your dietary needs and preferences. Are you gluten-free? Simply use certified gluten-free oats. Vegan? Swap the honey for maple syrup or agave nectar. Allergic to nuts? Sunflower seed butter or tahini work beautifully as substitutes. The possibilities are truly endless!
Beyond the basic recipe, consider these serving suggestions and variations to elevate your Homemade Granola Bars even further. For a decadent treat, drizzle melted dark chocolate over the cooled bars and sprinkle with sea salt. This adds a touch of indulgence that’s perfect for satisfying those chocolate cravings. If you’re looking for a protein boost, add a scoop of your favorite protein powder to the dry ingredients. This is a great option for post-workout fuel or a quick and easy breakfast on the go. For a festive twist, incorporate seasonal ingredients like cranberries and pumpkin seeds during the fall, or dried cherries and almonds during the holidays. You can also experiment with different spices, such as cinnamon, nutmeg, or ginger, to add warmth and depth of flavor.
These bars are incredibly convenient to have on hand. They’re perfect for packing in lunchboxes, taking on hikes, or enjoying as a mid-afternoon snack. I often make a big batch on the weekend and store them in an airtight container for the week ahead. They stay fresh for several days at room temperature, or you can freeze them for longer storage. Simply wrap them individually in plastic wrap or parchment paper before freezing to prevent them from sticking together.
I’m confident that you’ll love these Homemade Granola Bars as much as I do. They’re easy to make, endlessly customizable, and incredibly delicious. But don’t just take my word for it give them a try yourself! I’m so excited to see what variations you come up with. Once you’ve made your own batch, I’d love to hear about your experience. Share your photos and comments on social media using [Your Hashtag] or leave a review on the recipe page. Let me know what ingredients you used, what variations you tried, and what you thought of the final result. Your feedback is invaluable and helps me to continue creating recipes that you’ll love. Happy baking, and enjoy your delicious, homemade granola bars!
Remember, the best part about cooking is experimenting and making a recipe your own. So, don’t be afraid to get creative and have fun with it. I can’t wait to hear all about your granola bar adventures!
Homemade Granola Bars: The Ultimate Guide & Easy Recipes
Easy homemade granola bars with oats, nuts, seeds, and dried fruit. Bake for a golden crunch or enjoy no-bake for a chewy treat!
Ingredients
- 3 cups rolled oats (not instant)
- 1 cup mixed nuts (almonds, walnuts, pecans), roughly chopped
- 1/2 cup seeds (pumpkin, sunflower, flax), mixed
- 1/2 cup shredded coconut (unsweetened)
- 1/4 cup puffed rice cereal (optional, for extra crunch)
- 1/2 teaspoon ground cinnamon
- 1/4 teaspoon salt
- 1/2 cup honey
- 1/2 cup peanut butter (or almond butter, sunflower seed butter)
- 1/4 cup coconut oil, melted
- 1 teaspoon vanilla extract
- 1/2 cup dried cranberries (or raisins, chopped dates)
- 1/4 cup chocolate chips (optional)
Instructions
- Prepare Dry Ingredients: In a large bowl, combine rolled oats, chopped nuts, mixed seeds, shredded coconut, and puffed rice cereal (if using). Add cinnamon and salt, and toss to combine.
- Prepare Wet Ingredients: In a microwave-safe bowl, combine honey, peanut butter (or nut butter of choice), and melted coconut oil. Microwave for 30-45 seconds, or until softened. Stir until smooth. Stir in vanilla extract.
- Combine Wet and Dry: Pour the wet ingredients over the dry ingredients. Mix thoroughly until all dry ingredients are evenly coated. The mixture should hold together when squeezed. If too dry, add a tablespoon or two more of melted coconut oil or honey.
- Add Fruit and Chocolate: Gently fold in dried cranberries (or other dried fruit) and chocolate chips (if using).
- Press and Bake (or No-Bake):
- Baking Option: Preheat oven to 325°F (160°C). Line an 8×8 inch baking pan with parchment paper, leaving an overhang. Pour the granola mixture into the pan and press firmly and evenly. Bake for 20-25 minutes, or until golden brown.
- No-Bake Option: Line an 8×8 inch baking pan with parchment paper, leaving an overhang. Pour the granola mixture into the pan and press firmly and evenly. Place in the refrigerator for at least 2 hours, or preferably overnight, to firm up.
- Cool and Cut: Let the granola bars cool completely in the pan. Lift them out using the parchment paper overhang. Cut into desired size and shape. Chill for 30 minutes before cutting for cleaner cuts.
- Storage: Store in an airtight container at room temperature for up to a week, or in the refrigerator for up to two weeks. For longer storage, wrap individually and freeze for up to two months.
Notes
- Nut Butter Substitutions: Feel free to experiment with different nut butters, such as almond butter, cashew butter, or sunflower seed butter. Each will add a unique flavor to your granola bars.
- Dried Fruit Variations: Instead of dried cranberries, try using raisins, chopped dates, dried apricots, or even dried cherries.
- Seed Combinations: You can use any combination of seeds you like, such as pumpkin seeds, sunflower seeds, flax seeds, chia seeds, or hemp seeds.
- Spice It Up: Add a pinch of ground ginger, nutmeg, or cardamom for a warm and festive flavor.
- Add Some Protein: Stir in a scoop of protein powder for an extra boost of protein.
- Make it Vegan: Substitute the honey with maple syrup or agave nectar to make these granola bars vegan.
- Chocolate Lovers: Add more chocolate chips, or drizzle melted chocolate over the cooled granola bars for an extra decadent treat. You can also use different types of chocolate, such as dark chocolate, milk chocolate, or white chocolate.
- Texture Tweaks: If you prefer a chewier granola bar, use more honey or nut butter. If you prefer a crunchier granola bar, use more oats or nuts.
- Baking Time Adjustments: Keep a close eye on the granola bars while they are baking, as baking times may vary depending on your oven. If they start to brown too quickly, you can tent them with foil.
- Pressing Power: The key to making granola bars that hold together well is to press the mixture firmly into the pan. Don’t be afraid to really pack it in there!
Leave a Comment