
Cinnamon Sugar Pretzels are more than just a delightful snack; they represent a perfect blend of comfort and indulgence that captures hearts and taste buds alike. Imagine the aroma wafting through your kitchen: warm, freshly baked dough, dusted generously with aromatic cinnamon and sparkling sugar. It’s a scent that promises pure bliss, a taste that transports you to a cozy, nostalgic place.
While the pretzel itself boasts a fascinating history, believed to have originated in European monasteries as a Lenten bread, its sweet evolution, particularly when generously coated with cinnamon and sugar, truly stands out as a beloved modern adaptation. What makes these treats so utterly irresistible? For me, it’s the magical contrast: the slightly crisp exterior giving way to a wonderfully soft and chewy interior, all enveloped in that sweet, spicy, and utterly addictive cinnamon-sugar coating. Whether enjoyed warm from the oven on a chilly afternoon or crafted as a fun weekend project, the joy these homemade Cinnamon Sugar Pretzels bring is immense, offering a comforting warmth and a burst of flavor that is simply unmatched. I invite you to discover the simple pleasure and rich reward of baking these delightful treats.

Ingredients:
- For the Pretzel Dough:
- 1 ½ cups (360ml) warm water (between 105°F and 115°F / 40°C and 46°C)
- 1 tablespoon (12g) granulated sugar
- 2 teaspoons (7g) active dry yeast
- 2 ¼ teaspoons (13g) fine sea salt, divided (1 ½ teaspoons for the dough, ¾ teaspoon for the boiling solution)
- 2 tablespoons (28g) unsalted butter, melted and cooled slightly, plus more for greasing the bowl
- 4 ½ cups (540g) bread flour, plus more for dusting (I find bread flour gives the best chew!)
- For the Boiling Solution:
- 10 cups (2.4 liters) water
- ½ cup (120g) baking soda
- ¾ teaspoon (4g) fine sea salt (the remaining portion from above)
- For the Cinnamon Sugar Coating:
- ½ cup (113g) unsalted butter, melted
- 1 cup (200g) granulated sugar
- 2 tablespoons (14g) ground cinnamon
Preparing the Dough
- Activate the Yeast: In a large mixing bowl (or the bowl of a stand mixer), pour in your warm water. It’s important that the water is just right – too hot will kill the yeast, and too cold won’t activate it properly. Aim for a temperature that feels like a warm bath, not scalding. Sprinkle the 1 tablespoon of granulated sugar and the 2 teaspoons of active dry yeast over the warm water. Give it a gentle stir with a spoon or whisk to ensure the yeast is submerged. I like to let this mixture sit for about 5 to 10 minutes. You’ll know your yeast is alive and happy when it becomes wonderfully foamy and bubbly on top, almost like a little cloud of activity. This effervescent layer indicates that the yeast is feasting on the sugar and releasing carbon dioxide, which will later help our pretzels rise and become light. If, after 10 minutes, there’s no visible foam or activity, your yeast might be old or the water temperature was incorrect, and it’s best to start over with fresh yeast and carefully measured water. This initial step is absolutely critical for ensuring your homemade Cinnamon Sugar Pretzels will be delightfully soft and airy, with that perfect yeasted flavor.
- Mix the Dough Ingredients: Once your yeast mixture is beautifully bloomed and active, add 1 ½ teaspoons of fine sea salt and the 2 tablespoons of melted and slightly cooled unsalted butter to the bowl. Give it a quick whisk to combine these liquids thoroughly. Next, gradually add the bread flour, about 1 cup at a time, mixing well after each addition. I usually start with a wooden spoon or a sturdy spatula, incorporating the flour until it becomes too stiff to stir. Then, I switch to using my hands, or if you’re using a stand mixer with a dough hook, add the flour slowly on low speed. The dough will be shaggy, rough, and quite sticky at first, but don’t worry, that’s completely normal for a hydrated dough and a sign that you’re on the right track. Continue adding flour until a cohesive mass begins to form, but it will still look quite unrefined.
- Knead the Dough: Turn the shaggy dough out onto a very lightly floured surface. Now comes the most satisfying part of dough making: the kneading! Kneading is what develops the gluten in the bread flour, giving our pretzels their signature chewy texture and structure. If you’re kneading by hand, push the dough away from you with the heels of your hands, then fold it back over itself, give it a quarter turn, and repeat this rhythmic process. This vigorous kneading should take about 8 to 10 minutes. You’ll notice the dough transform from sticky and rough to smooth, elastic, and wonderfully springy. It should be pliable, feel soft, and bounce back slowly when you gently poke it with your finger. If using a stand mixer, attach the dough hook and knead on medium-low speed for about 6 to 8 minutes, until the dough is smooth, elastic, and pulls away cleanly from the sides of the bowl. I always perform a “windowpane test” at the end of kneading: gently pull a small piece of the dough between your fingers. If it stretches into a thin, translucent membrane without tearing, your gluten is perfectly developed, and the dough is ready for its first rise.
- First Rise: Lightly grease a large clean bowl with a little unsalted butter or a neutral oil to prevent sticking. Place the thoroughly kneaded dough into the prepared bowl, turning it once to ensure the entire surface is lightly coated with oil. This prevents a dry skin from forming on top of your beautiful dough. Cover the bowl tightly with plastic wrap or a clean, damp kitchen towel. Now, let it rise in a warm, draft-free place for about 1 to 1 ½ hours, or until it has roughly doubled in size. The exact time can vary significantly depending on the ambient temperature of your kitchen; warmer environments will encourage a faster rise. I sometimes turn on my oven to its lowest setting (around 170°F/77°C) for just 1-2 minutes, then turn it off and let the dough rise inside with the door slightly ajar – it creates a perfect warm and cozy environment! A proper first rise is absolutely essential for achieving a light, airy, and fluffy interior for our incredibly delicious Cinnamon Sugar Pretzels.
Shaping Your Pretzels
- Prepare for Shaping: Once your dough has beautifully doubled in size, gently punch it down to release the accumulated air. This step helps redistribute the yeast and nutrients, creating a finer, more even crumb in the final product. Turn the dough out onto a very lightly floured work surface. At this point, I highly recommend using a kitchen scale to ensure your pretzels are uniform in size. Uniformity is key for even baking, so each pretzel cooks perfectly at the same rate. Divide the dough into 12 equal pieces. For a typical pretzel size, each piece should weigh approximately 75-80 grams. If you don’t have a scale, try to eyeball it and make them as consistent as possible by cutting them into roughly equal portions.
- Roll the Ropes: Take one piece of dough and begin rolling it out into a long rope, aiming for about 20-24 inches (50-60 cm) in length. The trick here is to apply even pressure as you roll, ensuring the rope is consistent in thickness throughout its entire length. I do this by starting in the middle of the dough piece and rolling outwards towards the ends with my palms, applying gentle but firm pressure. If the dough snaps back or resists rolling, let it rest for a minute or two to allow the gluten to relax – this makes it much easier to stretch without tearing. You want a relatively thin rope, about the thickness of a permanent marker, as the pretzels will puff up considerably during both the boiling and baking stages. A thin rope will yield that classic delicate and chewy pretzel shape.
- Form the Pretzel Shape: This is the fun and iconic part! Once you have your long, even rope, lay it in a U-shape in front of you. Take the two ends and cross them over each other twice, forming a simple twist. Then, bring the twisted ends down towards the bottom curve of the U and press them firmly onto the dough to secure the classic pretzel shape. Make sure they are sealed really well, otherwise, they might unravel during the boiling process, which would be a shame! Repeat this shaping technique with all the remaining dough pieces. As you shape each one, place them on a parchment-lined baking sheet, leaving a little space between each pretzel to prevent them from sticking together. You can also cover them loosely with plastic wrap while you finish shaping the batch to prevent them from drying out.
The Boiling Process
- Preheat Oven and Prepare Boiling Solution: While you’re shaping your pretzels, it’s a good time to get your oven ready. Go ahead and preheat your oven to a hot 450°F (230°C). Line two large baking sheets with fresh sheets of parchment paper or silicone baking mats; I sometimes lightly spray them with non-stick cooking spray for extra insurance, especially if my parchment paper isn’t silicone-coated. Now, for the crucial boiling step! In your largest, widest pot (I often use my biggest Dutch oven, as it has ample surface area), combine 10 cups of water and ½ cup of baking soda, along with the remaining ¾ teaspoon of fine sea salt. Bring this mixture to a vigorous, rolling boil over high heat. The baking soda creates an alkaline environment, which is precisely what gives our Cinnamon Sugar Pretzels their beautiful dark brown, shiny crust and that distinct, slightly malty, pretzel flavor that sets them apart from regular bread.
- Boil the Pretzels: Once the baking soda solution is at a vigorous, active boil, carefully drop the shaped pretzels into the boiling solution, one or two at a time, depending on the size of your pot. It’s absolutely critical not to overcrowd the pot; each pretzel needs enough space to float freely and move without touching its neighbors. Overcrowding will cause the water temperature to drop too much and can result in soggy, rather than perfectly chewy, pretzels. Boil each pretzel for about 20-30 seconds per side, for a total of 40-60 seconds. You’ll notice them puff up slightly and take on a slightly slick appearance. Using a slotted spoon or a spider, carefully remove the pretzels from the hot water. Allow any excess water to drip off for a few seconds, then gently transfer them back to your prepared baking sheets. Be very gentle at this stage, as the boiled dough will be quite delicate.
Baking Your Cinnamon Sugar Pretzels
- Bake to Golden Perfection: Place the baking sheets with your boiled pretzels into the preheated oven. Bake for 12 to 15 minutes, or until the pretzels are beautifully golden brown and look wonderfully inviting. The exact baking time can vary slightly depending on your specific oven and the precise size and thickness of your pretzels, so consider these times as a guideline. I always keep a close eye on them, often rotating the baking sheets halfway through baking to ensure even browning across all the pretzels. You’re looking for that characteristic pretzel color, which is usually a bit darker and richer than a typical bread, hinting at their delightful chewiness and robust flavor.
- Cool Slightly: Once baked to perfection, immediately transfer the hot pretzels to a wire rack to cool slightly. While they are still very warm, we’ll prepare them for their glorious and essential cinnamon sugar coating. Do not let them cool completely, as the melted butter for the coating adheres best to warm pretzels, ensuring maximum stickiness and flavor absorption. This is truly where the magic really happens for our crave-worthy Cinnamon Sugar Pretzels!
The Cinnamon Sugar Coating
- Prepare the Cinnamon Sugar Mixture: In a shallow dish or a wide bowl (one large enough to easily dredge a pretzel), combine the 1 cup of granulated sugar and the 2 tablespoons of ground cinnamon. Whisk them together thoroughly until the cinnamon is completely and evenly distributed throughout the sugar. You want a consistent, warm brown color, with no clumps of cinnamon. This perfectly balanced blend of sweet sugar and aromatic cinnamon is the very heart of what makes these truly wonderful Cinnamon Sugar Pretzels so incredibly special and utterly irresistible.
- Butter and Coat: In a separate shallow dish or bowl, melt the ½ cup of unsalted butter. Ensure it’s fully liquid and warm. While the pretzels are still wonderfully warm from the oven, generously brush each pretzel with the melted butter on all sides. I find using a pastry brush works best to get into all the nooks and crannies of the pretzel shape, ensuring every part gets coated. Don’t be shy with the butter; it not only acts as the adhesive for the cinnamon sugar but also adds incredible richness, flavor, and moisture to the pretzel itself, making it even more delicious.
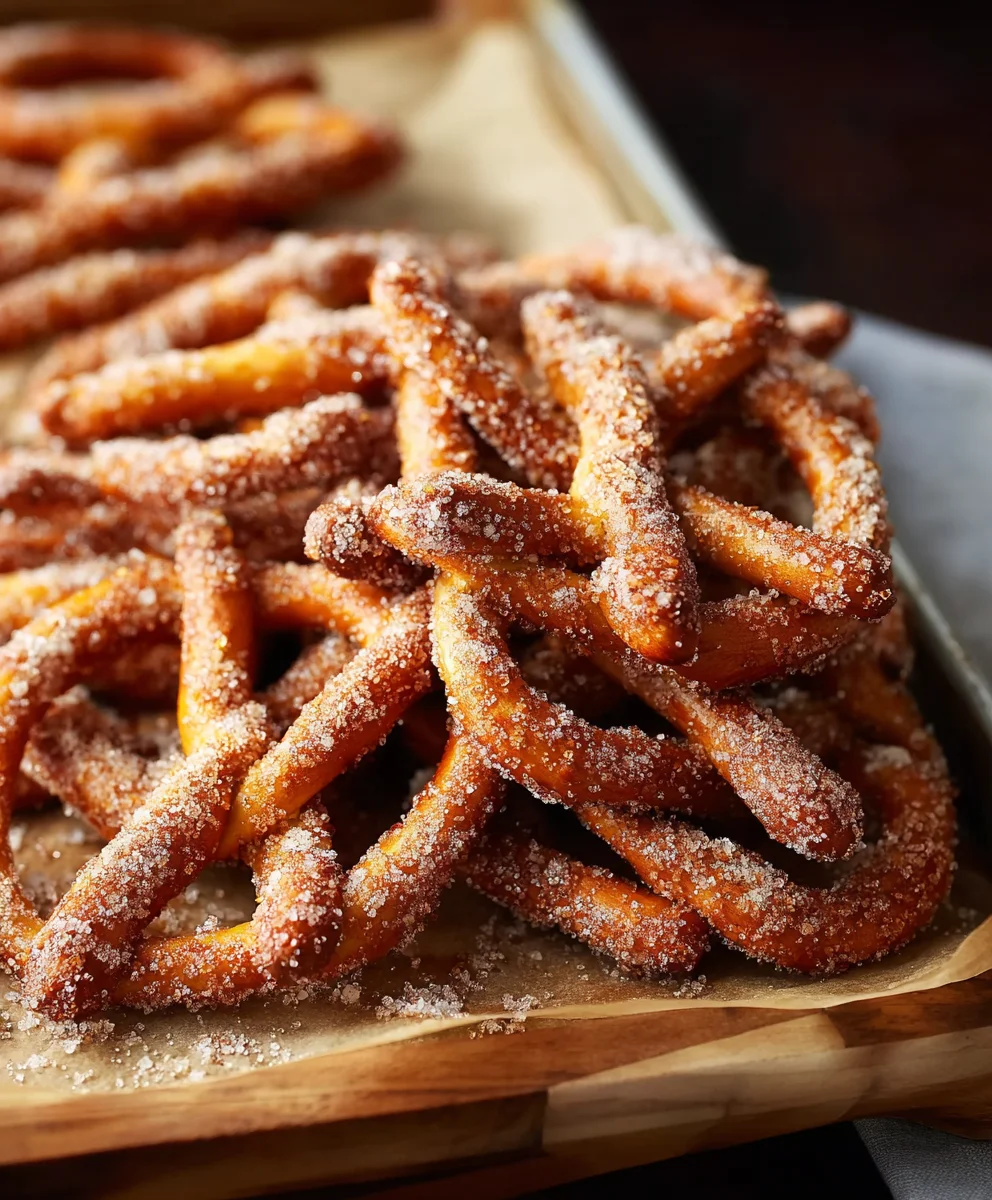
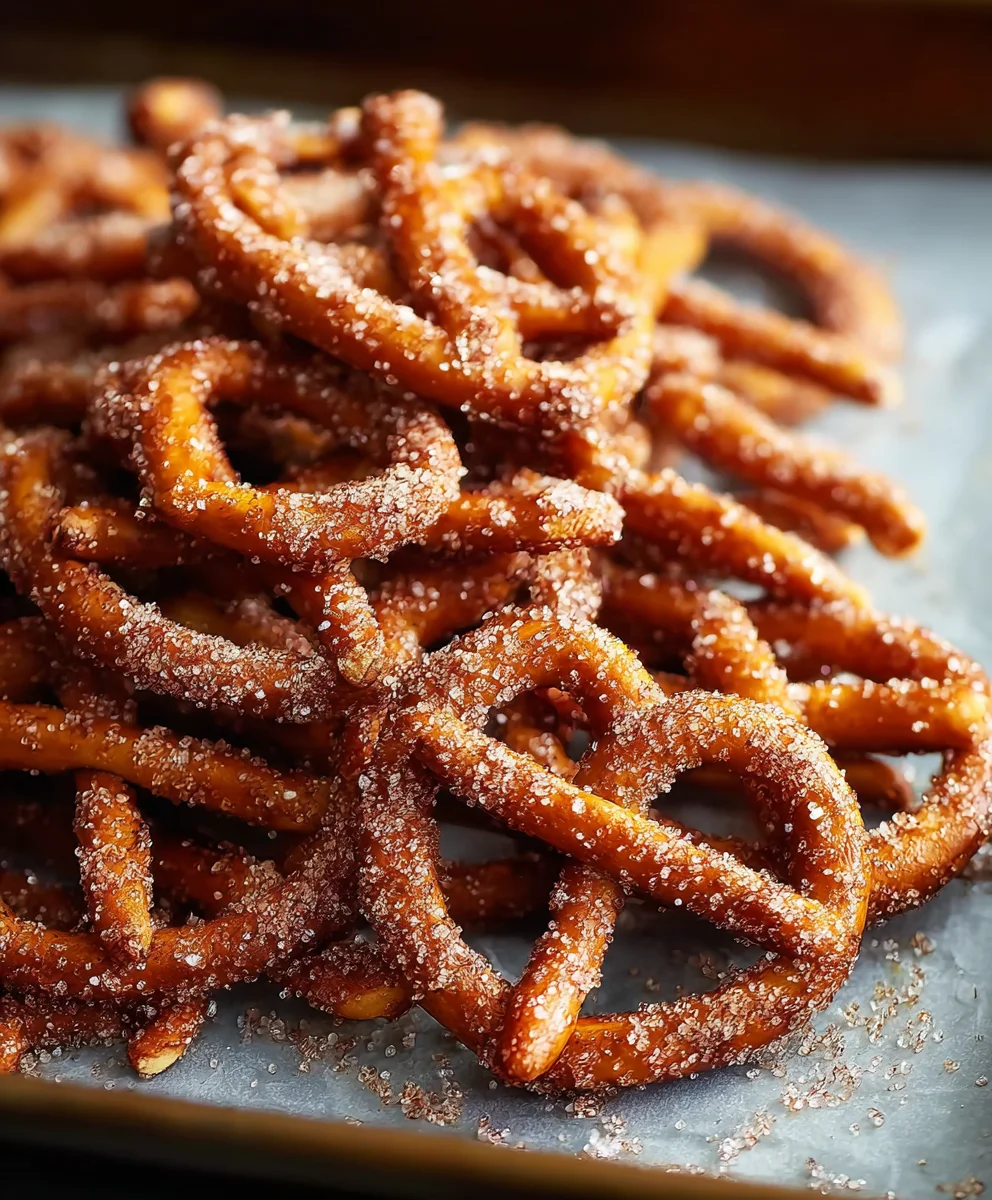
- Generously Coat with Cinnamon Sugar: Immediately after buttering, while the butter is still wet and warm, dredge each pretzel through the cinnamon sugar mixture. Turn it over several times, pressing gently, to ensure it’s completely and generously coated on all surfaces. You want every inch of that warm, buttery pretzel shimmering with that sweet, spiced goodness. There’s no such thing as too much cinnamon sugar when it comes to these treats! Transfer the fully coated pretzels back to the wire rack.
- Serve and Enjoy: Your homemade Cinnamon Sugar Pretzels are an absolute dream best enjoyed warm, ideally straight from the oven after coating! The delightful combination of the soft, tender, and chewy interior, the slight crispness and distinct flavor of the pretzel crust, and the generous coating of sweet, aromatic cinnamon sugar is an experience that is absolutely irresistible. They are perfect for a cozy afternoon snack, a special treat for movie night, a delightful addition to any dessert spread, or just whenever you crave something wonderfully sweet and satisfying.
Tips for the Best Cinnamon Sugar Pretzels:
- Dough Consistency is Key: When kneading, resist the urge to add too much extra flour. A slightly tacky dough is perfectly fine and will result in a more tender and moist pretzel. If your dough feels too stiff or dense, it will be harder to roll into those long ropes and can lead to tough, dense pretzels. Trust the process and aim for that smooth, elastic, yet slightly yielding feel. The goal is a dough that’s easy to work with but not dry.
- Precision in Boiling: The boiling step might seem a little intimidating at first, but it’s absolutely crucial for achieving the characteristic pretzel texture and flavor. Boiling for too long can make your pretzels tough or impart a too-strong baking soda flavor, while too short a boil won’t give them that iconic chewy crust and deep brown color. Stick closely to the recommended 20-30 seconds per side; this timeframe is optimal for developing the perfect pretzel exterior without overcooking the dough.
- Don’t Skip the Warmth for the Rise: Yeast absolutely loves a warm, consistent environment to thrive. If your kitchen is on the cooler side, your dough will take much longer to rise, and the final texture might not be as light and airy. Try warming your oven slightly (to its lowest setting for just a few minutes) then turning it off, or using a proofing drawer if your oven has one. A good, unhurried first rise contributes significantly to the soft, tender interior texture of your finished Cinnamon Sugar Pretzels.
- Storage: These delightful pretzels are truly at their peak when fresh and warm, right after they’ve been coated. However, if you happen to have any leftovers (which is a rare occurrence in my house!), store them in an airtight container at room temperature for up to 1-2 days. To bring them back to their delicious best, I like to pop them in a preheated oven at 300°F (150°C) for about 5-7 minutes, or until they are warmed through and the cinnamon sugar is slightly caramelized again. You can also microwave them for 15-30 seconds, though the texture won’t be quite as crisp as oven-reheated.
- Get Creative with Toppings: While the focus here is on classic, irresistible Cinnamon Sugar Pretzels, the base recipe is incredibly versatile and lends itself beautifully to experimentation! For a different sweet treat, you could drizzle a simple glaze made with powdered sugar and a splash of milk or lemon juice over some. Or, for a savory twist, simply skip the cinnamon sugar coating entirely and sprinkle the boiled (but unbaked) pretzels generously with coarse pretzel salt before baking for traditional soft pretzels. The possibilities are endless once you master this fantastic pretzel dough!
Conclusion:
And there you have it, dear friends! We’ve reached the sweet culmination of our culinary journey. I genuinely hope you’re feeling as inspired and hungry as I am right now. This isn’t just another recipe; it’s an invitation to experience pure, unadulterated comfort and joy in your own kitchen. Why are these Cinnamon Sugar Pretzels an absolute must-try? Because they effortlessly combine that delightful, chewy texture we all adore in a classic pretzel with the irresistible warmth and sweetness of cinnamon sugar. Imagine the aroma filling your home – that intoxicating blend of baking dough and spicy sweetness. It’s a scent that promises coziness, evokes childhood memories, and signals that something truly special is on its way. The moment you pull them from the oven, glistening with that buttery, sugary coating, you’ll understand. They’re simple enough for a fun weekend baking project, yet sophisticated enough to impress at any gathering. Forget store-bought snacks; these homemade treats offer a depth of flavor and a freshness that simply can’t be matched. They embody everything wonderful about baking from scratch: a little effort, a lot of love, and an incredibly rewarding outcome that delights all the senses.
Elevate Your Cinnamon Sugar Pretzel Experience
Now that you’ve mastered the art of creating these delectable morsels, let’s talk about how to truly make them shine, or how to put your own unique spin on them. While they are undeniably perfect straight out of the oven, perhaps with a cup of hot coffee or a tall glass of cold milk, their versatility is one of their most charming qualities. For an indulgent dessert, try serving them alongside a scoop of vanilla bean ice cream, allowing the warm pretzels to slightly melt the ice cream into a glorious, creamy puddle. You could also offer a variety of dipping sauces. A rich cream cheese frosting is always a winner, bringing a delightful tang that cuts through the sweetness beautifully. Melted dark chocolate or a homemade caramel sauce would also be absolutely divine, transforming them into an even more decadent treat. Imagine a platter of these at your next brunch, accompanied by small bowls of these various dips – a surefire hit!
Feeling adventurous? The beauty of these pretzels is how easily you can customize them. For an extra layer of texture and flavor, consider sprinkling some finely chopped toasted pecans or walnuts over the cinnamon sugar mixture just before baking. A light drizzle of lemon glaze (simply powdered sugar mixed with a tiny bit of lemon juice) after they cool adds a bright, zesty contrast that is surprisingly refreshing. You could even experiment with different spice blends – a pinch of nutmeg or cardamom alongside the cinnamon would introduce a subtle, exotic twist. For those who love a hint of savory with their sweet, a tiny sprinkle of flaky sea salt over the finished pretzels can create a sophisticated salted caramel effect, enhancing all the flavors. Don’t be afraid to break from tradition; perhaps roll some of the dough into smaller bites or even pretzel sticks, perfect for little hands or for dipping. The possibilities are truly endless, limited only by your imagination.
Your Turn: Bake, Savor, and Share!
My hope is that this recipe isn’t just something you read, but something you genuinely do. There’s an undeniable magic in creating something delicious with your own hands, and I truly believe that baking these pretzels will fill your kitchen with warmth and your heart with satisfaction. So, please, gather your ingredients, clear your countertop, and dive into the wonderful world of homemade baking. Don’t just make them; savor every moment, from the kneading of the dough to that first warm, chewy bite. I promise, the effort is well worth the reward. Once you’ve experienced the sheer delight of these homemade treats, I would absolutely love to hear all about it! Did you try a new variation? Did you serve them with a special dip? Were they a hit with your family and friends? Your experiences inspire me and other readers!
Please, come back and share your baking journey in the comments section below, or even better, snap a photo of your glorious creation and share it with us on your favorite social media platforms. Use the hashtag #CinnamonSugarPretzels (or any other relevant one) so I can see your wonderful work! There’s nothing more gratifying than seeing our community come together over a shared love for delicious food. Thank you for joining me on this sweet adventure. Happy baking, my friends!
Homemade Cinnamon Sugar Pretzels
These homemade Cinnamon Sugar Pretzels are an irresistible blend of comfort and indulgence. Featuring a crisp exterior, wonderfully soft and chewy interior, and a generous coating of sweet, aromatic cinnamon sugar, they’re perfect warm from the oven.
Ingredients
-
1 ½ cups (360ml) warm water
-
1 tablespoon (12g) granulated sugar
-
2 teaspoons (7g) active dry yeast
-
1 ½ teaspoons (9g) fine sea salt (for dough)
-
2 tablespoons (28g) unsalted butter, melted
-
4 ½ cups (540g) bread flour
-
10 cups (2.4 liters) water (for boiling)
-
½ cup (120g) baking soda
-
¾ teaspoon (4g) fine sea salt (for boiling solution)
-
½ cup (113g) unsalted butter, melted (for coating)
-
1 cup (200g) granulated sugar (for coating)
-
2 tablespoons (14g) ground cinnamon
Instructions
-
Step 1
In a large bowl, combine 1½ cups warm water, 1 tbsp granulated sugar, and 2 tsp active dry yeast. Stir gently and let sit for 5-10 minutes until foamy and bubbly. -
Step 2
Add 1½ tsp fine sea salt and 2 tbsp melted butter to the yeast mixture. Gradually add 4½ cups bread flour, mixing until a shaggy dough forms. Turn onto a lightly floured surface and knead for 8-10 minutes (by hand) or 6-8 minutes (stand mixer) until smooth and elastic. -
Step 3
Lightly grease a large bowl, place the dough in it, turning once. Cover tightly and let rise in a warm, draft-free place for 1 to 1½ hours, or until doubled in size. -
Step 4
Punch down the dough and divide into 12 equal pieces (approx. 75-80g each). Roll each piece into a 20-24 inch (50-60 cm) rope. Form into a U-shape, cross the ends twice, and press them firmly onto the bottom curve to secure the classic pretzel shape. Place on parchment-lined baking sheets. -
Step 5
Preheat oven to 450°F (230°C). In your largest pot, combine 10 cups water, ½ cup baking soda, and ¾ tsp fine sea salt. Bring to a vigorous, rolling boil over high heat. -
Step 6
Carefully drop 1-2 shaped pretzels into the boiling solution, ensuring not to overcrowd. Boil for 20-30 seconds per side (40-60 seconds total). Remove with a slotted spoon, allowing excess water to drip off, then transfer back to prepared baking sheets. -
Step 7
Bake for 12-15 minutes, or until beautifully golden brown. Transfer to a wire rack to cool slightly. Do not let them cool completely. -
Step 8
In a shallow dish, melt ½ cup unsalted butter. In a separate shallow dish, combine 1 cup granulated sugar and 2 tbsp ground cinnamon, whisking until evenly distributed. -
Step 9
While pretzels are still warm, generously brush each one with melted butter on all sides. Immediately dredge each buttered pretzel through the cinnamon sugar mixture, ensuring it’s completely coated. Serve warm for the best taste. -
Step 10
Store any leftovers in an airtight container at room temperature for 1-2 days. Reheat in a 300°F (150°C) oven for 5-7 minutes, or microwave for 15-30 seconds, to restore freshness.
Important Information
Nutrition Facts (Per Serving)
It is important to consider this information as approximate and not to use it as definitive health advice.
Allergy Information
Please check ingredients for potential allergens and consult a health professional if in doubt.
Leave a Comment