
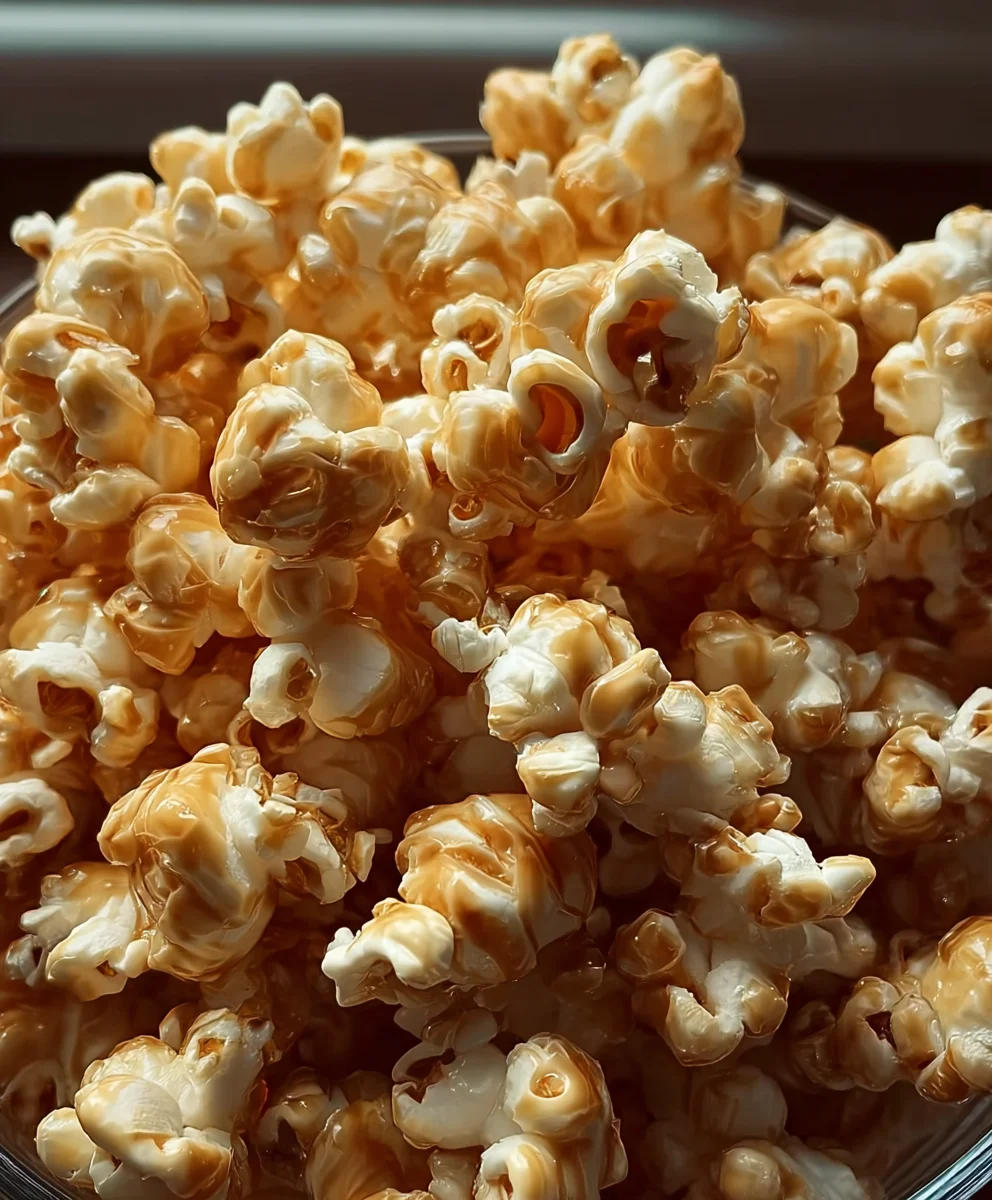
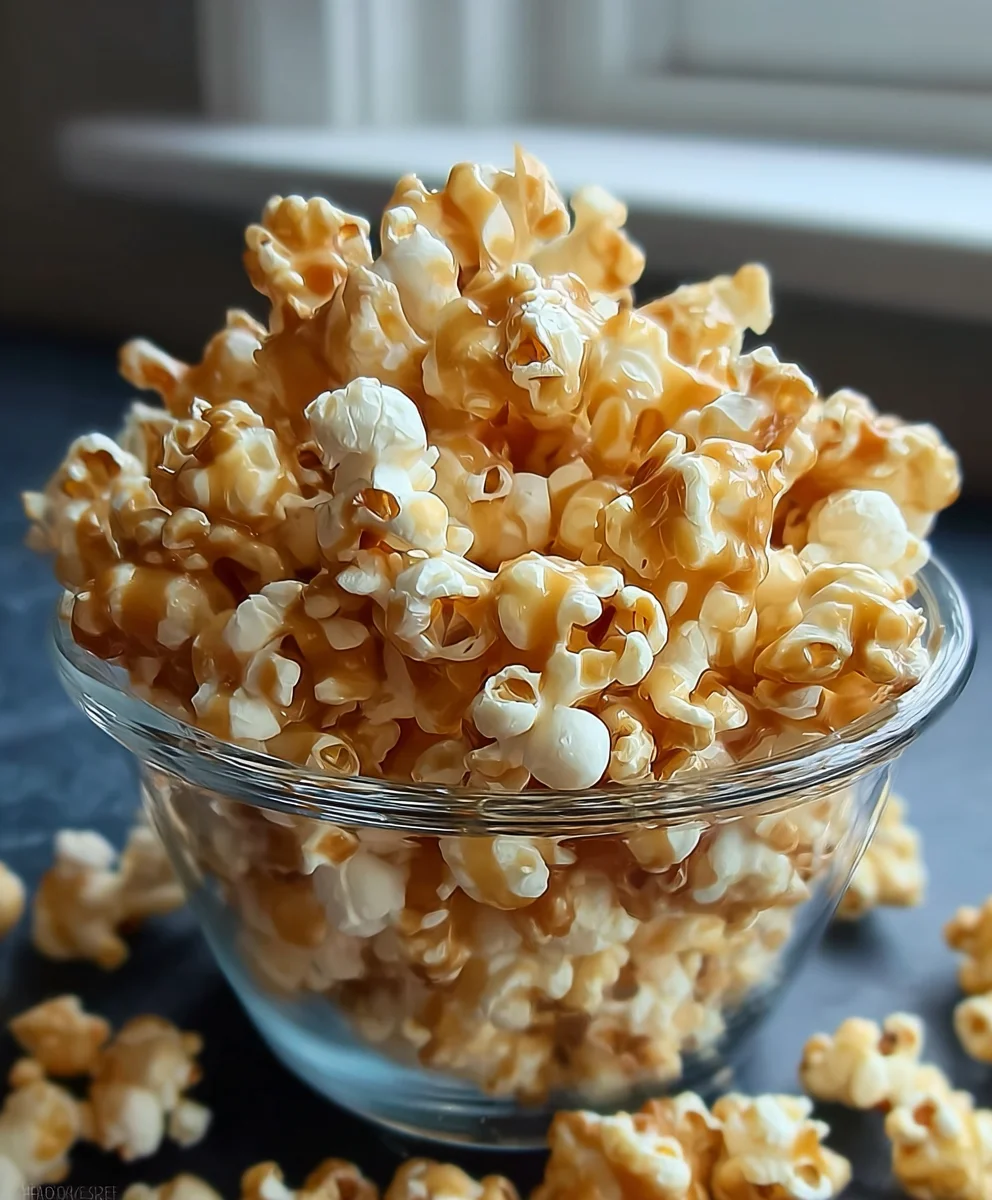
Homemade Caramel Popcorn is more than just a snack; it’s a golden ticket to nostalgia, a symphony of sweet and salty, and a treat that instantly elevates any occasion. I still recall the intoxicating aroma wafting from my grandmother’s kitchen, a scent synonymous with pure joy and simple pleasures. This classic confection, with its roots deeply embedded in American fairs, movie nights, and holiday gatherings, has captivated hearts for generations. It’s a timeless delight, a testament to the magic that happens when simple kernels meet rich, buttery caramel.
What makes this dish so universally adored? I believe it’s the irresistible contrast: the light, airy crunch of freshly popped corn perfectly coated in a thick, chewy, and intensely flavorful caramel. Every bite offers that perfect balance of sweetness and a hint of salt, creating an addictive experience that’s incredibly satisfying. Beyond its delightful taste and texture, the act of making Homemade Caramel Popcorn often brings a sense of comfort and tradition, transforming ordinary moments into special memories. Preparing it yourself ensures unparalleled freshness and allows you to customize the golden hue and chewiness of your caramel, creating a gourmet treat that far surpasses any store-bought alternative.

Ingredients:
- For the Popcorn:
- 1 cup unpopped popcorn kernels: I find that a good quality, fresh kernel makes all the difference for fluffy, large popcorn. Avoid microwave popcorn for this recipe, as it often has added oils and flavorings that can interfere with our delicious caramel. I usually opt for yellow kernels, but white kernels work just as wonderfully; it really just depends on what you prefer for size and texture.
- 3 tablespoons neutral oil (such as canola, vegetable, or coconut oil): This is what we’ll use to pop our kernels. Make sure it’s an oil with a high smoke point and a neutral flavor so it doesn’t impart any unwanted tastes to our final product.
- For the Homemade Caramel:
- 1 cup (2 sticks) unsalted butter: I always recommend unsalted butter for baking and candy making because it gives us complete control over the saltiness of the dish. If you only have salted butter, you can use it, but I’d suggest reducing the added salt in the caramel mixture by half a teaspoon, tasting, and adjusting as needed. Good quality butter really shines through in the caramel flavor!
- 2 cups packed light brown sugar: The brown sugar is essential for that rich, molasses-y depth that makes caramel popcorn so irresistible. Make sure it’s firmly packed into your measuring cup to ensure you have the correct amount. While dark brown sugar can be used for an even deeper, more robust flavor, light brown sugar offers a classic balance.
- ½ cup light corn syrup: Don’t skip the corn syrup! It plays a crucial role in preventing the sugar from crystallizing, which means a smoother, silkier caramel. It also adds a lovely sheen and helps achieve that perfect chewy-yet-crispy texture we’re aiming for. Rest assured, it won’t make your caramel taste like corn.
- 1 teaspoon salt: A good pinch of salt is absolutely vital to balance the sweetness of the caramel. It enhances all the flavors and makes the caramel taste even more complex and delicious. I usually use fine sea salt, but kosher salt also works beautifully.
- 1 teaspoon pure vanilla extract: Add this towards the end of the caramel cooking process. Good quality vanilla extract contributes a beautiful aromatic depth that complements the butter and brown sugar wonderfully. It’s truly a finishing touch that elevates the entire flavor profile of your Homemade Caramel Popcorn.
- ½ teaspoon baking soda: This magical ingredient is added right at the very end. When combined with the hot caramel, it reacts to create tiny air bubbles, which makes the caramel lighter in texture and easier to chew, preventing it from becoming rock hard. It also gives the caramel a slightly more porous structure, allowing it to coat the popcorn more effectively.
Phase 1: Preparing the Popcorn
-
Choose Your Popping Method and Pop the Kernels:
Before we dive into the luscious caramel, we need a mountain of perfectly popped corn! You have a couple of options here, and either will work wonderfully for our Homemade Caramel Popcorn.
For a stovetop method (my personal favorite for control and flavor): Grab a large, heavy-bottomed pot (a 6-quart pot works great). Pour your 3 tablespoons of neutral oil into the pot and add just three popcorn kernels. Place the pot over medium-high heat and cover it. Wait patiently until those three test kernels pop. This tells you your oil is at the ideal temperature. Once they pop, remove them from the pot, add the remaining 1 cup of unpopped popcorn kernels in an even layer, and immediately cover the pot again. Give the pot a gentle shake every 10-15 seconds to ensure even heating and prevent burning.
If you have an air popper: Simply follow your air popper’s instructions to pop the 1 cup of kernels. This method is quick and yields oil-free popcorn, which some people prefer. Just remember, no matter your method, you’ll want a substantial amount of popped corn, roughly 20-24 cups, so make sure you have enough kernels!
Once the popping slows to several seconds between pops, remove the pot from the heat or turn off your air popper. It’s better to have a few unpopped kernels than a batch of burnt popcorn. Immediately transfer the popped corn into a very large bowl – I mean, really large – because we’re going to be adding a lot of caramel goodness to it soon. Make sure it’s heatproof!
-
Remove Unpopped Kernels and Fluff:
Once your popcorn is in the large bowl, it’s a good idea to let it cool for just a minute or two. Then, carefully go through it and remove any unpopped kernels (also known as “old maids”). You can do this by hand, or by gently shaking the bowl, allowing the denser unpopped kernels to fall to the bottom, then scooping out the fluffy popcorn from the top. Trust me, biting into a hard, unpopped kernel can be quite jarring when you’re expecting a soft, crunchy caramel delight, so this step is well worth the small effort! Fluff the popcorn gently with your hands to separate any clustered pieces and ensure it’s ready to receive its glorious caramel coating. Set your bowl of perfectly popped corn aside.
Phase 2: Crafting the Caramel Sauce
-
Prepare Your Baking Sheets:
While the popcorn is chilling, let’s get ready for the caramel magic. Line two large baking sheets (or even three, if you have smaller ones) with parchment paper. This is a non-negotiable step! The caramel is incredibly sticky, and parchment paper will be your best friend for easy cleanup and preventing sticking. If you don’t have parchment paper, you can lightly grease the baking sheets with a neutral cooking spray, but parchment is truly superior here. Set these prepared sheets aside within easy reach, as you’ll need them quickly once the caramel is ready.
-
Combine Caramel Ingredients:
Now for the star of the show! In a heavy-bottomed saucepan (a 3-quart or 4-quart pot is ideal, as the caramel will bubble up quite a bit), combine your 1 cup unsalted butter, 2 cups packed light brown sugar, ½ cup light corn syrup, and 1 teaspoon salt. I always recommend using a heavy-bottomed pot because it distributes heat more evenly, which helps prevent scorching the caramel, a common pitfall. Give everything a quick stir with a sturdy spoon or heatproof spatula just to combine the ingredients before you turn on the heat.
-
Bring to a Boil:
Place the saucepan over medium heat. Stir the mixture continuously, or at least very frequently, until the butter has completely melted and the sugar has fully dissolved. You’ll be able to tell the sugar has dissolved when the mixture looks smooth and there are no longer any grainy bits at the bottom of the pot. This initial stirring is important to ensure all ingredients are well incorporated.
Once the mixture is smooth, bring it to a rolling boil. At this point, you can stop stirring. It’s actually better to avoid stirring once it’s boiling vigorously, as stirring can sometimes encourage sugar crystallization. If you see any sugar crystals forming on the sides of the pot, you can dip a pastry brush in warm water and gently brush them down into the mixture. This technique helps maintain a smooth, non-gritty caramel.
-
Cook to Temperature:
Now, this is the most crucial step for achieving perfect Homemade Caramel Popcorn! Continue to boil the caramel mixture, without stirring, until it reaches 240°F (115°C) on a candy thermometer. A reliable candy thermometer is your best friend here – guessing temperatures can lead to caramel that’s either too soft and gooey (making your popcorn soggy) or too hard and brittle (making it difficult to eat).
Clip your candy thermometer to the side of the pot, making sure the tip doesn’t touch the bottom of the pan. Keep a close eye on it. The mixture will start to thicken and change in color, gradually deepening to a beautiful amber hue. This process can take anywhere from 5 to 10 minutes, depending on your stovetop and pot. Be patient! Once it hits that 240°F mark, immediately remove the pot from the heat. Do not overcook it! Overcooked caramel can taste burnt or become too hard.
-
Add Vanilla and Baking Soda:
Once removed from the heat, quickly but carefully stir in the 1 teaspoon of pure vanilla extract and the ½ teaspoon of baking soda. This is where the magic happens! When you add the baking soda, the caramel mixture will immediately begin to foam up and lighten in color. This reaction is exactly what we want, as it creates those tiny air bubbles that make the caramel light, airy, and wonderfully chewy, rather than dense and tooth-shatteringly hard. The foaming action also makes the caramel significantly easier to spread and coat our popcorn. Stir vigorously until the baking soda is fully incorporated and the mixture is frothy and smooth. Work quickly but carefully, as the caramel is very hot and bubbly.
Phase 3: Coating the Popcorn
-
Pour Caramel Over Popcorn:
Working quickly, immediately pour the hot, foamy caramel sauce evenly over your pre-popped popcorn in that very large bowl. Try to distribute it as best you can across the surface of the popcorn. Don’t worry if it doesn’t look perfectly even yet; we’ll fix that in the next step. The key is to act fast while the caramel is still hot and fluid enough to coat.
-
Stir Thoroughly:
Now comes the arm workout! Grab two sturdy spatulas or large spoons and begin to gently but thoroughly toss and stir the popcorn, coating it evenly with the caramel. This can take a few minutes, and you’ll want to be persistent. The caramel will be very sticky, and it might seem like a daunting task, but keep at it. Aim to coat as many pieces of popcorn as possible. If the caramel starts to cool and become too stiff to stir, don’t fret; the baking step will help redistribute and set it. Just get it as evenly coated as you can at this stage. Even coating is key to truly delicious Homemade Caramel Popcorn!
Phase 4: Baking for Perfection
-
Spread on Baking Sheets:
Once your popcorn is reasonably coated, divide it evenly among your prepared parchment-lined baking sheets. Spread the caramel-coated popcorn out into a single layer as much as possible. Try not to overcrowd the sheets, as this will hinder even baking and crisping. If pieces are clinging together, gently separate them with your hands (once cool enough to touch, of course, or with spatulas). We want maximum air circulation around each delightful piece.
-
Bake and Stir:
Preheat your oven to a low 250°F (120°C). Place your baking sheets into the preheated oven. Now, here’s another secret to perfectly crisp and set Homemade Caramel Popcorn: we’re going to bake it! Bake for a total of 45 to 60 minutes.
However, you absolutely cannot just pop it in and walk away. Every 15 minutes, you’ll need to remove the baking sheets from the oven and give the popcorn a good stir with a heatproof spatula or spoon. This stirring helps to redistribute the caramel, ensuring that every piece gets evenly coated and dries out perfectly, preventing it from clumping into one giant, solid mass. It also allows the popcorn to toast slightly and the caramel to develop a deeper, richer flavor and that glorious crisp texture we all love. Don’t skip these stirring intervals – they are crucial for the ultimate crunch!
-
Cool Completely and Break Apart:
Once the baking time is up, the caramel popcorn should look glossy, feel firmer, and smell absolutely divine. Remove the baking sheets from the oven and let the caramel popcorn cool completely on the baking sheets. This can take at least an hour, or even longer if your kitchen is warm. Patience is a virtue here! The caramel will continue to harden and crisp up as it cools. Do not attempt to move or break apart the popcorn while it is still warm, as the caramel will be soft and sticky.
Once fully cooled, gently break the caramel popcorn into individual pieces or smaller clusters. You can use your hands, or if you have some particularly stubborn clumps, a spatula or even a knife can help to separate them. Store your glorious Homemade Caramel Popcorn in an airtight container at room temperature for up to a week (though I doubt it will last that long!). Enjoy the fruits of your labor – a truly irresistible treat that’s perfect for movie nights, parties, or just a delightful snack!
Conclusion:
And there you have it, my friends! We’ve reached the sweet finale of our culinary journey, and I genuinely hope you’re feeling inspired and excited to whip up a batch of this truly irresistible treat. If there’s one recipe I could implore you to try, it would undoubtedly be this one. Why, you ask? Because this isn’t just about making a snack; it’s about creating an experience, a memory, and a taste sensation that store-bought versions simply cannot replicate. The difference between mass-produced caramel popcorn and a batch of homemade caramel popcorn crafted with love and fresh ingredients is night and day. You’re not just getting popcorn; you’re getting perfectly popped kernels enveloped in a rich, buttery, golden caramel that crackles just right, offering that glorious balance of crunchy, chewy, sweet, and salty in every single bite. The aroma alone, as that caramel simmers and then coats the popcorn, is enough to transform your kitchen into a haven of comforting delight, promising pure indulgence.
I find immense joy in knowing exactly what goes into my food, and with this recipe, you have complete control over the quality and freshness of every component. That means no questionable additives, just wholesome ingredients coming together to create magic. It’s a treat that transcends simple snacking, elevating any occasion from a cozy movie night in to a lively gathering with friends. The satisfaction of pulling a fresh tray of perfectly coated, glistening caramel popcorn from the oven, knowing you made it yourself, is incredibly rewarding. Trust me when I say, once you taste this homemade goodness, there’s no going back. It’s an explosion of flavor and texture that will undoubtedly become a staple in your home, eagerly anticipated by everyone who tries it. This truly is a recipe that delivers on its promise of deliciousness every single time, making it a must-try for any sweet-toothed enthusiast or anyone looking to add a little extra joy to their day.
Unleash Your Creativity: Serving Suggestions & Sensational Variations
Now, let’s talk about making this already fantastic treat even more incredible! While a classic bowl of this caramel popcorn is perfect as is, it’s also wonderfully versatile. For a simple pleasure, serve it warm straight from the oven on a cozy family movie night, or bag it up for school lunches and afternoon snacks. It’s an absolute hit at parties, game days, and potlucks – just watch how quickly it disappears!
But why stop there? Let your culinary imagination run wild with these delightful variations:
Nutty Crunch: Before the caramel sets, toss in some roasted pecans, almonds, or cashews for an extra layer of crunch and flavor. The combination of sweet caramel and savory nuts is simply divine.
Chocolate Drizzle Dream: Once cooled, melt some milk, dark, or white chocolate chips and drizzle them generously over your caramel popcorn. Allow the chocolate to set, and you’ve got a gourmet treat that’s dangerously addictive. You can even add mini chocolate chips directly into the mixture before it cools.
Sweet & Salty Pretzel Pop: Crush up some mini pretzels and mix them in with your popcorn before adding the caramel. The salty crunch of the pretzels creates an irresistible contrast with the sweet, sticky caramel.
Spice it Up: A pinch of cinnamon or a tiny dash of espresso powder added to the caramel mixture can introduce a subtle yet sophisticated warmth that elevates the flavor profile beautifully.
Elegant Gifting: Package individual portions in pretty cellophane bags tied with a ribbon, or fill decorative jars with your homemade caramel popcorn for a thoughtful, personalized gift that everyone will adore. They make fantastic hostess gifts, holiday treats, or just a sweet surprise for a friend.
Dessert Topping Extraordinaire: Crumble some over a scoop of vanilla ice cream, stir it into a plain yogurt parfait for a textured breakfast, or use it as a crunchy topping for brownies or cupcakes. The possibilities are truly endless!Your Turn to Create and Share!
I truly believe that cooking and baking should be an adventure, a source of joy and creative expression. So, I wholeheartedly encourage you to roll up your sleeves and give this homemade caramel popcorn recipe a try. Don’t be intimidated; the process is much simpler than you might think, and the results are incredibly rewarding. Each step is designed to guide you to success, leading to a batch of golden, crunchy, and utterly delightful caramel popcorn that will impress everyone who tastes it. You’ll be amazed at how easily you can create something so incredibly delicious right in your own kitchen!
Once you’ve made your batch, I would absolutely love to hear about your experience! Did you stick to the classic version, or did you venture into some exciting variations? Did you find a new favorite combination or serving suggestion? Please share your thoughts, your successes, and even your funny mishaps with me. Your insights and creative twists inspire me and the entire community of fellow food enthusiasts. Snap a picture of your glorious creation and let us know how it turned out. There’s a wonderful sense of camaraderie that comes from sharing our culinary adventures, and I can’t wait to see what deliciousness you bring to life. Happy popping, my friends, and enjoy every single sweet, crunchy bite!
Homemade Caramel Popcorn Recipe
Homemade Caramel Popcorn is the perfect combination of sweet and salty flavors. This easy-to-make treat starts with freshly popped popcorn, which is coated in a rich, chewy caramel sauce made from brown sugar, butter, and marshmallows. The result is a decadent snack that’s perfect for any occasion—whether it’s a cozy movie night, a party, or a homemade gift for family and friends. The gooey caramel adds a delightful sweetness to every bite, while the popcorn provides a satisfying crunch.
Ingredients
-
1 cup unpopped popcorn kernels
-
3 tbsp neutral oil (canola, vegetable, or coconut)
-
1 cup (2 sticks) unsalted butter
-
2 cups packed light brown sugar
-
½ cup light corn syrup
-
1 tsp salt
-
1 tsp pure vanilla extract
-
½ tsp baking soda
Instructions
-
Step 1
Pop 1 cup popcorn kernels. For stovetop: Heat 3 tbsp neutral oil with 3 test kernels in a large pot until popped. Remove test kernels, add remaining 1 cup kernels, cover, and shake until popping slows. For air popper: Follow manufacturer’s instructions. Transfer 20-24 cups popped corn to a large heatproof bowl. Remove unpopped kernels and fluff. -
Step 2
Line 2-3 large baking sheets with parchment paper and set aside. -
Step 3
In a heavy 3-4 qt saucepan, combine 1 cup unsalted butter, 2 cups packed light brown sugar, ½ cup light corn syrup, and 1 tsp salt. Stir over medium heat until butter melts and sugar dissolves. -
Step 4
Bring the mixture to a rolling boil without stirring. Cook until it reaches 240°F (115°C) on a candy thermometer. Immediately remove from heat. -
Step 5
Quickly stir in 1 tsp pure vanilla extract and ½ tsp baking soda until the mixture is frothy and smooth. -
Step 6
Immediately pour the hot, foamy caramel evenly over the pre-popped popcorn in the large bowl. Using two sturdy spatulas, thoroughly toss and stir to coat the popcorn evenly. -
Step 7
Spread the caramel-coated popcorn in a single layer on the prepared baking sheets. Bake at 250°F (120°C) for 45-60 minutes, stirring every 15 minutes to redistribute the caramel. -
Step 8
Remove from the oven and let cool completely on the baking sheets (at least 1 hour). Once fully cooled, break the caramel popcorn into individual pieces or smaller clusters. Store in an airtight container at room temperature for up to a week.
Important Information
Nutrition Facts (Per Serving)
It is important to consider this information as approximate and not to use it as definitive health advice.
Allergy Information
Please check ingredients for potential allergens and consult a health professional if in doubt.
-

Leave a Comment