
?utm_medium=social&utm_source=pinterest&utm_campaign=tailwind_tribes&utm_content=tribes&utm_term=992166412_44896978_297243. Have you ever found yourself yearning for a dessert that embodies pure warmth, nostalgia, and absolute comfort? There’s something undeniably magical about a golden, bubbling crumble, its sweet, spiced fruit filling peeking out from beneath a buttery, crunchy topping. It’s more than just a dish; it’s a hug in a bowl, a timeless classic that evokes cherished memories of family gatherings and cozy evenings.
While the exact origins of the humble crumble are debated, its popularity soared in Britain during World War II, serving as a delicious and economical alternative to traditional pies when pastry ingredients were scarce. This resourceful dessert quickly became a staple, appreciated for its simplicity and heartwarming appeal, solidifying its place in culinary history across many cultures.
What truly makes our Classic Apple Crumble so universally beloved? It’s the exquisite interplay of textures and flavors. Imagine tender, sweet-tart apples, gently spiced with cinnamon and nutmeg, perfectly complementing the rich, buttery, and irresistibly crunchy streusel topping. It’s incredibly versatile, perfect for any season, and surprisingly easy to prepare, making it an ideal choice for both busy weeknights and special occasions. Prepare to create a truly unforgettable dessert that will become a cherished staple in your home, embodying the unique comfort and joy associated with the recipe we’re presenting today, identified by its special code: ?utm_medium=social&utm_source=pinterest&utm_campaign=tailwind_tribes&utm_content=tribes&utm_term=992166412_44896978_297243.

Ingredients:
- For the Chicken:
- 4-6 boneless, skinless chicken breasts (about 1.5 – 2 pounds total), butterflied and pounded thin
- 1/2 cup all-purpose flour, for dredging
- 2 large eggs, lightly beaten
- 1 1/2 cups Panko breadcrumbs (for superior crispiness!)
- 1/2 cup grated Parmesan cheese (the good stuff, please!), plus extra for topping
- 1 tablespoon dried Italian seasoning
- 1 teaspoon garlic powder
- 1 teaspoon salt
- 1/2 teaspoon black pepper
- 2-3 cups vegetable oil or canola oil, for pan-frying (enough to come up about 1/2 to 3/4 inch in your skillet)
- For the Homemade Marinara Sauce:
- 2 tablespoons olive oil
- 1 medium yellow onion, finely chopped
- 4-5 cloves garlic, minced
- 1 (28 ounce) can crushed tomatoes (look for San Marzano if you can!)
- 1 (14.5 ounce) can diced tomatoes, undrained (for a little extra texture)
- 1 teaspoon dried oregano
- 1 teaspoon dried basil
- 1 bay leaf
- 1 teaspoon granulated sugar (to balance acidity)
- Salt and freshly ground black pepper, to taste
- Optional: A small handful of fresh basil leaves, torn, for finishing
- For Assembling:
- 1 pound fresh mozzarella cheese, thinly sliced or shredded (fresh is truly best here for melt factor)
- Extra grated Parmesan cheese, for layering and topping
- Fresh parsley or basil, chopped, for garnish
- For Serving (Optional):
- 1 pound spaghetti, linguine, or penne pasta, cooked al dente
For the Homemade Marinara Sauce:
Making your own marinara is a game-changer for this dish, truly elevating the flavor profile far beyond what a jarred sauce can offer. It’s surprisingly simple and fills your kitchen with the most incredible aromas. Trust me, it’s worth the extra effort!
- Sauté Aromatics: Grab a large, heavy-bottomed pot or Dutch oven and set it over medium heat. Add the 2 tablespoons of olive oil. Once shimmering, add your finely chopped onion. We want to cook this until it’s beautifully softened and translucent, which usually takes about 5-7 minutes. Stir occasionally to prevent burning. This step is crucial for building a deep flavor base.
- Introduce Garlic: Next, toss in the minced garlic. Stir continuously for about 1 minute until it becomes fragrant. Be very careful here – garlic can burn quickly, and burnt garlic tastes bitter, which would unfortunately impact the entire sauce. We’re looking for aromatic, not browned!
- Add Tomatoes and Seasonings: Pour in the crushed tomatoes and the diced tomatoes (along with their juices). Stir everything together. Now, it’s time for our dried herbs: add the dried oregano, dried basil, and that single bay leaf. Give it another good stir.
- Season and Simmer: Add the granulated sugar; this little trick helps to cut through the acidity of the tomatoes and rounds out the flavor beautifully. Season generously with salt and freshly ground black pepper. Bring the sauce to a gentle simmer, then reduce the heat to low, cover the pot, and let it do its magic.
- Develop Flavors: Allow the sauce to simmer for at least 30-45 minutes, or even longer if you have the time (up to 1.5 hours is fantastic). The longer it simmers, the more the flavors will meld and deepen. Stir occasionally to prevent sticking. A low, slow simmer is key for a rich, complex sauce. If it starts to get too thick, you can add a tablespoon or two of water or vegetable broth.
- Final Touches: Once you’re happy with the consistency and flavor, remove the bay leaf. If you’re using fresh basil, tear it and stir it in now; the residual heat will wilt it perfectly and infuse that lovely fresh aroma. Taste and adjust seasonings one last time – you might need a pinch more salt or pepper. Set aside while you prepare the chicken.
For the Chicken Cutlets:
Preparing the chicken correctly is absolutely essential for achieving that perfect balance of tender, juicy meat and a gloriously crispy coating. Don’t rush this part!
- Prepare the Chicken: Lay your boneless, skinless chicken breasts on a cutting board. If they are thick, you’ll want to butterfly them horizontally to create two thinner pieces, or slice them in half if they are very large. Then, place each piece between two sheets of plastic wrap. Using a meat mallet or a heavy rolling pin, pound the chicken gently and evenly to about 1/4 to 1/2 inch thick. Pounding ensures even cooking and tenderness. Aim for uniform thickness across all pieces.
- Set Up Breading Stations: This is where we create our assembly line. You’ll need three shallow dishes or pie plates.
- Dish 1 (Flour): Pour your 1/2 cup of all-purpose flour into the first dish.
- Dish 2 (Eggs): Crack your 2 large eggs into the second dish and beat them lightly with a fork until the yolks and whites are fully combined.
- Dish 3 (Panko Mix): In the third dish, combine the 1 1/2 cups of Panko breadcrumbs, 1/2 cup of grated Parmesan cheese, 1 tablespoon of dried Italian seasoning, 1 teaspoon of garlic powder, 1 teaspoon of salt, and 1/2 teaspoon of black pepper. Mix thoroughly with a fork to ensure all ingredients are evenly distributed. The Panko breadcrumbs are non-negotiable for maximum crunch!
- Breading the Chicken: Now for the fun part! Take one pounded chicken cutlet and work your way down the line:
- Flour: Dredge the chicken in the flour, ensuring it’s fully coated. Shake off any excess flour; we want a thin, even layer.
- Egg Wash: Dip the floured chicken into the beaten egg, allowing any excess to drip off. The egg acts as our “glue.”
- Panko Mix: Finally, place the chicken into the Panko mixture. Gently press the breadcrumbs onto both sides of the chicken, ensuring a thick, even coating. Really make sure those Panko crumbs adhere well – they are our crispy armor!
Repeat this process for all remaining chicken cutlets. As you bread them, transfer the coated chicken pieces to a clean plate or baking sheet. For best results, let the breaded chicken rest for about 10-15 minutes before frying. This allows the breading to set, which helps prevent it from falling off during cooking.
Cooking the Chicken:
Pan-frying creates that irresistible golden-brown crust that truly defines Chicken Parmesan. Don’t crowd the pan, and maintain a consistent oil temperature for perfect results.
- Preheat Oven: While the chicken is resting, preheat your oven to 375°F (190°C). This is for the final baking step, where all the elements come together.
- Heat the Oil: Choose a large, heavy-bottomed skillet (cast iron or stainless steel works wonderfully). Pour in the vegetable or canola oil until it reaches about 1/2 to 3/4 inch deep. Place the skillet over medium-high heat. You’ll know the oil is ready when a small pinch of Panko breadcrumbs dropped in sizzles immediately and vigorously. Aim for an oil temperature around 350-375°F (175-190°C). Too cool, and the chicken will be greasy; too hot, and the breading will burn before the chicken cooks through.
- Pan-Fry the Chicken: Carefully place 2-3 breaded chicken cutlets into the hot oil, ensuring not to overcrowd the pan. Overcrowding will drop the oil temperature and lead to soggy chicken. Fry for about 3-4 minutes per side, until the chicken is golden brown and cooked through. The internal temperature should reach 165°F (74°C).
- Drain Excess Oil: As each batch of chicken is done, use tongs to carefully transfer the cooked cutlets to a wire rack set over a baking sheet. This allows any excess oil to drain off, keeping the chicken wonderfully crispy. You can also lightly blot them with paper towels.
- Repeat: Continue frying the remaining chicken in batches, adding more oil if needed, until all the cutlets are beautifully golden and cooked. Keep an eye on your oil temperature between batches; adjust the heat as necessary.
Assembling and Baking:
Now for the grand finale! This is where all your hard work comes together to create a harmonious symphony of flavors and textures.
- Prepare Baking Dish: Grab a large baking dish (a 9×13 inch dish is usually perfect for 4-6 cutlets). Spread a thin layer of your homemade marinara sauce on the bottom of the dish. This prevents sticking and adds an extra layer of flavor to the bottom of the chicken.
- Layer Chicken: Carefully arrange the pan-fried chicken cutlets in a single layer over the sauce in the baking dish. Don’t overlap them too much if possible; giving them space allows for even melting and bubbling of the cheese.
- Sauce and Cheese Layer 1: Spoon a generous amount of marinara sauce over each chicken cutlet, covering most of the breaded surface. Then, top each sauced cutlet with a slice or a good handful of the fresh mozzarella cheese. Distribute some extra grated Parmesan cheese over the mozzarella for an added punch of salty, nutty flavor.
- Optional Second Layer: If you have many cutlets and a large dish, you can sometimes do a second layer, though a single layer is generally preferred for optimal crispiness. If layering, put a little more sauce and cheese between the layers.
- Bake: Transfer the baking dish to your preheated 375°F (190°C) oven. Bake for 15-20 minutes, or until the cheese is beautifully melted, bubbly, and slightly golden brown around the edges. The sauce should also be warmed through and gently simmering. Keep an eye on it – you want golden, not burnt, cheese!
- Rest and Garnish: Once out of the oven, let the Chicken Parmesan rest for 5 minutes. This allows the cheese to set slightly and prevents all that delicious sauce from running everywhere when you serve it. Before serving, sprinkle with freshly chopped parsley or basil for a burst of freshness and color.
Serving Suggestions:
Chicken Parmesan is a hearty and satisfying meal on its own, but it truly shines when served with complementary sides that balance its richness.
- Pasta Perfection: The classic accompaniment is a bed of perfectly cooked pasta – spaghetti, linguine, or penne are all excellent choices. Toss your hot pasta with a little extra marinara sauce, or simply serve the Chicken Parmesan directly on top.
- Green Salad: A light, crisp green salad with a simple vinaigrette dressing provides a refreshing counterpoint to the rich chicken and cheese. Think mixed greens, cherry tomatoes, and cucumber.
- Garlic Bread: Who can resist dipping crusty garlic bread into that leftover marinara sauce? It’s a match made in heaven!
- Steamed or Roasted Vegetables: Asparagus, green beans, or broccoli, lightly steamed or roasted with a squeeze of lemon, add a healthy and vibrant element to the plate.
- Wine Pairing: A medium-bodied red wine like a Chianti, Sangiovese, or even a robust Merlot would pair beautifully with the rich flavors of this dish. For white wine lovers, a crisp Pinot Grigio could also work well.
However you choose to enjoy it, this homemade Chicken Parmesan is a labor of love that is guaranteed to impress. It’s comforting, incredibly flavorful, and truly a culinary triumph for any home cook. Enjoy every single bite!
Conclusion:
So, my dear food-loving friends, we’ve reached the delicious culmination of our culinary journey! I genuinely hope you’ve enjoyed exploring the ins and outs of this truly exceptional recipe. If there’s one dish I could implore you to try this week, it would be this one, hands down. It’s not merely a collection of ingredients; it’s a promise of warmth, flavor, and pure satisfaction that will bring a smile to your face and contentment to your belly. What makes this recipe an absolute must-try isn’t just its incredible taste, which is robust and utterly delightful, but also its remarkable simplicity and versatility. We’re talking about a dish that effortlessly fits into a busy weeknight schedule while simultaneously being impressive enough to serve to guests at your next dinner party. Imagine the look on their faces as they savor each bite, unaware of how little effort truly went into creating such a masterpiece!
I find this recipe to be a cornerstone for effortless entertaining and joyful family meals. Its rich flavors mingle perfectly, creating a harmony that is both comforting and exciting. Whether you’re a seasoned home cook or just starting your adventure in the kitchen, this particular dish offers a rewarding experience without any unnecessary stress. It builds confidence and delivers on flavor every single time. Truly, this recipe is a gift to your taste buds and your schedule.
Now, let’s talk about enhancing this already fantastic creation. While it’s utterly perfect on its own, I love offering a few serving suggestions and variations to spark your own creativity. For a complete meal, consider serving it alongside a vibrant, crisp green salad with a light vinaigrette to cut through the richness. A crusty loaf of artisanal bread is also a phenomenal companion, perfect for soaking up every last drop of that incredible sauce. If you’re looking to make it even heartier, a side of fluffy couscous, quinoa, or even some roasted root vegetables like carrots and parsnips would be absolutely divine.
But don’t stop there! This recipe is incredibly forgiving and open to interpretation. Feel free to explore different protein options – perhaps some tender pork loin, firm tofu, or even hearty chickpeas if you’re leaning towards a vegetarian option. You can also play with the spice levels; a pinch of red pepper flakes can introduce a lovely warmth, or a dash of smoked paprika could add a whole new layer of depth. Want to sneak in more veggies? Go for it! Bell peppers, spinach, or even some finely diced zucchini would integrate beautifully. Remember, the kitchen is your playground, and this recipe provides the perfect canvas for your culinary artistry. Don’t be afraid to make it truly your own!
So, what are you waiting for? Gather your ingredients, put on your favorite apron, and dive into this wonderful culinary experience. I promise you that once you taste the results, this recipe will quickly become a cherished staple in your home. And when you do create your masterpiece, we absolutely can’t wait to see your photos and read your stories! Sharing your culinary adventures is what makes this community so vibrant and inspiring. If you’re keen on seeing how popular dishes spread across social platforms, you might notice interesting tracking codes attached to links, particularly when content is shared on platforms like Pinterest. For example, a campaign to share delicious recipes might generate a specific tracking code like this one: ?utm_medium=social&utm_source=pinterest&utm_campaign=tailwind_tribes&utm_content=tribes&utm_term=992166412_44896978_297243. It’s fascinating to see how these bits of code help creators understand where the love and engagement are coming from!
Please come back here and share your experience in the comments below. What did you love most about the recipe? Did you try any exciting variations? Your feedback and shared creativity truly inspire me and countless other home cooks. Let’s continue to make some magic in the kitchen together!
Happy cooking, everyone!
People Also Ask
Can I make this recipe ahead of time?
Absolutely! This recipe often tastes even better the next day as the flavors have more time to meld. You can prepare it completely, let it cool, and then store it in an airtight container in the refrigerator for up to 3-4 days. Reheat gently on the stovetop or in the oven until warmed through.
What can I substitute for [specific ingredient, e.g., chicken broth]?
While the original ingredient provides a specific flavor, substitutions are often possible! For chicken broth, vegetable broth is an excellent vegetarian alternative. If you’re out of a certain herb, dried herbs can often replace fresh ones (use about a third of the amount). Always consider how a substitution might alter the overall taste and texture, but don’t hesitate to experiment.
Is this recipe freezer-friendly?
Yes, many recipes are surprisingly freezer-friendly! If the recipe contains dairy, be aware that the texture might change slightly upon thawing and reheating (sometimes becoming a bit grainy). To freeze, allow the cooked dish to cool completely, then transfer it to a freezer-safe container or bag. It can typically be frozen for up to 2-3 months. Thaw overnight in the refrigerator before reheating.
How do I adjust the spice level?
Adjusting the spice level is easy! If you prefer a milder dish, simply reduce or omit any chili flakes, hot sauce, or cayenne pepper. For those who love a kick, feel free to add more to taste, or incorporate fresh chilies (like jalapeños or serranos) for a more vibrant heat. Always add a little at a time and taste as you go.
Can I make this vegetarian or vegan?
Most recipes can be adapted for vegetarian or vegan diets with a few thoughtful substitutions. For meat, consider plant-based proteins like hearty mushrooms (portobello or cremini), lentils, chickpeas, firm tofu, or a plant-based meat substitute. For dairy, use unsweetened plant-based milks, vegan cheeses, or nutritional yeast for a cheesy flavor. Be mindful of hidden animal products in broths or sauces, opting for vegetable-based alternatives instead.
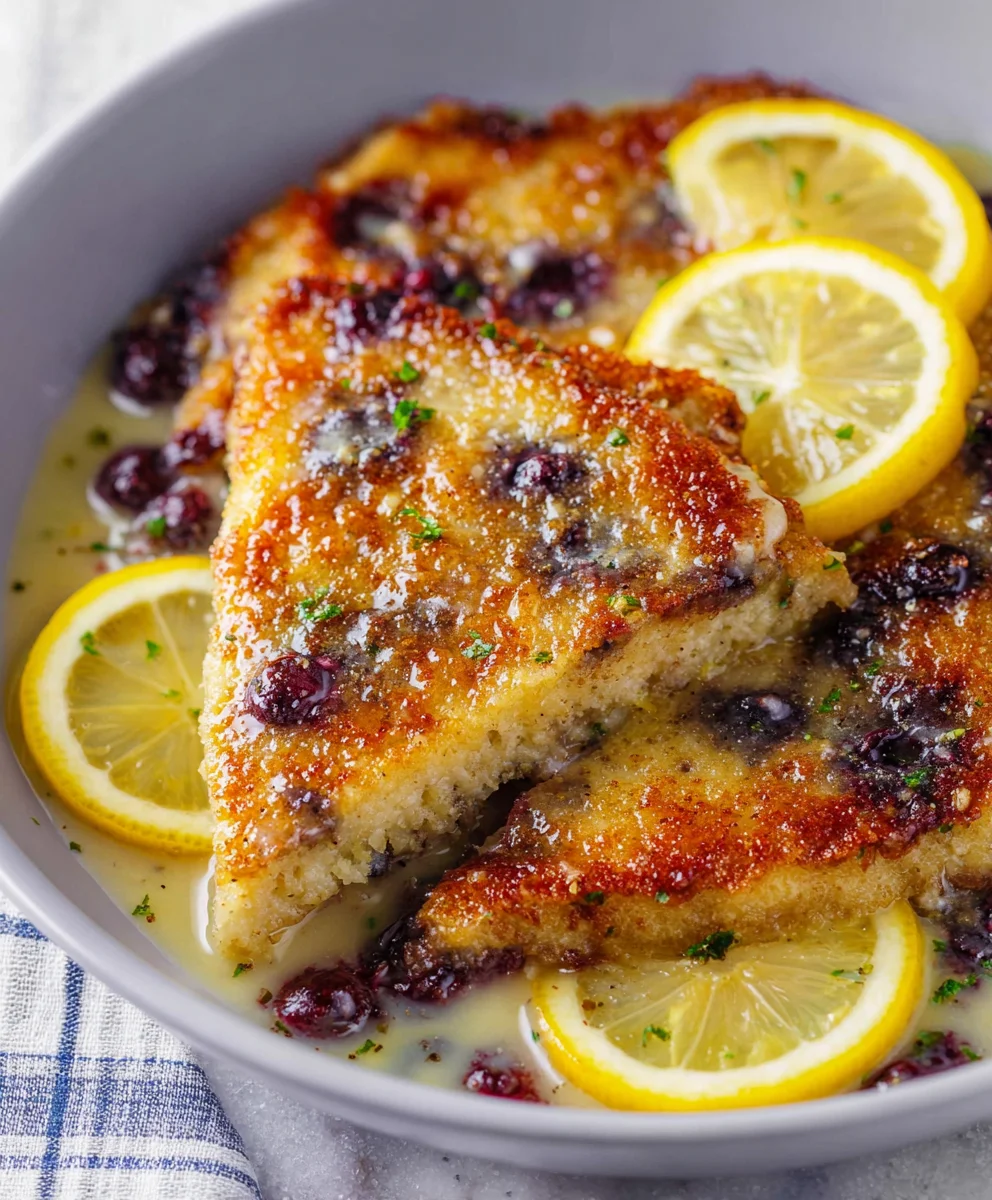
Crispy Parmesan Chicken with Lemon Garlic Butter Sauce
Enjoy juicy pan-fried chicken breasts with a crispy Parmesan coating, drizzled with a rich lemon garlic butter sauce. A quick and flavorful meal perfect for any weeknight.
Ingredients
-
1 1/2 lb chicken breast, (2 large), patted dry
-
1 Tbsp olive oil
-
1 Tbsp parsley, to garnish (optional)
-
1/2 lemon, sliced for garnish (optional)
-
2 large eggs
-
1 garlic clove, minced
-
1/2 tsp Italian seasoning
-
1/2 tsp salt
-
1/4 tsp ground black pepper
-
1 cup Parmesan cheese, grated
-
3 Tbsp all-purpose flour
-
8 Tbsp unsalted butter
-
2 garlic cloves, minced
-
1/4 cup lemon juice
-
1/4 cup chicken broth
Instructions
-
Step 1
Pound chicken breasts to 1/2-inch thickness. Pat dry with paper towels. -
Step 2
Prepare three shallow dishes: one with 3 Tbsp flour. The second with 2 eggs, 1 minced garlic clove, 1/2 tsp Italian seasoning, 1/2 tsp salt, and 1/4 tsp black pepper, whisked. The third with 1 cup grated Parmesan cheese. -
Step 3
Dredge each chicken piece in flour, then dip in the egg mixture, then press into Parmesan, ensuring a thick, even coating. -
Step 4
Heat 1 Tbsp olive oil in a large skillet over medium-high heat. Fry chicken for 4-5 minutes per side, until golden brown and cooked through (internal temperature 165°F). Transfer to a plate. -
Step 5
In the same skillet, melt 8 Tbsp unsalted butter. Add the remaining 2 minced garlic cloves and sauté for 30 seconds. Stir in 1/4 cup lemon juice and 1/4 cup chicken broth. Simmer for 2 minutes. -
Step 6
Pour the lemon garlic butter sauce over the cooked chicken. Garnish with 1 Tbsp parsley and 1/2 sliced lemon, if desired. Serve immediately.
Important Information
Nutrition Facts (Per Serving)
It is important to consider this information as approximate and not to use it as definitive health advice.
Allergy Information
Please check ingredients for potential allergens and consult a health professional if in doubt.

Leave a Comment