
Healthy No Bake Oreos—imagine indulging in the iconic flavor of your favorite sandwich cookie, but with a delightful twist: no baking required and crafted with your well-being in mind. I’m absolutely thrilled to share a recipe that brings together the best of both worlds – the nostalgic joy of a classic treat and the benefits of wholesome ingredients. No-bake desserts have graced kitchens for generations, cherished for their simplicity and the instant gratification they offer, especially during warmer months or when time is of the essence. The Oreo cookie itself, a beloved American staple since 1912, has a storied past, becoming synonymous with childhood memories and sweet indulgence. Today, we’re reimagining that beloved experience.
A Guilt-Free Classic That’s Unbelievably Easy
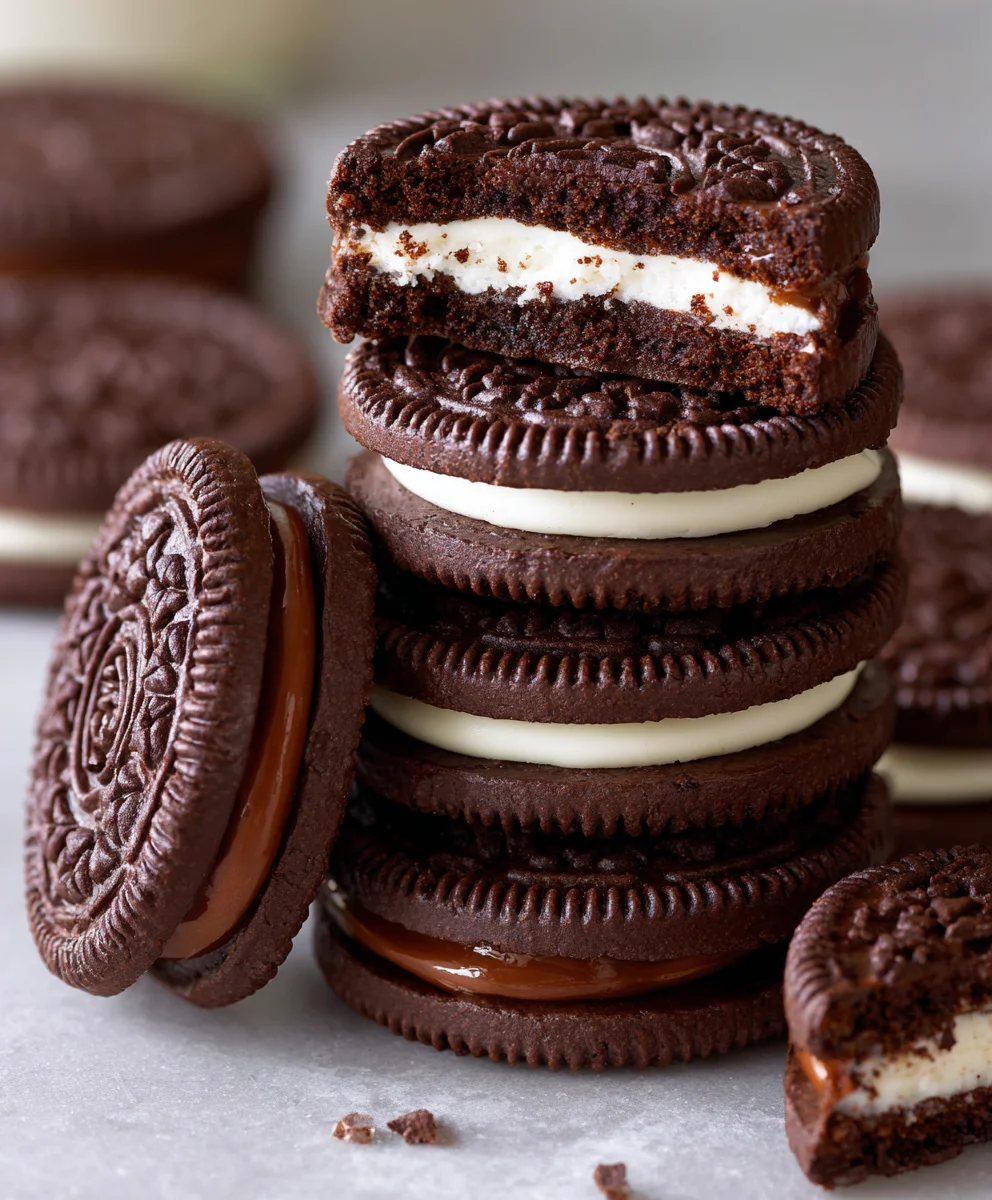
This recipe for Healthy No Bake Oreos delivers that unmistakable chocolatey crunch and creamy center you crave, but in a surprisingly nutritious package. It’s the ultimate answer to those spontaneous cookie cravings, offering a perfect blend of rich taste, satisfying texture, and unparalleled convenience. You’ll love how incredibly quick and easy these are to assemble, making them an ideal guilt-free treat for any occasion. Prepare to be amazed by how delicious and satisfying these Healthy No Bake Oreos truly are!

Ingredients:
-
For the Chocolate Cookie Base:
- 2 cups (about 180g) old-fashioned rolled oats (ensure certified gluten-free if needed for dietary restrictions)
- 1 ½ cups (about 225g) pitted Medjool dates, packed (make sure they are soft and fresh; if not, soak them in warm water for 10 minutes, then drain thoroughly before using)
- ½ cup (about 45g) unsweetened cocoa powder, high quality for best flavor
- ¼ teaspoon fine sea salt
- 1 teaspoon pure vanilla extract
- 2 tablespoons unsweetened almond milk or plant-based milk of your choice (only if needed to help the dough come together)
-
For the Creamy Vanilla Filling:
- 1 ½ cups (about 200g) raw cashews, soaked in hot water for at least 30 minutes, or cold water for 4-6 hours, then thoroughly drained and rinsed
- ½ cup (about 120ml) full-fat coconut cream, taken from a can of refrigerated full-fat coconut milk (scoop out the thick cream layer from the top, leaving the watery part behind)
- ¼ cup (about 60ml) maple syrup or agave nectar, for natural sweetness
- 1 ½ teaspoons pure vanilla extract (I love a generous amount of vanilla in the filling!)
- Pinch of fine sea salt, to balance the sweetness
- 1 tablespoon melted virgin coconut oil (optional, but highly recommended as it helps the filling set more firmly)
Preparing the Chocolate Cookie Base
- First things first, let’s get our equipment ready. You’ll need a good food processor for this recipe; it’s essential for creating that perfect cookie-like texture for our “Healthy No Bake Oreos.” If you don’t have one, a high-speed blender might work, but you’ll need to scrape down the sides very frequently and be patient.
- Begin by placing the rolled oats into the bowl of your food processor. Secure the lid and process the oats on high speed for about 30-60 seconds, or until they resemble a fine flour. We want to break them down enough so they can bind properly with the dates, forming a cohesive dough. Scrape down the sides of the bowl as needed to ensure everything is evenly processed. This step is crucial for achieving a smooth, uniform texture for your “Healthy No Bake Oreos” base, rather than a chunky, oat-y one.
- Next, add the pitted Medjool dates to the oat flour in the food processor. If your dates aren’t super soft, I highly recommend soaking them in warm water for about 10 minutes beforehand, then draining them very well. This makes them much easier to blend and helps create a smoother, stickier dough. Along with the dates, add the unsweetened cocoa powder, the ¼ teaspoon of fine sea salt, and the 1 teaspoon of pure vanilla extract. These ingredients are going to give us that rich, classic chocolate flavor we’re aiming for.
- Process the mixture again, starting on a low speed and gradually increasing to high. Continue to process until a sticky, uniform dough forms. This will take anywhere from 1 to 3 minutes, depending on the power of your food processor and the softness of your dates. You’ll know it’s ready when the mixture starts to clump together and pulls away from the sides of the bowl, resembling a large, cohesive ball of dough. If, after a couple of minutes, your dough still seems too dry or crumbly and isn’t coming together, add one tablespoon of almond milk (or your preferred plant-based milk) at a time, processing after each addition, until the desired sticky consistency is achieved. Be careful not to add too much liquid, as we want a firm dough.
- Once your dough is ready, transfer it to a piece of parchment paper. Place another piece of parchment paper on top and use a rolling pin to roll the dough out evenly to about ¼ inch (approximately 6mm) thickness. Alternatively, you can press the dough firmly into an even layer using your hands. This method works just as well and can be a bit quicker.
- Now comes the fun part: shaping our “cookie” bases! Using a 1 ½ to 2-inch (about 4-5 cm) round cookie cutter, cut out as many circles as possible from the rolled-out dough. Gather any scraps, gently press them back together, and re-roll to cut out more circles until all the dough is used. You should yield approximately 24-30 cookie bases, which will make 12-15 finished “Healthy No Bake Oreos.” Carefully transfer these chocolate discs to a plate or baking sheet lined with parchment paper.
- Place the plate or baking sheet with your cookie bases into the refrigerator while you prepare the filling. Chilling them slightly will help them firm up and make them easier to handle when it’s time for assembly. This little step is important for preventing your bases from being too delicate.
Crafting the Creamy Vanilla Filling
- If you haven’t already, ensure your raw cashews have been properly soaked. For best results and the creamiest filling, soaking them in hot water for at least 30 minutes (or cold water for 4-6 hours, or even overnight) is non-negotiable. After soaking, drain the cashews very thoroughly and rinse them under cold water. We want to remove any starchy residue and ensure they are ready to be transformed into a silky-smooth cream.
- Into a high-speed blender (a food processor might struggle to get this as smooth, so a blender is preferred here), add the drained cashews, the thick coconut cream (remember, scoop only the solid cream from the top of your refrigerated can of full-fat coconut milk), the maple syrup (or agave nectar), the 1 ½ teaspoons of pure vanilla extract, and the pinch of fine sea salt. If you’re using the optional melted coconut oil, add it now as well. The coconut oil truly helps the filling set beautifully and adds a lovely richness.
- Blend all the filling ingredients on high speed until the mixture is incredibly smooth and creamy. This can take anywhere from 2 to 5 minutes, depending on your blender. You will need to stop and scrape down the sides of the blender jar frequently, pushing the mixture back down towards the blades to ensure everything is incorporated evenly. Continue blending until there are absolutely no gritty cashew bits remaining, and the texture is as luscious and velvety as possible. This step is critical for achieving that authentic “cream” filling experience in our “Healthy No Bake Oreos.”
- Taste the filling at this point. If you prefer it a little sweeter, you can add another small drizzle of maple syrup and blend again. If it feels a little too thick to pipe or spread easily, you can add half a teaspoon of the watery part of the coconut milk (from the can) at a time, blending until you reach your desired consistency. Be cautious with added liquid, as we want the filling to be firm enough to hold its shape.
- Transfer the creamy vanilla filling to a piping bag fitted with a round tip, or simply use a spoon if you don’t have a piping bag. Place the piping bag (or bowl of filling) into the refrigerator for about 15-20 minutes. This short chill time will help the filling firm up slightly, making it much easier to pipe or spread onto your cookie bases without it oozing everywhere.
Assembling and Chilling Your Healthy No Bake Oreos
- Retrieve your chilled chocolate cookie bases and the slightly firmed vanilla filling from the refrigerator. Now it’s time to bring these components together to create our delightful “Healthy No Bake Oreos”!
- Lay out half of your chocolate cookie bases on your parchment-lined plate or tray. These will be the bottom halves of your “Oreos.”
- Take your piping bag filled with the vanilla cream (or grab your spoon). If using a piping bag, pipe a generous dollop of the creamy filling onto the center of each of the prepared chocolate cookie bases. Aim for a mound that’s about ¾ to 1 inch high. If using a spoon, carefully scoop a similar amount of filling and place it on each cookie base, gently spreading it slightly if needed, but keeping it mostly centered. Don’t be shy with the filling; that’s where a lot of the magic happens!
- Once all the bottom cookie bases have their creamy centers, take the remaining half of your chocolate cookie bases and gently place one on top of each filled cookie, creating a sandwich. Very lightly press down on the top cookie to gently spread the filling to the edges. Be careful not to press too hard, or the filling will ooze out too much, and the cookies might break. We want that iconic “Healthy No Bake Oreos” look with the filling peeking out slightly.
- Congratulations, your “Healthy No Bake Oreos” are assembled! Now, for the final, and perhaps most important, step: chilling. Carefully transfer the plate or tray with your assembled “Oreos” back into the refrigerator.
- Allow the “Healthy No Bake Oreos” to chill for at least 1 to 2 hours. This chilling time is absolutely essential. It allows the coconut oil in the filling to firm up properly, setting the filling and making the “Oreos” much easier to handle and eat. It also helps the flavors meld and the cookie bases to firm up even more. The longer they chill, the firmer and more authentic they will become. For the absolute best results, I often let them chill for 3-4 hours, or even overnight. This gives them that perfect snap in the cookie base and a solid, creamy filling.
- Once thoroughly chilled, your “Healthy No Bake Oreos” are ready to be enjoyed! Take them out of the refrigerator a few minutes before serving if you prefer them slightly less firm, but they are absolutely delightful when cold.
Storage and Enjoyment Tips
To keep your homemade “Healthy No Bake Oreos” fresh and delicious, store them in an airtight container in the refrigerator. They will maintain their quality and delightful texture for up to 5-7 days.
For a unique treat, you can also freeze these “Healthy No Bake Oreos”! Place them in a single layer in an airtight freezer-safe container. They can be frozen for up to 1 month. When you’re ready to enjoy them from the freezer, simply let them sit at room temperature for about 10-15 minutes, or enjoy them directly for a delightful frosty treat. The frozen version offers a completely different, yet equally satisfying, texture experience.
These “Healthy No Bake Oreos” are perfect for satisfying those sweet cravings without the guilt. They are naturally sweetened, packed with wholesome ingredients, and incredibly easy to make. I hope you love them as much as I do!
Conclusion:
After diving into the simple steps and delightful results of this recipe, I truly believe that the sheer brilliance of these treats lies in their effortless execution and incredible flavor payoff. I’ve explored countless dessert recipes, and I can confidently say that this one stands out not just for its ease, but for delivering that beloved, iconic cookie taste with a genuinely guilt-free twist. This isn’t just another dessert; it’s a culinary hack, a shortcut to satisfaction that doesn’t compromise on taste or texture. You get all the rich, chocolatey goodness and the creamy, sweet filling you adore, transformed into a healthier, no-fuss experience.
Why You Absolutely Must Try This Recipe:
First and foremost, the “no-bake” aspect is a game-changer. Imagine whipping up a batch of delectable cookies without ever turning on your oven. This means less heat in the kitchen, faster prep time, and an immediate gratification that’s hard to beat. It’s perfect for busy weeknights, last-minute cravings, or when you just want a quick, delicious treat without the fuss of traditional baking. Beyond convenience, the healthier ingredients we’ve incorporated mean you can indulge without the usual guilt. We’re talking about ingredients that nourish your body while still tantalizing your taste buds. The texture is another triumph—a satisfyingly crisp “cookie” exterior that gives way to a smooth, luscious “cream” filling, perfectly mirroring the classic treat you know and love. It’s an innovative approach that makes indulgence accessible and wholesome.
Endless Possibilities: Serving Suggestions and Variations to Explore
One of the things I adore most about this recipe is its incredible versatility. While delicious as is, these treats are a fantastic canvas for your culinary creativity. For serving, I love arranging them artfully on a platter for guests; they always elicit gasps of surprise and delight when people realize they’re homemade AND healthy! They pair wonderfully with a cold glass of plant-based milk for an afternoon snack, or alongside your morning coffee for a cheeky breakfast treat.
But let’s talk variations, because this is where the fun truly begins. Want to elevate the chocolate factor? Try dipping half of each finished cookie into melted dark chocolate and sprinkling with a pinch of sea salt before it sets. For a nutty twist, you could finely chop some pecans or walnuts and press them into the sides of the filling before adding the top cookie. Feeling adventurous? Incorporate a tiny dash of peppermint extract into the “cream” filling for a festive, mint-chocolate experience, or a hint of orange zest for a bright, citrusy note. You could even swap out the nut butter in the filling for a different variety, like cashew butter or sunflower seed butter, to experiment with new flavor profiles and textures. For those with dietary restrictions, this recipe is incredibly adaptable. To make them entirely vegan, simply ensure all your ingredients, especially your chocolate and binding agents, are plant-based. For a gluten-free version, use a certified gluten-free oat flour. The flexibility built into this recipe means everyone can enjoy these delightful confections.
Your Turn: Try and Share Your Experience!
I genuinely hope I’ve convinced you to give this incredible recipe a try. The joy of creating something so delicious and satisfying, with such minimal effort, is truly a wonderful experience. I can’t wait for you to discover the magic of making your own batch of these truly delightful Healthy No Bake Oreos. They are a revelation—a testament to how much flavor can be packed into a simple, wholesome dessert.
Once you’ve made them, I urge you to share your experience with me and our community! Did you stick to the original recipe, or did you put your own creative spin on them? What variations did you try, and which one became your favorite? I am always so inspired by the innovative ideas you all come up with. Please feel free to leave a comment below, share a photo of your creations on social media (I’d love to see them!), and let me know what you thought. Your feedback is invaluable, and it helps us all grow and discover new ways to enjoy healthy and delicious food. So, go ahead, gather your ingredients, and prepare to be amazed by how easy and incredibly tasty these healthier treats can be. You’ll be so glad you did!

Healthy No Bake Oreos
Indulge in the iconic flavor of your favorite sandwich cookie, reimagined! This easy, no-bake recipe delivers a chocolatey crunch and creamy vanilla center using wholesome ingredients. Quick to assemble and surprisingly nutritious, it’s perfect for satisfying sweet cravings without the guilt.
Ingredients
-
2 cups (180g) old-fashioned rolled oats
-
1 ½ cups (225g) pitted Medjool dates, packed
-
½ cup (45g) unsweetened cocoa powder, high quality
-
¼ teaspoon fine sea salt
-
1 teaspoon pure vanilla extract
-
2 tablespoons unsweetened almond milk or plant-based milk (only if needed)
-
1 ½ cups (200g) raw cashews, soaked and thoroughly drained and rinsed
-
½ cup (120ml) full-fat coconut cream (thick layer from refrigerated can)
-
¼ cup (60ml) maple syrup or agave nectar
-
1 ½ teaspoons pure vanilla extract
-
Pinch of fine sea salt
-
1 tablespoon melted virgin coconut oil (optional)
Instructions
-
Step 1
Process 2 cups rolled oats in a food processor for 30-60 seconds until fine flour. Add 1 ½ cups pitted dates, ½ cup cocoa powder, ¼ tsp sea salt, and 1 tsp vanilla extract. Process for 1-3 minutes until a sticky, uniform dough forms, scraping sides as needed. If too dry, add almond milk 1 tbsp at a time until desired consistency. -
Step 2
Transfer dough to parchment paper, top with another parchment sheet, and roll evenly to ¼ inch thickness. Using a 1 ½ – 2 inch round cookie cutter, cut out circles (approx. 24-30 bases). Transfer discs to a parchment-lined plate and chill in the refrigerator. -
Step 3
In a high-speed blender, combine 1 ½ cups soaked cashews, ½ cup coconut cream, ¼ cup maple syrup, 1 ½ tsp vanilla extract, a pinch of sea salt, and optional 1 tbsp melted coconut oil. Blend on high for 2-5 minutes, scraping sides, until incredibly smooth and creamy. Taste and adjust sweetness; add ½ tsp coconut milk if too thick. -
Step 4
Transfer the creamy vanilla filling to a piping bag (or a bowl for spooning) and place in the refrigerator for 15-20 minutes to firm up slightly. -
Step 5
Retrieve chilled cookie bases and filling. Lay out half of the chocolate bases. Pipe or spoon a generous dollop (¾ to 1 inch high) of filling onto the center of each bottom base. Top with the remaining cookie bases, gently pressing down to spread the filling to the edges. -
Step 6
Carefully transfer assembled Oreos back to the refrigerator and chill for at least 1-2 hours (preferably 3-4 hours or overnight) to allow the filling to set firmly. Once thoroughly chilled, your Healthy No Bake Oreos are ready to be enjoyed! Store in an airtight container in the refrigerator for up to 5-7 days, or freeze for up to 1 month.
Important Information
Nutrition Facts (Per Serving)
It is important to consider this information as approximate and not to use it as definitive health advice.
Allergy Information
Please check ingredients for potential allergens and consult a health professional if in doubt.

Leave a Comment