
Grilled Thanksgiving Turkey: Prepare to revolutionize your Thanksgiving feast! Forget the days of dry, oven-roasted turkey. This year, we’re taking the bird outside for a smoky, succulent experience that will have your guests raving. Imagine sinking your teeth into tender, juicy turkey infused with the subtle char of the grill a flavor profile that elevates this classic holiday dish to a whole new level.
While the traditional oven-roasted turkey holds a special place in our hearts, the idea of grilling a Thanksgiving turkey isn’t entirely new. In fact, open-fire cooking has been a cornerstone of celebratory meals for centuries. Think of the indigenous peoples of North America, who roasted whole animals over open flames long before ovens became commonplace. This method not only imparts a unique smoky flavor but also allows for a more even cooking process, resulting in a bird that’s moist and flavorful from the inside out.
People adore Grilled Thanksgiving Turkey for a multitude of reasons. First and foremost, it’s incredibly delicious! The smoky flavor complements the savory taste of the turkey, creating a complex and satisfying culinary experience. Secondly, grilling frees up valuable oven space, allowing you to focus on other Thanksgiving staples like stuffing, mashed potatoes, and pies. Finally, it’s a fun and engaging way to involve the whole family in the cooking process. So, ditch the oven this year and embrace the deliciousness of a Grilled Thanksgiving Turkey. You won’t regret it!

Ingredients:
- For the Brine:
- 1 gallon water
- 1 cup kosher salt
- 1 cup brown sugar, packed
- 1/2 cup granulated sugar
- 1 orange, quartered
- 1 lemon, quartered
- 4 sprigs fresh rosemary
- 6 sprigs fresh thyme
- 1 tablespoon black peppercorns
- 1 head of garlic, halved horizontally
- 2 bay leaves
- For the Turkey:
- 1 (12-14 pound) turkey, thawed completely
- 1/2 cup olive oil
- 2 tablespoons poultry seasoning
- 1 tablespoon smoked paprika
- 1 teaspoon garlic powder
- 1 teaspoon onion powder
- 1/2 teaspoon cayenne pepper (optional)
- Salt and freshly ground black pepper, to taste
- 1 apple, quartered
- 1 onion, quartered
- 2 stalks celery, chopped
- 4 sprigs fresh rosemary
- 6 sprigs fresh thyme
- For the Basting Sauce:
- 1/2 cup melted butter
- 1/4 cup apple cider vinegar
- 2 tablespoons honey
- 1 tablespoon Worcestershire sauce
- 1 teaspoon smoked paprika
Brining the Turkey
Okay, let’s get started! Brining is absolutely crucial for a juicy and flavorful grilled turkey. Trust me, you don’t want to skip this step. It’s what separates a good turkey from an amazing one.
- Prepare the Brine: In a large pot (big enough to hold the turkey and the brine), combine the water, kosher salt, brown sugar, and granulated sugar. Stir well until the salt and sugars are completely dissolved. This might take a few minutes, so be patient.
- Add Aromatics: Add the quartered orange and lemon, rosemary sprigs, thyme sprigs, black peppercorns, halved garlic head, and bay leaves to the brine. These aromatics will infuse the turkey with incredible flavor.
- Submerge the Turkey: Carefully place the thawed turkey into the brine. Make sure the turkey is completely submerged. If necessary, you can weigh it down with a plate or a heavy pot lid. I sometimes use a gallon-sized freezer bag filled with ice water to keep it submerged.
- Refrigerate: Cover the pot and refrigerate the turkey in the brine for at least 12 hours, but preferably 18-24 hours. This allows the brine to fully penetrate the turkey, resulting in a moist and flavorful bird. Don’t brine for longer than 24 hours, or the turkey might become too salty.
Preparing the Turkey for Grilling
Alright, the turkey has been brining and is now bursting with flavor! Time to get it ready for the grill. This part is all about drying the turkey and adding some extra seasoning.
- Remove from Brine: Remove the turkey from the brine and discard the brine. Rinse the turkey thoroughly under cold running water. This will remove any excess salt from the surface.
- Pat Dry: Pat the turkey completely dry, both inside and out, with paper towels. This is super important! A dry turkey skin will crisp up beautifully on the grill. Don’t skip this step!
- Season the Turkey: In a small bowl, combine the olive oil, poultry seasoning, smoked paprika, garlic powder, onion powder, and cayenne pepper (if using). Mix well.
- Rub with Seasoning: Rub the olive oil mixture all over the turkey, both under the skin (if you can carefully loosen it) and on the outside. Make sure to get every nook and cranny! Season generously with salt and freshly ground black pepper.
- Stuff the Cavity: Stuff the turkey cavity with the quartered apple, quartered onion, chopped celery, rosemary sprigs, and thyme sprigs. These aromatics will add even more flavor to the turkey as it cooks.
- Truss the Turkey (Optional): If you want, you can truss the turkey legs together with kitchen twine. This will help the turkey cook more evenly and maintain its shape. I usually skip this step, but it’s up to you.
Preparing the Grill
Now, let’s get the grill ready! Grilling a turkey requires indirect heat, so we’ll be setting up a two-zone fire. This means having coals on one side of the grill and an empty space on the other.
- Prepare the Charcoal: Light a chimney full of charcoal. You’ll need enough charcoal to maintain a consistent temperature of around 325-350°F (160-175°C) for several hours.
- Arrange the Coals: Once the charcoal is hot and ashed over, pour it onto one side of the grill. Leave the other side empty. This creates the two-zone fire.
- Add Wood Chips (Optional): If you want to add a smoky flavor to your turkey, you can add a handful of wood chips (such as applewood or hickory) to the coals. Soak the wood chips in water for about 30 minutes before adding them to the coals to prevent them from burning too quickly.
- Position the Grill Grate: Place the grill grate over the coals.
- Clean the Grate: Clean the grill grate with a wire brush.
- Oil the Grate: Lightly oil the grill grate with cooking oil to prevent the turkey from sticking.
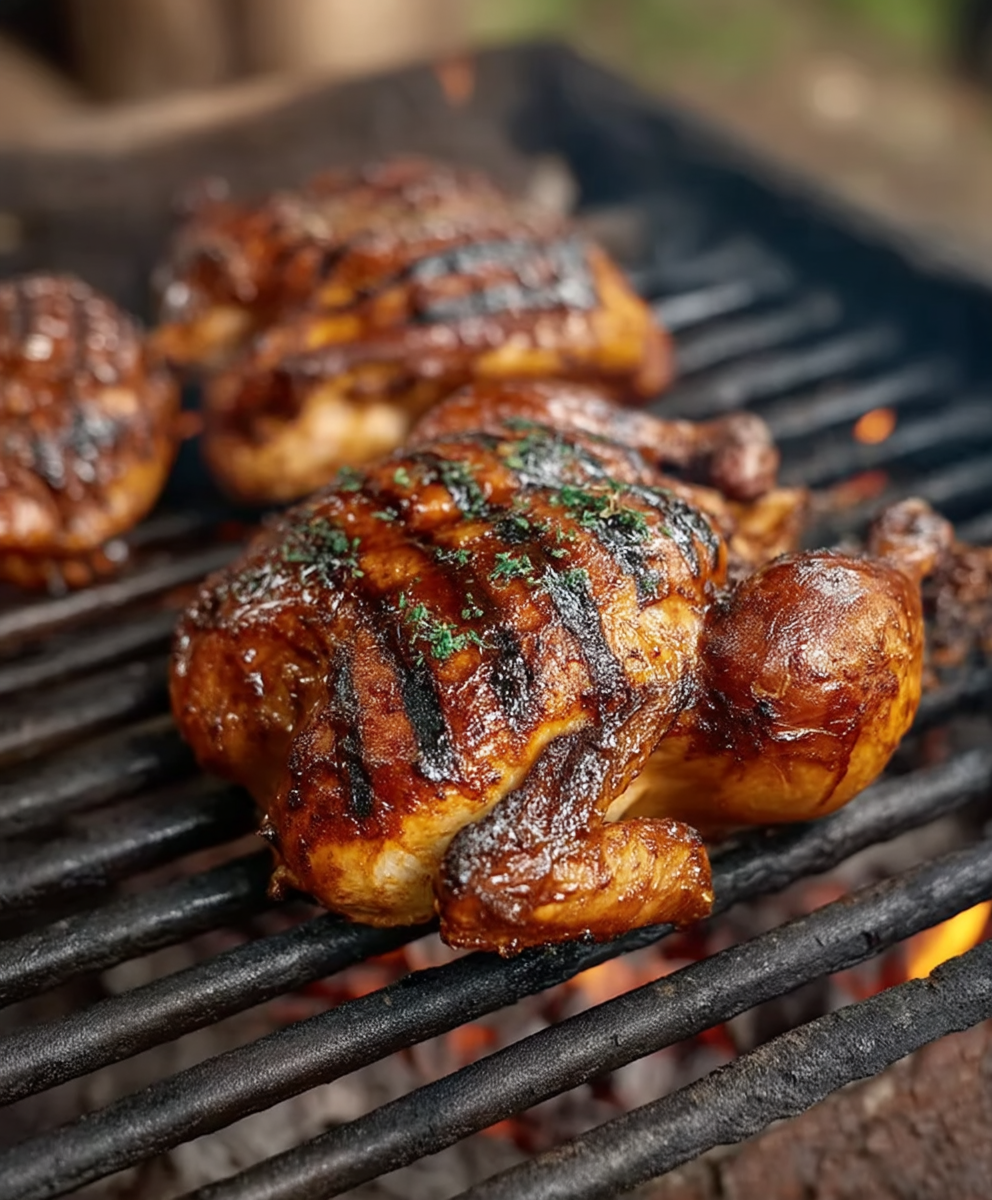
Grilling the Turkey
Here comes the fun part! Grilling the turkey requires patience and attention, but the results are well worth it. We’ll be using indirect heat to cook the turkey slowly and evenly.
- Place the Turkey on the Grill: Place the turkey on the grill grate, on the side opposite the coals (the indirect heat side). Position the turkey with the legs facing the coals.
- Cover the Grill: Cover the grill and maintain a temperature of around 325-350°F (160-175°C). Use the grill’s vents to control the temperature. If the temperature gets too high, close the vents slightly. If the temperature gets too low, open the vents slightly.
- Baste the Turkey: While the turkey is grilling, prepare the basting sauce. In a small saucepan, combine the melted butter, apple cider vinegar, honey, Worcestershire sauce, and smoked paprika. Heat over low heat until the ingredients are combined. Baste the turkey with the basting sauce every 30-45 minutes. This will help keep the turkey moist and add flavor.
- Rotate the Turkey: Rotate the turkey every hour to ensure even cooking. This will prevent one side from getting too dark.
- Check the Internal Temperature: Use a meat thermometer to check the internal temperature of the turkey. Insert the thermometer into the thickest part of the thigh, without touching the bone. The turkey is done when the internal temperature reaches 165°F (74°C).
- Grilling Time: The grilling time will vary depending on the size of the turkey and the temperature of the grill. A 12-14 pound turkey will typically take about 3-4 hours to grill.
Resting and Carving the Turkey
Almost there! Once the turkey is cooked, it’s important to let it rest before carving. This allows the juices to redistribute throughout the meat, resulting in a more tender and flavorful turkey.
- Remove from Grill: Once the turkey reaches an internal temperature of 165°F (74°C), remove it from the grill.
- Rest the Turkey: Place the turkey on a cutting board and cover it loosely with foil. Let the turkey rest for at least 30 minutes, but preferably 45 minutes to an hour.
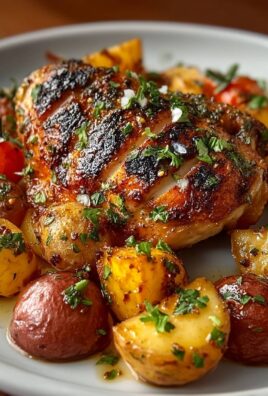
- Carve the Turkey: After the turkey has rested, carve it according to your preference. I like to start by removing the legs and thighs, then slicing the breast meat.
- Serve and Enjoy: Serve the carved turkey with your favorite Thanksgiving sides, such as mashed potatoes, stuffing, gravy, and cranberry sauce. Enjoy!
Conclusion:
This isn’t just another turkey recipe; it’s a Thanksgiving game-changer! I truly believe that once you experience the smoky, juicy perfection of a Grilled Thanksgiving Turkey, you’ll never go back to oven-roasting. The flavor is simply unparalleled, and the crispy skin is something dreams are made of. Forget dry, bland turkey this method guarantees a moist and flavorful bird that will have your guests raving.
But the best part? It frees up your oven! Think of all the extra space you’ll have for those delicious side dishes. No more juggling oven temperatures or stressing about timing. The grill becomes your Thanksgiving hero, allowing you to focus on other culinary creations and, more importantly, spending quality time with your loved ones.
And the possibilities don’t stop there! Feel free to experiment with different brines and rubs to customize the flavor profile to your liking. I’ve included my favorite recipe, but don’t be afraid to get creative. Try adding citrus zest to the brine for a bright, zesty flavor, or incorporate smoked paprika into the rub for an extra layer of smoky depth. You could even inject the turkey with a flavorful marinade before grilling for maximum moisture and flavor penetration.
Serving Suggestions & Variations:
* Classic Thanksgiving Feast: Serve your grilled turkey alongside traditional Thanksgiving sides like mashed potatoes, stuffing, cranberry sauce, and green bean casserole. The smoky flavor of the turkey will complement these classic dishes beautifully.
* Turkey Sandwiches: The leftovers (if there are any!) make incredible turkey sandwiches. Pile slices of grilled turkey onto your favorite bread with cranberry sauce, stuffing, and a dollop of mayonnaise.
* Turkey Salad: Dice up leftover grilled turkey and mix it with mayonnaise, celery, onion, and grapes for a delicious and easy turkey salad. Serve it on crackers, lettuce cups, or in a sandwich.
* Turkey Chili: Use leftover grilled turkey to make a hearty and flavorful turkey chili. Simply shred the turkey and add it to your favorite chili recipe.
* Spatchcock Variation: For an even faster grilling time, consider spatchcocking the turkey. This involves removing the backbone and flattening the bird, which allows it to cook more evenly and quickly.
I know grilling a turkey might seem intimidating at first, but trust me, it’s easier than you think. Just follow my step-by-step instructions, and you’ll be rewarded with the most delicious Thanksgiving turkey you’ve ever tasted. Remember to use a reliable meat thermometer to ensure the turkey is cooked to a safe internal temperature.
So, what are you waiting for? This Thanksgiving, ditch the oven and embrace the grill! I’m confident that this Grilled Thanksgiving Turkey recipe will become a new family favorite. I can’t wait to hear about your grilling adventures! Please, try this recipe and share your experience in the comments below. Let me know what variations you tried, what sides you served, and how much everyone loved it. Happy grilling, and Happy Thanksgiving!
Grilled Thanksgiving Turkey: The Ultimate Guide to a Delicious Holiday Meal
Juicy and flavorful grilled turkey, brined for maximum moisture and infused with aromatic herbs and spices. Perfect for Thanksgiving or any special occasion!
Ingredients
- 1 gallon water
- 1 cup kosher salt
- 1 cup brown sugar, packed
- 1/2 cup granulated sugar
- 1 orange, quartered
- 1 lemon, quartered
- 4 sprigs fresh rosemary
- 6 sprigs fresh thyme
- 1 tablespoon black peppercorns
- 1 head of garlic, halved horizontally
- 2 bay leaves
- 1 (12-14 pound) turkey, thawed completely
- 1/2 cup olive oil
- 2 tablespoons poultry seasoning
- 1 tablespoon smoked paprika
- 1 teaspoon garlic powder
- 1 teaspoon onion powder
- 1/2 teaspoon cayenne pepper (optional)
- Salt and freshly ground black pepper, to taste
- 1 apple, quartered
- 1 onion, quartered
- 2 stalks celery, chopped
- 4 sprigs fresh rosemary
- 6 sprigs fresh thyme
- 1/2 cup melted butter
- 1/4 cup apple cider vinegar
- 2 tablespoons honey
- 1 tablespoon Worcestershire sauce
- 1 teaspoon smoked paprika
Instructions
- Prepare the Brine: In a large pot, combine water, kosher salt, brown sugar, and granulated sugar. Stir until dissolved.
- Add Aromatics: Add quartered orange and lemon, rosemary, thyme, peppercorns, garlic, and bay leaves to the brine.
- Submerge the Turkey: Place the thawed turkey into the brine, ensuring it’s completely submerged. Weigh down if needed.
- Refrigerate: Cover and refrigerate for 12-24 hours (no longer than 24 hours).
- Remove from Brine: Remove the turkey from the brine and discard the brine. Rinse the turkey thoroughly under cold running water.
- Pat Dry: Pat the turkey completely dry, inside and out, with paper towels.
- Season the Turkey: In a bowl, combine olive oil, poultry seasoning, smoked paprika, garlic powder, onion powder, and cayenne pepper (if using).
- Rub with Seasoning: Rub the olive oil mixture all over the turkey, under the skin and on the outside. Season with salt and pepper.
- Stuff the Cavity: Stuff the turkey cavity with quartered apple, quartered onion, chopped celery, rosemary, and thyme.
- Truss the Turkey (Optional): Truss the turkey legs together with kitchen twine.
- Prepare the Charcoal: Light a chimney full of charcoal.
- Arrange the Coals: Pour the hot charcoal onto one side of the grill, leaving the other side empty (two-zone fire).
- Add Wood Chips (Optional): Add soaked wood chips to the coals for smoky flavor.
- Position the Grill Grate: Place the grill grate over the coals.
- Clean the Grate: Clean the grill grate with a wire brush.
- Oil the Grate: Lightly oil the grill grate with cooking oil.
- Place the Turkey on the Grill: Place the turkey on the grill grate, on the side opposite the coals (indirect heat). Position the turkey with the legs facing the coals.
- Cover the Grill: Cover the grill and maintain a temperature of around 325-350°F (160-175°C).
- Baste the Turkey: Combine melted butter, apple cider vinegar, honey, Worcestershire sauce, and smoked paprika in a saucepan. Baste the turkey every 30-45 minutes.
- Rotate the Turkey: Rotate the turkey every hour to ensure even cooking.
- Check the Internal Temperature: Use a meat thermometer to check the internal temperature of the turkey. Insert the thermometer into the thickest part of the thigh, without touching the bone. The turkey is done when the internal temperature reaches 165°F (74°C).
- Remove from Grill: Once the turkey reaches an internal temperature of 165°F (74°C), remove it from the grill.
- Rest the Turkey: Place the turkey on a cutting board and cover it loosely with foil. Let the turkey rest for at least 30 minutes, but preferably 45 minutes to an hour.
- Carve the Turkey: After the turkey has rested, carve it according to your preference.
- Serve and Enjoy: Serve the carved turkey with your favorite Thanksgiving sides.
Notes
- Brining is crucial for a juicy turkey. Don’t skip it!
- Ensure the turkey is completely thawed before brining.
- Don’t brine for longer than 24 hours, or the turkey may become too salty.
- Pat the turkey completely dry before seasoning to ensure crispy skin.
- Maintain a consistent grill temperature for even cooking.
- Resting the turkey is essential for tender and flavorful meat.
Leave a Comment