
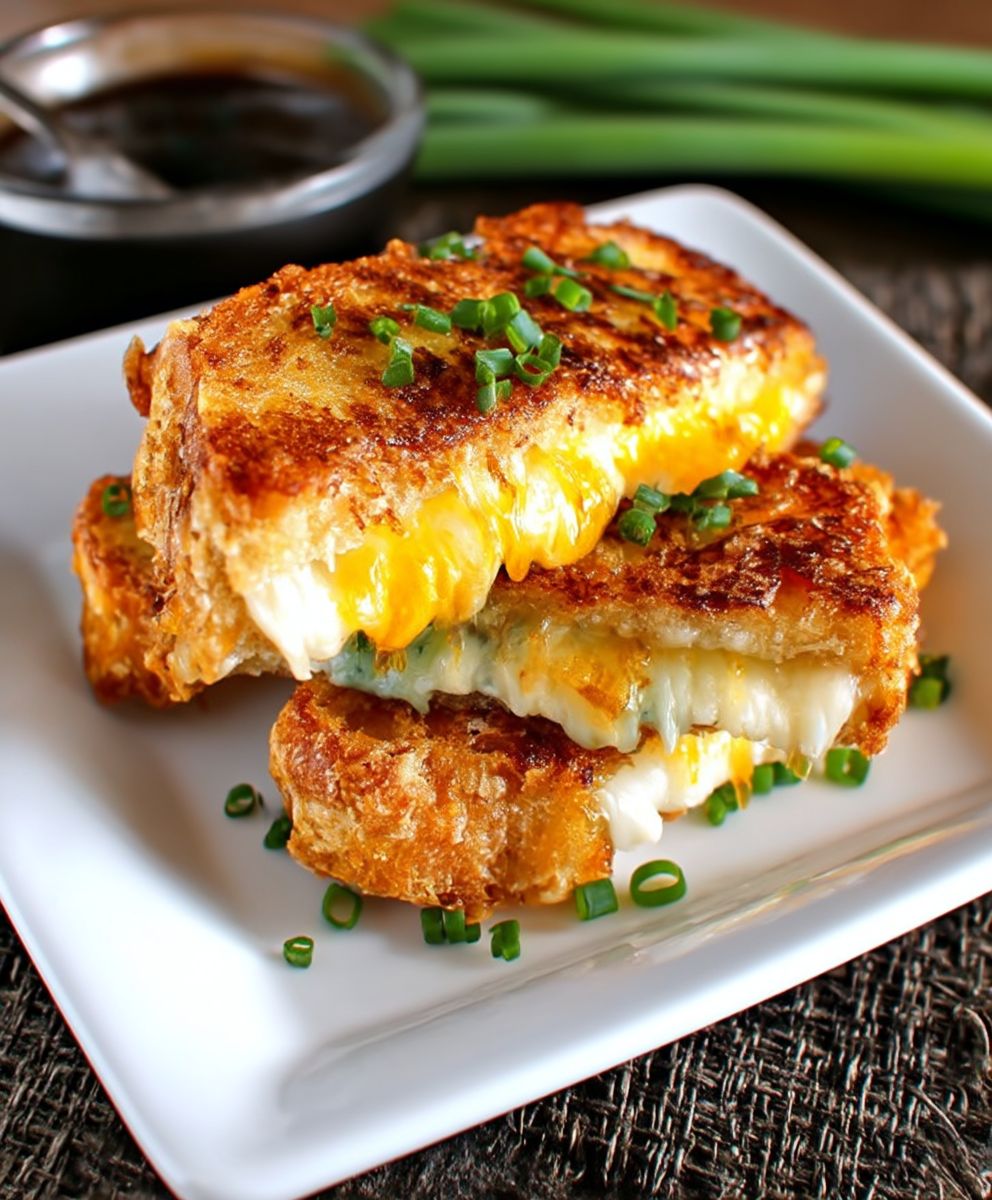
Grilled Cheese Sticks: the ultimate comfort food, reimagined! Forget everything you thought you knew about this classic sandwich because we’re taking it to a whole new level of fun and flavor. Imagine golden-brown, crispy sticks of cheesy goodness, perfect for dipping, snacking, or even a light meal. Are you ready to transform a childhood favorite into an irresistible treat that both kids and adults will adore?
While the exact origins of the grilled cheese sandwich are debated, its popularity soared in the United States during the 1920s, thanks to the invention of sliced bread and processed cheese. It quickly became a staple in American households, offering a quick, affordable, and satisfying meal. Our grilled cheese sticks build upon this legacy, offering a playful twist on a beloved classic.
What makes grilled cheese so universally appealing? It’s the perfect combination of textures: the crisp, buttery bread and the gooey, melted cheese create a symphony of deliciousness in every bite. Plus, it’s incredibly versatile! You can customize it with different cheeses, breads, and even add-ins like ham, tomato, or bacon. These grilled cheese sticks are no exception. They are easy to make, fun to eat, and endlessly adaptable to your personal preferences. So, let’s get cooking and create some cheesy magic!

Ingredients:
- 16 slices white bread
- 8 slices cheddar cheese
- 8 slices mozzarella cheese
- 1/2 cup butter, melted
- 1/4 cup grated Parmesan cheese
- 1 teaspoon garlic powder
- 1/2 teaspoon dried oregano
- 1/4 teaspoon red pepper flakes (optional)
- Marinara sauce, for dipping
Preparing the Grilled Cheese Sticks:
- Prepare the Bread: First, lay out all 16 slices of bread on a clean work surface. I like to use a large cutting board for this.
- Layer the Cheese: Now, take 8 slices of bread and place one slice of cheddar cheese and one slice of mozzarella cheese on each. Make sure the cheese covers as much of the bread surface as possible, but doesn’t hang over the edges too much. A little overhang is fine, but we don’t want it melting all over the pan later.
- Top with Bread: Place the remaining 8 slices of bread on top of the cheese-covered slices, creating 8 sandwiches. Gently press down on each sandwich to help the cheese adhere to the bread.
- Cut into Sticks: Using a sharp knife or pizza cutter, carefully cut each sandwich into 4 equal sticks. You should now have 32 grilled cheese sticks ready to go. I find a pizza cutter works best for a clean, even cut.
Making the Garlic Butter:
- Melt the Butter: In a small bowl, melt the butter in the microwave. I usually do this in 30-second intervals, stirring in between, to prevent it from splattering. You can also melt it on the stovetop over low heat if you prefer.
- Add Seasonings: Once the butter is melted, add the grated Parmesan cheese, garlic powder, dried oregano, and red pepper flakes (if using). Stir well to combine all the ingredients. The red pepper flakes add a nice little kick, but they’re totally optional if you prefer a milder flavor.
Cooking the Grilled Cheese Sticks:
- Prepare the Skillet: Heat a large skillet or griddle over medium heat. You want the skillet to be hot enough to toast the bread nicely, but not so hot that it burns the butter.
- Dip in Garlic Butter: Dip each grilled cheese stick into the garlic butter mixture, ensuring that all sides are coated evenly. I like to use tongs for this to avoid getting my fingers too greasy. You can also brush the butter on with a pastry brush if you prefer.
- Grill the Sticks: Place the buttered grilled cheese sticks in the hot skillet, being careful not to overcrowd the pan. You may need to cook them in batches.
- Cook Until Golden Brown: Cook the grilled cheese sticks for about 2-3 minutes per side, or until they are golden brown and the cheese is melted and gooey. Keep a close eye on them to prevent burning. If the bread is browning too quickly, reduce the heat slightly.
- Remove and Drain: Once the grilled cheese sticks are cooked to perfection, remove them from the skillet and place them on a paper towel-lined plate to drain any excess butter. This will help them stay crispy.
Serving and Enjoying:
- Serve Immediately: Serve the grilled cheese sticks immediately while they are still hot and the cheese is melted and gooey. They are best enjoyed fresh!
- Pair with Marinara Sauce: Serve with a side of warm marinara sauce for dipping. You can use store-bought marinara sauce or make your own from scratch. Other dipping sauces that would be delicious include ranch dressing, pesto, or even a spicy sriracha mayo.
- Optional Garnishes: For an extra touch, you can garnish the grilled cheese sticks with a sprinkle of fresh parsley or a dusting of Parmesan cheese.
Tips for Perfect Grilled Cheese Sticks:
- Use Good Quality Cheese: The quality of the cheese will greatly impact the flavor of the grilled cheese sticks. I recommend using a good quality cheddar and mozzarella cheese for the best results.
- Don’t Overcrowd the Pan: Overcrowding the pan will lower the temperature and prevent the grilled cheese sticks from browning properly. Cook them in batches if necessary.
- Adjust the Heat as Needed: Keep a close eye on the heat and adjust it as needed to prevent the bread from burning.
- Get Creative with Fillings: Feel free to experiment with different types of cheese and fillings. You could add ham, bacon, tomatoes, or even jalapenos for a spicier kick.
- Make Ahead Option: You can assemble the grilled cheese sticks ahead of time and store them in the refrigerator until you are ready to cook them. Just be sure to wrap them tightly in plastic wrap to prevent them from drying out.
Variations:
- Spicy Grilled Cheese Sticks: Add a pinch of cayenne pepper or a dash of hot sauce to the garlic butter for a spicy kick. You can also add sliced jalapenos to the cheese filling.
- Italian Grilled Cheese Sticks: Use provolone and mozzarella cheese and add a sprinkle of Italian seasoning to the garlic butter. Serve with marinara sauce for dipping.
- Ham and Cheese Grilled Cheese Sticks: Add a slice of ham to each sandwich before grilling.
- Bacon and Cheese Grilled Cheese Sticks: Add cooked and crumbled bacon to each sandwich before grilling.
- Pesto Grilled Cheese Sticks: Spread a thin layer of pesto on the bread before adding the cheese.
Serving Suggestions:
- Appetizer: Grilled cheese sticks make a great appetizer for parties or gatherings.
- Lunch: Serve them with a side salad or soup for a quick and easy lunch.
- Snack: They are also a perfect snack for kids and adults alike.
- Game Day: These are a crowd-pleasing snack for game day!
Storage Instructions:
Leftover grilled cheese sticks can be stored in an airtight container in the refrigerator for up to 3 days. To reheat, you can bake them in the oven at 350°F (175°C) for about 5-10 minutes, or until heated through. You can also reheat them in a skillet over medium heat, flipping occasionally, until heated through and the cheese is melted. Microwaving is not recommended as it can make the bread soggy.
Nutritional Information (approximate, per serving of 4 sticks):
Please note that the nutritional information is an estimate and may vary depending on the specific ingredients used.
- Calories: 400-450
- Fat: 25-30g
- Saturated Fat: 15-20g
- Cholesterol: 70-80mg
- Sodium: 700-800mg
- Carbohydrates: 30-35g
- Fiber: 1-2g
- Sugar: 5-7g
- Protein: 15-20g
Conclusion:
And there you have it! These Grilled Cheese Sticks are more than just a snack; they’re a delightful experience that’s quick, easy, and utterly satisfying. I truly believe this recipe is a must-try for anyone looking for a comforting, cheesy treat that’s perfect for kids and adults alike. The crispy, golden-brown exterior gives way to a warm, gooey center that’s simply irresistible.
What makes these grilled cheese sticks so special is their versatility. They’re not just for dipping in tomato soup (although that’s a classic pairing for a reason!). Think about serving them with a side of marinara sauce for a pizza-inspired twist. Or, for a more sophisticated flavor profile, try dipping them in a balsamic glaze or a creamy pesto. You could even get adventurous and pair them with a spicy sriracha mayo for a kick!
Beyond the dipping sauces, there are endless possibilities for variations. Want to add a little extra flavor? Sprinkle some garlic powder or Italian seasoning on the bread before grilling. Feeling fancy? Try using different types of cheese! A combination of cheddar and Gruyere would be divine, or you could add a touch of pepper jack for a bit of heat. You could even incorporate some finely chopped herbs like chives or parsley into the cheese mixture for a fresh, vibrant flavor.
Another fun variation is to use different types of bread. While classic white bread works perfectly, you could also try sourdough, whole wheat, or even brioche for a richer, sweeter flavor. For a gluten-free option, simply use your favorite gluten-free bread. The possibilities are truly endless!
These Grilled Cheese Sticks are also incredibly customizable to suit different dietary needs and preferences. If you’re looking for a healthier option, you can use whole-wheat bread and low-fat cheese. For vegetarians, this recipe is already a winner! And for those who are dairy-free, you can easily substitute dairy-free cheese and butter.
I’m confident that once you try this recipe, it will become a staple in your household. It’s perfect for a quick lunch, a satisfying snack, or even a fun appetizer for parties. The best part is that it’s so easy to make, even the kids can help!
So, what are you waiting for? Gather your ingredients, fire up your skillet, and get ready to enjoy the most delicious Grilled Cheese Sticks you’ve ever tasted. I’m so excited for you to try this recipe and experience the cheesy goodness for yourself.
And now for the most important part: I want to hear from you! Once you’ve made these grilled cheese sticks, please share your experience in the comments below. Let me know what variations you tried, what dipping sauces you loved, and any tips or tricks you discovered along the way. I’m always looking for new ideas and inspiration, and I love hearing from my readers. Don’t forget to share photos of your creations on social media using [Your Hashtag]! I can’t wait to see what you come up with! Happy grilling!
Grilled Cheese Sticks: The Ultimate Guide to Crispy, Cheesy Perfection
Crispy, cheesy grilled cheese sticks dipped in garlic butter and cooked to golden perfection. Serve with marinara sauce for dipping!
Ingredients
- 16 slices white bread
- 8 slices cheddar cheese
- 8 slices mozzarella cheese
- 1/2 cup butter, melted
- 1/4 cup grated Parmesan cheese
- 1 teaspoon garlic powder
- 1/2 teaspoon dried oregano
- 1/4 teaspoon red pepper flakes (optional)
- Marinara sauce, for dipping
Instructions
- Lay out all 16 slices of bread on a clean work surface.
- Take 8 slices of bread and place one slice of cheddar cheese and one slice of mozzarella cheese on each. Make sure the cheese covers as much of the bread surface as possible, but doesn’t hang over the edges too much.
- Place the remaining 8 slices of bread on top of the cheese-covered slices, creating 8 sandwiches. Gently press down on each sandwich to help the cheese adhere to the bread.
- Using a sharp knife or pizza cutter, carefully cut each sandwich into 4 equal sticks. You should now have 32 grilled cheese sticks ready to go.
- In a small bowl, melt the butter in the microwave in 30-second intervals, stirring in between, to prevent it from splattering. You can also melt it on the stovetop over low heat if you prefer.
- Once the butter is melted, add the grated Parmesan cheese, garlic powder, dried oregano, and red pepper flakes (if using). Stir well to combine all the ingredients.
- Heat a large skillet or griddle over medium heat.
- Dip each grilled cheese stick into the garlic butter mixture, ensuring that all sides are coated evenly.
- Place the buttered grilled cheese sticks in the hot skillet, being careful not to overcrowd the pan. You may need to cook them in batches.
- Cook the grilled cheese sticks for about 2-3 minutes per side, or until they are golden brown and the cheese is melted and gooey. Keep a close eye on them to prevent burning. If the bread is browning too quickly, reduce the heat slightly.
- Once the grilled cheese sticks are cooked to perfection, remove them from the skillet and place them on a paper towel-lined plate to drain any excess butter.
- Serve the grilled cheese sticks immediately while they are still hot and the cheese is melted and gooey. They are best enjoyed fresh!
- Serve with a side of warm marinara sauce for dipping.
- For an extra touch, you can garnish the grilled cheese sticks with a sprinkle of fresh parsley or a dusting of Parmesan cheese.
Notes
- Use good quality cheese for the best flavor.
- Don’t overcrowd the pan to ensure proper browning.
- Adjust the heat as needed to prevent burning.
- Get creative with fillings try ham, bacon, tomatoes, or jalapenos.
- You can assemble the grilled cheese sticks ahead of time and store them in the refrigerator until ready to cook.


Leave a Comment