
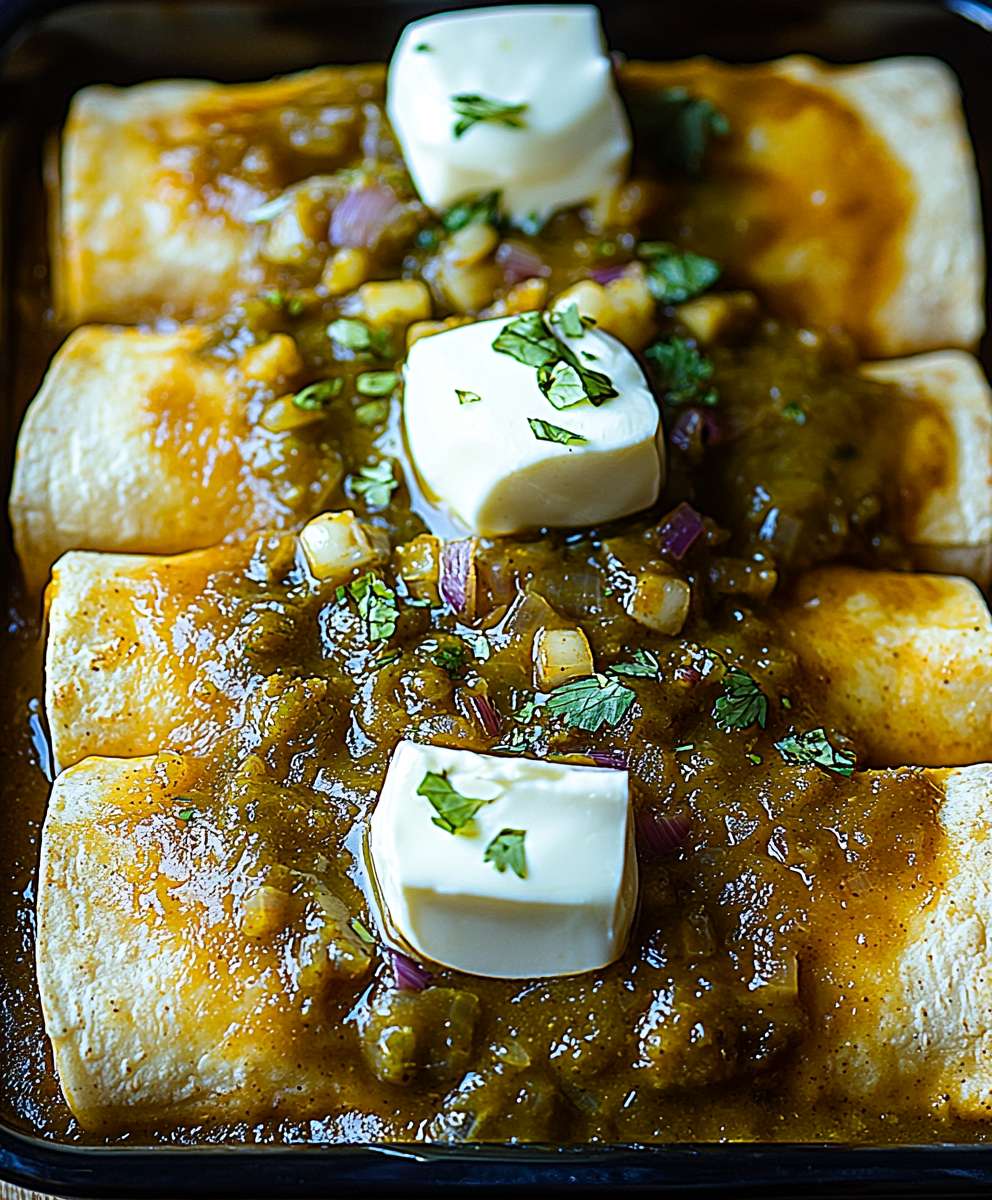
Green Chile Enchiladas: Prepare to embark on a culinary journey south of the border with a dish that’s as comforting as it is vibrant. Forget bland weeknight dinners; we’re diving headfirst into a cheesy, saucy, and utterly irresistible experience that will have your taste buds singing! Have you ever craved a meal that’s both satisfying and bursting with flavor? Then look no further!
Enchiladas, a cornerstone of Mexican cuisine, boast a rich history dating back to the Mayan civilization, where corn tortillas were used to wrap small fish. Over time, the dish evolved, incorporating the diverse flavors and ingredients of different regions. Our star ingredient, green chile, adds a distinctive Southwestern flair, particularly beloved in New Mexico, where it’s practically a state treasure. The earthy, slightly spicy, and subtly sweet notes of green chile elevate these enchiladas to a whole new level of deliciousness.
What makes Green Chile Enchiladas so universally adored? It’s the perfect combination of textures and tastes. The soft, warm tortillas embrace a savory filling, all smothered in a creamy, tangy green chile sauce and topped with melted cheese. Its a symphony of flavors that dance on your palate. Plus, they are incredibly versatile! You can customize the filling to your liking, making them a perfect option for vegetarians and meat-lovers alike. Whether you’re looking for a quick weeknight meal or a crowd-pleasing dish for a gathering, these enchiladas are guaranteed to be a hit. So, let’s get cooking and bring a little Southwestern sunshine to your kitchen!

Ingredients:
- For the Green Chile Sauce:
- 2 tablespoons olive oil
- 1 medium onion, chopped
- 2 cloves garlic, minced
- 1 pound fresh green chiles (such as Anaheim or Hatch), roasted, peeled, seeded, and chopped (or 2 cans, 4 oz each, diced green chiles)
- 1 teaspoon ground cumin
- 1/2 teaspoon dried oregano
- 1/4 teaspoon salt, or to taste
- 1/4 teaspoon black pepper, or to taste
- 2 cups chicken broth
- 1 tablespoon all-purpose flour (optional, for thickening)
- For the Enchiladas:
- 12 corn tortillas
- 2 cups shredded cooked chicken (or cheese, or a combination)
- 2 cups shredded Monterey Jack cheese (or cheddar, or a Mexican blend)
- 1/2 cup chopped cilantro, for garnish (optional)
- Sour cream, for serving (optional)
- Diced tomatoes, for serving (optional)
Preparing the Green Chile Sauce
- Sauté the Aromatics: First, grab a large saucepan or Dutch oven and heat the olive oil over medium heat. Add the chopped onion and cook until softened and translucent, about 5-7 minutes. Then, toss in the minced garlic and cook for another minute until fragrant. Be careful not to burn the garlic!
- Add the Green Chiles and Spices: Now, it’s time to add the star of the show the chopped green chiles! If you’re using fresh chiles, make sure they’re roasted, peeled, seeded, and chopped. Canned diced green chiles work great too if you’re short on time. Add the cumin, oregano, salt, and pepper to the saucepan. Stir everything together well to combine the spices with the chiles and aromatics.
- Simmer the Sauce: Pour in the chicken broth and bring the mixture to a simmer. Reduce the heat to low, cover the saucepan, and let it simmer for at least 15-20 minutes. This allows the flavors to meld together beautifully and the sauce to thicken slightly. The longer it simmers, the richer the flavor will be!
- Thicken the Sauce (Optional): If you prefer a thicker sauce, you can create a slurry by whisking together the all-purpose flour with a couple of tablespoons of cold water in a small bowl. Gradually whisk the slurry into the simmering sauce, stirring constantly to prevent lumps from forming. Continue to simmer for another 5-10 minutes, or until the sauce reaches your desired consistency. If you like a thinner sauce, skip this step entirely.
- Blend the Sauce (Optional): For a smoother sauce, you can use an immersion blender to blend the sauce directly in the saucepan. Alternatively, you can carefully transfer the sauce to a regular blender (in batches, if necessary) and blend until smooth. Be extremely cautious when blending hot liquids! If using a regular blender, make sure to vent the lid to prevent pressure from building up. Once blended, return the sauce to the saucepan and keep warm over low heat.
Assembling the Enchiladas
- Preheat the Oven: Preheat your oven to 350°F (175°C). This will ensure that the enchiladas bake evenly and the cheese melts beautifully.
- Warm the Tortillas: This is a crucial step to prevent the tortillas from cracking when you roll them. There are a few ways to warm them:
- Microwave: Wrap a stack of tortillas in a damp paper towel and microwave for about 30-60 seconds, or until they are pliable.
- Skillet: Heat a dry skillet over medium heat. Warm each tortilla individually for about 15-20 seconds per side, until softened.
- Oven: Wrap the tortillas in foil and warm them in the preheated oven for about 10-15 minutes.
- Assemble the Enchiladas: Now comes the fun part! One at a time, dip a warmed tortilla into the green chile sauce, coating both sides. Place the sauced tortilla on a plate.
- Add the Filling: Spoon about 2-3 tablespoons of shredded chicken (or cheese, or your preferred filling) down the center of the tortilla. Don’t overfill them, or they’ll be difficult to roll.
- Roll the Enchiladas: Carefully roll up the tortilla tightly and place it seam-side down in a baking dish. A 9×13 inch baking dish works well for 12 enchiladas. You can lightly grease the baking dish with cooking spray to prevent sticking, but it’s usually not necessary since the tortillas are coated in sauce.
- Repeat: Repeat steps 3-5 with the remaining tortillas, sauce, and filling, arranging the enchiladas snugly in the baking dish.
- Top with Cheese: Once all the enchiladas are rolled and arranged in the dish, sprinkle the remaining shredded cheese evenly over the top. This will create a delicious, melty, cheesy crust.
Baking the Enchiladas
- Bake: Cover the baking dish with aluminum foil. This will help to keep the enchiladas moist and prevent the cheese from browning too quickly. Bake in the preheated oven for 20 minutes.
- Uncover and Bake: Remove the foil and continue baking for another 5-10 minutes, or until the cheese is melted, bubbly, and lightly golden brown. Keep a close eye on them to prevent burning.
- Rest: Remove the enchiladas from the oven and let them rest for a few minutes before serving. This will allow the sauce to thicken slightly and the enchiladas to hold their shape better.
Serving and Enjoying
- Garnish (Optional): Sprinkle the chopped cilantro over the enchiladas for a pop of fresh flavor and color.
- Serve: Serve the green chile enchiladas hot, straight from the baking dish.
- Add Toppings (Optional): Offer sour cream and diced tomatoes as toppings for your guests to customize their enchiladas. Other great topping options include guacamole, shredded lettuce, and sliced black olives.
- Enjoy!: Dig in and enjoy your delicious homemade green chile enchiladas! They’re perfect for a weeknight dinner, a weekend gathering, or any occasion where you want to impress your friends and family with a flavorful and satisfying meal.
Tips and Variations:
- Spice Level: Adjust the amount of green chiles to your liking. If you prefer a milder sauce, use fewer chiles or choose a milder variety. For a spicier sauce, use more chiles or add a pinch of cayenne pepper.
- Filling Options: Get creative with your fillings! In addition to chicken and cheese, you can use ground beef, shredded pork, black beans, corn, or any combination of your favorite ingredients.
- Vegetarian Option: For a vegetarian version, simply omit the chicken and use a combination of cheese, black beans, corn, and other vegetables as the filling.
- Make-Ahead: You can assemble the enchiladas ahead of time and store them in the refrigerator for up to 24 hours before baking. Just add a few extra minutes to the baking time to ensure they are heated through.
- Freezing: Enchiladas freeze well. Assemble them, but don’t bake them. Wrap them tightly in plastic wrap and then in foil. Freeze for up to 3 months. Thaw overnight in the refrigerator before baking as directed.
Conclusion:
And there you have it! These Green Chile Enchiladas are truly a must-try recipe, and I’m confident they’ll become a staple in your kitchen. The vibrant flavors of the roasted green chiles combined with the creamy cheese and tender tortillas create a symphony of taste that’s both comforting and exciting. Forget bland enchiladas this recipe delivers a serious punch of flavor that will leave you wanting more. But why are these enchiladas so special? It’s the combination of fresh ingredients and the simple, yet effective, cooking method. Roasting the green chiles brings out their natural sweetness and smoky undertones, which perfectly complements the richness of the cheese. Plus, the homemade enchilada sauce is far superior to anything you can buy in a jar. Trust me, once you’ve tasted the difference, you’ll never go back! Beyond the incredible flavor, these Green Chile Enchiladas are also incredibly versatile. Serve them as a main course with a side of Mexican rice and refried beans for a complete and satisfying meal. Or, for a lighter option, top them with a dollop of sour cream, some fresh cilantro, and a squeeze of lime juice. They’re also fantastic for potlucks and gatherings, as they can be easily made ahead of time and reheated. Looking for variations? Feel free to experiment with different fillings. Shredded chicken, ground beef, or even black beans would all be delicious additions. You could also try using different types of cheese, such as Monterey Jack or pepper jack, to add a unique twist. For a vegetarian option, consider adding sautéed vegetables like zucchini, corn, and bell peppers to the filling. And if you’re feeling adventurous, try adding a fried egg on top for a decadent brunch treat. Serving Suggestions:- Classic: Serve with Mexican rice and refried beans.
- Light: Top with sour cream, cilantro, and lime.
- Potluck: Make ahead and reheat.
- Brunch: Add a fried egg on top.
- Protein: Add shredded chicken, ground beef, or black beans.
- Cheese: Use Monterey Jack or pepper jack.
- Vegetarian: Add sautéed zucchini, corn, and bell peppers.

Green Chile Enchiladas: A Delicious & Easy Recipe
- Total Time: 75 minutes
- Yield: 6 servings 1x
Description
Comforting Green Chile Chicken Enchiladas with flavorful homemade green chile sauce, tender chicken, and cheese.
Ingredients
- 2 tablespoons olive oil
- 1 medium onion, chopped
- 2 cloves garlic, minced
- 1 pound fresh green chiles (such as Anaheim or Hatch), roasted, peeled, seeded, and chopped (or 2 cans, 4 oz each, diced green chiles)
- 1 teaspoon ground cumin
- 1/2 teaspoon dried oregano
- 1/4 teaspoon salt, or to taste
- 1/4 teaspoon black pepper, or to taste
- 2 cups chicken broth
- 1 tablespoon all-purpose flour (optional, for thickening)
- 12 corn tortillas
- 2 cups shredded cooked chicken (or cheese, or a combination)
- 2 cups shredded Monterey Jack cheese (or cheddar, or a Mexican blend)
- 1/2 cup chopped cilantro, for garnish (optional)
- Sour cream, for serving (optional)
- Diced tomatoes, for serving (optional)
Instructions
- Heat the olive oil in a large saucepan or Dutch oven over medium heat. Add the chopped onion and cook until softened and translucent, about 5-7 minutes. Add the minced garlic and cook for another minute until fragrant.
- Add the chopped green chiles (roasted and prepared, or canned). Add the cumin, oregano, salt, and pepper. Stir well to combine.
- Pour in the chicken broth and bring to a simmer. Reduce heat to low, cover, and simmer for at least 15-20 minutes, or longer for a richer flavor.
- If desired, whisk together the all-purpose flour with a couple of tablespoons of cold water in a small bowl. Gradually whisk the slurry into the simmering sauce, stirring constantly. Simmer for another 5-10 minutes, or until thickened.
- For a smoother sauce, use an immersion blender or carefully transfer the sauce to a regular blender (in batches, if necessary) and blend until smooth. Return the sauce to the saucepan and keep warm over low heat.
- Preheat oven to 350°F (175°C).
- Warm the tortillas using your preferred method (microwave, skillet, or oven) until pliable.
- Dip a warmed tortilla into the green chile sauce, coating both sides. Place the sauced tortilla on a plate.
- Spoon about 2-3 tablespoons of shredded chicken (or cheese, or your preferred filling) down the center of the tortilla.
- Carefully roll up the tortilla tightly and place it seam-side down in a baking dish (9×13 inch).
- Repeat steps 3-5 with the remaining tortillas, sauce, and filling, arranging the enchiladas snugly in the baking dish.
- Sprinkle the remaining shredded cheese evenly over the top.
- Cover the baking dish with aluminum foil. Bake in the preheated oven for 20 minutes.
- Remove the foil and continue baking for another 5-10 minutes, or until the cheese is melted, bubbly, and lightly golden brown.
- Remove the enchiladas from the oven and let them rest for a few minutes before serving.
- Sprinkle the chopped cilantro over the enchiladas.
- Serve the green chile enchiladas hot, straight from the baking dish.
- Offer sour cream and diced tomatoes as toppings.
- Enjoy!
Notes
- Spice Level: Adjust the amount of green chiles to your liking.
- Filling Options: Get creative with your fillings! In addition to chicken and cheese, you can use ground beef, shredded pork, black beans, corn, or any combination of your favorite ingredients.
- Vegetarian Option: For a vegetarian version, simply omit the chicken and use a combination of cheese, black beans, corn, and other vegetables as the filling.
- Make-Ahead: You can assemble the enchiladas ahead of time and store them in the refrigerator for up to 24 hours before baking. Just add a few extra minutes to the baking time to ensure they are heated through.
- Freezing: Enchiladas freeze well. Assemble them, but don’t bake them. Wrap them tightly in plastic wrap and then in foil. Freeze for up to 3 months. Thaw overnight in the refrigerator before baking as directed.
- Prep Time: 30 minutes
- Cook Time: 45 minutes


Leave a Comment