
Milk Chocolate Stuffed Jack O Lantern Cookies Recipe is more than just a seasonal treat; it’s a delightful experience waiting to unfold in your kitchen. Imagine the joy of biting into a perfectly soft, subtly spiced cookie, only to discover a warm, molten milk chocolate center that oozes with every mouthful. This isn’t just any cookie; it’s a festive masterpiece that brings the spirit of autumn and Halloween right to your dessert plate, promising both visual charm and an unforgettable taste sensation.
I’ve always cherished the traditions of fall, from pumpkin patches to cozy evenings, and these cookies encapsulate that warmth and wonder. While the iconic jack-o’-lantern carving has a rich history rooted in ancient Celtic traditions of warding off spirits and celebrating the harvest, these edible renditions offer a sweet, modern homage. They capture the whimsical essence of the season, transforming a simple cookie into a canvas for festive creativity that’s perfect for gatherings or a quiet afternoon bake.
Why You’ll Fall in Love with This Recipe
People absolutely adore this dish for so many wonderful reasons. The blend of a classic, chewy cookie base with the unexpected surprise of a gooey milk chocolate filling creates an irresistible contrast in both texture and flavor. It’s the kind of dessert that elicits gasps of delight when served, especially when the warm chocolate spills out. Furthermore, crafting these adorable, grinning faces is an incredibly fun and engaging activity, perfect for inviting family and friends into the kitchen. Whether you’re preparing for a Halloween gathering or simply want to brighten a crisp autumn afternoon, this Milk Chocolate Stuffed Jack O Lantern Cookies Recipe promises to be a memorable and cherished addition to your seasonal repertoire. I’m truly excited for you to experience the magic!

Ingredients:
-
For the Milk Chocolate Stuffed Jack O’ Lantern Cookies:
- Two and a half cups (300g) all-purpose flour, plus more for dusting
- One teaspoon baking powder
- ½ teaspoon salt
- One cup (226g) unsalted butter, softened to room temperature
- One cup (200g) granulated sugar
- One large egg, at room temperature
- One teaspoon pure vanilla extract
- Orange gel food coloring (I find gel works best for vibrant color without thinning the dough)
- Eight ounces (about 225g) good quality milk chocolate, cut into ½ to ¾ inch chunks or squares (e.g., from a chocolate bar)
-
For the Royal Icing Decoration (Optional, but highly recommended!):
- Two cups (240g) powdered sugar (confectioners’ sugar), sifted
- Two tablespoons meringue powder
- Three to four tablespoons warm water, or as needed
- Black gel food coloring
-
Essential Tools:
- Stand mixer with paddle attachment or a hand mixer
- Large mixing bowls
- Spatulas
- Rolling pin
- Round cookie cutters (one larger, about 3-inch, and possibly smaller ones for eyes, nose, and mouth) or a sharp paring knife
- Baking sheets
- Parchment paper
- Wire cooling rack
- Piping bags and small round piping tips (for royal icing)
Preparing the Vibrant Orange Cookie Dough for Your Stuffed Jack O’ Lanterns
Creating the perfect base for our Milk Chocolate Stuffed Jack O’ Lantern Cookies begins with a wonderful, tender sugar cookie dough. The key here is a dough that holds its shape beautifully while baking, ensuring our festive designs remain intact and our luscious milk chocolate filling stays perfectly contained.
-
Whisk the Dry Ingredients: In a medium bowl, whisk together the two and a half cups of all-purpose flour, one teaspoon of baking powder, and ½ teaspoon of salt. I always take a moment to really whisk these well; it ensures the leavening and seasoning are evenly distributed throughout the dough, giving our cookies a consistent texture and flavor. Set this aside for now.
-
Cream the Butter and Sugar: In the bowl of your stand mixer, fitted with the paddle attachment (or using a hand mixer and a large bowl), cream together the one cup of softened unsalted butter and one cup of granulated sugar. Beat them on medium speed until the mixture is light, fluffy, and pale in color. This process typically takes about 3-5 minutes, and it’s a crucial step because it incorporates air into the butter, which contributes to the cookies’ tenderness. Don’t rush this step; it truly makes a difference in the final texture of your “Milk Chocolate Stuffed Jack O Lantern Cookies Recipe.”
-
Add Egg and Vanilla: Scrape down the sides of the bowl with a spatula, then add the one large egg and one teaspoon of pure vanilla extract. Beat on medium speed until just combined. Be careful not to overmix here after adding the egg, as overmixing can lead to tougher cookies. Just mix until no streaks of egg yolk are visible.
-
Gradually Incorporate Dry Ingredients: With the mixer on low speed, gradually add the dry ingredient mixture to the wet ingredients. Mix until just combined and a soft dough forms. Again, less is more here. As soon as you see no more dry flour, stop mixing. Overworking the dough develops the gluten too much, which can make your cookies tough and less tender.
-
Achieve That Signature Orange Hue: Now for the fun part – coloring our Jack O’ Lanterns! Add several drops of orange gel food coloring to the dough. I prefer gel coloring because it provides a vibrant color without adding excess liquid, which could alter the dough’s consistency. Start with a few drops and knead it in either with your hands (wearing gloves if you don’t want orange fingers!) or by mixing on low speed in your stand mixer. Continue adding more drops until you achieve your desired bright, festive orange color. This vibrant orange is essential for the classic “Milk Chocolate Stuffed Jack O Lantern Cookies Recipe” look!
-
Chill the Dough: Divide the dough into two equal portions. Flatten each portion into a disk, wrap tightly in plastic wrap, and refrigerate for at least one hour. Chilling is absolutely vital for sugar cookie dough. It solidifies the butter, which prevents the cookies from spreading excessively in the oven, ensuring your intricate Jack O’ Lantern shapes hold up beautifully. It also makes the dough much easier to handle when rolling and cutting.
Forming and Stuffing Your Milk Chocolate Jack O’ Lanterns
This is where the magic truly begins – transforming our orange dough into adorable, chocolate-filled Jack O’ Lanterns. Patience and a light touch are your best friends in this phase.
-
Prepare Your Workspace: Lightly flour your work surface and your rolling pin. Take one disk of chilled dough from the refrigerator. If it’s too hard to roll, let it sit at room temperature for just 5-10 minutes to soften slightly, but don’t let it get too warm. You want it firm enough to handle.
-
Roll Out the Dough: Roll out the dough to about ¼-inch thickness. Aim for an even thickness across the entire sheet of dough. An even thickness is crucial for uniform baking and ensuring a perfect seal for your “Milk Chocolate Stuffed Jack O Lantern Cookies Recipe.” If the dough sticks, dust your surface or rolling pin with a little more flour, but try not to add too much, as it can make the cookies tough.
-
Cut Out Cookie Bottoms: Using your chosen round cookie cutter (around 3 inches is a good size for a substantial stuffed cookie), cut out as many circles as you can from the first rolled-out dough disk. These will form the bottoms of our cookies. Carefully transfer these rounds to baking sheets lined with parchment paper. Leave about 1-2 inches between each cookie.
-
Prepare the Jack O’ Lantern Tops: Now, retrieve the second disk of chilled dough and roll it out to the same ¼-inch thickness. Cut out an equal number of round circles using the same cutter. These will be the tops of our cookies, destined to become our festive Jack O’ Lantern faces.
-
Carve the Faces: This is the creative part! For each top cookie round, use smaller cookie cutters (e.g., small triangles for eyes and nose, a small rectangle or crescent for the mouth) or a sharp paring knife to carefully cut out the classic Jack O’ Lantern face features. You can make them spooky, silly, or friendly – it’s entirely up to you! Take your time to make clean cuts. If the dough gets too warm and sticky, pop it back into the fridge for a few minutes to firm up.
-
Add the Milk Chocolate Filling: On each plain cookie bottom already on your baking sheet, place two or three pieces of your good quality milk chocolate chunks or squares in the center. Make sure to leave a decent border (about ½ inch) around the edge of the cookie. This border is essential for properly sealing our “Milk Chocolate Stuffed Jack O Lantern Cookies Recipe” and preventing the chocolate from oozing out during baking. I highly recommend using a quality chocolate bar and breaking it yourself; chocolate chips often have stabilizers that prevent them from melting as smoothly as bar chocolate, and we want that gooey, melty center!
-
Assemble and Seal the Cookies: Carefully place one of your carved Jack O’ Lantern top rounds directly over a chocolate-topped bottom round. Gently press down around the edges of the two dough layers to seal them together. You can use your fingertips or the tines of a fork to crimp the edges, creating a decorative seal that also helps to ensure no chocolate escapes. Be thorough but gentle, as you don’t want to distort the cookie shape too much.
-
Chill Again (Optional but Recommended): Once all your cookies are assembled, I highly recommend placing the baking sheets with the unbaked cookies back into the refrigerator for at least 15-20 minutes. This final chill will further firm up the butter in the dough, reducing the chance of spreading and helping the cookies maintain their beautiful shape and crisp edges during baking.
Baking Your Perfect Milk Chocolate Stuffed Jack O’ Lantern Cookies
The moment of truth! Baking these cookies correctly ensures a perfectly cooked dough and a delightfully molten chocolate center.
-
Preheat Your Oven: While your cookies are having their final chill, preheat your oven to 350°F (175°C). Make sure your oven rack is in the middle position for even heat distribution.
-
Bake to Golden Perfection: Place the chilled baking sheets into the preheated oven. Bake for 10-14 minutes, or until the edges of the cookies are lightly golden and the centers appear set. The exact baking time can vary depending on your oven and the thickness of your cookies, so keep a close eye on them. You don’t want them to be too dark, as that can make them dry, but you do want them cooked through. A perfectly baked “Milk Chocolate Stuffed Jack O Lantern Cookies Recipe” will have a slightly crisp edge and a tender, soft interior, with molten chocolate ready to burst forth!
-
Cooling Down: Once baked, remove the baking sheets from the oven. Let the cookies cool on the baking sheet for about 5 minutes before carefully transferring them to a wire cooling rack to cool completely. Allowing them to cool on the baking sheet initially helps them set up and prevents them from breaking when you move them. They will be delicate when warm, especially with that melty chocolate inside!
Decorating Your Spooky Treats with Royal Icing
While our cookies are already charming with their carved faces, a little bit of black royal icing truly brings them to life and highlights those iconic Jack O’ Lantern features. This step adds both visual appeal and a delightful, subtle sweetness.
-
Prepare the Royal Icing: If you’re making your own royal icing, combine the two cups of sifted powdered sugar and two tablespoons of meringue powder in a medium bowl. Gradually add the warm water, one tablespoon at a time, mixing with a whisk or a hand mixer on low speed, until you achieve a smooth, pipeable consistency. For outlining, you want a consistency similar to toothpaste – thick enough to hold its shape but fluid enough to flow smoothly. For flooding (if you wanted to fill in the features, though usually we leave the chocolate peeking through), you would thin it a bit more with water, to a consistency like honey. For our purposes, an outlining consistency is perfect.
-
Color the Icing: Add several drops of black gel food coloring to the royal icing. Mix thoroughly until you achieve a deep, consistent black color. This contrast will really make the Jack O’ Lantern faces pop!
-
Prepare for Piping: Transfer your black royal icing to a piping bag fitted with a very small round piping tip (like a PME #1 or #2, or Wilton #1 or #2). If you don’t have piping tips, you can snip a tiny corner off a plastic zip-top bag; just make sure the hole is very small for fine lines.
-
Outline the Jack O’ Lantern Features: Once your cookies are completely cool (this is essential – warm cookies will melt the icing!), carefully pipe an outline around the eyes, nose, and mouth that you cut out. You can also add a small piped stem at the top of the pumpkin shape if you wish. This black outline truly defines the “Milk Chocolate Stuffed Jack O Lantern Cookies Recipe” and gives them their classic spooky charm!
-
Let the Icing Dry: Allow the royal icing to dry completely before stacking or storing the cookies. This can take anywhere from 1-2 hours to overnight, depending on the humidity in your environment. Royal icing dries hard, which protects your beautiful decorations.
-
Serve and Enjoy: Once the icing is fully dry, your delicious and festive Milk Chocolate Stuffed Jack O’ Lantern Cookies are ready to be devoured! They are perfect for Halloween parties, fall gatherings, or simply as a special treat. When you bite into them, you’ll discover that wonderful gooey, melted milk chocolate center that makes them truly irresistible. Enjoy the fruits of your labor!
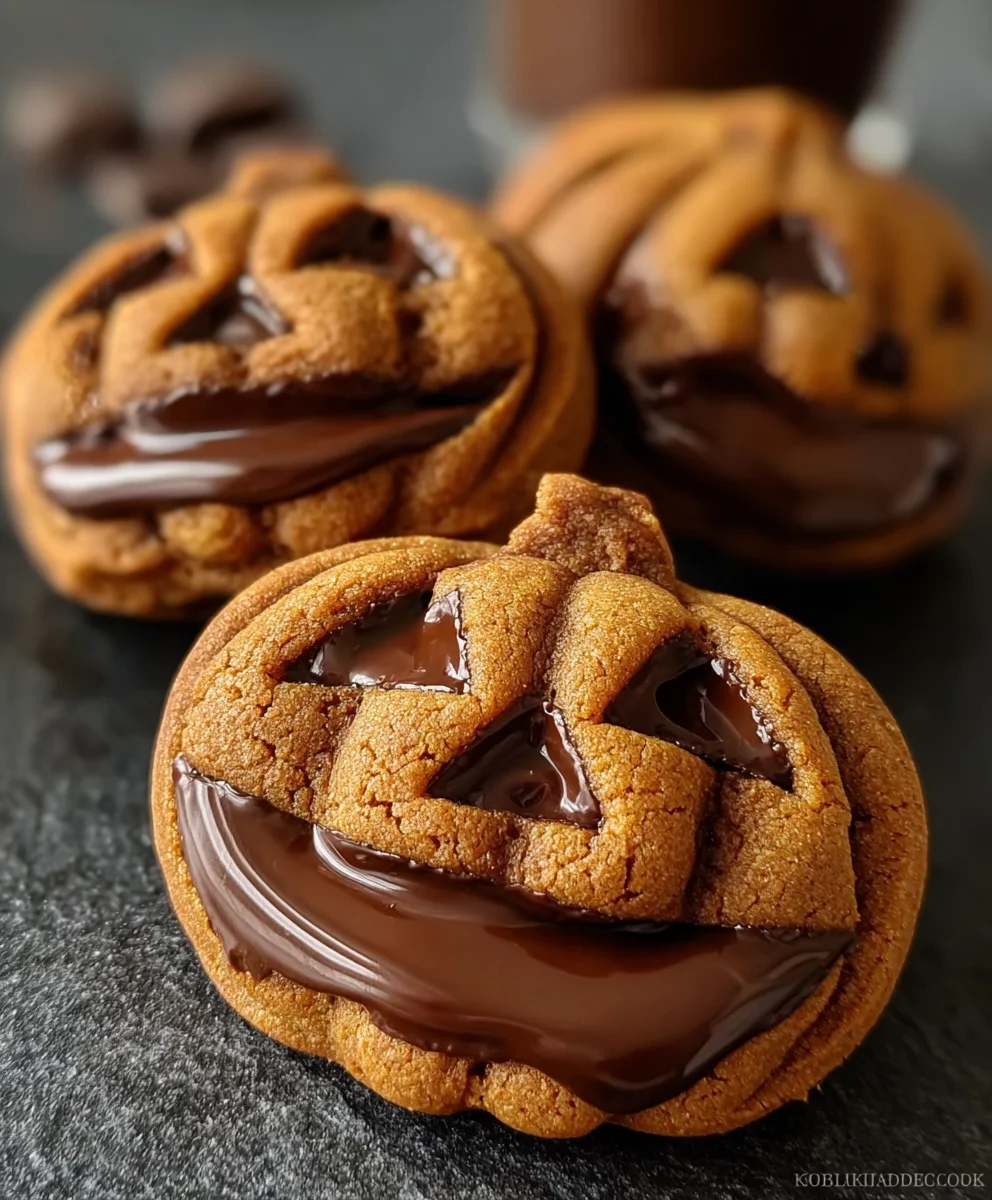

Gooey Milk Chocolate Stuffed Jack O’ Lantern Cookies
These Milk Chocolate Stuffed Jack-o-lantern Cookies are the perfect treat for Halloween celebrations. With a chewy cookie base, subtly spiced with cinnamon and nutmeg, and filled with luscious milk chocolate, these cookies are both fun and delicious. The dough is made with warm spices like cinnamon and nutmeg, giving the cookies a cozy fall flavor. After baking, the cookies are decorated with vibrant orange icing to resemble jack-o-lanterns, while black icing is used to add spooky details. These festive cookies are sure to be a hit at Halloween parties or as a fun baking project with kids. Serve them with a glass of milk for the ultimate Halloween treat!
Ingredients
-
2½ cups (300g) all-purpose flour
-
1 tsp baking powder
-
½ tsp salt
-
½ tsp ground cinnamon
-
½ tsp ground nutmeg
-
1 cup (226g) unsalted butter, softened
-
1 cup (200g) granulated sugar
-
1 large egg
-
1 tsp pure vanilla extract
-
Orange gel food coloring
-
1 cup milk chocolate chips
-
For Royal Icing:
-
2 cups (240g) powdered sugar, sifted
-
2 tbsp meringue powder
-
3-4 tbsp warm water
-
Black gel food coloring
Instructions
-
Step 1
In a medium bowl, whisk together flour, baking powder, salt, ground cinnamon, and ground nutmeg. In the bowl of a stand mixer, cream softened unsalted butter and granulated sugar on medium speed until light, fluffy, and pale (3-5 minutes). Scrape down the bowl, then beat in the large egg and pure vanilla extract until just combined. -
Step 2
With the mixer on low speed, gradually add the dry ingredient mixture to the wet ingredients until a soft dough forms. Add several drops of orange gel food coloring and knead or mix until a vibrant, festive orange color is achieved. -
Step 3
Divide the dough into two equal portions, flatten each into a disk, wrap tightly in plastic wrap, and refrigerate for at least 1 hour. Chilling is vital for preventing spread and making the dough easier to handle. -
Step 4
Lightly flour your work surface and rolling pin. Take one disk of chilled dough and roll it out to about ¼-inch thickness. Using a 3-inch round cookie cutter, cut out as many circles as possible. Transfer these rounds to baking sheets lined with parchment paper, leaving 1-2 inches between each. -
Step 5
Roll out the second disk of chilled dough to ¼-inch thickness. Cut out an equal number of round circles using the same cutter. For each top cookie round, use smaller cookie cutters or a sharp paring knife to carefully carve out classic Jack O’ Lantern face features (eyes, nose, mouth). -
Step 6
In a microwave-safe bowl, melt 1 cup of milk chocolate chips in the microwave, stirring every 20 seconds until smooth. On each plain cookie bottom on your baking sheet, spoon two or three teaspoons of the melted milk chocolate in the center. Ensure the cookie dough is evenly flattened before adding the chocolate filling. Leave about a ½-inch border around the edge of the cookie for sealing. -
Step 7
Carefully place one carved Jack O’ Lantern top round directly over a chocolate-topped bottom round. Gently press down around the edges of the two dough layers to seal them together. Use your fingertips or the tines of a fork to crimp the edges, pressing firmly to prevent the chocolate from leaking during baking. -
Step 8
Once all cookies are assembled, place the baking sheets with unbaked cookies back into the refrigerator for at least 15-20 minutes. While chilling, preheat your oven to 350°F (175°C) with the rack in the middle position. Bake for 10-14 minutes, or until the edges are lightly golden and centers appear set. Do not overbake. -
Step 9
Remove baking sheets from the oven and let cookies cool on the sheets for about 5 minutes. Carefully transfer them to a wire cooling rack to cool completely. They will be delicate when warm. -
Step 10
In a medium bowl, combine sifted powdered sugar and meringue powder. Gradually add warm water, one tablespoon at a time, mixing until you achieve a smooth, pipeable consistency similar to toothpaste. Add several drops of black gel food coloring and mix thoroughly until a deep, consistent black color is achieved. -
Step 11
Transfer the black royal icing to a piping bag fitted with a very small round piping tip. For a more professional look, use piping bags to create clean lines. Once cookies are completely cool, carefully pipe an outline around the eyes, nose, and mouth that you cut out. Allow the royal icing to dry completely (1-2 hours or overnight, depending on humidity) before stacking or storing. -
Step 12
Once the icing is fully dry, your delicious and festive Gooey Milk Chocolate Stuffed Jack O’ Lantern Cookies are ready to be devoured! Enjoy the ultimate Halloween treat with a glass of milk.
Important Information
Nutrition Facts (Per Serving)
It is important to consider this information as approximate and not to use it as definitive health advice.
Allergy Information
Please check ingredients for potential allergens and consult a health professional if in doubt.
Leave a Comment