
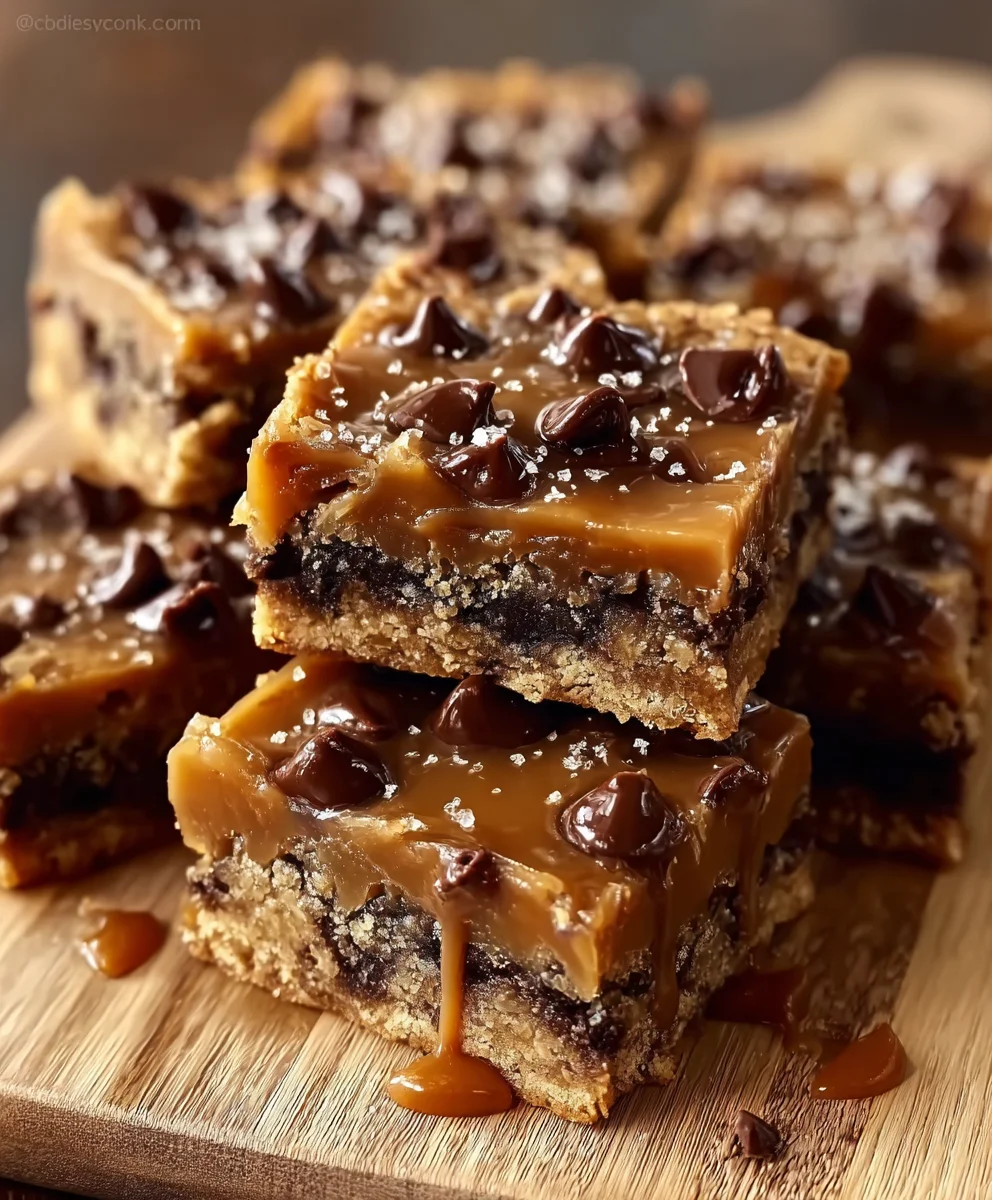
Chocolate Chip Caramel Bars are truly a symphony of flavors and textures, a dessert that effortlessly captures hearts with every single bite. I believe few treats can rival the sheer delight of sinking your teeth into that perfect combination: a buttery, golden-brown cookie base, a rich, molten caramel layer, and an abundance of perfectly melted chocolate chips. While not steeped in ancient history, these bars represent the ultimate evolution of comfort baking, taking the humble cookie bar to an extraordinary new level of indulgence that has quickly made them a beloved staple at potlucks, bake sales, and family gatherings across modern kitchens.
What makes these Chocolate Chip Caramel Bars so universally adored is their incredible balance of sweetness and a hint of savory depth from the caramel, coupled with a wonderfully varied texture – from the slightly crisp edges to the supremely gooey center. They offer all the beloved elements of classic chocolate chip cookies but in a convenient, shareable bar form, making them an ideal dessert for any occasion, from casual weeknights to festive celebrations. It’s a dish that promises pure, unadulterated comfort and joy, always disappearing rapidly whenever they’re served.

Ingredients:
-
For the Buttery Shortbread Base:
- 1 ½ cups (180g) all-purpose flour
- ½ cup (100g) granulated sugar
- ¼ teaspoon salt
- 1 cup (226g) unsalted butter, very cold and cut into ½-inch cubes
-
For the Rich, Chewy Caramel Layer:
- 1 cup (226g) unsalted butter
- 1 cup (200g) packed light brown sugar
- ½ cup (120ml) light corn syrup
- ¼ teaspoon salt
- 1 (14-ounce/397g) can sweetened condensed milk
- 1 teaspoon pure vanilla extract
-
For the Irresistible Chocolate Chip Topping:
- 2 cups (340g) semi-sweet chocolate chips (or your favorite type – milk or dark work beautifully too!)
- Optional: Flaky sea salt, for sprinkling
-
Kitchen Essentials:
- 9×13-inch baking pan
- Parchment paper
- Non-stick cooking spray
- Candy thermometer (highly recommended for perfect caramel)
Prepping Your Baking Pan for Success
- Get Your Pan Ready: First things first, grab your 9×13-inch baking pan. To make sure your Chocolate Chip Caramel Bars come out easily and look beautiful, we’re going to line it. Take a piece of parchment paper and line the bottom and two long sides of the pan, leaving an overhang on the sides. This overhang will act as a sling, allowing you to lift the entire slab of bars out of the pan once they’re cooled and set. It’s a game-changer, trust me!
- Grease for Good Measure: Even though we’re using parchment, I always like to give it a quick spray with non-stick cooking spray. This just adds an extra layer of insurance to ensure nothing sticks, and makes for a super smooth release.
Crafting the Buttery Shortbread Base
- Combine Dry Ingredients: In a medium-sized bowl, whisk together the all-purpose flour, granulated sugar, and salt. Give it a good whisk to ensure everything is evenly distributed. This dry mixture forms the foundation of our wonderfully crumbly shortbread base for these delightful Chocolate Chip Caramel Bars.
- Incorporate the Cold Butter: Now comes the fun part! Add your very cold, cubed unsalted butter to the dry ingredients. It’s crucial that the butter is cold; this helps create that classic tender, crumbly shortbread texture. Using a pastry blender, two knives, or even your fingertips, cut the butter into the flour mixture until it resembles coarse crumbs, with some pea-sized pieces of butter still visible. Avoid overworking the dough here – we want it just combined enough. If you’re using your hands, work quickly so the butter doesn’t get too warm.
- Press into the Pan: Transfer the shortbread mixture into your prepared 9×13-inch baking pan. Using your hands, or the flat bottom of a measuring cup or glass, firmly press the mixture evenly into the bottom of the pan. You want a compact, even layer. Pressing it down firmly is key to preventing the base from being too crumbly when you cut your bars later. Don’t be shy with the pressure!
- Pre-Bake the Base: Pop the pan into a preheated oven at 350°F (175°C) and bake for 20-25 minutes, or until the edges are lightly golden brown and the center is set. The kitchen will start smelling absolutely incredible at this point, a wonderful hint of what’s to come with your Chocolate Chip Caramel Bars.
- Cool Completely: Once baked, remove the shortbread base from the oven and place it on a wire rack to cool completely. This step is absolutely non-negotiable! If you pour warm caramel over a warm base, it will make a mess and could affect the texture of your finished bars. Patience is a virtue here, my friends.
Whipping Up the Silky Caramel Layer
This is where the magic happens and creates the signature gooey middle of our Chocolate Chip Caramel Bars. While it might seem a bit intimidating, with a candy thermometer and a little attention, you’ll master it!
- Gather Caramel Ingredients in a Saucepan: In a heavy-bottomed 3-quart saucepan, combine the unsalted butter, packed light brown sugar, light corn syrup, and salt. Make sure it’s a heavy-bottomed pan to help prevent scorching.
- Begin the Melting Process: Place the saucepan over medium heat. Stir constantly with a whisk or wooden spoon until the butter is completely melted and the sugar has dissolved. This constant stirring is important to ensure even heating and prevent any ingredients from sticking to the bottom and burning.
- Add Sweetened Condensed Milk: Once melted and smooth, stir in the entire can of sweetened condensed milk. Continue to stir until everything is well combined and smooth.
- Bring to a Gentle Boil: Bring the mixture to a gentle boil, stirring constantly. You’ll notice it starting to thicken.
-
The Critical Cooking Phase (Candy Thermometer Recommended!): Reduce the heat to medium-low and continue to boil gently, stirring constantly to prevent sticking and burning. This is the stage where a candy thermometer becomes your best friend. Insert the candy thermometer into the caramel, making sure it doesn’t touch the bottom of the pan. Cook the caramel, stirring, until it reaches 235-240°F (113-116°C) – this is the “soft ball” stage.
- Why the Temperature is Key: Reaching the exact temperature is absolutely crucial for the perfect chewy consistency of your caramel. If it’s too low, your caramel will be too soft and runny; too high, and it might become hard and brittle. For the perfect Chocolate Chip Caramel Bars, that soft ball stage is what we’re aiming for.
- If You Don’t Have a Thermometer (Use with Caution): If you don’t have a candy thermometer, you can test for the soft ball stage by dropping a small amount of hot caramel into a cup of very cold water. Let it cool for a few seconds, then pick up the caramel with your fingers. It should form a soft, pliable ball that holds its shape but is still squishy. This method requires a bit more practice and can be less accurate, so I strongly recommend a thermometer for best results. This process usually takes about 10-15 minutes once it starts boiling, but it can vary based on your stovetop and pan. Keep that arm moving and keep stirring!
- Remove from Heat and Add Vanilla: Once your caramel reaches the desired temperature, immediately remove the saucepan from the heat. Stir in the pure vanilla extract. Be careful, as it will bubble up a bit. Give it a good stir until the vanilla is fully incorporated. The aroma at this point is just heavenly!
- Pour and Set: Carefully pour the hot, luscious caramel evenly over the completely cooled shortbread base in the pan. Use an offset spatula or the back of a spoon to spread it out smoothly to the edges.
- Allow to Set: Let the caramel layer cool at room temperature for at least 1-2 hours, or until it’s firm enough to hold its shape. If you’re impatient (like I often am!), you can pop it in the refrigerator for about 30-45 minutes to speed up the setting process. You want it firm enough that the chocolate topping won’t sink into it.
Adding the Irresistible Chocolate Chip Topping
The final layer of these spectacular Chocolate Chip Caramel Bars! This layer adds that classic chocolatey finish we all adore.
-
Melt the Chocolate Chips: In a microwave-safe bowl, place your semi-sweet chocolate chips.
- Microwave Method: Microwave on high power in 30-second intervals, stirring well after each interval, until the chocolate is smooth and completely melted. Be very careful not to overheat the chocolate, as it can seize up and become grainy. It’s better to under-microwave and let residual heat finish the job with stirring.
- Double Boiler Method (Alternative): If you prefer, you can melt the chocolate chips over a double boiler. Place the chocolate in a heatproof bowl set over a saucepan of simmering water (make sure the bottom of the bowl doesn’t touch the water). Stir constantly until the chocolate is smooth and melted. This method gives you more gentle, controlled heat.
- Spread Over Caramel: Once your chocolate is beautifully melted and smooth, pour it evenly over the set caramel layer. Using an offset spatula or the back of a spoon, gently spread the chocolate all the way to the edges of the pan, creating a smooth, even topping.
- Optional Flaky Sea Salt: If you’re a fan of that delightful sweet and salty combination, now is the time to sprinkle a pinch or two of flaky sea salt evenly over the melted chocolate. It adds a sophisticated touch and really elevates the flavor of these Chocolate Chip Caramel Bars.
- Allow Chocolate to Set: Let the chocolate topping set. You can leave it at room temperature for an hour or two, or for faster setting, place the pan in the refrigerator for about 30 minutes. You want the chocolate to be firm before you attempt to cut the bars.
Chilling, Slicing, and Serving Your Chocolate Chip Caramel Bars
- Chill for Firmness: For the cleanest cuts and best overall texture, transfer the entire pan of Chocolate Chip Caramel Bars to the refrigerator and chill for at least 2-3 hours, or even better, overnight. This chilling time allows all three layers to firm up properly, ensuring they don’t squish or separate when you slice them. It’s tough to wait, but completely worth it!
- Lift and Slice: Once thoroughly chilled and firm, use the parchment paper overhang to carefully lift the entire slab of bars out of the pan and onto a cutting board.
- Achieve Clean Cuts: For perfectly clean, neat slices, here’s a pro tip: use a large, sharp chef’s knife. For even cleaner cuts, you can warm your knife under hot water, wipe it dry, and then make a cut. Repeat this process for each slice. This warms the chocolate slightly, preventing it from cracking. Slice the slab into desired bar sizes – I usually go for 24-36 smaller squares or rectangles, as these Chocolate Chip Caramel Bars are quite rich!
- Serve and Store: Your stunning Chocolate Chip Caramel Bars are now ready to be enjoyed! Store any leftover bars in an airtight container at room temperature for up to 3-4 days, or in the refrigerator for up to a week. If refrigerated, I recommend letting them come to room temperature for about 15-20 minutes before serving, as the caramel and shortbread are at their best when slightly softer. These bars also freeze beautifully for up to 2-3 months; just make sure to wrap individual bars tightly in plastic wrap before placing them in a freezer-safe container. Enjoy every decadent bite!
Conclusion:
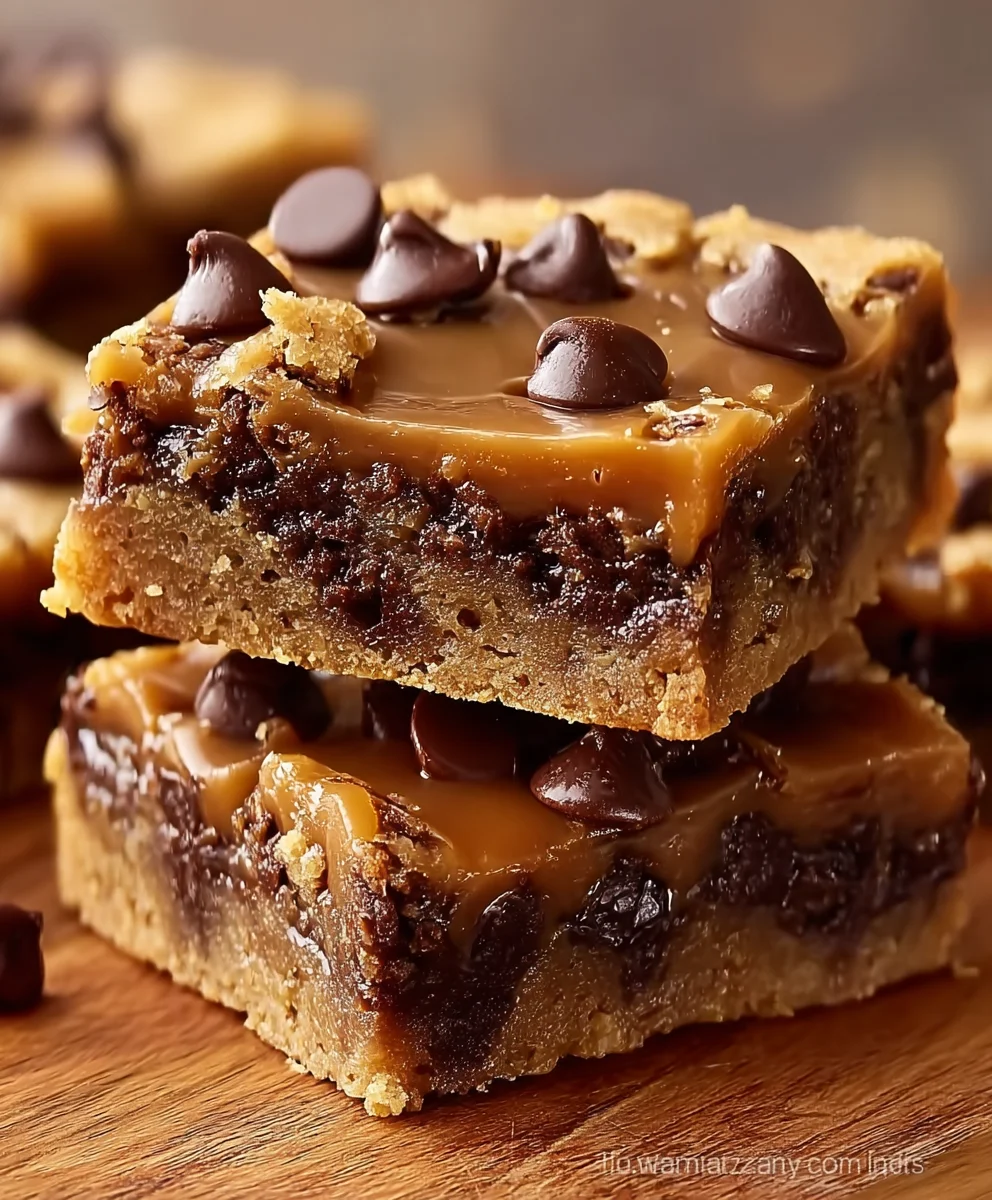
Well, my friends, we’ve reached the sweet finale of our journey, and I genuinely hope you’re as excited as I am about what we’ve just created. If you’ve been searching for that one dessert that truly stands out, that brings a smile to everyone’s face, and that delivers an unparalleled burst of comfort with every bite, then look no further. This recipe for Chocolate Chip Caramel Bars isn’t just a collection of ingredients; it’s an experience, a delightful indulgence that I promise will become a cherished staple in your baking repertoire. It’s the kind of treat that doesn’t just satisfy a sweet tooth; it ignites a pure, unadulterated joy that only the perfect blend of gooey caramel and rich chocolate can achieve.
Why are these bars an absolute must-try? Picture this: a perfectly chewy, golden-brown crust, studded generously with melty chocolate chips, followed by a thick, luxurious layer of buttery, stretching caramel that glistens invitingly. And then, another showering of chocolate chips on top, creating a mosaic of sweet, rich, and utterly irresistible textures. Each bite offers that perfect balance of salty-sweet, that delightful tug-and-give of warm caramel, and the comforting melt of chocolate. They are incredibly easy to make, forgiving even for novice bakers, yet yield results that look and taste like they came straight from a gourmet bakery. The aroma alone as they bake is enough to make your entire home feel like the warmest, most inviting place on earth. I’ve seen these bars disappear in record time at every gathering I’ve brought them to, and I can confidently say they are universal crowd-pleasers, appealing to kids and adults alike with their comforting familiarity and surprising depth of flavor.
Now, let’s talk about taking your enjoyment of these amazing bars to the next level. While they are utterly divine straight from the pan, still warm and gooey, a few serving suggestions can elevate the experience even further. Imagine serving a warm square of these bars with a generous scoop of vanilla bean ice cream, allowing the cold creaminess to contrast beautifully with the warm, rich bar. A delicate dusting of flaky sea salt over the top before serving can enhance that crucial salty-sweet dynamic, making the flavors pop even more. For a truly decadent treat, a drizzle of extra caramel sauce or a swirl of melted dark chocolate just before serving adds an artistic touch and an extra layer of indulgence. If you’re feeling adventurous, consider folding in a handful of chopped toasted pecans or walnuts into the batter for an added textural crunch and nutty undertone. For a seasonal twist, a pinch of cinnamon or a dash of pumpkin pie spice could be a fun addition to the crust around autumn. You can even try using different kinds of chocolate chips – a mix of milk, dark, and white chocolate chips can create a delightful complexity. The beauty of this recipe lies in its versatility; feel free to experiment and make it truly your own!
I genuinely believe that baking should be a joyful, rewarding process, and this recipe embodies that spirit perfectly. It’s a simple act that brings immense pleasure, both in the making and the sharing. So, please, don’t just admire these words on the screen. Take the leap, preheat your oven, gather your ingredients, and experience the magic for yourself. I promise you won’t regret it. Once you’ve pulled these golden, gooey delights from the oven, cut them into perfect squares, and savored that first incredible bite, I would absolutely love to hear from you! Did you stick to the original recipe, or did you venture into some delicious variations? What was the general consensus from your taste testers? Your experiences and creative twists are what make the culinary world so vibrant and inspiring. Share your stories, your photos, and your tips with me and our community. Let’s spread the joy of these truly unforgettable Chocolate Chip Caramel Bars far and wide!
People Also Ask:
How do I know when my Chocolate Chip Caramel Bars are done?
You’ll know your Chocolate Chip Caramel Bars are perfectly baked when the edges are golden brown and firm, and the center is set but still looks a bit gooey. A good indicator is when a toothpick inserted into the crust (not the caramel layer) comes out mostly clean, and the caramel bubbles gently. Don’t overbake, as you want to maintain that wonderfully chewy and soft texture!
Can I make Chocolate Chip Caramel Bars ahead of time?
Absolutely! These bars are fantastic for making ahead. In fact, some people find they taste even better the next day once the flavors have had a chance to meld. Just be sure to store them properly, as detailed below.
How should I store leftover Chocolate Chip Caramel Bars?
To keep your bars fresh, store them in an airtight container at room temperature for up to 3-4 days. If your kitchen is very warm, or for longer storage, you can refrigerate them for up to a week. Just be aware that refrigeration might make the caramel a little firmer, but a quick zap in the microwave for 10-15 seconds can bring back that glorious gooeyness!
Can I freeze Chocolate Chip Caramel Bars?
Yes, these bars freeze beautifully! Once completely cooled, cut them into individual squares. Place them in a single layer on a baking sheet to freeze for an hour or two until firm, then transfer them to an airtight freezer-safe container or a heavy-duty freezer bag, separating layers with parchment paper. They can be frozen for up to 2-3 months. Thaw at room temperature or warm gently in the microwave when you’re ready to enjoy them again.
What kind of chocolate chips are best for Chocolate Chip Caramel Bars?
I find that semi-sweet chocolate chips offer the best balance, complementing the sweetness of the caramel without being overly rich. However, feel free to use your favorite! Milk chocolate chips will make them sweeter, while dark chocolate chips will add a delightful hint of bitterness to cut through the sweetness. A mix of different types of chocolate chips can also be wonderful for a more complex flavor profile!
Recipe
A delicious recipe
Ingredients
Instructions
Important Information
Nutrition Facts (Per Serving)
It is important to consider this information as approximate and not to use it as definitive health advice.
Allergy Information
Please check ingredients for potential allergens and consult a health professional if in doubt.
Leave a Comment