
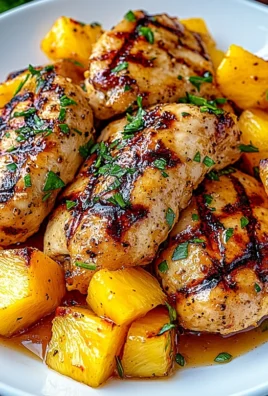
Garlic Chicken Fried Chicken: Prepare to have your taste buds completely tantalized! Imagine sinking your teeth into crispy, golden-brown chicken, infused with the bold and savory flavor of garlic. This isn’t your average fried chicken; it’s a flavor explosion that will leave you craving more.
Fried chicken, in its various forms, has a rich history, tracing back to Scotland and West Africa. However, the American South perfected the technique, transforming it into a beloved comfort food. Our Garlic Chicken Fried Chicken recipe takes this classic dish to a whole new level by incorporating the pungent and aromatic magic of garlic.
What makes this dish so irresistible? It’s the perfect combination of textures the satisfying crunch of the coating giving way to the juicy, tender chicken inside. The garlic adds a depth of flavor that elevates the entire experience. People adore this recipe because it’s relatively simple to make, yet delivers restaurant-quality results. It’s perfect for a weeknight dinner or a weekend gathering. Plus, who can resist the allure of perfectly fried chicken with a garlicky kick? Get ready to experience fried chicken like never before!

Ingredients:
- For the Chicken:
- 2 lbs boneless, skinless chicken breasts, cut into 1-inch cubes
- 1 cup buttermilk
- 1 large egg
- 1 tablespoon hot sauce (optional, for extra flavor)
- 2 cups all-purpose flour
- 1/2 cup cornstarch
- 2 tablespoons garlic powder
- 2 tablespoons onion powder
- 1 tablespoon paprika
- 1 tablespoon dried thyme
- 1 teaspoon cayenne pepper (optional, for extra heat)
- 1 teaspoon salt
- 1/2 teaspoon black pepper
- For the Garlic Sauce:
- 4 tablespoons butter
- 6 cloves garlic, minced
- 1/4 cup honey
- 1/4 cup soy sauce
- 2 tablespoons rice vinegar
- 1 tablespoon brown sugar
- 1 teaspoon sesame oil
- 1/2 teaspoon red pepper flakes (optional, for extra heat)
- 2 tablespoons chopped green onions, for garnish
- Sesame seeds, for garnish
- For Frying:
- Vegetable oil, for frying (enough to fill a large skillet or Dutch oven about 2 inches deep)
Marinating the Chicken
Okay, let’s get started! First, we need to marinate the chicken. This is a crucial step because it helps to tenderize the chicken and infuse it with flavor. Trust me, you don’t want to skip this!
- In a large bowl, whisk together the buttermilk, egg, and hot sauce (if using). The hot sauce adds a nice little kick, but it’s totally optional if you’re not a fan of spice.
- Add the chicken cubes to the buttermilk mixture, making sure they’re all fully submerged. This ensures that every piece gets that delicious marinade.
- Cover the bowl with plastic wrap and refrigerate for at least 30 minutes, or up to 4 hours. The longer it marinates, the more flavorful and tender the chicken will be. I usually aim for at least an hour if I have the time.
Preparing the Dredging Station
While the chicken is marinating, let’s get our dredging station ready. This will make the frying process much smoother and less messy.
- In a shallow dish, whisk together the flour, cornstarch, garlic powder, onion powder, paprika, thyme, cayenne pepper (if using), salt, and pepper. Make sure everything is well combined so that each piece of chicken gets an even coating of all those wonderful spices.
- The cornstarch helps to create a crispier coating, so don’t skip it! The spices are where all the flavor comes from, so feel free to adjust them to your liking. If you like it extra garlicky, add more garlic powder!
Dredging and Frying the Chicken
Now for the fun part dredging and frying! This is where the magic happens and the chicken transforms into crispy, golden-brown perfection.
- Heat the vegetable oil in a large skillet or Dutch oven over medium-high heat. You’ll want the oil to be around 350-375°F (175-190°C). If you don’t have a thermometer, you can test the oil by dropping a small piece of bread into it. If it sizzles and turns golden brown in about 30 seconds, the oil is ready.
- Remove the chicken from the buttermilk marinade, letting any excess drip off. You don’t want the chicken to be dripping wet, or the flour won’t stick properly.
- Dredge each piece of chicken in the flour mixture, making sure it’s fully coated. Press the flour onto the chicken to help it adhere. This is important for getting a nice, thick, crispy crust.
- Carefully place the dredged chicken into the hot oil, being careful not to overcrowd the skillet. Overcrowding will lower the oil temperature and result in soggy chicken. Fry in batches if necessary.
- Fry the chicken for about 5-7 minutes per side, or until it’s golden brown and cooked through. The internal temperature of the chicken should reach 165°F (74°C).
- Remove the fried chicken from the skillet and place it on a wire rack lined with paper towels to drain any excess oil. This will help keep the chicken crispy.
Making the Garlic Sauce
While the chicken is draining, let’s whip up that amazing garlic sauce. This sauce is what takes this dish from good to absolutely incredible!
- In a medium saucepan, melt the butter over medium heat.
- Add the minced garlic and cook for about 1-2 minutes, or until fragrant. Be careful not to burn the garlic, as it will become bitter.
- Stir in the honey, soy sauce, rice vinegar, brown sugar, sesame oil, and red pepper flakes (if using).
- Bring the sauce to a simmer and cook for about 5-7 minutes, or until it has thickened slightly. Stir occasionally to prevent it from sticking to the bottom of the pan. The sauce should be thick enough to coat the back of a spoon.
Assembling the Garlic Chicken Fried Chicken
Alright, we’re in the home stretch! Now it’s time to bring everything together and enjoy our delicious creation.
- Place the fried chicken in a large bowl.
- Pour the garlic sauce over the chicken and toss to coat evenly. Make sure every piece of chicken is covered in that glorious sauce.
- Garnish with chopped green onions and sesame seeds.
- Serve immediately and enjoy! This Garlic Chicken Fried Chicken is best served hot and fresh.
Tips for Extra Crispy Chicken
- Double Dredge: For an extra crispy coating, dredge the chicken in the flour mixture, then dip it back into the buttermilk marinade, and then dredge it in the flour mixture again. This creates a thicker, crispier crust.
- Cold Oil Start: Some people swear by starting with cold oil and letting it heat up gradually with the chicken in it. This can help the chicken cook more evenly and prevent the outside from burning before the inside is cooked through. I haven’t tried this method myself, but it’s worth experimenting with!
- Don’t Overcrowd: I can’t stress this enough! Overcrowding the skillet will lower the oil temperature and result in soggy chicken. Fry in batches to ensure that each piece gets crispy.
- Wire Rack: Always drain the fried chicken on a wire rack lined with paper towels. This allows air to circulate around the chicken, preventing it from getting soggy.
Variations and Substitutions
- Spicy Chicken: If you like your chicken extra spicy, add more cayenne pepper to the flour mixture or increase the amount of red pepper flakes in the garlic sauce. You can also use a spicier hot sauce in the marinade.
- Sweet and Savory: For a sweeter sauce, add more honey or brown sugar. For a more savory sauce, add a splash of Worcestershire sauce or a pinch of MSG.
- Gluten-Free: To make this recipe gluten-free, use gluten-free all-purpose flour and gluten-free soy sauce.
- Chicken Thighs: You can also use boneless, skinless chicken thighs instead of chicken breasts. Chicken thighs are more flavorful and tend to stay more moist during frying.
- Air Fryer: While this recipe is designed for deep frying, you can also try air frying the chicken. Preheat your air fryer to 400°F (200°C) and air fry the chicken for about 15-20 minutes, flipping halfway through, or until it’s golden brown and cooked through. You may need to spray the chicken with oil to help it crisp up.
Serving Suggestions
- Rice: Serve this Garlic Chicken Fried Chicken over a bed of steamed rice for a complete and satisfying meal.
- Noodles: It’s also delicious served with noodles, such as lo mein or chow mein.
- Vegetables: Pair it with some steamed or stir-fried vegetables, such as broccoli, green beans, or bok choy.
- Salad: For a lighter meal, serve it with a side salad.
- Appetizer: Cut the chicken into smaller pieces and serve it as an appetizer with toothpicks.
Storage and Reheating

Conclusion:
So, there you have it! My take on Garlic Chicken Fried Chicken, a dish that’s guaranteed to become a new family favorite. I truly believe this recipe is a must-try for anyone who loves the satisfying crunch of fried chicken combined with the savory, aromatic punch of garlic. It’s not just fried chicken; it’s an experience! The crispy, golden-brown exterior gives way to juicy, tender chicken infused with the unmistakable flavor of garlic a symphony of textures and tastes that will leave you wanting more.
Why is it a must-try? Because it’s incredibly delicious, surprisingly easy to make, and offers a unique twist on a classic comfort food. Forget bland, ordinary fried chicken; this recipe elevates the dish to a whole new level. The garlic marinade penetrates deep into the chicken, ensuring that every bite is bursting with flavor. And the crispy coating? It’s simply irresistible.
But the best part? This recipe is incredibly versatile. Feel free to experiment with different variations to suit your taste. For a spicier kick, add a pinch of cayenne pepper to the flour mixture or a dash of hot sauce to the marinade. If you’re a fan of herbs, try incorporating some fresh thyme or rosemary into the breading. Want to make it even more decadent? Use buttermilk instead of regular milk for an extra-tender and flavorful chicken.
As for serving suggestions, the possibilities are endless! This Garlic Chicken Fried Chicken is fantastic on its own, served with your favorite dipping sauces like ranch, honey mustard, or even a spicy sriracha mayo. It’s also a perfect addition to a picnic basket or a potluck gathering.
Serving Suggestions:
* Classic Comfort: Serve it with mashed potatoes and gravy, coleslaw, and corn on the cob for a truly satisfying meal.
* Southern Style: Pair it with biscuits, collard greens, and mac and cheese for a taste of the South.
* Asian Fusion: Serve it over rice with stir-fried vegetables and a drizzle of sweet chili sauce.
* Sandwich Sensation: Use it to make a delicious chicken sandwich with lettuce, tomato, and your favorite condiments.
* Salad Topper: Slice it up and add it to a salad for a protein-packed and flavorful meal.
Don’t be afraid to get creative and experiment with different sides and sauces to find your perfect combination. The beauty of this recipe is that it’s so adaptable and can be customized to your liking.
I’m confident that you’ll love this Garlic Chicken Fried Chicken as much as I do. It’s a crowd-pleaser that’s perfect for any occasion, from a casual weeknight dinner to a special weekend celebration.
So, what are you waiting for? Head to the kitchen, gather your ingredients, and give this recipe a try! I promise you won’t be disappointed. And when you do, please share your experience with me! I’d love to hear what you think and see your creations. Tag me in your photos on social media and let me know what variations you tried. I’m always looking for new and exciting ways to improve my recipes, and your feedback is invaluable. Happy cooking, and enjoy your delicious Garlic Chicken Fried Chicken! I can’t wait to hear all about it!
Garlic Chicken Fried Chicken: The Ultimate Crispy Recipe
Crispy, golden-brown fried chicken coated in a flavorful garlic sauce. A guaranteed crowd-pleaser!
Ingredients
- 2 lbs boneless, skinless chicken breasts, cut into 1-inch cubes
- 1 cup buttermilk
- 1 large egg
- 1 tablespoon hot sauce (optional, for extra flavor)
- 2 cups all-purpose flour
- 1/2 cup cornstarch
- 2 tablespoons garlic powder
- 2 tablespoons onion powder
- 1 tablespoon paprika
- 1 tablespoon dried thyme
- 1 teaspoon cayenne pepper (optional, for extra heat)
- 1 teaspoon salt
- 1/2 teaspoon black pepper
- 4 tablespoons butter
- 6 cloves garlic, minced
- 1/4 cup honey
- 1/4 cup soy sauce
- 2 tablespoons rice vinegar
- 1 tablespoon brown sugar
- 1 teaspoon sesame oil
- 1/2 teaspoon red pepper flakes (optional, for extra heat)
- 2 tablespoons chopped green onions, for garnish
- Sesame seeds, for garnish
- Vegetable oil, for frying (enough to fill a large skillet or Dutch oven about 2 inches deep)
Instructions
- Marinate the Chicken: In a large bowl, whisk together the buttermilk, egg, and hot sauce (if using). Add the chicken cubes to the buttermilk mixture, ensuring they are fully submerged. Cover and refrigerate for at least 30 minutes, or up to 4 hours.
- Prepare the Dredging Station: In a shallow dish, whisk together the flour, cornstarch, garlic powder, onion powder, paprika, thyme, cayenne pepper (if using), salt, and pepper.
- Dredge and Fry the Chicken: Heat the vegetable oil in a large skillet or Dutch oven to 350-375°F (175-190°C). Remove the chicken from the marinade, letting excess drip off. Dredge each piece of chicken in the flour mixture, pressing to adhere.
- Carefully place the dredged chicken into the hot oil, being careful not to overcrowd the skillet. Fry in batches if necessary.
- Fry the chicken for about 5-7 minutes per side, or until it’s golden brown and cooked through. The internal temperature of the chicken should reach 165°F (74°C).
- Remove the fried chicken from the skillet and place it on a wire rack lined with paper towels to drain any excess oil.
- Make the Garlic Sauce: In a medium saucepan, melt the butter over medium heat. Add the minced garlic and cook for about 1-2 minutes, or until fragrant.
- Stir in the honey, soy sauce, rice vinegar, brown sugar, sesame oil, and red pepper flakes (if using).
- Bring the sauce to a simmer and cook for about 5-7 minutes, or until it has thickened slightly. Stir occasionally to prevent it from sticking to the bottom of the pan.
- Assemble the Garlic Chicken Fried Chicken: Place the fried chicken in a large bowl. Pour the garlic sauce over the chicken and toss to coat evenly. Garnish with chopped green onions and sesame seeds. Serve immediately.
Notes
- Double Dredge: Dredge the chicken in the flour mixture, then dip it back into the buttermilk marinade, and then dredge it in the flour mixture again.
- Don’t Overcrowd: Overcrowding the skillet will lower the oil temperature and result in soggy chicken. Fry in batches to ensure that each piece gets crispy.
- Wire Rack: Always drain the fried chicken on a wire rack lined with paper towels.
- Spicy Chicken: Add more cayenne pepper to the flour mixture or increase the amount of red pepper flakes in the garlic sauce.
- Sweet and Savory: For a sweeter sauce, add more honey or brown sugar. For a more savory sauce, add a splash of Worcestershire sauce or a pinch of MSG.
- Gluten-Free: To make this recipe gluten-free, use gluten-free all-purpose flour and gluten-free soy sauce.
- Chicken Thighs: You can also use boneless, skinless chicken thighs instead of chicken breasts.
- Air Fryer: Preheat your air fryer to 400°F (200°C) and air fry the chicken for about 15-20 minutes, flipping halfway through, or until it’s golden brown and cooked through.
- Rice: Serve this Garlic Chicken Fried Chicken over a bed of steamed rice.
- Noodles: It’s also delicious served with noodles, such as lo mein or chow mein.
- Vegetables: Pair it with some steamed or stir-fried vegetables, such as broccoli, green beans, or bok choy.
- Salad: For a lighter meal, serve it with a side salad.
- Appetizer: Cut the chicken into smaller pieces and serve it as an appetizer with toothpicks.
Leave a Comment