
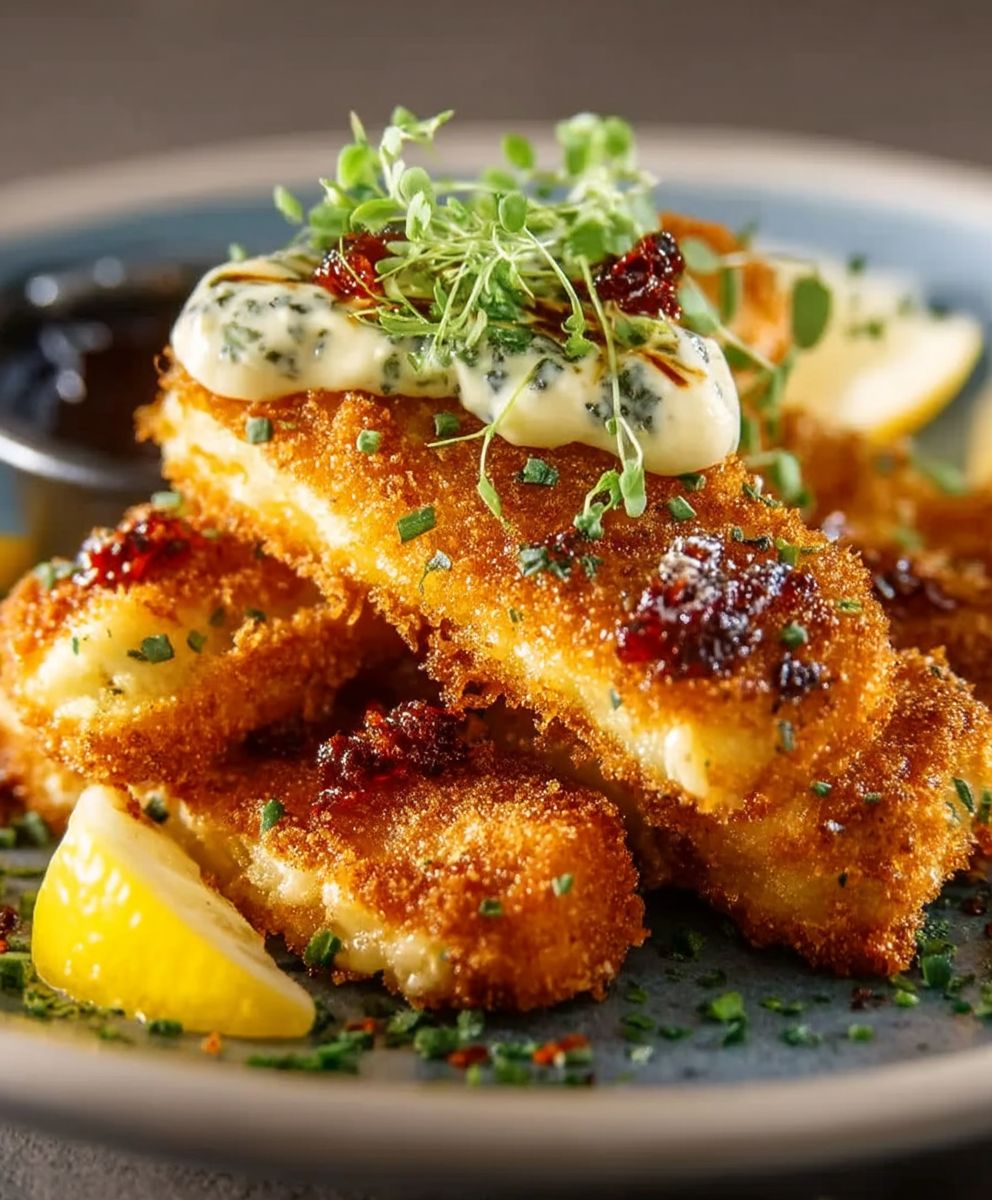
Fish sticks, those golden-brown rectangles of flaky goodness, might evoke childhood memories of quick weeknight dinners. But did you know that these convenient culinary creations have a surprisingly interesting history? While the exact origin is debated, the concept of breaded and frozen fish portions gained popularity in the mid-20th century, offering a practical solution for busy families seeking a nutritious and affordable meal.
Beyond their convenience, the enduring appeal of fish sticks lies in their satisfying simplicity. The crispy, golden coating gives way to tender, mild fish, making them a crowd-pleaser for even the pickiest eaters. Whether dipped in ketchup, tartar sauce, or even a squeeze of lemon, they offer a comforting and familiar flavor that transcends generations. In this article, we’ll explore how to elevate this classic dish, offering tips and tricks to create the perfect fish sticks every time. Get ready to rediscover the joy of this easy-to-love meal!

Ingredients:
- 1 pound white fish fillets (cod, haddock, or tilapia), skinless and boneless
- 1 cup all-purpose flour
- 2 large eggs, beaten
- 2 cups panko breadcrumbs
- 1 teaspoon salt
- 1/2 teaspoon black pepper
- 1/2 teaspoon garlic powder
- 1/4 teaspoon paprika
- 1/4 teaspoon onion powder
- 1/4 cup vegetable oil, for frying
- Lemon wedges, for serving (optional)
- Tartar sauce, for serving (optional)
Preparing the Fish:
Okay, let’s get started! First things first, we need to prepare our fish. This is a crucial step to ensure our fish sticks are perfectly sized and cooked evenly.
- Cut the Fish into Sticks: Lay your fish fillets on a clean cutting board. Using a sharp knife, cut the fillets into strips that are about 1 inch wide and 3-4 inches long. Aim for uniform size so they cook at the same rate. Don’t worry if they aren’t perfect; we’re going for homemade charm here!
- Pat the Fish Dry: This is super important! Use paper towels to thoroughly pat the fish sticks dry. Removing excess moisture will help the breading adhere better and result in crispier fish sticks. Trust me, soggy fish sticks are a no-go.
Setting Up the Breading Station:
Now, let’s create our breading station. This will make the breading process much smoother and less messy. Organization is key!
- Prepare Three Shallow Dishes: You’ll need three shallow dishes or pie plates. In the first dish, place the all-purpose flour. In the second dish, add the beaten eggs. And in the third dish, combine the panko breadcrumbs, salt, pepper, garlic powder, paprika, and onion powder. Mix the breadcrumbs and spices well to ensure even distribution of flavor.
- Seasoning is Key: Don’t skimp on the seasoning! The spices in the breadcrumb mixture are what give our fish sticks that delicious flavor. Feel free to adjust the amounts to your liking. If you like a little heat, add a pinch of cayenne pepper.
Breading the Fish Sticks:
Alright, the fun part! This is where we transform our plain fish sticks into golden, crispy delights.
- Dredge in Flour: Take one fish stick at a time and dredge it in the flour, making sure to coat all sides. Shake off any excess flour. The flour acts as a base for the egg to adhere to.
- Dip in Egg: Next, dip the floured fish stick into the beaten eggs, ensuring it’s completely coated. Let any excess egg drip off. The egg helps the breadcrumbs stick and adds richness.
- Coat in Breadcrumbs: Finally, transfer the egg-coated fish stick to the panko breadcrumb mixture. Press the breadcrumbs firmly onto all sides of the fish stick, making sure it’s completely covered. This is what gives us that amazing crispy texture.
- Repeat: Repeat the breading process with the remaining fish sticks.
- Rest (Optional but Recommended): Place the breaded fish sticks on a plate or baking sheet lined with parchment paper. If you have time, let them rest in the refrigerator for about 15-20 minutes. This helps the breading adhere even better and prevents it from falling off during frying.
Cooking Process:
Time to cook our fish sticks! We’re going to pan-fry them for that perfect golden-brown crispiness.
- Heat the Oil: In a large skillet, heat the vegetable oil over medium heat. You want the oil to be hot enough to sizzle when you add a breadcrumb, but not so hot that it burns the breading.
- Fry the Fish Sticks: Carefully place the breaded fish sticks in the hot oil, making sure not to overcrowd the pan. Cook in batches if necessary. Overcrowding the pan will lower the oil temperature and result in soggy fish sticks.
- Cook Until Golden Brown: Cook the fish sticks for about 3-4 minutes per side, or until they are golden brown and cooked through. The internal temperature of the fish should reach 145°F (63°C).
- Don’t Overcook: Be careful not to overcook the fish sticks, as they can become dry. The fish is cooked when it flakes easily with a fork.
- Remove and Drain: Remove the cooked fish sticks from the skillet and place them on a plate lined with paper towels to drain any excess oil.
Serving and Enjoying:
The moment we’ve been waiting for! Time to serve up our delicious homemade fish sticks.
- Serve Immediately: Serve the fish sticks immediately while they are still hot and crispy.
- Lemon Wedges and Tartar Sauce: Serve with lemon wedges and tartar sauce for dipping. Other great dipping sauces include ketchup, cocktail sauce, or even a homemade aioli.
- Side Dishes: Fish sticks are great served with a variety of side dishes, such as french fries, coleslaw, macaroni and cheese, or a simple salad.
- Enjoy! Enjoy your homemade fish sticks! They’re a fun and easy meal that’s perfect for kids and adults alike.
Tips and Variations:
Want to customize your fish sticks? Here are a few tips and variations to try:
- Air Fryer Option: For a healthier option, you can air fry the fish sticks. Preheat your air fryer to 400°F (200°C). Place the breaded fish sticks in the air fryer basket in a single layer, making sure they are not touching. Cook for 8-10 minutes, flipping halfway through, until golden brown and cooked through.
- Baked Option: You can also bake the fish sticks in the oven. Preheat your oven to 400°F (200°C). Place the breaded fish sticks on a baking sheet lined with parchment paper. Bake for 12-15 minutes, flipping halfway through, until golden brown and cooked through.
- Different Types of Fish: Feel free to experiment with different types of white fish, such as pollock or whiting.
- Gluten-Free Option: To make gluten-free fish sticks, use gluten-free all-purpose flour and gluten-free breadcrumbs.
- Spice It Up: Add a pinch of cayenne pepper or some chili powder to the breadcrumb mixture for a little kick.
- Herb It Up: Add some dried herbs, such as parsley, dill, or thyme, to the breadcrumb mixture for extra flavor.
- Cheese It Up: Add some grated Parmesan cheese to the breadcrumb mixture for a cheesy twist.
Storage Instructions:
If you have any leftover fish sticks, store them in an airtight container in the refrigerator for up to 3 days. Reheat them in the oven or air fryer for best results.
Reheating Instructions:
To reheat fish sticks, preheat your oven or air fryer to 350°F (175°C). Place the fish sticks on a baking sheet lined with parchment paper or in the air fryer basket. Heat for 5-7 minutes, or until heated through and crispy.
Freezing Instructions:
You can also freeze the breaded fish sticks before cooking. Place the breaded fish sticks on a baking sheet lined with parchment paper and freeze for about 2 hours, or until solid. Then, transfer the frozen fish sticks to a freezer bag or airtight container. They can be stored in the freezer for up to 2 months. When ready to cook, you can cook them directly from frozen, adding a few extra minutes to the cooking time.
Conclusion:
So there you have it! I truly believe this isn’t just another fish stick recipe; it’s a gateway to rediscovering a childhood favorite, but with a grown-up twist. The crispy, golden breading, the flaky, flavorful fish inside it’s a symphony of textures and tastes that will have you wondering why you ever settled for the frozen aisle versions. This recipe is a must-try because it’s surprisingly easy, incredibly satisfying, and allows you to control exactly what goes into your food, ensuring a healthier and tastier meal for you and your family. Forget bland and boring; these homemade fish sticks are bursting with flavor!
But the fun doesn’t stop there! Think of this recipe as a blank canvas for your culinary creativity. Want to spice things up? Add a pinch of cayenne pepper or a dash of hot sauce to the breadcrumb mixture for a fiery kick. Craving something a little more sophisticated? Try using panko breadcrumbs for an extra-crispy coating and experiment with different types of fish, like cod or haddock.
Serving Suggestions:
* Classic Comfort: Serve your homemade fish sticks with a side of creamy tartar sauce, crispy french fries, and a dollop of ketchup. It’s the perfect nostalgic meal!
* Taco Tuesday Upgrade: Flake the fish sticks and use them as a filling for fish tacos. Top with shredded cabbage, pico de gallo, and a squeeze of lime for a fresh and flavorful twist.
* Salad Sensation: Add sliced fish sticks to a bed of mixed greens with your favorite vegetables and a light vinaigrette for a healthy and satisfying lunch.
* Fish Stick Sliders: Place a fish stick on a mini slider bun with a slice of cheese and a dollop of tartar sauce for a fun and easy appetizer.
* Elevated Plating: For a more refined presentation, serve the fish sticks alongside roasted asparagus and a lemon-butter sauce.
Don’t be afraid to get creative and experiment with different dipping sauces, sides, and presentations. The possibilities are endless! I personally love pairing them with a homemade dill aioli or a sweet chili sauce for an unexpected burst of flavor.
I’m so excited for you to try this recipe and experience the joy of homemade fish sticks for yourself. It’s a simple pleasure that can bring a smile to anyone’s face. Once you’ve given it a go, I’d absolutely love to hear about your experience! Did you make any variations? What were your favorite dipping sauces? What did your family think?
Please, share your photos and stories in the comments below. Your feedback is invaluable and helps me continue to create recipes that you’ll love. I can’t wait to see your culinary creations! Happy cooking! I am sure that you will love this recipe and make it again and again.
Fish Sticks: The Ultimate Guide to Cooking, Recipes, and Nutrition
Crispy, golden-brown homemade fish sticks! Easy to make, perfectly seasoned, and a guaranteed hit. Serve with lemon wedges and tartar sauce.
Ingredients
- 1 pound white fish fillets (cod, haddock, or tilapia), skinless and boneless
- 1 cup all-purpose flour
- 2 large eggs, beaten
- 2 cups panko breadcrumbs
- 1 teaspoon salt
- 1/2 teaspoon black pepper
- 1/2 teaspoon garlic powder
- 1/4 teaspoon paprika
- 1/4 teaspoon onion powder
- 1/4 cup vegetable oil, for frying
- Lemon wedges, for serving (optional)
- Tartar sauce, for serving (optional)
Instructions
- Cut the Fish into Sticks: Lay fish fillets on a cutting board. Cut into strips about 1 inch wide and 3-4 inches long.
- Pat the Fish Dry: Thoroughly pat the fish sticks dry with paper towels.
- Prepare Three Shallow Dishes: Place flour in the first dish, beaten eggs in the second, and combine panko breadcrumbs, salt, pepper, garlic powder, paprika, and onion powder in the third. Mix well.
- Dredge in Flour: Dredge each fish stick in flour, shaking off excess.
- Dip in Egg: Dip the floured fish stick into the beaten eggs, ensuring it’s completely coated. Let any excess egg drip off.
- Coat in Breadcrumbs: Transfer the egg-coated fish stick to the panko breadcrumb mixture. Press the breadcrumbs firmly onto all sides.
- Repeat: Repeat the breading process with the remaining fish sticks.
- Rest (Optional): Place the breaded fish sticks on a plate or baking sheet lined with parchment paper. Refrigerate for 15-20 minutes.
- Heat the Oil: In a large skillet, heat the vegetable oil over medium heat.
- Fry the Fish Sticks: Carefully place the breaded fish sticks in the hot oil, making sure not to overcrowd the pan. Cook in batches if necessary.
- Cook Until Golden Brown: Cook the fish sticks for about 3-4 minutes per side, or until they are golden brown and cooked through. The internal temperature of the fish should reach 145°F (63°C).
- Remove and Drain: Remove the cooked fish sticks from the skillet and place them on a plate lined with paper towels to drain any excess oil.
- Serve Immediately: Serve the fish sticks immediately while they are still hot and crispy.
- Lemon Wedges and Tartar Sauce: Serve with lemon wedges and tartar sauce for dipping.
Notes
- Air Fryer Option: Preheat air fryer to 400°F (200°C). Cook for 8-10 minutes, flipping halfway through.
- Baked Option: Preheat oven to 400°F (200°C). Bake for 12-15 minutes, flipping halfway through.
- Different Types of Fish: Pollock or whiting can be used.
- Gluten-Free Option: Use gluten-free flour and breadcrumbs.
- Spice It Up: Add cayenne pepper or chili powder to the breadcrumbs.
- Herb It Up: Add dried herbs to the breadcrumbs.
- Cheese It Up: Add grated Parmesan cheese to the breadcrumbs.
- Storage Instructions: Store leftovers in an airtight container in the refrigerator for up to 3 days.
- Reheating Instructions: Preheat oven or air fryer to 350°F (175°C). Heat for 5-7 minutes.
- Freezing Instructions: Freeze breaded fish sticks on a baking sheet, then transfer to a freezer bag. Store for up to 2 months. Cook from frozen, adding extra cooking time.
Leave a Comment