
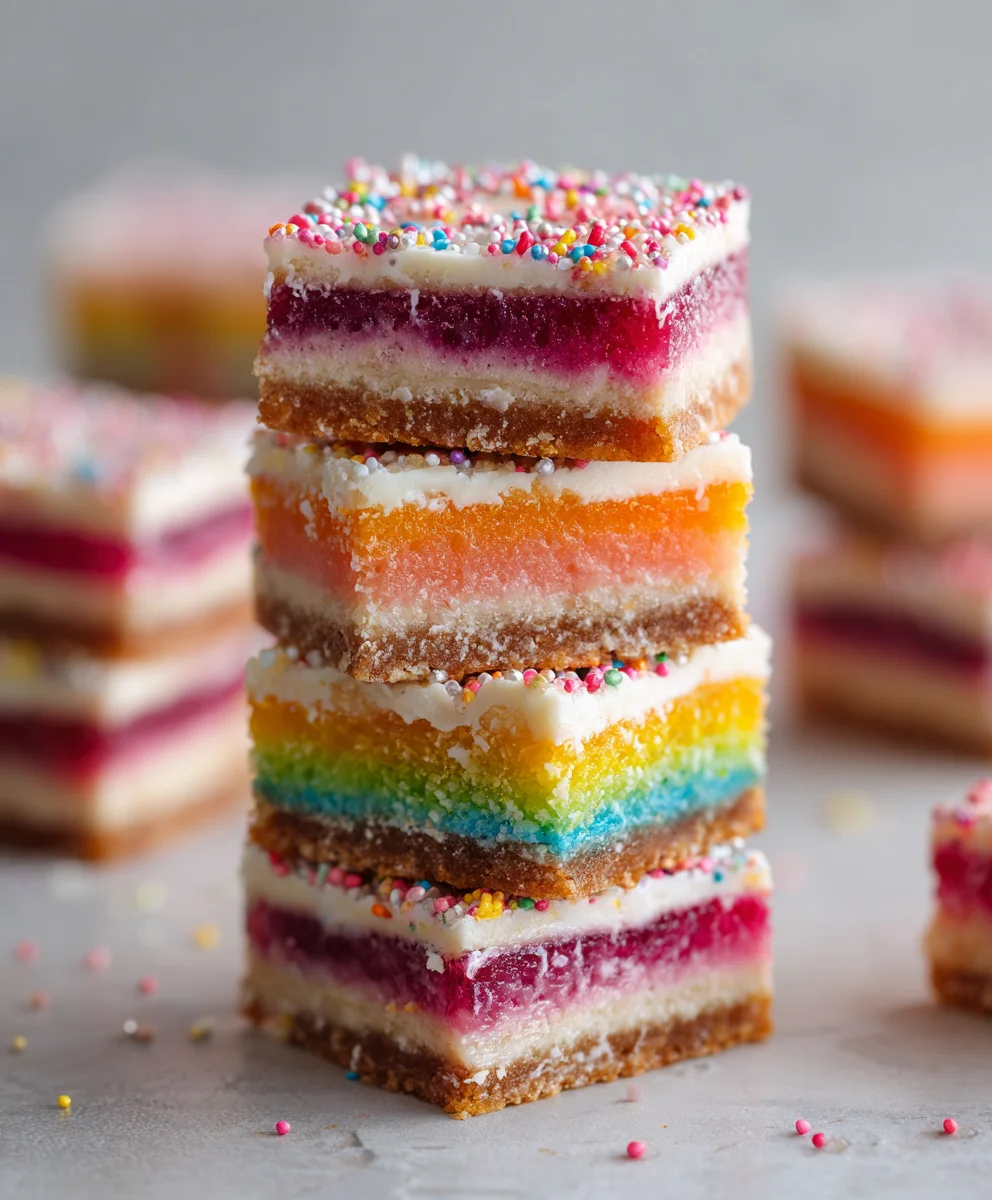
Rainbow Bars! Just hearing the name conjures images of vibrant hues and irresistible sweetness, doesn’t it? As someone who cherishes the simple joys of home baking, I can confidently say that few desserts spark as much delight and visual appeal as these magnificent treats. They are a true testament to the idea that food can be both a feast for the eyes and a symphony for the palate.
This beloved confection, often known by various delightful names such as Magic Cookie Bars or Seven-Layer Bars, has graced countless potlucks, holiday tables, and bake sales across generations. While their exact origin is debated, their rise to popularity in American kitchens, especially since the mid-20th century, is undeniable. They represent a comforting slice of nostalgia for many, a go-to recipe that promises crowd-pleasing results with minimal fuss.
Why We Adore These Colorful Confections
What makes people utterly adore these delightful Rainbow Bars? It’s the magical combination of textures and flavors in every bite. Imagine a rich, buttery crust providing the perfect foundation, topped with layers of chewy coconut, crunchy nuts, sweet chocolate chips, and often, a touch of condensed milk that caramelizes into a gooey, melt-in-your-mouth dream. They are incredibly convenient to make, requiring no special equipment, and the visual impact alone is enough to brighten anyone’s day. Their versatility also allows for delightful variations, ensuring they remain a fresh and exciting treat every time.

Ingredients:
- For the Shortbread Crust:
- 1 cup (2 sticks or 226g) unsalted butter, softened
- ½ cup (100g) granulated sugar
- 2 cups (240g) all-purpose flour
- ½ teaspoon salt
- 1 teaspoon vanilla extract (optional, but lovely!)
- For the Rainbow Filling:
- 2 cans (14 ounces each, total 28 ounces or 794g) sweetened condensed milk
- 4 large egg yolks (save the whites for another recipe!)
- ½ cup (120ml) fresh lemon juice (or lime juice, for a tangier bar)
- 1 teaspoon vanilla extract
- Gel food coloring kit (red, orange, yellow, green, blue, purple – or any colors you fancy!)
- Optional Topping:
- Rainbow sprinkles, for a festive finish
- Shredded coconut, lightly toasted, for added texture and flavor
Prepping Your Workspace and Oven
- Before we dive into the fun of mixing and coloring, let’s get our kitchen ready. First things first, preheat your oven to 350°F (175°C). This ensures that when your crust goes in, it starts baking evenly right away. Oven temperature consistency is key for a perfect bake, so allow it ample time to reach the desired heat.
- Next, prepare your baking pan. I find that a 9×13 inch (23×33 cm) baking pan works best for this recipe, yielding a good thickness for the bars. You’ll want to line it with parchment paper, leaving an overhang on the longer sides. This parchment paper sling is an absolute lifesaver later on when it’s time to lift the entire slab of bars out for easy slicing, ensuring they come out perfectly intact without any sticky situations. A light spray with non-stick cooking spray before laying down the parchment paper can also add an extra layer of insurance, especially if your parchment tends to slip.
Crafting the Golden Crust
- Let’s start with the foundation of our delightful Rainbow Bars: the buttery shortbread crust. In a large mixing bowl, combine your softened unsalted butter with the granulated sugar. Using an electric mixer on medium speed, or a sturdy whisk if you’re feeling energetic, beat these two ingredients together until the mixture is beautifully light, fluffy, and has a noticeably pale yellow hue. This creaming process is absolutely essential as it incorporates air, which contributes significantly to a tender, delicate, and melt-in-your-mouth crust. Don’t rush this step; it really makes a difference to the final texture of your crust.
- Now, gradually add the all-purpose flour and the salt to the butter-sugar mixture. If you’re using vanilla extract, this is also the perfect time to swirl it in. Mix on low speed, or gently fold in by hand with a sturdy spatula, until just combined. Be careful not to overmix at this stage! Overmixing can develop the gluten in the flour, leading to a tough and chewy crust rather than the crumbly, shortbread-like texture we are passionately aiming for. The dough should resemble coarse crumbs but hold together when pressed firmly between your fingers.
- Take this beautiful crumbly dough and evenly press it into the bottom of your prepared 9×13 inch baking pan. I like to use the bottom of a flat-bottomed glass or a measuring cup to firmly and uniformly press the dough across the entire surface. Pay special attention to the corners and edges to ensure an even thickness. An even crust is crucial for consistent baking.
- Slide your pan with the pressed crust into the preheated 350°F (175°C) oven. Bake for about 15-20 minutes, or until the edges are lightly golden brown and the center looks set. This partial baking, also known as blind baking, helps to create a firm barrier for our wet filling, preventing a soggy bottom and giving us that perfect crisp shortbread layer. Once baked, remove the pan from the oven and set it aside to cool slightly while we prepare the vibrant rainbow filling. Keep the oven on!
Creating the Vibrant Rainbow Filling
- While our crust is cooling, let’s embark on the most exciting part: creating the colorful filling! In a separate large mixing bowl, whisk together the two cans of sweetened condensed milk, the four large egg yolks, and the fresh lemon juice. The lemon juice is vital here; its acidity perfectly balances the sweetness of the condensed milk, giving our bars that delightful tangy counterpoint. Don’t forget to add your teaspoon of vanilla extract for that warm, aromatic touch. Whisk until the mixture is smooth and thoroughly combined. This is our base filling.
- Now for the rainbow magic! We need to divide our creamy base filling into separate bowls, one for each color you plan to use. For a traditional rainbow, you’ll want six bowls: red, orange, yellow, green, blue, and purple. If you’re feeling adventurous, feel free to add more colors or create your own palette! Eyeball the division as evenly as possible – precision isn’t paramount, but we want similarly sized layers for a visually appealing effect.
-
Time to add the color!
- Into the first bowl, add a few drops of red gel food coloring. Stir gently but thoroughly until the color is uniform and vibrant. Remember, gel food colorings are highly concentrated, so start with a small amount and add more gradually until you achieve your desired shade.
- Repeat this process for the remaining bowls:
- For orange, combine red and yellow food coloring, or use orange gel directly.
- For yellow, add yellow gel food coloring.
- For green, add green gel food coloring.
- For blue, add blue gel food coloring.
- And finally, for purple, combine red and blue food coloring, or use purple gel directly.
Take your time with this step. The beauty of Rainbow Bars lies in their distinct, vivid colors. Ensure each bowl of filling is perfectly colored before moving on. I love seeing the array of colors lined up, ready to be layered!
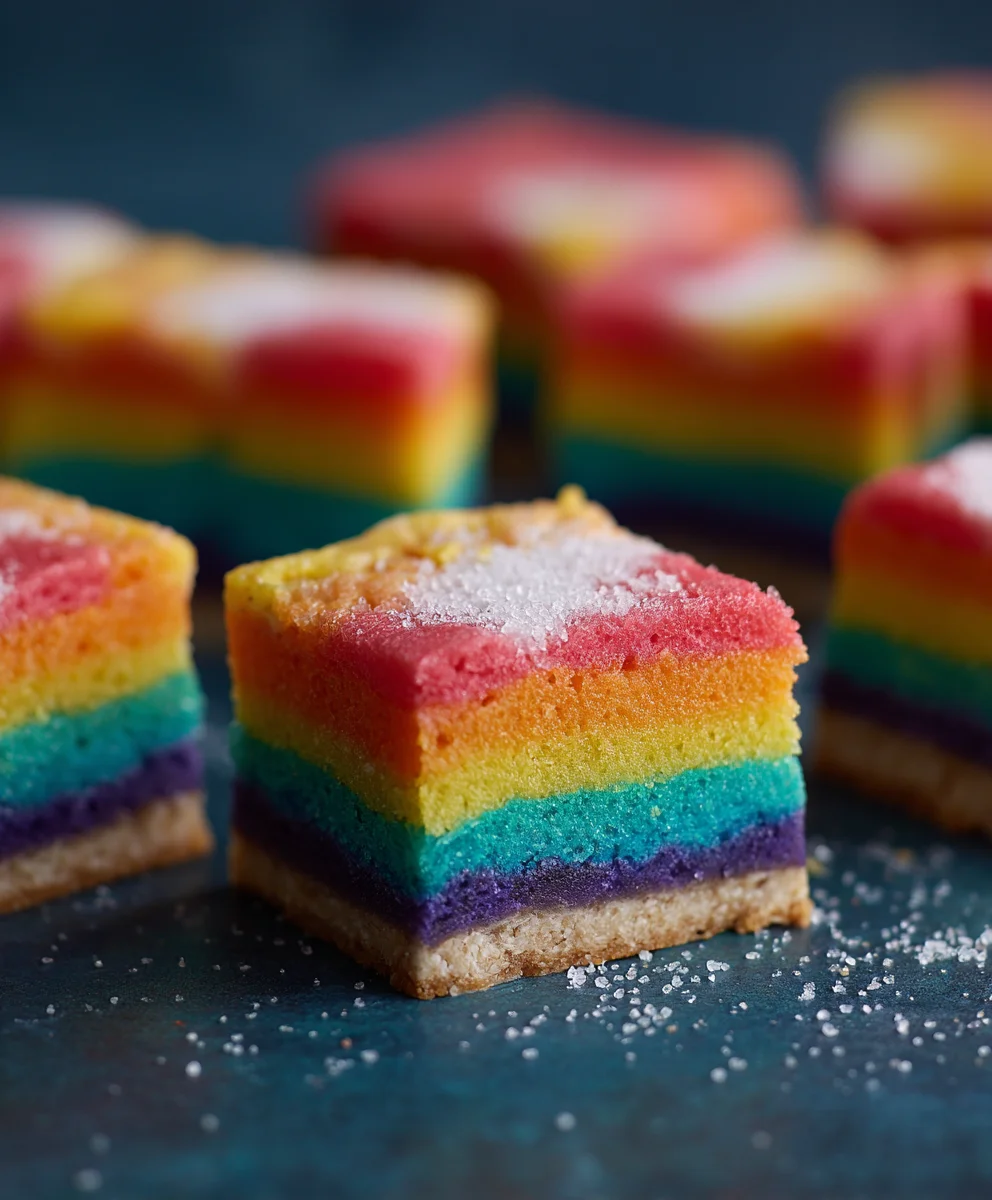
Layering and Baking the Rainbow Bars
- Now that our crust is slightly cooled and our colors are prepped, it’s time to layer! This process requires a little patience to ensure those crisp, distinct color lines that make Rainbow Bars so enchanting. Start by pouring your first chosen color (I usually start with purple or blue, the “cooler” colors, at the bottom) evenly over the partially baked crust. Use a gentle hand and perhaps the back of a spoon to spread it if needed, but try not to disturb the crust too much.
- Place the pan back into your 350°F (175°C) oven and bake this first layer for about 6-8 minutes, or just until it’s set enough that it no longer jiggles excessively when gently nudged. You’re not looking for it to be fully baked, just firm enough to support the next layer without mixing. This brief bake is critical for maintaining separate color layers.
- Remove the pan from the oven. Now, carefully pour your second chosen color (e.g., blue, if you started with purple) evenly over the first set layer. Again, be gentle. Return the pan to the oven and bake for another 6-8 minutes until this layer is also just set.
-
You will repeat this exact process for each subsequent color. Pour a layer, bake for 6-8 minutes until just set, then remove, add the next color, and repeat. It’s a rhythmic dance of pouring and brief baking, and it’s what gives these bars their signature striped appearance.
Pro Tip for Perfect Layers:
When pouring each new layer, try to pour it over the back of a spoon held just above the previous layer. This technique helps to distribute the liquid gently and prevents it from creating divots or breaking through the partially set layer below, ensuring beautiful, flat, and distinct stripes.
- After you’ve poured and briefly baked all of your colorful layers, giving each its individual “set” time, it’s time for the final bake. Once all layers are in the pan, return the pan to the oven for a longer bake of about 20-25 minutes. This final bake will ensure that all the layers are fully cooked through, the filling is completely set, and the flavors have a chance to meld beautifully. You’ll know it’s done when the center is firm to the touch and the edges are lightly golden.
The Grand Finale: Cooling, Slicing, and Enjoying
- Congratulations, you’ve created a masterpiece! Once the bars are baked, carefully remove the pan from the oven. This next step is perhaps the most challenging for eager bakers: you must let the Rainbow Bars cool completely in the pan on a wire rack. I mean completely! This can take several hours, or you can even let them chill in the refrigerator for a few hours once they’ve reached room temperature. Resist the urge to slice them warm, as the filling needs ample time to firm up fully; otherwise, your beautiful layers might ooze and lose their crisp definition. Patience truly is a virtue here.
- Once the bars are thoroughly chilled and firm, use the parchment paper overhangs as handles to gently lift the entire slab out of the baking pan. Place it on a clean cutting board. This parchment paper sling is truly invaluable!
- Now, for the final artistic touch! If you’re using optional toppings like rainbow sprinkles or toasted shredded coconut, this is the perfect moment to adorn your bars. A sprinkle of rainbow magic just before slicing adds an extra burst of festivity and visual appeal. Press them gently onto the surface so they adhere to the slightly sticky top layer.
- Using a sharp knife, carefully slice the bars into your desired size and shape. I find that wiping the knife blade clean between each cut with a damp cloth helps to achieve perfectly clean, vibrant lines, showcasing each stunning layer. For an even cleaner cut, you can even warm your knife under hot water and dry it before each slice.
- Voila! Your spectacular Rainbow Bars are ready to be admired and devoured. Arrange them on a platter and watch as they bring smiles and joy to everyone who sees (and tastes!) them.
-
Storage Tips for Your Rainbow Bars:
These delightful bars can be stored in an airtight container at room temperature for up to 3 days, or in the refrigerator for up to a week. The refrigeration will make them even firmer and perhaps a little chewier, which some people absolutely love! If you want to extend their life even further, they also freeze beautifully. Wrap individual bars tightly in plastic wrap and then place them in a freezer-safe bag or container for up to 2-3 months. Just thaw them at room temperature or in the refrigerator before serving. Enjoy every colorful bite!
Conclusion:
Well, friends, we’ve journeyed through the creation of what I truly believe is one of the most delightful and visually stunning treats you can possibly whip up in your own kitchen. I’m not just saying this because I’m passionate about baking; I’m saying it because these treats truly embody everything wonderful about homemade goodness: simplicity, beauty, and an absolutely irresistible flavor. If you’ve been searching for that perfect recipe to brighten your day, impress your guests, or simply bring a huge smile to the faces of your loved ones, then look no further. This recipe isn’t just about mixing ingredients; it’s about crafting joy, layer by colorful layer. The satisfying crunch, the soft chew, the vibrant burst of color – it all comes together in a symphony of sensory delight that truly makes this a must-try experience for any baker, from novice to seasoned pro.
What makes these particular bars so utterly special, you ask? It’s the way they effortlessly combine a comforting, familiar texture with an explosion of visual charm. They are the ultimate crowd-pleaser, appealing to children with their playful colors and captivating adults with their sophisticated simplicity and delicious taste. Every single bite is a testament to the fact that baking doesn’t have to be complicated to be extraordinary. We’re talking about a treat that feels gourmet but comes together with incredible ease. They’re forgiving, they’re fun, and they guarantee a fantastic outcome every time. Seriously, I can’t emphasize enough how much I adore this recipe, and I have a feeling you’re about to fall head over heels for it too.
Serving Suggestions & Creative Twists for Your Masterpiece
Now that you’re armed with the knowledge to create these beauties, let’s talk about how you can best enjoy them and even put your own spin on things. These bars are incredibly versatile. Imagine starting your morning with a square of this delightful treat alongside a warm cup of coffee or a comforting mug of tea – it’s a tiny slice of happiness to kickstart your day. They are also absolutely perfect for an afternoon pick-me-up, a welcome addition to any lunchbox, or a star attraction on a dessert platter at your next gathering. Seriously, when these make an appearance, they don’t last long!
But why stop there? Let’s get creative! While the classic rendition is always a winner, you can easily adapt this recipe to suit different occasions or flavor preferences. For instance, think about swapping out the sprinkles for different themed varieties during holidays. Picture red and green sprinkles for a festive Christmas treat, pastel sprinkles for an elegant Easter brunch, or even orange and black for a fun Halloween twist. The possibilities are truly endless, allowing these bars to transform into a seasonal delight for any celebration.
You could also play with flavor extracts. A touch of almond extract instead of vanilla could offer a subtle, sophisticated twist, or a hint of lemon or orange zest grated into the mix could introduce a bright, zesty note that perfectly complements the sweetness. For those who love a bit of extra texture, consider folding in some mini chocolate chips or white chocolate chips, or even a handful of finely chopped nuts like macadamias or pecans for an added crunch and richness. Imagine serving these with a scoop of vanilla bean ice cream for an elevated dessert experience, or perhaps drizzling them with a simple white chocolate glaze for an extra touch of decadence. If you’re baking for a larger crowd, don’t hesitate to double the recipe; these are guaranteed to be a hit at any potluck, bake sale, or family get-together. The sheer adaptability of these Rainbow Bars is part of their magic, allowing you to make them uniquely yours.
So, my dear fellow bakers, I implore you: don’t just read about this wonderful creation. Take the plunge! Gather your ingredients, put on your apron, and let the magic happen in your kitchen. I promise you, the joy you’ll experience from baking these, and more importantly, the joy you’ll see on the faces of those who get to taste them, will be incredibly rewarding. Once you’ve made them, I would absolutely love to hear about your experience. Did you add your own creative twist? What was your favorite part of the process? Did they bring smiles to everyone’s faces? Please, share your stories and your results! There’s nothing quite like the community of home bakers sharing their successes and inspirations. Happy baking, and get ready to spread some serious colorful joy!
Easy Rainbow Bars – A Fun, Colorful Treat for All!
These vibrant Rainbow Bars, also known as Magic Cookie Bars, feature a buttery shortbread crust topped with a tangy, colorful condensed milk and egg yolk filling. Each distinct color layer is baked to perfection, offering a feast for both the eyes and the palate. A delightful and visually stunning dessert, perfect for any occasion.
Ingredients
-
1 cup (226g) unsalted butter, softened
-
½ cup (100g) granulated sugar
-
2 cups (240g) all-purpose flour
-
½ teaspoon salt
-
1 teaspoon vanilla extract (optional, for crust)
-
2 cans (14 ounces each, total 794g) sweetened condensed milk
-
4 large egg yolks
-
½ cup (120ml) fresh lemon juice
-
1 teaspoon vanilla extract (for filling)
-
Gel food coloring kit (red, orange, yellow, green, blue, purple)
-
Rainbow sprinkles (optional, for topping)
-
Shredded coconut, lightly toasted (optional, for topping)
Instructions
-
Step 1
Preheat oven to 350°F (175°C). Line a 9×13 inch (23×33 cm) baking pan with parchment paper, leaving an overhang on the longer sides. -
Step 2
In a large bowl, cream softened unsalted butter and granulated sugar until light, fluffy, and pale yellow. Gradually add all-purpose flour, salt, and vanilla extract (if using), mixing on low speed until just combined to form coarse crumbs. Press this dough evenly and firmly into the bottom of the prepared pan. -
Step 3
Bake the pressed crust for 15-20 minutes, or until the edges are lightly golden brown and the center is set. Remove from oven and let cool slightly. Keep the oven on. -
Step 4
In a separate large mixing bowl, whisk together sweetened condensed milk, large egg yolks, fresh lemon juice, and vanilla extract until smooth and thoroughly combined. This is your base filling. -
Step 5
Divide the base filling evenly into six separate bowls. Add a few drops of gel food coloring to each bowl: red, orange (red+yellow), yellow, green, blue, and purple (red+blue). Stir each color gently but thoroughly until uniform and vibrant. Adjust coloring as needed. -
Step 6
Pour the first chosen color (e.g., purple) evenly over the partially baked crust. Bake in the 350°F (175°C) oven for about 6-8 minutes, or until just set enough that it no longer jiggles excessively. Remove from oven. Carefully pour the second chosen color evenly over the first set layer, optionally over the back of a spoon to distribute gently. Return to oven and bake for another 6-8 minutes until just set. Repeat this exact process for each subsequent color, layering and briefly baking until all six colorful layers are in the pan. -
Step 7
After all colorful layers have been poured and briefly baked, return the pan to the oven for a final bake of about 20-25 minutes. The bars are done when the center is firm to the touch and the edges are lightly golden. -
Step 8
Carefully remove the pan from the oven and let the Rainbow Bars cool completely in the pan on a wire rack. This can take several hours, or you can chill them in the refrigerator for a few hours once they’ve reached room temperature. Complete cooling is essential for the filling to firm up and for clean slices. -
Step 9
Once thoroughly chilled and firm, use the parchment paper overhangs to lift the entire slab of bars out of the pan onto a clean cutting board. If using, adorn with rainbow sprinkles or toasted shredded coconut. Using a sharp knife, slice the bars into desired sizes, wiping the blade clean between each cut for perfectly vibrant lines. Serve and enjoy! -
Step 10
Store Rainbow Bars in an airtight container at room temperature for up to 3 days, or in the refrigerator for up to a week. For longer storage, wrap individual bars tightly in plastic wrap and freeze for 2-3 months. Thaw at room temperature or in the refrigerator before serving.
Important Information
Nutrition Facts (Per Serving)
It is important to consider this information as approximate and not to use it as definitive health advice.
Allergy Information
Please check ingredients for potential allergens and consult a health professional if in doubt.
Leave a Comment