
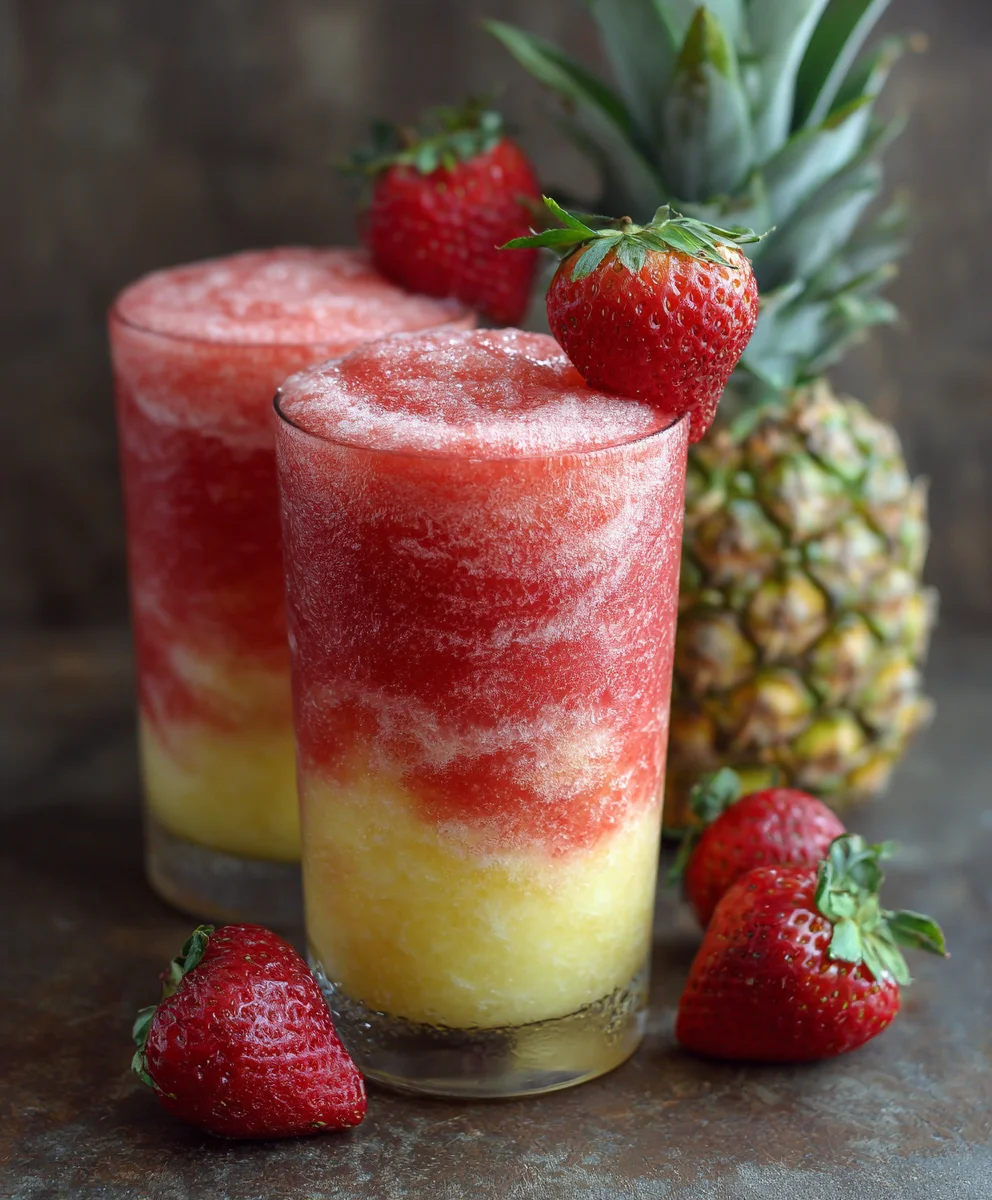
Easy Pineapple Strawberry Swirled Slushies are not just a simple beverage; they are a delightful escape, a vibrant explosion of tropical flavors designed to awaken your senses and refresh your soul. Imagine a sun-kissed afternoon, a gentle breeze, and the perfect icy concoction in hand. That’s precisely the magic these slushies deliver. I believe this delightful drink perfectly encapsulates the joy of summer, blending the succulent sweetness of ripe pineapple with the bright, slightly tart notes of fresh strawberries. The captivating swirl of colors is not just aesthetically pleasing; it’s a visual promise of the balanced, invigorating taste sensation awaiting you.
The beauty of fruit-based refreshments has been celebrated across cultures for centuries, evolving from simple chilled juices to sophisticated, layered drinks. Our modern take brings this timeless tradition right to your kitchen with incredible ease. What truly makes this recipe special is its undeniable appeal: the irresistible combination of flavors, the wonderfully icy yet smooth texture that melts deliciously on your tongue, and the sheer convenience of whipping up such a show-stopping treat in minutes. It’s the kind of drink that brings smiles, making it perfect for family gatherings, solo relaxation, or as a vibrant centerpiece for any celebration. For anyone seeking a simple yet spectacular way to beat the heat or simply indulge in a moment of pure bliss, these Easy Pineapple Strawberry Swirled Slushies are the ultimate answer.

Ingredients:
- 2 cups fresh strawberries, hulled and sliced: I always go for the brightest red, ripest strawberries I can find. They provide the most natural sweetness and vibrant color, which is essential for our “Easy Pineapple Strawberry Swirled Slushies.” Make sure to wash them thoroughly before hulling.
- 2 cups fresh pineapple, peeled, cored, and cubed: Look for a pineapple that smells sweet at the base and gives slightly when pressed. Fresh pineapple makes all the difference here, offering that tangy-sweet tropical flavor that pairs perfectly with the strawberries.
- 2-4 tablespoons granulated sugar (optional, to taste): My preference is usually to let the fruit’s natural sweetness shine, but sometimes a little extra sugar is needed, especially if your fruit isn’t at peak ripeness. You can also use a natural sweetener like maple syrup or agave nectar if you prefer.
- 1 tablespoon fresh lime juice: This is my secret weapon! A touch of lime juice brightens all the flavors, cutting through the sweetness and adding a wonderful zesty zing that elevates the slushie. Don’t skip it!
- 1/2 cup cold water or coconut water (divided): We’ll use this liquid to help our blender work its magic. Water is perfectly fine, but coconut water will lend an extra layer of tropical flavor and a hint of natural sweetness. We’ll add this gradually to achieve the perfect slushie consistency.
- 1 cup ice cubes (optional, see notes for texture): While freezing the fruit is key, a little extra ice can help achieve a thicker, more immediate slushie texture, especially if your fruit isn’t fully frozen.
Equipment You’ll Need:
- High-powered blender: This is a must for achieving that smooth, icy, yet pourable slushie consistency without any chunks. A good blender will make this “Easy Pineapple Strawberry Swirled Slushies” recipe truly effortless.
- Baking sheet lined with parchment paper: Essential for freezing your fruit without it clumping together.
- Airtight freezer-safe bag or container: For storing your prepped fruit.
- Measuring cups and spoons: Standard kitchen essentials.
- Sharp knife and cutting board: For fruit preparation.
- Serving glasses: For presenting your beautiful swirled slushies.
Phase 1: Preparing Your Fruit Bases for Easy Pineapple Strawberry Swirled Slushies
The success of our “Easy Pineapple Strawberry Swirled Slushies” heavily relies on perfectly prepped, partially frozen fruit. This step is crucial for achieving that delightful icy texture without over-diluting our flavors with too much extra ice.
- Prepare the Strawberries: First things first, let’s get those strawberries ready. I like to give them a good rinse under cold running water to ensure they’re squeaky clean. Then, using a small paring knife, carefully hull each strawberry by removing the green leafy top and the white core. Once hulled, slice them into halves or quarters. Smaller pieces will freeze more evenly and blend more smoothly later.
- Prepare the Pineapple: Now for the pineapple! This can seem a bit daunting, but with a sharp knife, it’s a breeze. Start by slicing off the top and bottom of the pineapple. Then, stand it upright and carefully slice downwards, following the curve of the fruit, to remove the prickly skin. Once the skin is off, you’ll see “eyes” or small brown spots; you can either carefully carve these out with a V-cut or remove them with a vegetable peeler. Finally, lay the pineapple on its side and slice it into rounds. From there, you can easily cut out the tough, fibrous core from each round and then cube the remaining pineapple flesh into roughly 1-inch pieces.
- Freeze the Fruit Properly: This is where the magic really begins for our “Easy Pineapple Strawberry Swirled Slushies.” Once both your strawberries and pineapple are prepped and cubed, you’ll want to flash freeze them. Lay the fruit pieces in a single layer on separate baking sheets lined with parchment paper. This prevents them from sticking together in one giant frozen lump, which would be a nightmare for your blender! Place the baking sheets in the freezer for at least 2-3 hours, or ideally until the fruit is firm but not rock-hard. The goal here is for the fruit to be very cold and firm, but not frozen solid like an ice cube. If it’s too solid, it can be very hard on your blender and may require more liquid, which could dilute the flavor. If you’re planning ahead, you can freeze them overnight or even for a few days in advance. Once firm, transfer the fruit to separate airtight freezer-safe bags or containers. This preparation step can be done well in advance, making the actual slushie assembly incredibly quick when you’re ready to serve.
- Optimal Freezing Time Considerations: I’ve found that about 3-4 hours in a standard home freezer usually hits that sweet spot of “firm but not rock-hard.” If your freezer runs very cold, you might check it a little earlier. Conversely, if you’re dealing with a less powerful freezer, you might need to extend the time. The key is to have the fruit cold enough to create a super icy texture when blended, without being so frozen that your blender struggles. This attention to detail is what makes truly great “Easy Pineapple Strawberry Swirled Slushies.”
Phase 2: Crafting the Strawberry Slushie Base
Now that our fruit is perfectly chilled and ready, we’re going to create the first vibrant layer of our “Easy Pineapple Strawberry Swirled Slushies” – the luscious strawberry base!
- Combine Strawberry Ingredients: In your high-powered blender, add the frozen (but not rock-hard) strawberry pieces. To this, add half of your fresh lime juice (about 1/2 tablespoon) and about half of the optional granulated sugar (1-2 tablespoons). This initial amount of sugar is a starting point; we can always adjust later. Finally, add about 1/4 cup of your cold water or coconut water.
- Begin Blending: Secure the lid on your blender. Start blending on a low setting, gradually increasing the speed. Use your blender’s tamper (if it has one) to push the frozen fruit down towards the blades. This is crucial for achieving a smooth consistency without adding too much liquid. You want to encourage the fruit to blend into itself, rather than relying solely on the added liquid.
- Achieving the Right Consistency: Blend until the mixture is completely smooth and thick, resembling a soft-serve ice cream or a very thick smoothie. If the blender is struggling, add the remaining 1/4 cup of water/coconut water, but do so very slowly, a tablespoon at a time, until the blades can move freely. My philosophy for perfect “Easy Pineapple Strawberry Swirled Slushies” is to add as little liquid as possible to preserve the intense fruit flavor.
- Taste and Adjust: Once you have a smooth consistency, give it a quick taste. Is it sweet enough for your liking? If not, add a little more sugar (a teaspoon at a time) and blend again until incorporated. Is it bright enough? A tiny squeeze more of lime juice can do wonders. Remember, this is your slushie, so tailor it to your preference!
- Set Aside: Pour the finished strawberry slushie base into a separate bowl or container. If you’re not immediately assembling, you can place it in the freezer for about 10-15 minutes to maintain its icy texture, but don’t let it freeze solid. You want it to remain scoopable or pourable for the swirl.
Phase 3: Crafting the Pineapple Slushie Base
With our strawberry base ready, it’s time to create the equally delicious and refreshing pineapple layer for our “Easy Pineapple Strawberry Swirled Slushies.” This golden base will provide a wonderful contrast in both color and flavor.
- Clean Your Blender (Optional but Recommended): For the cleanest swirl and to prevent any flavor crossover, I usually give my blender pitcher a quick rinse before moving on to the pineapple. You don’t need to deep clean it, just a quick rinse to remove any lingering strawberry bits.
- Combine Pineapple Ingredients: Add the frozen pineapple pieces to your clean blender. Just like with the strawberries, add the remaining half of your fresh lime juice (about 1/2 tablespoon) and the remaining optional granulated sugar (1-2 tablespoons). Start with about 1/4 cup of the cold water or coconut water.
- Begin Blending the Pineapple: Secure the lid and start blending on a low setting, gradually increasing the speed. Again, utilize your blender’s tamper to help process the frozen pineapple. Pineapple can be a bit trickier than strawberries due to its fibrous nature, so patience and the tamper are your best friends here. You might notice it takes a tad longer to break down into a smooth consistency, but trust the process!
- Achieving the Ideal Pineapple Consistency: Continue blending until the pineapple mixture is incredibly smooth and thick, mimicking the consistency of soft-serve or a very dense sorbet. If your blender is struggling significantly, add the remaining 1/4 cup of water/coconut water very gradually, a tablespoon at a time. My personal aim for these “Easy Pineapple Strawberry Swirled Slushies” is always to create a base that is as thick and flavorful as possible, meaning minimal added liquid.
- Taste and Adjust the Pineapple: Once the pineapple slushie base is silky smooth, give it a taste test. Does it need more sweetness to balance the natural tang of the pineapple? Add a little more sugar if desired, blending again to incorporate. The lime juice should already be perfectly enhancing its tropical notes. This adjustment stage is vital for a truly balanced “Easy Pineapple Strawberry Swirled Slushies” experience.
- Prepare for Swirling: Now you have two beautiful, vibrant, and delicious slushie bases ready to be swirled together! Proceed immediately to the next phase for the best results, as you want both bases to be at their optimal icy, yet pourable, consistency for that perfect swirl.
Phase 4: Mastering the Swirl for Your Easy Pineapple Strawberry Swirled Slushies
This is the fun part – where we bring everything together to create the visually stunning and utterly delicious “Easy Pineapple Strawberry Swirled Slushies”! The swirling technique isn’t complicated, but it does make all the difference in presentation.
- Prepare Your Glasses: Grab your favorite serving glasses. For the most dramatic swirl, clear glasses work best, allowing you and your guests to appreciate the beautiful color contrast. I often chill my glasses in the freezer for a few minutes beforehand; this helps keep the slushie colder for longer, especially if you’re serving on a hot day.
- Start Layering: Begin by spooning or carefully pouring a generous layer of one of your slushie bases – say, the strawberry – into the bottom of a glass. Don’t press it down too hard; we want it to remain light and airy. Fill the glass about one-third of the way.
- Introduce the Second Layer: Next, spoon or pour a layer of the pineapple slushie base directly on top of the strawberry layer. Fill up to about two-thirds of the glass. Try to keep the layers distinct at this stage.
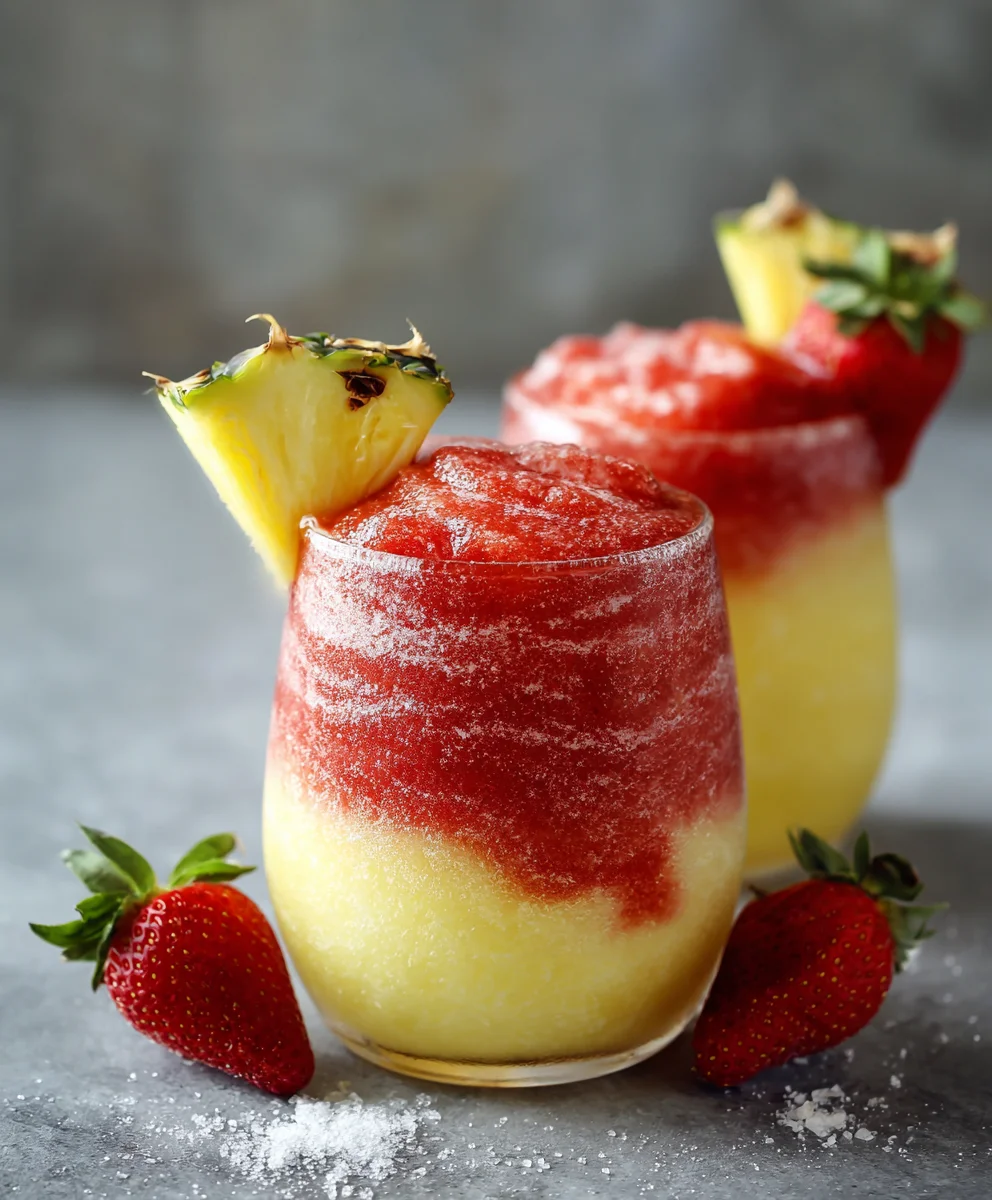
- Continue Alternating: Repeat the process, adding another layer of strawberry, then pineapple, until your glass is almost full. You should have distinct, alternating layers of red and yellow/gold. The key to “Easy Pineapple Strawberry Swirled Slushies” isn’t just the flavor, but also the visual appeal!
- Create the Swirl: Now for the artistic touch! Take a long spoon or a straw and gently insert it into the glass, reaching almost to the bottom. Slowly swirl the spoon or straw around the inside edge of the glass once or twice. The trick is to swirl just enough to create beautiful ribbons of color, without fully mixing the two flavors. We want distinct streaks, not a homogenous orange slushie. This gentle motion will create that gorgeous, inviting swirl that makes these “Easy Pineapple Strawberry Swirled Slushies” so special.
- Garnish and Serve Immediately: For an extra touch of elegance and freshness, you can garnish your slushies. I love adding a fresh strawberry sliced on the rim, a small wedge of pineapple, or even a sprig of fresh mint. Serve your “Easy Pineapple Strawberry Swirled Slushies” immediately with a wide straw. These are best enjoyed right after they’re made to experience their optimal icy, refreshing texture.
Tips for the Perfect Easy Pineapple Strawberry Swirled Slushies:
-
Flavor Variations Beyond the Swirl:
While the pineapple and strawberry are a match made in heaven for these “Easy Pineapple Strawberry Swirled Slushies,” feel free to experiment! You could try adding a small handful of fresh mint leaves to the strawberry base for a refreshing twist, or a pinch of ginger to the pineapple for an unexpected zing. A tiny bit of vanilla extract can also round out the fruit flavors beautifully. Don’t be afraid to make this recipe your own!
-
Adjusting Sweetness:
Fruit ripeness varies greatly, so always taste your bases before committing to a final sweetness level. If your fruit is incredibly ripe and sweet, you might find you don’t need any added sugar at all! Conversely, if your fruit is a little tart, don’t hesitate to add a bit more sugar or a natural sweetener. Remember, it’s easier to add more sweetness than to take it away, so start with less and build up.
-
Kid-Friendly Options:
These “Easy Pineapple Strawberry Swirled Slushies” are inherently kid-friendly, but you can make them even more fun! Use fun straws, add gummy bears on top (for a very occasional treat!), or even make them into popsicles by pouring the mixed slushie into molds and freezing. Kids absolutely adore the vibrant colors and refreshing taste.
-
Adult Variations (21+):
For an adult-only version, you can transform these into fantastic frozen cocktails. For the strawberry base, I recommend adding a shot of white rum or vodka during the blending process. For the pineapple base, a shot of coconut rum or even tequila would be delightful. Just be mindful that alcohol lowers the freezing point, so your slushies might be a little softer. Adjust the liquid content accordingly. A splash of prosecco or champagne poured over the finished slushie in the glass also makes for a wonderful, fizzy treat!
-
Storage and Re-Blending:
While these “Easy Pineapple Strawberry Swirled Slushies” are truly best enjoyed fresh, if you have leftovers, you can store them in an airtight container in the freezer. When you’re ready to enjoy them again, they will likely be frozen solid. Simply break them up into chunks, place them back in the blender with a tiny splash of water or juice, and re-blend until you reach that perfect slushie consistency again. You might need to add a touch more sweetener or lime juice to refresh the flavors.
-
Choosing Your Liquid:
I mentioned using water or coconut water, but you could also use a splash of orange juice, apple juice, or even sparkling water (though sparkling water should be added after initial blending to retain fizz) for slightly different flavor profiles. Each choice will subtly alter the overall taste of your “Easy Pineapple Strawberry Swirled Slushies,” so choose what best suits your palate.
Troubleshooting Common Slushie Challenges:
-
Slushie is Too Thick:
If your slushie base is too thick and your blender is struggling, or if it’s too much like an ice block to drink, simply add a small amount of cold water, coconut water, or even a splash of fruit juice (like orange or apple) – about a tablespoon at a time. Blend briefly after each addition until you reach your desired pourable, yet icy, consistency. The key for perfect “Easy Pineapple Strawberry Swirled Slushies” is a gradual addition to avoid making it too watery.
-
Slushie is Too Thin/Watery:
This usually happens if too much liquid was added initially, or if your fruit wasn’t frozen enough. Don’t worry, it’s fixable! You have a couple of options. You can add a handful of extra ice cubes (about 1/4 to 1/2 cup) to the blender and blend again until incorporated. This will help thicken it up quickly. Alternatively, if you have more frozen fruit on hand, you can add a few extra pieces and re-blend. If neither of those is an option, you can pour the mixture into a shallow freezer-safe container and freeze it for about 30-60 minutes, stirring every 15 minutes, until it reaches a semi-frozen, slushy state.
-
Blender is Struggling with Frozen Fruit:
If your fruit was frozen rock-solid, even a high-powered blender might have a tough time. The best solution here is to let the fruit sit out at room temperature for 5-10 minutes to soften slightly before blending. Using a blender tamper to push the fruit down towards the blades is also incredibly helpful. Start on a very low speed and gradually increase. Adding a tiny bit of liquid can also help get things moving, but remember our goal for intensely flavored “Easy Pineapple Strawberry Swirled Slushies” is to minimize added liquid.
-
Flavor Balance is Off:
Too Sweet: If your slushie tastes overly sweet, a squeeze more fresh lime juice is your best friend. The acidity will help balance out the sweetness and brighten the flavors. You could also add a tiny pinch of salt to enhance the existing flavors without making it salty.
Too Tart: If your fruit was very tart, you might need more sugar. Add a teaspoon at a time and blend until fully incorporated, tasting after each addition. Maple syrup or agave nectar can also be used for a more natural sweetness.
Lacking Flavor: If your slushie tastes a bit bland, it might be due to overly ripe fruit that has lost some of its punch, or too much added liquid. A squeeze of lime juice will almost always perk things up. You could also try blending in a few more pieces of very ripe, intensely flavored fruit if you have them. -
Swirl Isn’t Working:
If your slushie bases are too thin, they might mix together immediately rather than swirl. Make sure your bases are thick and cold. If they’re too thin, refer to the “Slushie is Too Thin” troubleshooting step. If they’re too thick, they might just sit on top of each other. In that case, gently stir a tiny bit more to help them combine into an artistic pattern. Remember, the beauty of “Easy Pineapple Strawberry Swirled Slushies” is in the gentle, imperfect swirl!
Conclusion:
Well, my friends, we’ve reached the sweet end of our delicious journey, and I genuinely hope you’re as excited as I am about what we’ve just explored. If there’s one recipe you absolutely have to add to your summer repertoire, or frankly, any time you need a burst of sunshine, it’s this one. Why is it such a game-changer, you ask? Let me tell you.
This isn’t just another drink; it’s an experience. Imagine a scorching afternoon, the kind where the air shimmers with heat, and you reach for something that instantly transports you to a breezy beachside cabana. That’s the magic of these slushies. They are the epitome of refreshment, offering a blissful escape with every single sip. The vibrant, tangy sweetness of perfectly ripe strawberries dances harmoniously with the tropical punch of juicy pineapple, creating a symphony of flavors that is nothing short of extraordinary. The swirling effect isn’t just visually stunning; it ensures that each mouthful delivers a delightful mix of both fruits, preventing any single flavor from overwhelming the other. It’s a beautifully balanced act, a testament to how simple ingredients can create something truly magnificent.
Beyond the incredible taste, what makes this recipe a true must-try is its astounding simplicity. We’re talking minimal effort for maximum reward here. You don’t need a culinary degree or a fancy array of gadgets. Just a few fresh ingredients and a blender stand between you and pure, unadulterated bliss. It’s quick, it’s straightforward, and it consistently delivers results that will impress both you and anyone you choose to share them with. Think about hosting a backyard barbecue, a casual get-together with friends, or simply treating yourself after a long day – these slushies are the answer. They cater to all ages, are naturally gluten-free, and can easily be adapted to suit various dietary preferences, making them an incredibly versatile option for any occasion.
Elevate Your Slushie Experience: Serving Suggestions & Variations
Now, while the basic recipe for these Easy Pineapple Strawberry Swirled Slushies is divine on its own, I’m a firm believer in making things your own! Here are a few ideas to inspire you:
- Garnish Galore: For an extra touch of elegance and flavor, don’t forget the garnishes! A fresh strawberry sliced and perched on the rim, a wedge of pineapple, or even a sprig of fresh mint can elevate the presentation significantly. For a truly luxurious treat, a dollop of homemade whipped cream or a swirl of coconut cream on top adds a dreamy, creamy texture.
- Adult Indulgence: For those moments when you want to turn a refreshing drink into a celebratory cocktail, a splash of your favorite clear spirit works wonders. A shot of white rum transforms it into a delightful daiquiri-like concoction, while vodka or even a sparkling Prosecco can add an exciting kick. Just remember to add it at the blending stage or stir it in gently just before serving.
- Kid-Friendly Fun: To make these even more appealing to the younger crowd, consider adding a few gummy bears to the bottom of the glass or a sprinkle of colorful edible glitter. You could also serve them in fun, novelty cups with crazy straws to amplify the excitement.
- Tropical Twists: Feel free to experiment with other fruits! A small ripe banana blended in can add a creamy texture and subtle sweetness. A few chunks of mango would further enhance the tropical vibe, or a squeeze of fresh lime juice could add an invigorating zest. Don’t be afraid to try a peach-raspberry swirl, or even a mixed berry explosion for different flavor profiles.
- Make-Ahead Magic: If you’re planning a party or just want to have them ready to go, you can blend the fruit mixtures separately and freeze them in ice cube trays. Then, when you’re ready for a slushie, just pop out the fruit cubes, blend with a tiny bit of water or juice, and voilà! Instant refreshment without the fuss.
- Serving Vessels: While any glass will do, consider serving these in chilled mason jars, tall pilsner glasses, or even hollowed-out pineapple halves for a truly Instagram-worthy presentation.
I genuinely encourage you, with all my heart, to set aside a few minutes this week and whip up a batch of these glorious slushies. Don’t just read about the deliciousness; experience it firsthand! You’ll be amazed at how quickly they come together and how utterly satisfying they are. It’s a simple act of self-care, a small burst of joy that you absolutely deserve.
And when you do, please, please, come back and tell me all about it! Did you stick to the recipe, or did you venture into your own creative variations? What was your favorite part? Did you find the perfect garnish? Your insights and experiences are incredibly valuable, not just to me, but to our entire community of fellow food enthusiasts. Share your photos on your favorite social media platforms – I’d love to see your beautiful creations! Your feedback fuels my passion and helps inspire new ideas for everyone. So, grab those fruits, fire up your blender, and let’s make some memories. I can’t wait to hear from you!
Easy Pineapple Strawberry Swirled Slushies
Picture yourself sipping a refreshingly sweet, vibrantly colored slushie that combines the tropical tang of pineapple with the sweet-tart essence of sun-ripened strawberries. This homemade frozen treat brings together two beloved fruits in a stunning swirled creation that tastes like summer in a glass. The natural sweetness of fresh fruit creates a healthier alternative to store-bought slushies, perfect for those scorching afternoons by the pool. Creates an Instagram-worthy drink with beautiful natural colors and no artificial dyes, using frozen fruit for the perfect slushy texture without diluting flavors. This delightful drink perfectly encapsulates the joy of summer, blending succulent sweetness with bright, slightly tart notes.
Ingredients
-
2 cups fresh strawberries, hulled & sliced
-
2 cups fresh pineapple, peeled, cored & cubed
-
2-4 tbsp granulated sugar (optional)
-
1 tbsp fresh lime juice
-
1/2 cup cold water or coconut water (divided)
-
1 cup ice cubes (optional)
Instructions
-
Step 1
Rinse, hull, and slice strawberries. Peel, core, and cube pineapple into roughly 1-inch pieces. -
Step 2
Arrange fruit in a single layer on separate parchment-lined baking sheets. Freeze for 2-4 hours until firm but not rock-hard. Transfer to separate airtight freezer bags or containers. -
Step 3
In a high-powered blender, add the frozen strawberries, 1/2 tbsp fresh lime juice, 1-2 tbsp granulated sugar (optional), and 1/4 cup cold water or coconut water. -
Step 4
Blend from a low to high setting, using your blender’s tamper to achieve a smooth, thick, soft-serve-like consistency. If needed, add the remaining 1/4 cup liquid gradually, 1 tbsp at a time. Taste and adjust sweetness or tartness with more sugar or lime juice. -
Step 5
Pour the strawberry slushie base into a separate bowl. If not immediately assembling, place it in the freezer for 10-15 minutes to maintain its icy texture, ensuring it remains scoopable. -
Step 6
Rinse your blender pitcher. Add the frozen pineapple pieces, the remaining 1/2 tbsp fresh lime juice, 1-2 tbsp granulated sugar (optional), and 1/4 cup cold water or coconut water. -
Step 7
Blend from a low to high setting, using the tamper, until incredibly smooth and thick. Add the remaining 1/4 cup liquid very gradually if the blender struggles. Taste and adjust sweetness. -
Step 8
Chill clear serving glasses beforehand for best results. Spoon alternating layers of the strawberry and pineapple slushie bases into each glass until almost full. -
Step 9
Gently insert a long spoon or straw into the glass and swirl once or twice around the edge to create beautiful ribbons of color without fully mixing. Garnish with fresh fruit or a mint sprig, and serve your Easy Pineapple Strawberry Swirled Slushies immediately with a wide straw.
Important Information
Nutrition Facts (Per Serving)
It is important to consider this information as approximate and not to use it as definitive health advice.
Allergy Information
Please check ingredients for potential allergens and consult a health professional if in doubt.

Leave a Comment