
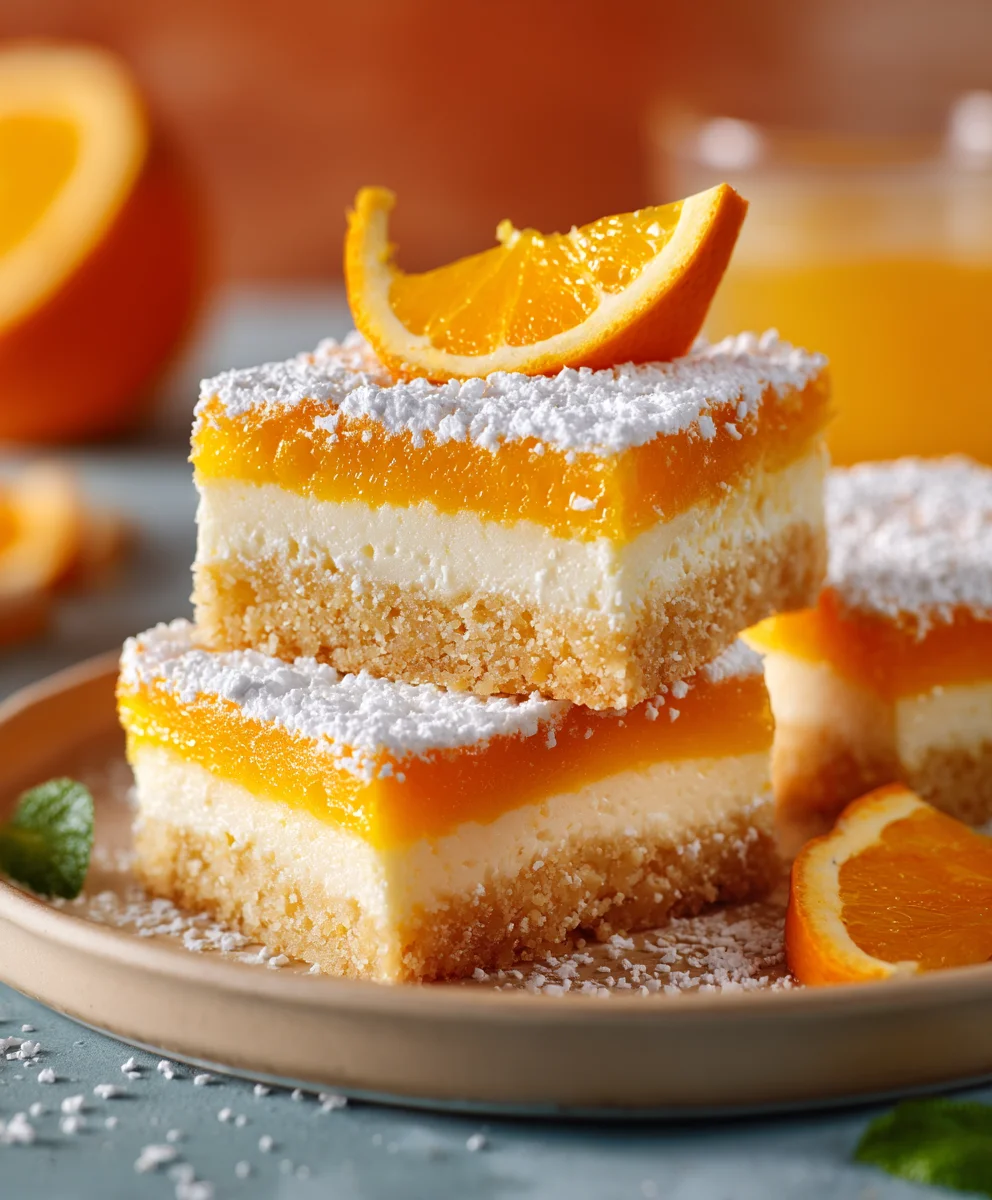
Orange Creamsicle Bars – just the name instantly conjures up vivid memories of sunny childhood afternoons and that quintessential, delightful treat that defined summer. There’s something truly magical about the classic creamsicle flavor; that perfect harmony between bright, tangy orange and smooth, sweet vanilla cream creates an irresistible sensation. It’s a nostalgic combination that has charmed generations, originally as a beloved frozen ice pop, and now brilliantly reimagined in this convenient, utterly irresistible bar form.
This recipe for Orange Creamsicle Bars captures all that beloved essence, transforming it into a bake-sale-ready, potluck-perfect dessert. Imagine a buttery shortbread crust topped with a silky, citrusy filling, reminiscent of your favorite frozen confection, but in a sliceable, shareable format. The vibrant flavor, the incredibly satisfying texture, and the refreshing finish make these bars a perennial favorite, promising a burst of sunshine and joy with every single bite. I am confident you will fall in love with these delightful bars, just as I have!

Ingredients:
For the Shortbread Crust:
- 1 ½ cups (180g) all-purpose flour: I always use unbleached for the best texture.
- ½ cup (100g) granulated sugar: Just enough for a touch of sweetness.
- ¼ teaspoon salt: Crucial for balancing the flavors and enhancing the butter.
- 1 cup (226g) unsalted butter: Make sure it’s nice and cold, cut into small cubes. This is key for a flaky, tender crust.
For the Orange Creamsicle Filling:
- 2 (8-ounce) packages (450g total) full-fat cream cheese: Softened to room temperature. This is absolutely non-negotiable for a smooth, lump-free filling!
- 1 cup (200g) granulated sugar: Provides the perfect sweetness against the tang of orange and cream cheese.
- 2 teaspoons pure vanilla extract: Don’t skimp here; good quality vanilla makes a huge difference.
- 2 tablespoons fresh orange zest: From about 2 medium oranges. This is where a lot of that vibrant orange flavor comes from, so don’t skip it!
- ½ cup fresh orange juice: From about 1-2 medium oranges. Freshly squeezed is always best for these Orange Creamsicle Bars.
- 1 ½ cups cold heavy cream (or heavy whipping cream): This is what gives the filling its incredibly light, airy, and creamy texture. Ensure it’s very cold!
For the Orange Glaze (Optional, but highly recommended!):
- 1 ½ cups (180g) powdered sugar (confectioners’ sugar): Sifted for a super smooth glaze.
- 2-3 tablespoons fresh orange juice: Start with 2 tablespoons and add more a tiny bit at a time until you reach your desired consistency.
- Pinch of orange zest (optional): For an extra burst of fragrance and visual appeal.
Equipment You’ll Need:
- 9×13-inch baking pan
- Parchment paper
- Electric mixer (stand mixer or hand mixer)
- Large mixing bowls (at least two)
- Zester/Microplane
- Citrus juicer
- Spatulas
- Whisk
- Measuring cups and spoons
- Wire rack
Let’s Make Our Delicious Orange Creamsicle Bars!
Phase 1: Crafting the Perfect Shortbread Crust
- Preheat and Prepare: First things first, let’s get our oven ready. Preheat your oven to 350°F (175°C). While that’s heating up, grab your 9×13-inch baking pan. I like to line mine with parchment paper, leaving an overhang on the longer sides. This little trick makes lifting the cooled bars out of the pan an absolute breeze, ensuring clean edges for your beautiful Orange Creamsicle Bars. You can lightly grease the pan first to help the parchment stick.
- Combine Dry Ingredients: In a large mixing bowl, combine the all-purpose flour, granulated sugar, and salt. Give them a quick whisk to ensure everything is evenly distributed. This dry mixture sets the stage for our tender, crumbly crust.
- Cut in the Cold Butter: Now, for the magic! Add your cold, cubed unsalted butter to the dry ingredients. Using a pastry blender, two knives, or even your fingertips (if you work quickly to avoid melting the butter), cut the butter into the flour mixture until it resembles coarse crumbs. You should see pieces ranging from pea-sized to small lentil-sized. The key here is to keep the butter cold; this creates little pockets of steam during baking, leading to that wonderful flaky texture we all adore in a good shortbread.
- Press into the Pan: Once your butter and flour are perfectly combined, transfer this crumbly mixture to your prepared 9×13-inch baking pan. Using the bottom of a measuring cup or your hands, firmly and evenly press the mixture into the bottom of the pan. Make sure it’s a compact, uniform layer all the way to the edges. A well-pressed crust is crucial for bars that hold together beautifully.
- Bake the Crust: Place the pan in your preheated oven and bake for 20-25 minutes, or until the edges are lightly golden brown and the center looks set. The aroma filling your kitchen will be heavenly! Once baked, remove the pan from the oven and place it on a wire rack to cool completely. It’s really important that this crust is fully cool before we add our filling, otherwise, it could melt and make things messy.
Phase 2: Whipping Up the Dreamy Orange Creamsicle Filling
- Prepare Orange Zest and Juice: Before we dive into mixing, let’s get our vibrant orange elements ready. Zest your oranges first – you’ll need 2 tablespoons of finely grated zest. Use a microplane or a fine grater, being careful to only get the bright orange part and avoid the bitter white pith underneath. Then, slice and juice the oranges to get ½ cup of fresh orange juice. Set these aside; the fresh citrus flavor is what really makes these Orange Creamsicle Bars sing!
- Cream the Cream Cheese: In a large mixing bowl, using your electric mixer (either a stand mixer with a paddle attachment or a hand mixer), beat the softened cream cheese on medium speed until it’s incredibly smooth and creamy. This should take about 2-3 minutes. Do not rush this step! Any lumps now will be lumps in your final filling, and we want silky smooth bars. Scrape down the sides of the bowl frequently to ensure everything gets incorporated.
- Add Sugar and Flavorings: With the mixer still on medium speed, gradually add the granulated sugar to the cream cheese, beating until it’s fully incorporated and the mixture is light and fluffy, another 2-3 minutes. Then, beat in the vanilla extract, fresh orange zest, and fresh orange juice until just combined. The mixture will be thick and wonderfully aromatic at this point. Give it a taste – it should be sweet, tangy, and bursting with orange flavor.
- Whip the Heavy Cream: In a separate, very clean, and preferably chilled mixing bowl, pour in your cold heavy cream. Using your electric mixer fitted with the whisk attachment, beat the heavy cream on high speed until stiff peaks form. This means when you lift the whisk, the cream stands up straight without drooping. This usually takes about 3-5 minutes, but keep a close eye on it, as it can go from perfect to over-whipped (and gritty) very quickly!
- Gently Fold for Airiness: Now for the delicate part! Add about one-third of the whipped cream to your cream cheese mixture. Gently fold it in with a spatula until just combined. Then, add the remaining whipped cream in two additions, continuing to fold gently until no streaks of white cream remain. The goal here is to maintain as much air as possible in the mixture, which is what gives these Orange Creamsicle Bars their signature light and airy texture. Overmixing at this stage will deflate the cream, making your filling less ethereal.
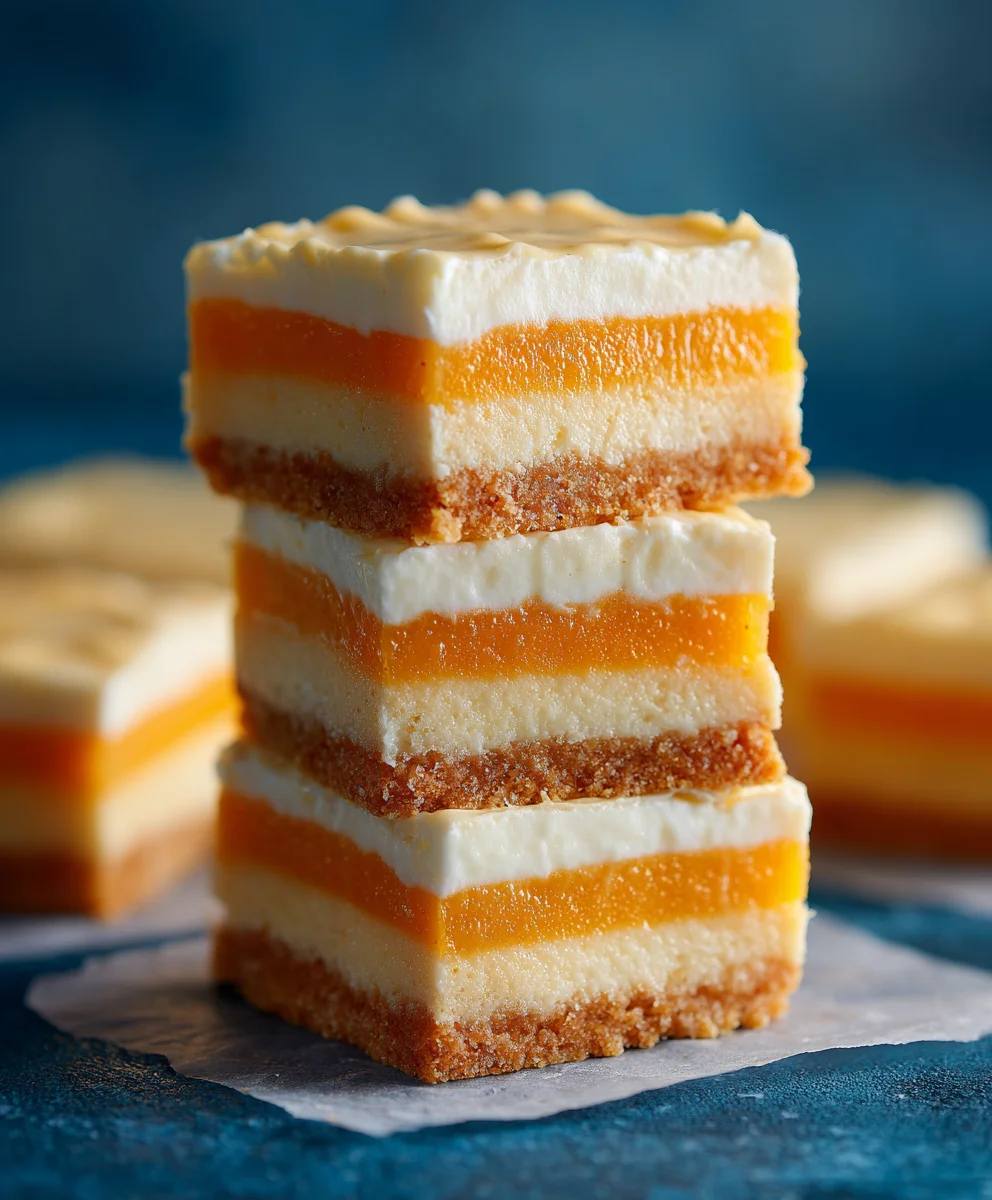
Phase 3: Assembling and Chilling Our Orange Creamsicle Bars
- Layer the Filling: Once your shortbread crust is completely cooled (and I mean completely – patience is a virtue here!), carefully spoon the orange creamsicle filling over the crust. Use an offset spatula or the back of a spoon to gently spread the filling into an even layer, reaching all the way to the edges of the pan. Take your time to make it smooth and uniform for beautiful slices later.
- Prepare for Chilling: Cover the pan loosely with plastic wrap. You don’t want the plastic wrap touching the filling directly if possible, as condensation can sometimes form.
- The All-Important Chill: This is arguably the most critical step for perfect Orange Creamsicle Bars. Place the covered pan in the refrigerator and chill for a minimum of 4-6 hours, or preferably overnight. This long chilling period allows the filling to firm up completely, making it easy to slice and ensuring those beautiful, clean layers. It also allows all the flavors to meld together wonderfully. Trust me, the wait is absolutely worth it for a perfectly set bar that won’t fall apart when you cut into it.
Phase 4: Drizzling the Optional, Zesty Orange Glaze
While the orange glaze is optional, I highly recommend it! It adds an extra layer of orange flavor, a touch more sweetness, and a lovely glossy finish that makes these Orange Creamsicle Bars look even more irresistible.
- Prepare the Glaze: Once your bars are thoroughly chilled, you can prepare the glaze. In a small mixing bowl, combine the sifted powdered sugar with 2 tablespoons of fresh orange juice. Whisk until smooth. The consistency should be thick but pourable. If it’s too thick, add more orange juice a quarter teaspoon at a time until you reach the desired consistency. If it’s too thin, add a tiny bit more sifted powdered sugar.
- Add Zest (Optional): If you like, stir in a tiny pinch of orange zest for an extra aromatic kick and a pretty speckled look.
- Drizzle and Set: Once you have your desired glaze consistency, you can either drizzle it over the entire pan of chilled bars using a spoon or a whisk, or if you prefer a neater look, you can transfer it to a small piping bag (or a zip-top bag with the corner snipped off) and pipe decorative lines. After drizzling, return the pan to the refrigerator for about 15-30 minutes to allow the glaze to set.
Phase 5: Serving and Storing Your Orange Creamsicle Bars
- Ready to Slice: After the bars have thoroughly chilled and the glaze (if used) has set, it’s time for the moment of truth! Lift the parchment paper overhang to carefully remove the entire slab of bars from the baking pan and transfer it to a cutting board.
- Cutting the Bars: For clean cuts, use a large, sharp knife. For the neatest slices, you can run your knife under hot water and wipe it clean between each cut. This will prevent the filling from sticking and dragging. Cut the slab into 12-16 equally sized bars, depending on how large you like your servings. I usually go for 4 rows by 3 or 4 rows by 4, creating lovely little squares or rectangles.
- Serving Suggestion: These Orange Creamsicle Bars are best served cold, straight from the refrigerator. Their refreshing, creamy texture is absolutely perfect on a warm day or as a delightful treat any time of year.
- Storage: Store any leftover Orange Creamsicle Bars in an airtight container in the refrigerator. They will keep beautifully for up to 5-7 days. The flavors often deepen and become even more delightful after a day or two in the fridge.
- Freezing (Optional): For longer storage, these bars can also be frozen! Place individual bars on a baking sheet and freeze until firm (about 1-2 hours). Then, transfer the frozen bars to a freezer-safe airtight container, separating layers with parchment paper to prevent sticking. They will keep well in the freezer for up to 1-2 months. Thaw them in the refrigerator for a few hours before serving for that perfect creamsicle texture. Enjoy your delightful homemade treats!
Conclusion:
So, there you have it, my friends! We’ve reached the delicious end of our journey through the creation of what I genuinely believe will become one of your new favorite treats. I’m not just saying this lightly; these Orange Creamsicle Bars are truly something special. They capture that quintessential taste of childhood summers, that perfectly balanced blend of sweet vanilla creaminess and bright, zesty orange, all nestled on a wonderfully buttery and crumbly crust. It’s a symphony of flavors and textures that simply sings with joy, promising to transport you back to simpler times with every single bite. I often find myself craving them on a warm afternoon, but honestly, they bring a ray of sunshine to even the gloomiest of days.
What makes this recipe a must-try isn’t just the nostalgic flavor, though that’s certainly a huge part of its appeal. It’s also the delightful simplicity of putting it all together, yielding an impressive dessert that looks and tastes far more complicated than it actually is. The vibrant orange hue, the smooth, velvety texture of the filling, and the satisfying crunch of the base combine to create an experience that’s both comforting and invigorating. I’ve made these for countless gatherings, and without fail, they are always the first dessert to disappear, sparking conversations about childhood memories and requests for the recipe. Trust me when I say, once you taste these, you’ll understand exactly why I’m so enthusiastic about them. They’re a true crowd-pleaser and an instant mood lifter.
Serving Suggestions for Your Orange Creamsicle Bars:
Now, let’s talk about how to best enjoy these incredible bars. While they are absolutely divine straight out of the fridge, served simply on their own, there are so many ways to elevate the experience. Imagine serving them slightly chilled on a hot summer’s day with a dollop of fresh, lightly sweetened whipped cream, perhaps garnished with a delicate orange segment or a few fresh mint leaves for an extra touch of elegance. For a more decadent treat, pair a bar with a scoop of vanilla bean ice cream – the contrast of temperatures and the doubling down on the creamy vanilla notes is pure bliss. They also make an exquisite accompaniment to an afternoon cup of Earl Grey tea or a robust black coffee, providing a lovely sweet counterpoint. For your next backyard BBQ or potluck, arrange them artfully on a platter; their bright color alone will be an instant attraction. And honestly, for a quiet evening at home, sometimes the best way to enjoy them is curled up on the sofa with a good book and a single, perfect bar.
Creative Variations to Make Them Your Own:
One of the joys of baking is the freedom to experiment and personalize, and this recipe offers a fantastic canvas for your culinary creativity. If you’re feeling adventurous, consider swapping out the orange for another citrus. Lemon Creamsicle Bars, anyone? Or perhaps a tangy lime version for a truly tropical twist. You could even do a blend of orange and lemon zest in the filling for an extra layer of complexity. For a richer, more intense orange flavor, try adding a few drops of food-grade orange oil in addition to the zest and juice. To add another dimension of texture, a light sprinkle of toasted coconut flakes over the top before chilling, or even mixed into the crust, would be absolutely divine. If you want to play with the base, a vanilla wafer crust or even an almond flour crust for a gluten-free option would work wonderfully. For those who want to make them dairy-free, simply substitute the cream cheese and condensed milk with their plant-based counterparts; there are many excellent options available now that maintain the creamy texture beautifully. Imagine a swirl of raspberry or strawberry jam lightly rippled through the top of the filling before chilling – the vibrant color and extra fruitiness would be a delightful surprise. Don’t be afraid to experiment; that’s where some of the most exciting kitchen discoveries happen!
I genuinely hope this recipe brings as much joy to your kitchen and your taste buds as it has to mine. There’s something so satisfying about creating a dessert that truly makes people smile, and these Orange Creamsicle Bars do exactly that. They embody everything wonderful about homemade treats: love, flavor, and a touch of nostalgic magic.
Your Turn! Dive In and Share Your Experience!
Now it’s your turn to experience the magic! I truly encourage you to set aside some time, gather your ingredients, and whip up a batch of these glorious bars. You won’t regret it, I promise. There’s a special kind of satisfaction that comes from baking something so delicious from scratch, and I’m so excited for you to feel that too. Once you’ve made them, I would absolutely love to hear about your experience. Did you stick to the original recipe, or did you venture into one of the variations? What was your favorite part? Did they bring back any special memories for you?
Please, don’t keep your culinary triumphs to yourself! Come back and leave a comment below to share your thoughts, your successes, and even your creative tweaks. If you share photos on social media, be sure to tag me so I can see your beautiful creations! Your feedback and shared experiences are what truly make this community vibrant and inspiring. Thank you for joining me on this delicious adventure, and happy baking! I can’t wait to hear all about your delightful Orange Creamsicle Bars.
Easy Orange Creamsicle Bars
These Easy Orange Creamsicle Bars capture the nostalgic flavor of the classic frozen treat in a delicious, sliceable dessert. Featuring a buttery shortbread crust topped with a silky, citrusy orange and vanilla cream filling, these bars are a refreshing delight perfect for any occasion.
Ingredients
-
1 ½ cups (180g) all-purpose flour
-
½ cup (100g) granulated sugar
-
¼ teaspoon salt
-
1 cup (226g) unsalted butter, cold, cubed
-
2 (8-ounce) packages (450g total) full-fat cream cheese, softened
-
1 cup (200g) granulated sugar
-
2 teaspoons pure vanilla extract
-
2 tablespoons fresh orange zest
-
½ cup fresh orange juice
-
1 ½ cups cold heavy cream (or heavy whipping cream)
-
1 ½ cups (180g) powdered sugar, sifted
-
2-3 tablespoons fresh orange juice
-
Pinch of orange zest (optional)
Instructions
-
Step 1
Preheat oven to 350°F (175°C). Line a 9×13-inch pan with parchment paper. In a large bowl, whisk flour, sugar, and salt. Cut in cold, cubed butter until coarse crumbs form. Press firmly into the prepared pan. Bake 20-25 minutes until lightly golden. Cool completely on a wire rack. -
Step 2
Zest oranges for 2 tablespoons zest; juice for ½ cup fresh orange juice. In a large bowl, beat softened cream cheese with an electric mixer until smooth (2-3 min). Gradually add 1 cup sugar, beat until fluffy (2-3 min). Beat in vanilla, orange zest, and orange juice. In a separate chilled bowl, beat cold heavy cream until stiff peaks form (3-5 min). Gently fold whipped cream into the cream cheese mixture in three additions until just combined. -
Step 3
Spread orange creamsicle filling evenly over the completely cooled crust. Cover loosely with plastic wrap. Refrigerate for a minimum of 4-6 hours, or preferably overnight, until firm. -
Step 4
Once bars are chilled, prepare glaze: whisk 1 ½ cups sifted powdered sugar with 2-3 tablespoons fresh orange juice until smooth. Add pinch of orange zest, if desired. Drizzle glaze over chilled bars. Return to refrigerator for 15-30 minutes to set. -
Step 5
Lift bars from pan using parchment overhang; transfer to a cutting board. Using a sharp knife, slice into 12-16 bars. Serve cold. Store leftovers in an airtight container in the refrigerator for 5-7 days. Bars can be frozen for 1-2 months; thaw in refrigerator before serving.
Important Information
Nutrition Facts (Per Serving)
It is important to consider this information as approximate and not to use it as definitive health advice.
Allergy Information
Please check ingredients for potential allergens and consult a health professional if in doubt.

Leave a Comment