
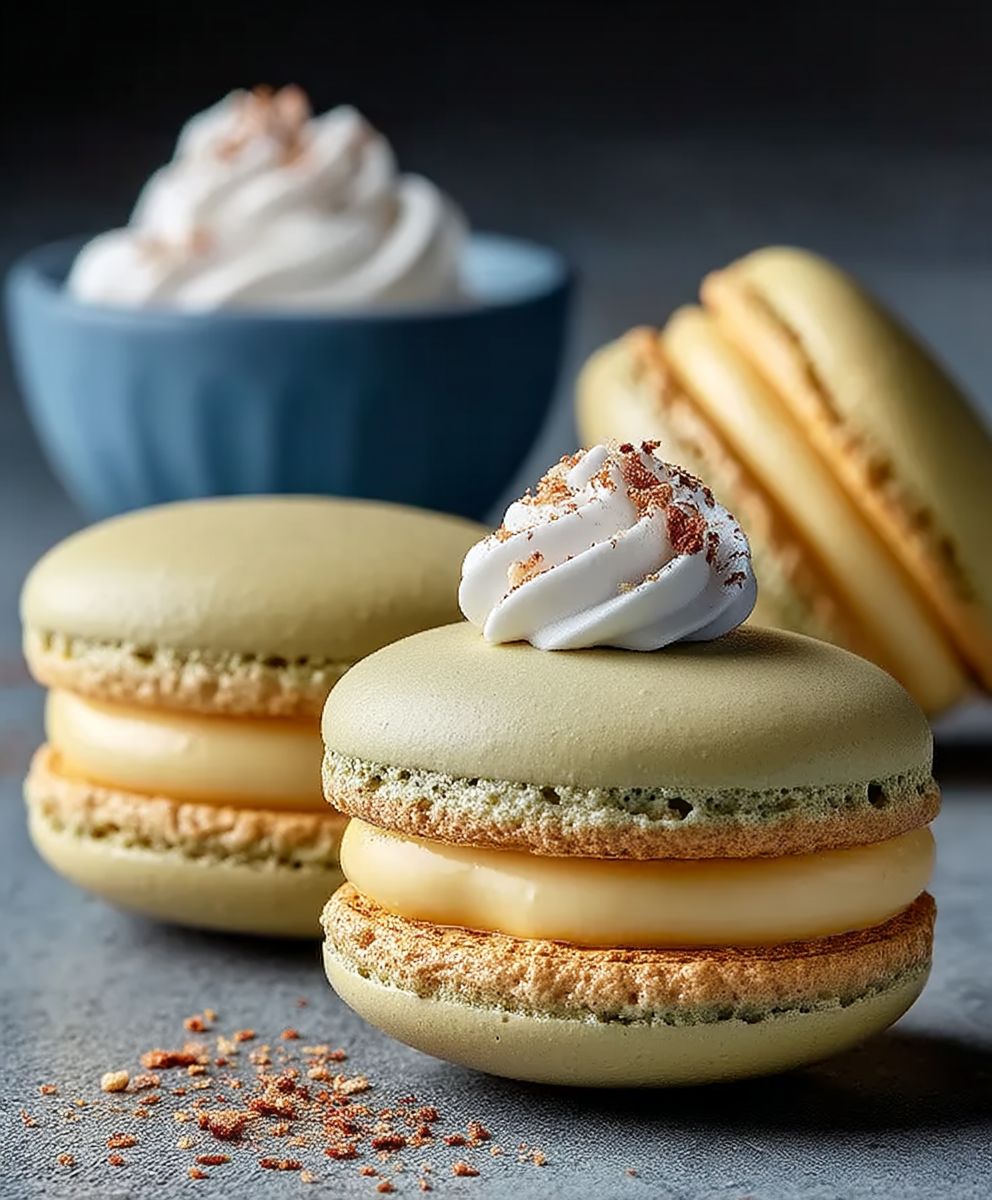
Easy Macaroons: Prepare to be amazed by these delightful little cookies that require minimal effort but deliver maximum flavor! Have you ever craved a sweet treat that’s both elegant and incredibly simple to make? Look no further. These easy macaroons are the answer to your dessert prayers, offering a chewy, coconutty goodness that will have everyone reaching for seconds (and thirds!).
Macaroons have a rich history, with variations found across different cultures. While often confused with the French macarons (those colorful meringue-based sandwich cookies), macaroons are typically made with shredded coconut, sugar, and egg whites. Some believe they originated in Italy, brought to France during the Renaissance. Regardless of their exact origin, they’ve become a beloved treat worldwide.
What makes these cookies so irresistible? It’s the perfect combination of textures a slightly crisp exterior giving way to a soft, chewy interior. The sweet, tropical flavor of coconut shines through, making them a delightful treat any time of year. Plus, they’re naturally gluten-free, making them a great option for those with dietary restrictions. And did I mention how easy they are to make? With just a few simple ingredients and minimal baking time, you can whip up a batch of these delectable cookies in no time. Let’s get baking!

Ingredients:
- 3 large egg whites, aged (see notes below)
- ¾ cup (150g) granulated sugar
- ¼ teaspoon cream of tartar
- 2 cups (200g) almond flour, finely ground
- 1 cup (100g) powdered sugar
- ½ teaspoon almond extract (optional, but recommended)
- Pinch of salt
- Optional: Food coloring (gel or powder preferred)
A Note on Egg Whites: Aging egg whites is crucial for achieving that perfect macaroon texture. Separate your egg whites a day or two in advance and store them, covered, in the refrigerator. This allows some of the moisture to evaporate, resulting in a more stable meringue. You can also use pasteurized egg whites from a carton, but aging them is still recommended if you have the time.
Preparing the Meringue:
This is where the magic begins! A stable meringue is the foundation of a great macaroon. Don’t rush this step.
- Whip the Egg Whites: In a clean, grease-free bowl (stainless steel or glass is best), beat the aged egg whites with an electric mixer on medium speed until soft peaks form. Soft peaks mean the peaks curl over when you lift the beaters.
- Add Cream of Tartar: Sprinkle in the cream of tartar. This helps stabilize the egg whites and prevents them from collapsing. Continue beating on medium speed.
- Gradually Add Sugar: Slowly add the granulated sugar, about a tablespoon at a time, while continuing to beat on medium-high speed. This gradual addition is key to dissolving the sugar properly and creating a glossy, stable meringue.
- Beat to Stiff, Glossy Peaks: Continue beating until the meringue forms stiff, glossy peaks. Stiff peaks mean the peaks stand straight up when you lift the beaters. The meringue should be smooth and shiny, not grainy. This can take anywhere from 5-10 minutes, depending on your mixer. Don’t overbeat! Overbeating can dry out the meringue.
Macaronage: Combining the Dry and Wet Ingredients
Macaronage is the French term for the process of folding the dry ingredients into the meringue. This is arguably the most important step in making macaroons, as it determines the final texture. The goal is to deflate the meringue slightly, creating a batter that is smooth, flowing, and has a lava-like consistency. This is where many people struggle, so pay close attention!
- Sift the Dry Ingredients: In a separate bowl, sift together the almond flour, powdered sugar, and salt. Sifting removes any lumps and ensures a smooth batter.
- Add Dry Ingredients to Meringue: Add the sifted dry ingredients to the meringue in two or three additions.
- First Fold: Using a flexible spatula, gently fold the dry ingredients into the meringue. Start by cutting down through the center of the mixture, then scraping up the sides of the bowl and folding the batter over itself. Rotate the bowl as you fold.
- The Macaronage: This is where the “deflating” happens. Continue folding the batter, scraping the sides and bottom of the bowl to ensure everything is incorporated. The batter will start to lose some of its volume and become smoother. This is not just mixing! You are intentionally deflating the meringue to achieve the right consistency.
- Test the Consistency: The batter is ready when it flows slowly and smoothly off your spatula in a thick ribbon. When the ribbon falls back into the bowl, it should slowly disappear back into the batter within 20-30 seconds. This is often described as a “lava-like” consistency. Another test is to draw a figure eight with the spatula in the batter. If the figure eight remains visible for a few seconds before disappearing, the batter is ready.
- Don’t Overmix! Overmixing will result in a thin, runny batter that will spread too much during baking and produce flat, cracked macaroons. Undermixing will result in a lumpy batter that will produce macaroons with pointy tops.
- Add Almond Extract and Food Coloring (Optional): If using almond extract and/or food coloring, add them now and gently fold them into the batter until evenly distributed. Be careful not to overmix. If you want to make different colored macaroons, divide the batter into separate bowls and add the food coloring to each bowl individually.
Piping and Resting:
Getting the macaroons onto the baking sheet is another important step. Consistent size and shape are key for even baking.
- Prepare Piping Bag: Fit a piping bag with a round tip (about ½ inch in diameter).
- Fill Piping Bag: Fill the piping bag with the macaroon batter. Twist the top of the bag to prevent the batter from leaking out.
- Pipe the Macaroons: Line a baking sheet with parchment paper or a silicone baking mat. Pipe the macaroon batter onto the prepared baking sheet in even circles, about 1 ½ inches in diameter, leaving about 1 inch of space between each macaroon.
- Tap the Baking Sheet: After piping, firmly tap the baking sheet several times on the counter. This helps to release any air bubbles in the batter and create a smooth surface.
- Resting Time: This is a crucial step! Let the piped macaroons rest at room temperature for 30-60 minutes, or until a skin forms on the surface. You should be able to gently touch the surface of the macaroon without any batter sticking to your finger. This skin is what helps the macaroons develop their signature “feet” during baking. The resting time will vary depending on the humidity in your kitchen.
Baking:
Baking macaroons can be tricky, as oven temperatures can vary. It may take a few tries to find the perfect temperature and baking time for your oven.
- Preheat Oven: Preheat your oven to 300°F (150°C). It’s important to use an oven thermometer to ensure your oven is accurate.
- Bake the Macaroons: Bake the macaroons for 12-18 minutes, or until the “feet” have formed and the macaroons are set. The feet are the ruffled edges that form at the base of the macaroons.
- Check for Doneness: To check for doneness, gently try to lift a macaroon from the baking sheet. If it sticks, it needs to bake for a few more minutes. If it comes off easily, it’s done.
- Cool Completely: Let the macaroons cool completely on the baking sheet before removing them. This can take 30 minutes to an hour.
Assembling (Optional):
Macaroons are delicious on their own, but they’re even better with a filling! Here are a few ideas:
- Chocolate Ganache: A classic choice! Simply melt equal parts chocolate and heavy cream, then let it cool and thicken before piping it onto the macaroons.
- Buttercream: A versatile filling that can be flavored with anything from vanilla to fruit purees.
- Jam or Jelly: A simple and delicious option.
- Salted Caramel: A sweet and salty treat that pairs perfectly with the almond flavor of the macaroons.
- Prepare Filling: Make your desired filling.
- Pair Macaroon Shells: Match up macaroon shells that are similar in size and shape.
- Pipe Filling: Pipe a small amount of filling onto the flat side of one macaroon shell.
- Sandwich Together: Gently sandwich the filling with the flat side of another macaroon shell.
- Refrigerate (Optional): Refrigerate the assembled macaroons for at least 30 minutes to allow the filling to set. This also helps to soften the macaroons slightly.
Storage:
Macaroons are best stored in an airtight container in the refrigerator. They will keep for up to a week. You can also freeze them for longer storage. Let them thaw completely before serving.
Troubleshooting:
- Cracked Macaroons: This is usually caused by too much air in the batter, not resting the macaroons long enough, or baking at too high of a temperature.
- Flat Macaroons: This is usually caused by overmixing the batter or using too much liquid in the recipe.
- No Feet: This is usually
Conclusion:
And there you have it! Our easy macaroons recipe is truly a game-changer. I know, I know, macaroons can seem intimidating, conjuring images of fussy French pastry chefs and complicated techniques. But trust me, this recipe throws all that out the window. It’s ridiculously simple, uses ingredients you probably already have in your pantry, and delivers unbelievably delicious results every single time.
Why is this a must-try? Because it’s the perfect combination of ease and elegance. You get that chewy, coconutty goodness that everyone loves, without spending hours in the kitchen. It’s the ideal treat for a quick dessert craving, a last-minute party, or even a thoughtful homemade gift. Plus, the satisfaction of making something so impressive with so little effort is just unbeatable.
But the best part? This recipe is incredibly versatile! Feel free to experiment and make it your own. For a richer flavor, try using toasted coconut flakes. To add a touch of chocolate, dip the cooled macaroons in melted dark chocolate or drizzle them with white chocolate. A sprinkle of sea salt on top adds a delightful salty-sweet contrast. You could even incorporate different extracts, like almond or vanilla, to create unique flavor profiles. Imagine a batch of almond macaroons dipped in dark chocolate pure bliss!
Serving suggestions are endless. These easy macaroons are fantastic on their own, of course, but they also pair beautifully with a scoop of vanilla ice cream, a cup of coffee or tea, or even a glass of dessert wine. They’re a delightful addition to any dessert platter and make a charming edible gift when packaged in a pretty box or tin. For a festive touch, add a few drops of food coloring to the batter to create colorful macaroons for holidays or special occasions. Think pastel shades for Easter, red and green for Christmas, or even your favorite team’s colors for game day!
I truly believe that everyone should have this recipe in their repertoire. It’s a guaranteed crowd-pleaser, a time-saver, and a delicious way to impress your friends and family. So, what are you waiting for? Gather your ingredients, preheat your oven, and get ready to experience the joy of homemade macaroons without the fuss.
I’m so excited for you to try this recipe! And I really want to hear about your experience. Did you try any variations? Did you add any special ingredients? What did your friends and family think? Please, please, please come back and leave a comment below to share your thoughts and photos. Your feedback is invaluable, and it helps other readers discover the magic of these easy macaroons. Happy baking! I can’t wait to hear all about your macaroon adventures! Don’t forget to rate the recipe too!
Easy Macaroons: The Simplest Recipe You'll Ever Find
Delicate, colorful French macarons with a smooth shell and signature "feet." This recipe guides you through each step, from meringue to macaronage, for perfect results.
Ingredients
- 3 large egg whites, aged (see notes)
- ¾ cup (150g) granulated sugar
- ¼ teaspoon cream of tartar
- 2 cups (200g) almond flour, finely ground
- 1 cup (100g) powdered sugar
- ½ teaspoon almond extract (optional, but recommended)
- Pinch of salt
- Optional: Food coloring (gel or powder preferred)
Instructions
- In a clean, grease-free bowl (stainless steel or glass is best), beat the aged egg whites with an electric mixer on medium speed until soft peaks form. Soft peaks mean the peaks curl over when you lift the beaters.
- Sprinkle in the cream of tartar. This helps stabilize the egg whites and prevents them from collapsing. Continue beating on medium speed.
- Slowly add the granulated sugar, about a tablespoon at a time, while continuing to beat on medium-high speed. This gradual addition is key to dissolving the sugar properly and creating a glossy, stable meringue.
- Continue beating until the meringue forms stiff, glossy peaks. Stiff peaks mean the peaks stand straight up when you lift the beaters. The meringue should be smooth and shiny, not grainy. This can take anywhere from 5-10 minutes, depending on your mixer. Don’t overbeat! Overbeating can dry out the meringue.
- In a separate bowl, sift together the almond flour, powdered sugar, and salt. Sifting removes any lumps and ensures a smooth batter.
- Add the sifted dry ingredients to the meringue in two or three additions.
- Using a flexible spatula, gently fold the dry ingredients into the meringue. Start by cutting down through the center of the mixture, then scraping up the sides of the bowl and folding the batter over itself. Rotate the bowl as you fold.
- Continue folding the batter, scraping the sides and bottom of the bowl to ensure everything is incorporated. The batter will start to lose some of its volume and become smoother. This is not just mixing! You are intentionally deflating the meringue to achieve the right consistency.
- The batter is ready when it flows slowly and smoothly off your spatula in a thick ribbon. When the ribbon falls back into the bowl, it should slowly disappear back into the batter within 20-30 seconds. This is often described as a “lava-like” consistency. Another test is to draw a figure eight with the spatula in the batter. If the figure eight remains visible for a few seconds before disappearing, the batter is ready.
- Don’t Overmix! Overmixing will result in a thin, runny batter that will spread too much during baking and produce flat, cracked macaroons. Undermixing will result in a lumpy batter that will produce macaroons with pointy tops.
- If using almond extract and/or food coloring, add them now and gently fold them into the batter until evenly distributed. Be careful not to overmix. If you want to make different colored macaroons, divide the batter into separate bowls and add the food coloring to each bowl individually.
- Fit a piping bag with a round tip (about ½ inch in diameter).
- Fill the piping bag with the macaroon batter. Twist the top of the bag to prevent the batter from leaking out.
- Line a baking sheet with parchment paper or a silicone baking mat. Pipe the macaroon batter onto the prepared baking sheet in even circles, about 1 ½ inches in diameter, leaving about 1 inch of space between each macaroon.
- After piping, firmly tap the baking sheet several times on the counter. This helps to release any air bubbles in the batter and create a smooth surface.
- This is a crucial step! Let the piped macaroons rest at room temperature for 30-60 minutes, or until a skin forms on the surface. You should be able to gently touch the surface of the macaroon without any batter sticking to your finger. This skin is what helps the macaroons develop their signature “feet” during baking. The resting time will vary depending on the humidity in your kitchen.
- Preheat your oven to 300°F (150°C). It’s important to use an oven thermometer to ensure your oven is accurate.
- Bake the macaroons for 12-18 minutes, or until the “feet” have formed and the macaroons are set. The feet are the ruffled edges that form at the base of the macaroons.
- To check for doneness, gently try to lift a macaroon from the baking sheet. If it sticks, it needs to bake for a few more minutes. If it comes off easily, it’s done.
- Let the macaroons cool completely on the baking sheet before removing them. This can take 30 minutes to an hour.
- Make your desired filling.
- Match up macaroon shells that are similar in size and shape.
- Pipe a small amount of filling onto the flat side of one macaroon shell.
- Gently sandwich the filling with the flat side of another macaroon shell.
- Refrigerate the assembled macaroons for at least 30 minutes to allow the filling to set. This also helps to soften the macaroons slightly.
Notes
- Aging egg whites is crucial for achieving that perfect macaroon texture. Separate your egg whites a day or two in advance and store them, covered, in the refrigerator. This allows some of the moisture to evaporate, resulting in a more stable meringue. You can also use pasteurized egg whites from a carton, but aging them is still recommended if you have the time.
- Baking macaroons can be tricky, as oven temperatures can vary. It may take a few tries to find the perfect temperature and baking time for your oven.
- Cracked Macaroons: This is usually caused by too much air in the batter, not resting the macaroons long enough, or baking at too high of a temperature.
- Flat Macaroons: This is usually caused by overmixing the batter or using too much liquid in the recipe.
- No Feet: This is usually
Leave a Comment