
Fried Ravioli – a phrase that might sound unusual to some, but to those in the know, it immediately conjures images of golden, crispy perfection. Have you ever wondered how an Italian pasta staple transformed into such a beloved, crunchy appetizer?
I certainly have, and the story is as delightful as the dish itself! This iconic treat, often associated with the vibrant culinary scene of St. Louis, Missouri, took a simple concept – pasta filled with savory goodness – and elevated it by giving it a deep-fried, irresistible twist. It’s a testament to innovation in the kitchen, proving that sometimes, the best dishes come from unexpected experiments. Today, it’s a staple on menus far beyond its humble origins, captivating palates with its unique charm.
Why We Can’t Get Enough of Fried Ravioli
People absolutely adore this dish for countless reasons. Imagine biting into a perfectly golden, crispy shell that gives way to a warm, tender pocket of seasoned cheese or meat. The contrast in textures is simply divine! Paired with your favorite marinara sauce for dipping, it becomes an explosion of flavors that satisfies both your savory and comfort food cravings. Whether you’re looking for an impressive appetizer for a gathering, a fun snack for game night, or just a delicious way to enjoy ravioli in a whole new light, Fried Ravioli is an undeniable crowd-pleaser that I believe everyone should try at least once. It’s surprisingly easy to make at home, bringing that restaurant-quality magic right to your kitchen.

<h2>Ingredients:</h2>
<ul>
<li><strong>For the Ravioli:</strong></li>
<ul>
<li>Two (2) 9-ounce packages (or one large 25-ounce package) fresh or frozen cheese ravioli (spinach and cheese or mushroom ravioli also work wonderfully!)</li>
</ul>
<li><strong>For the Breading Station:</strong></li>
<ul>
<li>½ cup all-purpose flour</li>
<li>2 large eggs, lightly beaten with 1 tablespoon water or milk</li>
<li>2 cups Panko breadcrumbs (I find these give the best crispness for <strong>Fried Ravioli</strong>)</li>
<li>½ cup finely grated Parmesan cheese, plus extra for garnish</li>
<li>1 tablespoon dried Italian seasoning</li>
<li>1 teaspoon garlic powder</li>
<li>½ teaspoon onion powder</li>
<li>½ teaspoon salt (or to taste)</li>
<li>¼ teaspoon black pepper (freshly ground is always best)</li>
<li>¼ teaspoon red pepper flakes (optional, for a little kick!)</li>
</ul>
<li><strong>For Frying:</strong></li>
<ul>
<li>4-6 cups vegetable oil, canola oil, or other neutral high smoke point oil, for deep frying</li>
</ul>
<li><strong>For Serving:</strong></li>
<ul>
<li>Warm marinara sauce, for dipping</li>
<li>Fresh parsley, chopped, for garnish (optional)</li>
</ul>
</ul>
<h3>Preparing Your Ravioli for Frying</h3>
<ol>
<li>
<h4>Thawing and Separating the Ravioli:</h4>
First things first, if you’re using frozen ravioli, you’ll need to gently thaw them. I find the best way to do this is to spread them out in a single layer on a baking sheet lined with parchment paper and let them sit at room temperature for about 15-20 minutes, or until they’re no longer hard but still quite firm. If they’re fresh, you can skip this thawing step. The key here is to ensure the ravioli are slightly firm but pliable. This prevents them from breaking apart during the breading process and also ensures they cook evenly when they hit the hot oil. If they are too soft, they risk tearing; if too frozen, the breading won’t adhere properly, and they might cook unevenly internally. You want them just right, ready to become perfectly golden <strong>Fried Ravioli</strong>.
</li>
<li>
<h4>Setting Up Your Breading Station:</h4>
This is where the magic really begins for achieving that irresistible crunch. You’ll want to set up three shallow dishes or pie plates in an assembly line fashion. Think of it like a production line for your future <strong>Fried Ravioli</strong>!
<ul>
<li>
<strong>Dish 1 (Flour):</strong> Pour your ½ cup of all-purpose flour into the first dish. This initial dusting helps create a tacky surface for the egg wash to cling to, which is crucial for a good breading.
</li>
<li>
<strong>Dish 2 (Egg Wash):</strong> In the second dish, whisk together the 2 large eggs with 1 tablespoon of water or milk until well combined and slightly frothy. The egg wash acts as the “glue” for your breadcrumbs, so make sure it’s consistent.
</li>
<li>
<strong>Dish 3 (Seasoned Breadcrumbs):</strong> This is the flavor powerhouse! In your third dish, combine the 2 cups of Panko breadcrumbs, ½ cup of finely grated Parmesan cheese, 1 tablespoon of Italian seasoning, 1 teaspoon of garlic powder, ½ teaspoon of onion powder, ½ teaspoon of salt, ¼ teaspoon of black pepper, and the optional ¼ teaspoon of red pepper flakes. Mix these ingredients thoroughly with a fork or your hands until everything is evenly distributed. You want every ravioli to get a full, flavorful coating. <strong>This seasoned Panko is what will give your <strong>Fried Ravioli</strong> its signature golden, crispy exterior and incredible taste.</strong>
</li>
</ul>
</li>
<li>
<h4>Breading Each Ravioli with Care:</h4>
Now for the hands-on part! Take one thawed ravioli at a time and follow these steps meticulously to ensure maximum crispiness and flavor:
<ul>
<li><strong>Flour First:</strong> Gently dredge the ravioli in the flour, making sure it’s lightly coated on all sides. Give it a gentle tap to shake off any excess flour.</li>
<li><strong>Egg Wash Next:</strong> Dip the floured ravioli into the egg wash, turning to coat completely. Lift it out and let any excess egg drip off for a couple of seconds. You don’t want it overly saturated, just a nice, even layer.</li>
<li><strong>Breadcrumbs Last (and Most Importantly!):</strong> Immediately transfer the egg-washed ravioli into the seasoned Panko breadcrumbs. Press down gently but firmly on both sides to ensure the breadcrumbs adhere well. You want a thick, even coating all over. <strong>This generous coating is key to the satisfying crunch of perfect <strong>Fried Ravioli</strong>.</strong></li>
</ul>
As you bread each ravioli, place it on a clean baking sheet lined with parchment paper. <h5>Pro Tip: Chilling for Superior Crispness</h5> Once all your ravioli are breaded, I highly recommend placing the entire baking sheet in the refrigerator for at least 30 minutes, or even up to an hour. This chilling step helps the breading set and adhere even better to the ravioli, which in turn prevents it from falling off during frying and ensures an extra-crispy exterior. This seemingly small step makes a huge difference in the final texture of your <strong>Fried Ravioli</strong>!
</li>
</ol>
<h3>The Frying Process: Achieving Golden Perfection</h3>
<ol start=”4″>
<li>
<h4>Heating the Frying Oil:</h4>
In a large, heavy-bottomed pot, Dutch oven, or deep fryer, pour enough vegetable, canola, or other neutral high smoke point oil to come up about 2-3 inches. You want the ravioli to be fully submerged or nearly so for even cooking. Place the pot over medium-high heat. <strong>The ideal temperature for frying <strong>Fried Ravioli</strong> is between 350°F and 375°F (175°C – 190°C).</strong> I strongly suggest using a deep-fry thermometer to monitor the oil temperature accurately. If the oil is too cool, the ravioli will absorb too much oil and become greasy; if it’s too hot, the breading will burn before the ravioli inside is properly cooked. If you don’t have a thermometer, you can test the oil by dropping a tiny pinch of breadcrumbs into it. If they sizzle immediately and float to the top, your oil is ready.
</li>
<li>
<h4>Frying in Batches:</h4>
Once your oil is at the correct temperature, carefully lower a few of the breaded ravioli into the hot oil using a slotted spoon or spider. <strong>It’s crucial not to overcrowd the pot.</strong> Frying too many at once will drop the oil temperature significantly, leading to soggy and greasy <strong>Fried Ravioli</strong>. Fry only 4-6 ravioli at a time, depending on the size of your pot. This allows the oil to maintain its heat and ensures even browning.
</li>
<li>
<h4>Cooking to Golden Brown:</h4>
Fry the ravioli for about 2-3 minutes, turning them once or twice with your slotted spoon, until they are beautifully golden brown and crispy on all sides. You’ll notice the breading becoming perfectly crunchy and the aroma filling your kitchen – that’s when you know you’re on the right track! The cheese inside will also start to warm and melt, making for a delicious gooey center.
</li>
<li>
<h4>Draining the Excess Oil:</h4>
Once the <strong>Fried Ravioli</strong> reach that perfect golden hue, carefully remove them from the oil using your slotted spoon or spider. Transfer them immediately to a plate lined with several layers of paper towels. This step is essential for absorbing any excess oil, ensuring your ravioli are crispy, not greasy. <h5>Keeping Them Warm</h5> If you’re frying multiple batches, you can keep the cooked ravioli warm and crisp by placing them on a wire rack set over a baking sheet in an oven preheated to a low temperature, around 200°F (90°C). This prevents them from steaming and losing their crunch while you finish frying the rest. Continue frying the remaining ravioli in batches, ensuring the oil temperature stays consistent between batches.
</li>
</ol>
<h3>Serving Your Delicious Fried Ravioli</h3>
<ol start=”8″>
<li>
<h4>The Grand Finale: Garnish and Dip!</h4>
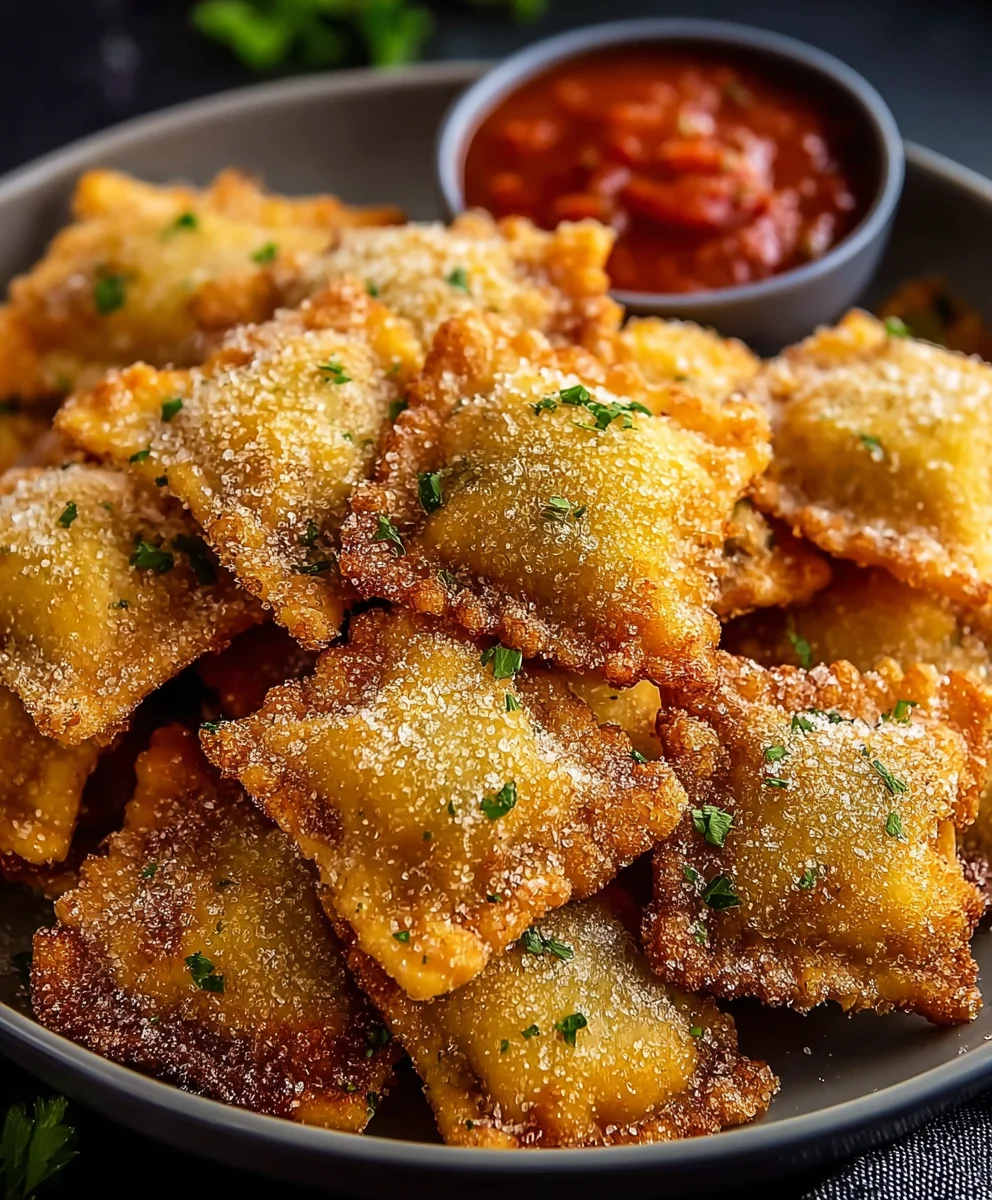
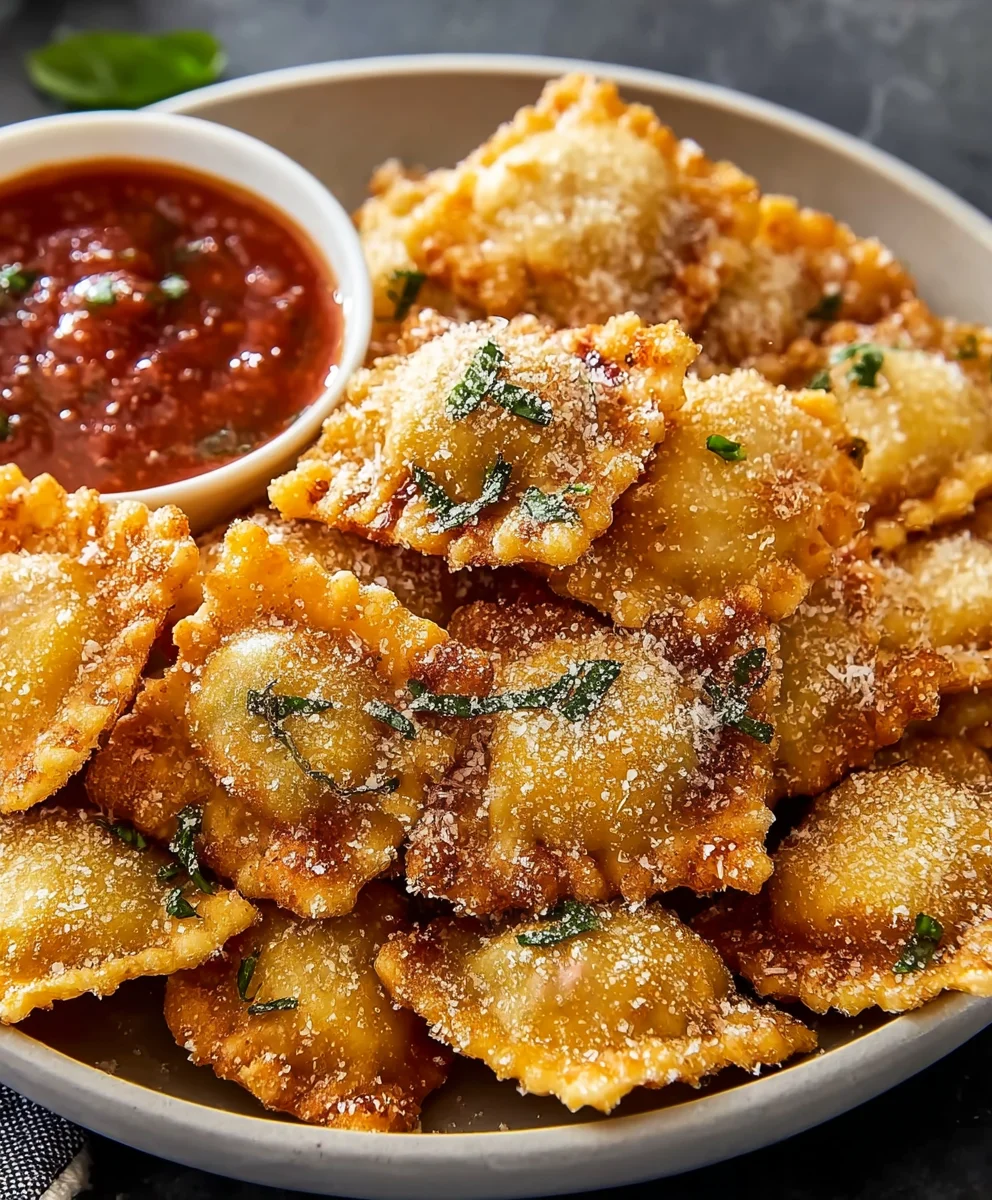
As soon as your final batch of <strong>Fried Ravioli</strong> is drained and ready, it’s time to serve them immediately. They are truly best enjoyed hot and fresh out of the fryer.
<ul>
<li><strong>Garnish:</strong> Arrange the crispy ravioli on a serving platter. For an extra touch of flavor and visual appeal, sprinkle them generously with a little extra finely grated Parmesan cheese and some freshly chopped parsley, if desired. The parsley adds a nice pop of color and freshness that complements the richness of the fried cheese.</li>
<li><strong>Dipping Sauce:</strong> Serve your <strong>Fried Ravioli</strong> with a bowl of warm marinara sauce for dipping. The tangy sweetness of the marinara perfectly cuts through the richness of the fried cheese, creating a harmonious balance of flavors. While marinara is the classic choice, don’t be afraid to experiment! A creamy pesto sauce, a vibrant roasted red pepper dip, or even a garlic aioli can also be absolutely delicious accompaniments. Sometimes, I even enjoy them with a simple drizzle of balsamic glaze for an elevated touch. <strong>Regardless of your choice, the dipping sauce is a crucial element that elevates these crispy <strong>Fried Ravioli</strong> from a simple snack to an irresistible appetizer.</strong></li>
</ul>
These <strong>Fried Ravioli</strong> make a fantastic appetizer for parties, a fun snack for game nights, or even a delightful side dish. They are always a crowd-pleaser and disappear quickly, so be prepared to make a second batch! Enjoy the delightful crunch and savory goodness of your homemade creation! <h5>Leftovers (If Any!)</h5> While best eaten fresh, any leftover <strong>Fried Ravioli</strong> can be stored in an airtight container in the refrigerator for up to 2-3 days. Reheat them in an air fryer or in an oven at 350°F (175°C) for about 5-7 minutes to regain some of their crispness, rather than using a microwave which tends to make them soft.
</li>
</ol>
Conclusion:
And there you have it, my friends! We’ve journeyed through the simple steps to create a truly unforgettable snack or appetizer that promises to be a crowd-pleaser every single time. This isn’t just another recipe; it’s an invitation to experience pure culinary delight, a symphony of textures and flavors that will undoubtedly become a staple in your kitchen. Why is this recipe a must-try? Because it transcends the ordinary. We’re talking about bite-sized pockets of joy, crispy on the outside with a golden-brown perfection, giving way to a warm, tender, and incredibly flavorful filling on the inside. It’s the kind of dish that elicits gasps of appreciation and demands second, even third, servings. The magic lies in its simplicity – taking humble ravioli and transforming it into something truly spectacular with just a few clever steps. You don’t need to be a gourmet chef to achieve these results; just a little bit of love and a hot pan are all it takes. Seriously, the “wow” factor here is off the charts! It’s that perfect balance of comfort food familiarity with an elevated, restaurant-quality crispness that you’ll be proud to serve.
My hope is that you’re now feeling inspired, perhaps even a little bit hungry, to whip up a batch of these glorious morsels yourself. Trust me, the aroma that fills your kitchen as these golden beauties fry is an experience in itself, a delightful precursor to the deliciousness that awaits. Imagine the smiles when you present a platter of these perfectly golden, delectable bites. This is more than just cooking; it’s creating moments, setting the stage for wonderful conversations and shared enjoyment. It truly is a versatile star, capable of stealing the show as a standalone snack or complementing a larger meal with its irresistible charm. So, for anyone looking to add a truly impressive yet effortlessly achievable dish to their repertoire, look no further than this fantastic method for creating the most delightful Fried Ravioli. You won’t regret diving into this crispy, cheesy adventure!
Elevate Your Experience: Serving Suggestions & Creative Variations
Now that you’ve mastered the art of perfectly golden-brown fried ravioli, let’s talk about taking them from great to absolutely extraordinary with some fantastic serving suggestions and creative variations. The classic pairing, of course, is a warm bowl of rich marinara sauce. Its tangy sweetness perfectly cuts through the savory richness of the ravioli, creating a harmonious balance. But don’t stop there! Think about homemade pesto for a fresh, herbaceous kick, or a creamy Alfredo sauce for an extra touch of indulgence. For those who like a little heat, a spicy arrabbiata dip or even a simple Sriracha mayo can add an exciting zing.
- Dipping Delights: Beyond the Italian staples, consider a roasted red pepper coulis for a smoky sweetness, or a garlic aioli for a pungent, creamy partner. A balsamic glaze, drizzled lightly over the top just before serving, can also add a sophisticated, sweet-tart finish that really makes the flavors pop.
- Cheese, Please!: If your ravioli are cheese-filled, you might enjoy serving them with a sprinkle of freshly grated Parmesan or Pecorino Romano for an added layer of salty, sharp flavor. A warm, cheesy dip like a simple queso or a three-cheese blend could also be an incredibly decadent option for a party.
- Herbaceous Touches: Garnish with fresh herbs like finely chopped parsley, basil, or chives not only for visual appeal but also to brighten the flavors. A sprig of fresh rosemary can also infuse a lovely, aromatic quality.
- Flavorful Breadings: Don’t be afraid to experiment with your breadcrumb mixture! Add a pinch of smoked paprika, a dash of garlic powder, onion powder, or even a tiny amount of dried oregano or basil to the breading for an extra layer of flavor. For a spicier kick, mix in some red pepper flakes.
- Filling Fun: While cheese ravioli are fantastic, consider trying meat-filled or spinach and ricotta ravioli for different flavor profiles. Each will offer a unique experience when fried to golden perfection. You could even explore dessert ravioli (filled with chocolate or fruit) for a sweet fried treat, though that’s a different adventure altogether!
- Serving Style: These make an incredible appetizer platter when served alongside other finger foods like bruschetta, olives, and a selection of cheeses. They’re also perfect for game day, movie nights, or as a fun side dish to a simple green salad or a light soup.
Your Culinary Journey Awaits!
So, now it’s your turn! I genuinely encourage you to roll up your sleeves, gather your ingredients, and give this recipe a try. You’ll be amazed at how quickly you can transform simple ingredients into something so incredibly satisfying and impressive. There’s a special kind of joy that comes from creating delicious food with your own hands, and sharing it with loved ones. Once you’ve made your batch of perfectly crispy, wonderfully flavorful Fried Ravioli, please don’t keep the experience to yourself! I would absolutely love to hear about your culinary adventure. Share your triumphs, your clever variations, your favorite dipping sauces, and any tips or tricks you discovered along the way. Did you add a secret spice to the breading? Did you find a new favorite dip? What kind of ravioli did you use? Your experiences are valuable, and they inspire me and other home cooks in our vibrant community. Don’t hesitate to share photos of your golden-brown masterpieces too – we all love to see delicious food! Happy frying, and happy eating!
Easy Fried Ravioli: Crispy & Delicious Appetizer for Parties!
Golden, crispy Fried Ravioli is a beloved appetizer, often associated with St. Louis. This recipe transforms a simple Italian pasta staple into an irresistible deep-fried treat. With its divine contrast of crispy shell and warm, tender cheese or meat filling, paired with marinara for dipping, it’s a crowd-pleaser that’s surprisingly easy to make at home. Perfect for parties, game nights, or a fun snack.
Ingredients
-
2 (9oz) or 1 (25oz) package fresh/frozen cheese ravioli
-
½ cup all-purpose flour
-
2 large eggs, beaten with 1 tbsp water or milk
-
2 cups Panko breadcrumbs
-
½ cup finely grated Parmesan cheese
-
1 tbsp dried Italian seasoning
-
1 tsp garlic powder
-
½ tsp onion powder
-
½ tsp salt
-
¼ tsp black pepper
-
¼ tsp red pepper flakes (optional)
-
4-6 cups vegetable, canola, or other neutral high smoke point oil, for deep frying
-
Warm marinara sauce, for dipping
-
Fresh parsley, chopped (optional, for garnish)
Instructions
-
Step 1
If using frozen ravioli, gently thaw on a parchment-lined baking sheet for 15-20 min until firm but pliable. Fresh ravioli can skip this step. -
Step 2
Set up three shallow dishes: 1) ½ cup all-purpose flour. 2) 2 beaten eggs with 1 tbsp water or milk. 3) 2 cups Panko breadcrumbs, ½ cup finely grated Parmesan cheese, 1 tbsp Italian seasoning, 1 tsp garlic powder, ½ tsp onion powder, ½ tsp salt, ¼ tsp black pepper, and optional ¼ tsp red pepper flakes, mixed well. -
Step 3
Dredge each ravioli in flour, tap off excess. Dip in egg wash, letting excess drip. Coat thoroughly in seasoned Panko breadcrumbs, pressing gently. Place breaded ravioli on a parchment-lined baking sheet. Chill for at least 30-60 minutes to help the breading set. -
Step 4
In a deep pot, heat 2-3 inches of vegetable, canola, or other neutral high smoke point oil to 350-375°F (175-190°C) using a deep-fry thermometer. -
Step 5
Carefully lower 4-6 breaded ravioli into hot oil with a slotted spoon. Do not overcrowd, as this will drop the oil temperature and lead to greasy ravioli. -
Step 6
Fry for about 2-3 minutes, turning once or twice, until beautifully golden brown and crispy on all sides. -
Step 7
Remove with a slotted spoon and transfer immediately to a plate lined with several layers of paper towels to drain excess oil. If frying multiple batches, keep cooked ravioli warm and crisp on a wire rack over a baking sheet in a 200°F (90°C) oven. -
Step 8
Serve immediately, garnished with extra Parmesan cheese and chopped parsley (optional). Serve with a bowl of warm marinara sauce for dipping. Experiment with other dips like creamy pesto, roasted red pepper, or garlic aioli if desired. Leftovers can be stored for 2-3 days and reheated in an air fryer or oven at 350°F (175°C) for 5-7 minutes.
Important Information
Nutrition Facts (Per Serving)
It is important to consider this information as approximate and not to use it as definitive health advice.
Allergy Information
Please check ingredients for potential allergens and consult a health professional if in doubt.


Leave a Comment